版权声明:本文为博主原创文章,遵循 CC 4.0 BY-SA 版权协议,转载请附上原文出处链接和本声明。
前言
swagger是一个很好的restful形式的api文档,可以通过比较小的侵入来提供很好的restful的文档。因为swagger是依赖服务生成的,所以其实是依赖服务的,这也算是它的一个小缺点吧。但是其实如果一个项目习惯去手写文档之后,也是可以的,但是新的项目还是建议去用一些自动生成的文档,省去了很多麻烦。
spring boot配置swagger
引入swagger依赖
<dependency>
    <groupId>io.springfox</groupId>
    <artifactId>springfox-swagger2</artifactId>
    <version>2.2.2</version>
</dependency>
<dependency>
    <groupId>io.springfox</groupId>
    <artifactId>springfox-swagger-ui</artifactId>
    <version>2.2.2</version>
</dependency>
- 1
- 2
- 3
- 4
- 5
- 6
- 7
- 8
- 9
- 10
编写swagger对应的配置
import org.springframework.context.annotation.Bean;
import org.springframework.context.annotation.Configuration;
import springfox.documentation.builders.ApiInfoBuilder;
import springfox.documentation.builders.PathSelectors;
import springfox.documentation.builders.RequestHandlerSelectors;
import springfox.documentation.service.ApiInfo;
import springfox.documentation.spi.DocumentationType;
import springfox.documentation.spring.web.plugins.Docket;
import springfox.documentation.swagger2.annotations.EnableSwagger2;


@Configuration
@EnableSwagger2
public class SwaggerConfig {

    @Bean
    public Docket createRestApi() {
                    // 文档类型
        return new Docket(DocumentationType.SWAGGER_2)
                // 创建api的基本信息
                .apiInfo(apiInfo())
                // 选择哪些接口去暴露
                .select()
                // 扫描的包
                .apis(RequestHandlerSelectors.basePackage("com.demo.web.controller"))
                .paths(PathSelectors.any())
                .build();
    }

    private ApiInfo apiInfo() {
        return new ApiInfoBuilder()
                .title("groundhog-web swagger文档")
                .contact("name")
                .version("1.0")
                .build();
    }
}
- 1
- 2
- 3
- 4
- 5
- 6
- 7
- 8
- 9
- 10
- 11
- 12
- 13
- 14
- 15
- 16
- 17
- 18
- 19
- 20
- 21
- 22
- 23
- 24
- 25
- 26
- 27
- 28
- 29
- 30
- 31
- 32
- 33
- 34
- 35
- 36
- 37
在api和请求参数中使用注解
接口中使用swagger注解
@RestController
@Api(value = "测试swagger", description = "测试swagger api")
public class TestSwaggerController {

    @ApiOperation(value = "返回url中的参数", notes = "返回url中的参数")
    @ApiImplicitParam(name = "id", value = "id值", paramType = "path", required = true, dataType = "Integer")
    @GetMapping(path = "/getUrlParam/{id}")
    public Integer getUrlParam(@PathVariable(value = "id") Integer id) {
        return id;
    }

}
- 1
- 2
- 3
- 4
- 5
- 6
- 7
- 8
- 9
- 10
- 11
- 12
可以访问localhost:port/swagger-ui.html看到生成的swagger文档。可以看到请求结果:
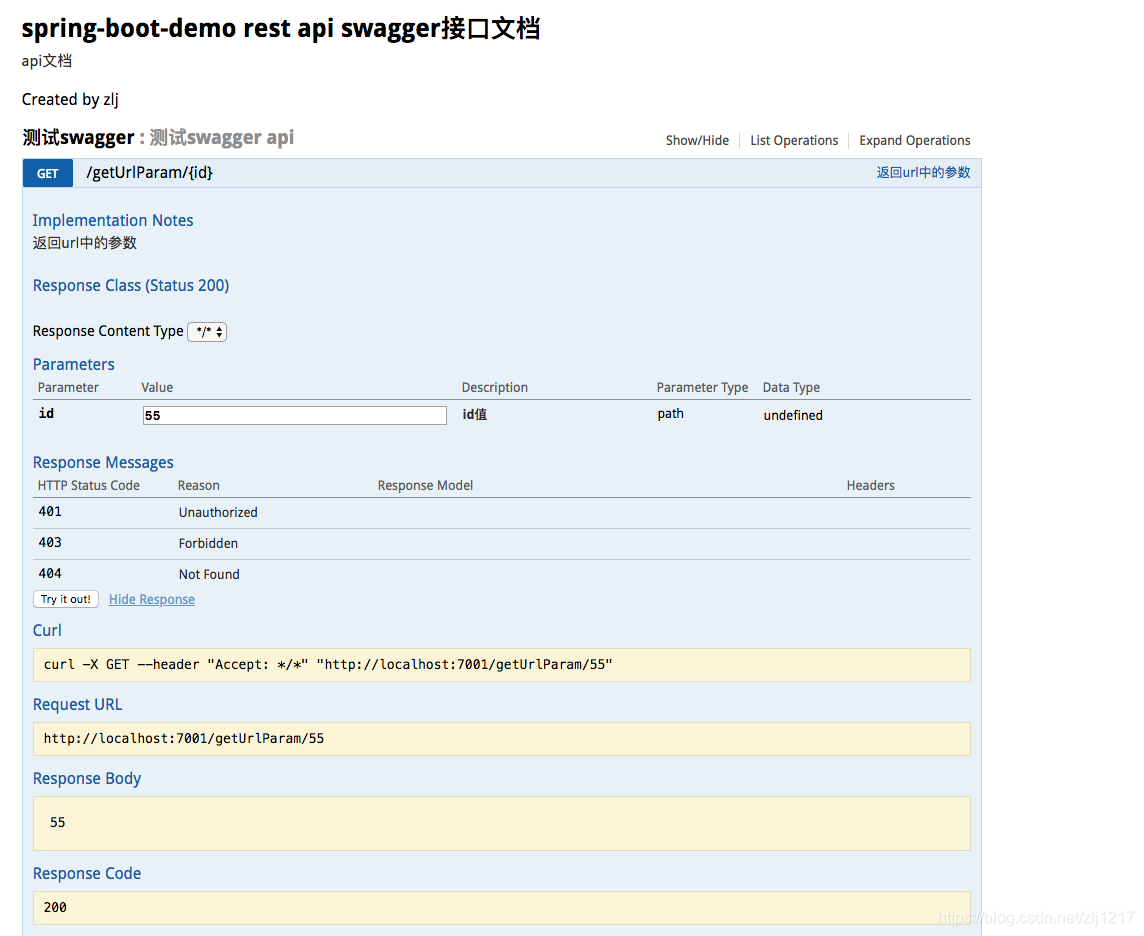
也可以看到之前post方法的接口也可以生成对于的参数文档,这里也可以对表单参数bean使用@ApiModel和@ApiProperty注解进行标识。

swagger相关注解和官方文档
swagger常用注解:
- @Api:修饰整个类,描述controller的作用
- @ApiOperation:描述一个类的一个方法,或者说一个接口
- @ApiParam:单个参数描述
- @ApiModel:用对象来接收参数
- @ApiProperty:用对象接收参数时,描述对象的一个字段
- @ApiImplicitParam:一个请求参数
- @ApiImplicitParams:多个请求参数
这里推荐下官方文档,感兴趣可以看一下其他注解和相关配置:
[注解官方文档](