写在前面
我们刚开始做自动化测试,可能写的代码都是基于原生写的代码,看起来特别不美观,而且感觉特别生硬。
来看下面一段代码,如下图所示:

从上面图片代码来看,具体特征如下:
- driver对象在测试类中显示
- 定位元素的value值在测试类中显示
- 定位元素的方式(By对象)在测试类中显示
- 代码一报错,还要去测试类里面找是哪段代码报错,要是代码行数几百行时呢,就不好定位问题了
- 这样的测试脚本组装批量执行,批量报错后,怒号排查,定位问题,很吃力
看看自己有几条命中呢,其他现象就不一一列举了。
1、为什么要写自动化测试框架
从个人方面来说:
- 逼格高,让别人感觉你好厉害,技术强
- 面试是加分项,会写框架,可以作为谈资硬性指标
- 一个组内,要是妹纸多,你可以秀技能,吸引妹纸也说不定呢
- 对自己而言,更是一种挑战和提升
从实际方面来说:
- 提高脚本编写效率,脚本的可读性,可降低代码维护成本
- 方便定位问题,失败定位问题会比较方便
- 可以提升测试效率,编写脚本成本,拿来就用,直接点方法就行
- 减少了手工测试成本,节省人力成本
2、框架设计思路与实现
框架的几大要素:driver,元素管理,脚本,数据,元素对象,LOG,报告,运行机制,失败用例
框架的分层思想:脚本,数据,元素对象分离,使用Page Object和Page Factory思想,这里我将框架分为四层:基础层、元素对象层、操作层、业务层。
这里我们以163邮箱登录为例,进行讲解。
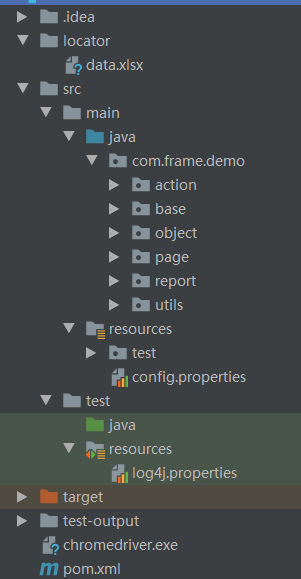
具体代码目录结构如下:
下面我们将进入大家都比较关注的话题了,这里我只分享思路哈,跟上步伐,别掉队哦
2.1、log4j日志配置
关于log4j,这部分不是讲解重点,因为只需配置一次可以一直使用,下面的配置是拿来就能用的,有兴趣的同学可以自行百度去学习,本文只是为了使用log4j的日志效果。
添加配置文件log4j.properties,具体如下:
###根logger设置###
log4j.rootLogger = INFO,console,file

### 输出信息到控制台###
log4j.appender.console = org.apache.log4j.ConsoleAppender
log4j.appender.console.Target = System.out
log4j.appender.console.layout = org.apache.log4j.PatternLayout
log4j.appender.console.Threshold = info
log4j.appender.console.layout.ConversionPattern = [%p] %d{yyyy-MM-dd HH:mm:ss} method: %l----%m%n

###输出INFO 级别以上的日志文件设置###
log4j.appender.file = org.apache.log4j.DailyRollingFileAppender
log4j.appender.file.File = D:/log/web.log
log4j.appender.file.Append = true
log4j.appender.file.Threshold = info
log4j.appender.file.layout = org.apache.log4j.PatternLayout
log4j.appender.file.layout.ConversionPattern = %d{yyyy-MM-dd HH:mm:ss} method: %l - [ %p ]----%m%nH
新建测试类,名为TestLog,具体示例代码如下:
package com.frame.demo.test;

import org.apache.log4j.Logger;
import org.testng.annotations.Test;

public class TestLog {
    /**
     * log4j日志
     */
    private static Logger logger = Logger.getLogger(TestLog.class);
    @Test
    public void testLog() {
        logger.info("this is info log!!");
        logger.error("this is error log!!");
    }
}
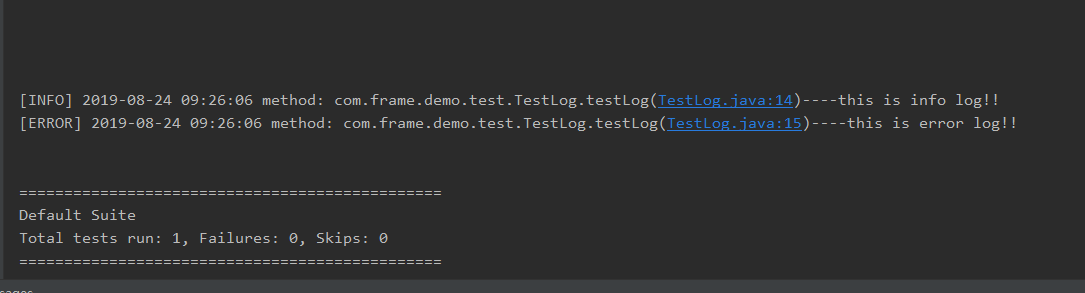
运行效果如下图:
2.2、基础层的实现
用于封装浏览器对象,这里只写了firefox 和 chrome两种浏览器,有兴趣的同学可自行扩展。
具体代码示例如下:
package com.frame.demo.base;

import org.openqa.selenium.WebDriver;
import org.openqa.selenium.chrome.ChromeDriver;
import org.openqa.selenium.firefox.FirefoxDriver;

/**
 * @author rongrong
 */
public class GetDriverUtil {

    /**
     * @param browersName
     * @return
     */
    public static WebDriver getDriver(String browersName) {
        if (browersName.equalsIgnoreCase("firefox")) {
            return new FirefoxDriver();
        } else {
            System.setProperty("webdriver.chrome.driver", "chromedriver.exe");
            return new ChromeDriver();
        }
    }

}
2.3、元素对象管理与实现
为什么要做元素对象管理,因为在一个页面中有几十个元素对象,而一个网站有多个页面,一旦页面元素发生变化,维护起来不是很方便,因此,我们可以把需要录入的定位元素集中地放在一个地方去管理维护,而不是分散在测试用例脚本(代码)中。
这样的好处就是,可以提升些许编写脚本速度,降低后期维护成本,这时如果UI变了,我们只需要修改对应的页面中的元素定位即可。
具体数据源格式如下:

2.31、解析Excel文件
我们可以使用xml、yaml、excel、csv、mysql等等去存储管理元素对象数据,鉴于我们测试同学习惯用Excel去编写维护用例,本案例就以Excel为数据源,来进行元素的管理和维护,其他文件去维护管理的,有兴趣的同学可以去尝试。
首先来解析Excel文件,在pom.xml中添加依赖,如下:
        <!-- https://mvnrepository.com/artifact/org.apache.poi/poi -->
        <dependency>
            <groupId>org.apache.poi</groupId>
            <artifactId>poi</artifactId>
            <version>3.16</version>
        </dependency>
        <!-- https://mvnrepository.com/artifact/org.apache.poi/poi-ooxml -->
        <dependency>
            <groupId>org.apache.poi</groupId>
            <artifactId>poi-ooxml</artifactId>
            <version>3.16</version>
        </dependency>
解析excel文件,具体示例代码如下:
package com.frame.demo.utils;

import org.apache.poi.hssf.usermodel.HSSFWorkbook;
import org.apache.poi.ss.usermodel.*;
import org.apache.poi.xssf.usermodel.XSSFWorkbook;

import java.io.FileInputStream;
import java.io.FileNotFoundException;
import java.io.IOException;
import java.io.InputStream;
import java.util.LinkedHashMap;
import java.util.List;
import java.util.Map;

public class ReadExcelUtil {


    public static Map<String, String> getElementData() {
        Workbook wb;
        Sheet sheet;
        Row row;
        List<Map<String, String>> list = null;
        String cellData;
        Map<String, String> map = new LinkedHashMap<String, String>();
        wb = readExcel("locator/data.xlsx");
        if (wb != null) {
            sheet = wb.getSheetAt(0);
            int rownum = sheet.getPhysicalNumberOfRows();
            for (int i = 1; i < rownum; i++) {
                row = sheet.getRow(i);
                if (row != null) {
                    String name = (String) getCellFormatValue(row.getCell(0));
                    cellData = getCellFormatValue(row.getCell(1)) + "," + getCellFormatValue(row.getCell(2));
                    map.put(name, cellData);
                } else {
                    break;
                }
            }
        }
        return map;
    }


    public static Workbook readExcel(String filePath) {
        Workbook wb = null;
        if (filePath == null) {
            return null;
        }
        String extString = filePath.substring(filePath.lastIndexOf("."));
        InputStream is = null;
        try {
            is = new FileInputStream(filePath);
            if (".xls".equals(extString)) {
                return wb = new HSSFWorkbook(is);
            } else if (".xlsx".equals(extString)) {
                return wb = new XSSFWorkbook(is);
            } else {
                return wb = null;
            }
        } catch (FileNotFoundException e) {
            e.printStackTrace();
        } catch (IOException e) {
            e.printStackTrace();
        }
        return wb;
    }

    public static Object getCellFormatValue(Cell cell) {
        Object cellValue = null;
        if (cell != null) {
            switch (cell.getCellType()) {
                case Cell.CELL_TYPE_NUMERIC: {
                    cellValue = String.valueOf(cell.getNumericCellValue());
                    break;
                }
                case Cell.CELL_TYPE_FORMULA: {
                    if (DateUtil.isCellDateFormatted(cell)) {
                        cellValue = cell.getDateCellValue();
                    } else {
                        cellValue = String.valueOf(cell.getNumericCellValue());
                    }
                    break;
                }
                case Cell.CELL_TYPE_STRING: {
                    cellValue = cell.getRichStringCellValue().getString();
                    break;
                }
                default:
                    cellValue = "";
            }
        } else {
            cellValue = "";
        }
        return cellValue;
    }


}
可以在本地创建一个data.xlsx文件,保存在locator目录中,放在项目根目录下,通过调用getElementData方法,将解析后元素对象放到map中实现映射
读取配置文件config.properties,具体代码如下:
package com.frame.demo.utils;

import java.util.Locale;
import java.util.ResourceBundle;


public class BaseInfo {

    public static String getBrowserType() {
        return getInfo("browserType");
    }

    public static String getUrl() {
        return getInfo("url");
    }

    public static String getInfo(String key) {
        ResourceBundle bundle = ResourceBundle.getBundle("config", Locale.CHINA);
        String value = bundle.getString(key);
        return value;
    }
}
2.32、By对象的封装
在写脚本时,元素对象一般是这样写的 WebElement element = driver.findElement(By.name(value);,接下来我们要把excel解析出来的Map中的"value"转换成 By 对象,添加如下代码:
 private By getBy(String method, String methodValue) {
        if (method.equals("id")) {
            return By.id(methodValue);
        } else if (method.equals("name")) {
            return By.name(methodValue);
        } else if (method.equals("xpath")) {
            return By.xpath(methodValue);
        } else if (method.equals("className")) {
            return By.className(methodValue);
        } else if (method.equals("linkText")) {
            return By.linkText(methodValue);
        } else if (method.equals("css")) {
            return By.cssSelector(methodValue);
        } else {
            return By.partialLinkText(methodValue);
        }
    }
这样通过map中的key和 value 的值就对产生一个 By 对象,接着可以把这个对象传给 driver.findElement 方法,然后我们在进行WebElement 对象的封装
    private By getBy(String method, String methodValue) {
        if (method.equalsIgnoreCase("id")) {
            return By.id(methodValue);
        } else if (method.equalsIgnoreCase("name")) {
            return By.name(methodValue);
        } else if (method.equalsIgnoreCase("tagName")) {
            return By.tagName(methodValue);
        } else if (method.equalsIgnoreCase("className")) {
            return By.className(methodValue);
        } else if (method.equalsIgnoreCase("linkText")) {
            return By.linkText(methodValue);
        } else if (method.equalsIgnoreCase("xpath")) {
            return By.xpath(methodValue);
        } else if (method.equalsIgnoreCase("cssSelector")) {
            return By.cssSelector(methodValue);
        } else {
            return By.partialLinkText(methodValue);
        }
    }


    public WebElement findElement(String name) {
        String data = elementData.get(name).toString();
        String method = data.split(",")[0];
        String methodValue = data.split(",")[1];return driver.findElement(this.getBy(method, methodValue));
    }
这回再来看一下,是不是感觉有那么点意思了,代码整洁了许多,到这里一个简单的元素管理部分的实现就算基本完成了,这只是提供一个思路,来个总结性的代码。
package com.frame.demo.page;

import com.frame.demo.base.GetDriverUtil;
import com.frame.demo.utils.BaseInfo;
import com.frame.demo.utils.ReadExcelUtil;
import org.apache.log4j.Logger;
import org.openqa.selenium.By;
import org.openqa.selenium.WebDriver;
import org.openqa.selenium.WebElement;
import org.openqa.selenium.support.PageFactory;

import java.util.Map;

public class BasePage {
    private static Logger logger = Logger.getLogger(BasePage.class);
    static WebDriver driver;
    Map<String, String> elementData;

    public BasePage() {
        String browserType = BaseInfo.getBrowserType();
        driver = GetDriverUtil.getDriver(browserType);
        driver.manage().window().maximize();
        PageFactory.initElements(driver, this);
        elementData = ReadExcelUtil.getElementData();
    }

    private By getBy(String method, String methodValue) {
        if (method.equalsIgnoreCase("id")) {
            return By.id(methodValue);
        } else if (method.equalsIgnoreCase("name")) {
            return By.name(methodValue);
        } else if (method.equalsIgnoreCase("tagName")) {
            return By.tagName(methodValue);
        } else if (method.equalsIgnoreCase("className")) {
            return By.className(methodValue);
        } else if (method.equalsIgnoreCase("linkText")) {
            return By.linkText(methodValue);
        } else if (method.equalsIgnoreCase("xpath")) {
            return By.xpath(methodValue);
        } else if (method.equalsIgnoreCase("cssSelector")) {
            return By.cssSelector(methodValue);
        } else {
            return By.partialLinkText(methodValue);
        }
    }

    public WebElement findElement(String name) {
        String data = elementData.get(name).toString();
        String method = data.split(",")[0];
        String methodValue = data.split(",")[1];
        logger.info("获取元素控件 " + name);
        return driver.findElement(this.getBy(method, methodValue));
    }


    public void switchToFrame(int frame) {
        driver.switchTo().frame(frame);
    }

    public void open() {
        String url = BaseInfo.getUrl();
        logger.info("打开163邮箱首页");
        driver.get(url);
    }

    public void quit() {
        logger.info("关闭浏览器成功!");
        driver.quit();
    }
}
整合了一部分driver对象的操作,仅供参考,有兴趣的同学可以接着拓展
2.4、元素对象层的再封装
接着我们再来创建一个类,名为Action继承BasePage,用于存放页面元素定位和常用控件操作的封装,具体示例代码如下:
package com.frame.demo.action;

import com.frame.demo.page.BasePage;

public class Action extends BasePage {

    public void sendKeys(String name, String str) {
        findElement(name).clear();
        findElement(name).sendKeys(str);
    }

    public void click(String name) {
        findElement(name).click();
    }

    public String getText(String name) {
        return findElement(name).getText();
    }
}
2.5、操作层的实现
接着我们再来创建一个类,名为LoginPage继承Action,用来记录登录的一系列操作,具体示例代码如下:
package com.frame.demo.object;

import com.frame.demo.action.Action;
import org.testng.Assert;
public class LoginPage extends Action {
    public void login(String userName, String pwd, String expected) throws Exception {
        open();
        click("密码登录");
        switchToFrame(0);
        sendKeys("输入用户名", userName);
        sendKeys("输入密码", pwd);
        click("点击登录");
        Thread.sleep(1000);
        String msg = getText("错误提示信息");
        Assert.assertEquals(msg, expected);
        quit();
    }
}
2.6、业务层的实现
最后我们再来创建一个类,名为TestFrame继承LoginPage,用来验证登录功能,具体示例代码如下:
package com.frame.demo.test;

import com.frame.demo.object.LoginPage;
import org.testng.annotations.Test;

public class TestFrame extends LoginPage {

    @Test
    public void textLogin() throws Exception {
       login("your userName", "your passWord", "帐号格式错误");
    }
}
到此基本可以说是,一个最简单的自动化测试框架算完成了一大半啦,是不是感觉很开心。哈哈
2.7、测试报告的美化
笔者之前用过testNG自带的测试报告、优化过reportNG的测试报告、Zreport(大飞总原创),Allure2,这些是我之前都用过的,这里我想用extentreport做演示讲解,因为界面的dashboard很好看,毕竟始于颜值嘛,哈哈,好了,废话不多说。
具体步骤如下:
在maven项目pom.xml文件添加如下内容:
   <dependency>
            <groupId>com.relevantcodes</groupId>
            <artifactId>extentreports</artifactId>
            <version>2.41.1</version>
        </dependency>

        <dependency>
            <groupId>com.vimalselvam</groupId>
            <artifactId>testng-extentsreport</artifactId>
            <version>1.3.1</version>
        </dependency>

        <dependency>
            <groupId>com.aventstack</groupId>
            <artifactId>extentreports</artifactId>
            <version>3.0.6</version>
        </dependency>
然后新建一个类,名为ExtentTestngReporterListener,用来编写监听类,监听测试执行过程中哪些测试成功,哪些失败,写入报告中,具体示例代码如下:
package com.frame.demo.report;

import com.aventstack.extentreports.ExtentReports;
import com.aventstack.extentreports.ExtentTest;
import com.aventstack.extentreports.ResourceCDN;
import com.aventstack.extentreports.Status;
import com.aventstack.extentreports.model.TestAttribute;
import com.aventstack.extentreports.reporter.ExtentHtmlReporter;
import com.aventstack.extentreports.reporter.configuration.ChartLocation;
import org.testng.*;
import org.testng.xml.XmlSuite;

import java.io.File;
import java.util.*;

/**
 * @author rongrong
 */
public class ExtentTestngReporterListener implements IReporter {
    //生成的路径以及文件名
    private static final String OUTPUT_FOLDER = "test-output/";
    private static final String FILE_NAME = "index.html";
    private ExtentReports extent;

    @Override
    public void generateReport(List<XmlSuite> xmlSuites, List<ISuite> suites, String outputDirectory) {
        init();
        boolean createSuiteNode = false;
        if (suites.size() > 1) {
            createSuiteNode = true;
        }
        for (ISuite suite : suites) {
            Map<String, ISuiteResult> result = suite.getResults();
            //如果suite里面没有任何用例,直接跳过,不在报告里生成
            if (result.size() == 0) {
                continue;
            }
            //统计suite下的成功、失败、跳过的总用例数
            int suiteFailSize = 0;
            int suitePassSize = 0;
            int suiteSkipSize = 0;
            ExtentTest suiteTest = null;
            //存在多个suite的情况下,在报告中将同一个一个suite的测试结果归为一类,创建一级节点。
            if (createSuiteNode) {
                suiteTest = extent.createTest(suite.getName()).assignCategory(suite.getName());

            }
            boolean createSuiteResultNode = false;
            if (result.size() > 1) {
                createSuiteResultNode = true;
            }
            for (ISuiteResult r : result.values()) {
                ExtentTest resultNode;
                ITestContext context = r.getTestContext();
                if (createSuiteResultNode) {
                    //没有创建suite的情况下,将在SuiteResult的创建为一级节点,否则创建为suite的一个子节点。
                    if (null == suiteTest) {
                        resultNode = extent.createTest(r.getTestContext().getName());
                    } else {
                        resultNode = suiteTest.createNode(r.getTestContext().getName());
                    }
                } else {
                    resultNode = suiteTest;
                }
                if (resultNode != null) {
                    resultNode.getModel().setName(suite.getName() + " : " + r.getTestContext().getName());
                    if (resultNode.getModel().hasCategory()) {
                        resultNode.assignCategory(r.getTestContext().getName());
                    } else {
                        resultNode.assignCategory(suite.getName(), r.getTestContext().getName());
                    }
                    resultNode.getModel().setStartTime(r.getTestContext().getStartDate());
                    resultNode.getModel().setEndTime(r.getTestContext().getEndDate());
                    //统计SuiteResult下的数据
                    int passSize = r.getTestContext().getPassedTests().size();
                    int failSize = r.getTestContext().getFailedTests().size();
                    int skipSize = r.getTestContext().getSkippedTests().size();
                    suitePassSize += passSize;
                    suiteFailSize += failSize;
                    suiteSkipSize += skipSize;
                    if (failSize > 0) {
                        resultNode.getModel().setStatus(Status.FAIL);
                    }
                    resultNode.getModel().setDescription(String.format("Pass: %s ; Fail: %s ; Skip: %s ;", passSize, failSize, skipSize));
                }
                buildTestNodes(resultNode, context.getFailedTests(), Status.FAIL);
                buildTestNodes(resultNode, context.getSkippedTests(), Status.SKIP);
                buildTestNodes(resultNode, context.getPassedTests(), Status.PASS);
            }
            if (suiteTest != null) {
                suiteTest.getModel().setDescription(String.format("Pass: %s ; Fail: %s ; Skip: %s ;", suitePassSize, suiteFailSize, suiteSkipSize));
                if (suiteFailSize > 0) {
                    suiteTest.getModel().setStatus(Status.FAIL);
                }
            }

        }

        extent.flush();
    }

    private void init() {
        //文件夹不存在的话进行创建
        File reportDir = new File(OUTPUT_FOLDER);
        if (!reportDir.exists() && !reportDir.isDirectory()) {
            reportDir.mkdir();
        }
        ExtentHtmlReporter htmlReporter = new ExtentHtmlReporter(OUTPUT_FOLDER + FILE_NAME);
        htmlReporter.config().setDocumentTitle("自动化测试报告");
        htmlReporter.config().setReportName("自动化测试报告");
        htmlReporter.config().setChartVisibilityOnOpen(true);
        htmlReporter.config().setTestViewChartLocation(ChartLocation.TOP);
        htmlReporter.config().setResourceCDN(ResourceCDN.EXTENTREPORTS);
        htmlReporter.config().setCSS(".node.level-1  ul{ display:none;} .node.level-1.active ul{display:block;}");
        extent = new ExtentReports();
        extent.attachReporter(htmlReporter);
        extent.setReportUsesManualConfiguration(true);
    }

    private void buildTestNodes(ExtentTest extenttest, IResultMap tests, Status status) {
        //存在父节点时,获取父节点的标签
        String[] categories = new String[0];
        if (extenttest != null) {
            List<TestAttribute> categoryList = extenttest.getModel().getCategoryContext().getAll();
            categories = new String[categoryList.size()];
            for (int index = 0; index < categoryList.size(); index++) {
                categories[index] = categoryList.get(index).getName();
            }
        }

        ExtentTest test;

        if (tests.size() > 0) {
            //调整用例排序,按时间排序
            Set<ITestResult> treeSet = new TreeSet<ITestResult>(new Comparator<ITestResult>() {
                @Override
                public int compare(ITestResult o1, ITestResult o2) {
                    return o1.getStartMillis() < o2.getStartMillis() ? -1 : 1;
                }
            });
            treeSet.addAll(tests.getAllResults());
            for (ITestResult result : treeSet) {
                Object[] parameters = result.getParameters();
                String name = "";
                //如果有参数只取第一个参数作test-name
                for (int i = 0; i < parameters.length; i++) {
                    name = parameters[0].toString();
                }

                if (name.length() > 0) {
                    if (name.length() > 100) {
                        name = name.substring(0, 100) + "...";
                    }
                } else {
                    name = result.getMethod().getMethodName();
                }
                if (extenttest == null) {
                    test = extent.createTest(name);
                } else {
                    //作为子节点进行创建时,设置同父节点的标签一致,便于报告检索。
                    test = extenttest.createNode(name).assignCategory(categories);
                }
                for (String group : result.getMethod().getGroups()) {
                    test.assignCategory(group);
                }

                List<String> outputList = Reporter.getOutput(result);
                for (String output : outputList) {
                    //将用例的log输出报告中
                    test.debug(output);
                }
                if (result.getThrowable() != null) {
                    test.log(status, result.getThrowable());
                } else {
                    test.log(status, "Test " + status.toString().toLowerCase() + "ed");
                }
                //test.getModel().setStartTime(getTime(result.getStartMillis()));
                //test.getModel().setEndTime(getTime(result.getEndMillis()));
            }
        }
    }

    private Date getTime(long millis) {
        Calendar calendar = Calendar.getInstance();
        calendar.setTimeInMillis(millis);
        return calendar.getTime();
    }

}
在xml文件中设置监听
<listener class-name="com.frame.demo.report.ExtentTestngReporterListener"/>
运行测试后,会自动生成测试报告,如下:

到此测试报告部分介绍完毕,现在整体的一个测试框架就算搭建完成了!!
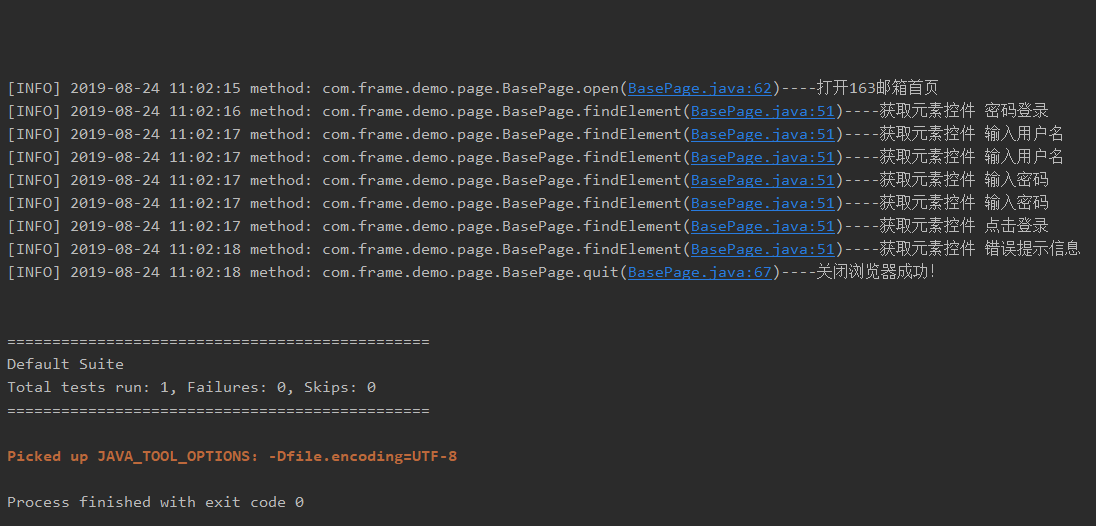
整体运行效果:
总结
笔者仅是提供一个思路,希望感兴趣的同学可以从头到下自己敲一遍,笔者能力有限,还请勿喷,如果大家有更好的想法,还请在文末给我留言,一起学习交流!!
友情提示
原创不易,如转载或复制以上代码还请注明出处,觉得文章好,还请添加关注!