#nginx子配置文件目录
conf.d
#php代理文件
fastcgi_params
#字符集
koi-utf
koi-win
win-utf
#文件的类型
mime.types
#主配置文件
nginx.conf
[root@web01 nginx]# cat /etc/nginx/nginx.conf
#nginx 的用户
user www;
#工作进程数
worker_processes 20;
#错误日志
error_log /var/log/nginx/error.log warn;
#pid文件
pid /var/run/nginx.pid;
#事件驱动模块
events {
#工作进程最大连接数
worker_connections 1000;
}
#http 内核模块
http {
#包含的文件类型
include /etc/nginx/mime.types;
#nginx默认是下载所有文件类型的,直接在浏览器访问
default_type application/octet-stream;
#日志格式 名字 abc
log_format abc '$remote_addr - - - - zls qiudao $remote_user [$time_local] "$request" '
'$status $body_bytes_sent "$http_referer" '
'"$http_user_agent" "$http_x_forwarded_for"';
log_format abd '$remote_addr - $remote_user "$request" '
'$status $body_bytes_sent "$http_referer" '
'"$http_user_agent" "$http_x_forwarded_for"';
#日志路径 调用abc格式
access_log /var/log/nginx/access.log abc;
#高效传输
sendfile on;
#tcp_nopush on;
#长连接超时 65s
keepalive_timeout 65;
#开启压缩
#gzip on;
#包含子配置文件目录
include /etc/nginx/conf.d/*.conf;
include /etc/nginx/*.conf;
}
#虚拟主机
server {
#监听的端口
listen 80;
#域名,_; localhost;
server_name game.abc.com;
#location 匹配规则 就是location 匹配到根 就到根里找
location / {
#指定站点目录
root /code/h5_games;
#指定索引页面(默认主页)
index index.html;
}
}
$remote_addr        # 记录客户端IP地址
$remote_user        # 记录客户端用户名
$time_local         # 记录通用的本地时间
$time_iso8601       # 记录ISO8601标准格式下的本地时间
$request            # 记录请求的方法以及请求的http协议
$status             # 记录请求状态码(用于定位错误信息)
$body_bytes_sent    # 发送给客户端的资源字节数,不包括响应头的大小
$bytes_sent         # 发送给客户端的总字节数
$msec               # 日志写入时间。单位为秒,精度是毫秒。
$http_referer       # 记录从哪个页面链接访问过来的   就是浏览器,像360浏览器
$http_user_agent    # 记录客户端浏览器相关信息
$http_x_forwarded_for #记录客户端IP地址
$request_length     # 请求的长度(包括请求行, 请求头和请求正文)。
$request_time       # 请求花费的时间,单位为秒,精度毫秒
# 注:如果Nginx位于负载均衡器,nginx反向代理之后, web服务器无法直接获取到客 户端真实的IP地址。
# $remote_addr获取的是反向代理的IP地址。 反向代理服务器在转发请求的http头信息中,
# 增加X-Forwarded-For信息,用来记录客户端IP地址和客户端请求的服务器地址。
log_format  abd  '$remote_addr - |$remote_user| [$time_local] "$request" '
                 '$status $body_bytes_sent $bytes_sent  "$http_referer" '
                 '"$http_user_agent" "$http_x_forwarded_for"';
game日志记录实战
location /favicon.ico {
access_log off;
return 200;
}
location /js/common.js {
access_log /var/log/nginx/js.log abc;
}
日志切割
/var/log/nginx/*.log {
#按天切割
daily
#忽略丢失的日志
missingok
#保留52天的日志
rotate 52
#文件压缩
compress
#延时压缩
delaycompress
#不切割控日志
notifempty
#创建出来新日志的文件权限 640 属主(nginx)和属组(adm)
create 640 nginx adm
#所有文件归档完成后执行脚本
sharedscripts
#执行的命令
postrotate
if [ -f /var/run/nginx.pid ]; then
kill -USR1 `cat /var/run/nginx.pid`
fi
endscript
}
[root@nginx conf.d]# cat /etc/logrotate.d/nginx
/var/log/nginx/*.log {
daily # 每天切割日志
missingok # 日志丢失忽略
rotate 52 # 日志保留52天
compress # 日志文件压缩
delaycompress # 延迟压缩日志
notifempty # 不切割空文件
create 640 nginx adm # 日志文件权限
sharedscripts #所有文件归档完成后执行脚本
postrotate # 切割日志执行的命令
if [ -f /var/run/nginx.pid ]; then
kill -USR1 `cat /var/run/nginx.pid`
fi
endscript
}
nginx常用模块
1)目录索引模块
ngx_http_autoindex_module模块处理以斜杠字符('/')结尾的请求,并生成目录列表。
当ngx_http_index_module模块找不到索引文件时,通常会将请求传递给ngx_http_autoindex_module模块。
Nginx默认是不允许列出整个目录浏览下载。
Syntax:    autoindex on | off;
Default:    autoindex off;
Context:    http, server, location

# autoindex常用参数
autoindex_exact_size off;
默认为on, 显示出文件的确切大小,单位是bytes。
修改为off,显示出文件的大概大小,单位是kB或者MB或者GB。

autoindex_localtime on;
默认为off,显示的文件时间为GMT时间。
修改为on, 显示的文件时间为文件的服务器时间。

charset utf-8,gbk;
默认中文目录乱码,添加上解决乱码。
配置示例:
[root@web01 ~]# vim /etc/nginx/conf.d/module.conf
server {
listen 80;
server_name module.driverzeng.com;
charset utf-8,gbk;
localtion / {
root /code;
index index.html index.htm;
}
location /download {
alias /module;
autoindex on;
autoindex_exact_size off;
autoindex_localtime on;
}
}
2)Nginx状态模块
ngx_http_stub_status_module模块提供对基本状态信息的访问。 默认情况下不构建此模块,应使用--with-http_stub_status_module配置参数启用它
Syntax: stub_status;
Default: —
Context: server, location
配置Nginx status示例
server {
listen 80;
server_name module.driverzeng.com;
access_log off;
location /nginx_status {
stub_status;
}
}
server {
listen 80;
server_name module.driverzeng.com;
charset utf-8,gbk;
localtion / {
root /code;
index index.html index.htm;
}
location /download {
alias /module;
autoindex on;
autoindex_exact_size off;
autoindex_localtime on;
}
location /nginx_status {
stub_status;
}
}
打开浏览器访问:http://module.driverzeng.com/nginx_status
Active connections: 2
server accepts handled requests
373 373 695
Reading: 0 Writing: 1 Waiting: 1
Active connections # 当前活动的连接数
accepts # 当前的总连接数TCP
handled # 成功的连接数TCP
requests # 总的http请求数
Reading # 请求
Writing # 响应
Waiting # 等待的请求数,开启了keepalive
# 注意, 一次TCP的连接,可以发起多次http的请求, 如下参数可配置进行验证
keepalive_timeout 0; # 类似于关闭长连接
keepalive_timeout 65; # 65s没有活动则断开连接
3)Nginx访问控制
#允许配置语法
Syntax:    allow address | CIDR | unix: | all;
Default:    —
Context:    http, server, location, limit_except

#拒绝配置语法
Syntax:   deny address | CIDR | unix: | all;
Default:   —
Context:   http, server, location, limit_except
1)访问控制配置示例,拒绝指定的IP,其他全部允许
server {
    listen 80;
    server_name module.driverzeng.com;
    access_log off;

   location /nginx_status {
       stub_status;
       deny 10.0.0.1;
       allow all;
   }
}
2) 访问控制配置示例, 只允许谁能访问, 其它全部拒绝
server {
    listen 80;
    server_name module.driverzeng.com;
    access_log off;

   location /nginx_status {
       stub_status;
       allow   10.0.0.0/24;
       allow   127.0.0.1;
       deny   all;
   }
}
4)登录认证模块
1)基于用户登陆认证配置语法
#访问提示字符串
Syntax: auth_basic string| off;
Default: auth_basic off;
Context: http, server, location, limit_except

#账户密码文件
Syntax: auth_basic_user_file file;
Default: -
Context: http, server, location, limit_except
2)基于用户登陆认证配置实践
#1.需要安装httpd-tools,该包中携带了htpasswd命令
[root@web01 ~]# yum install httpd-tools
#2.创建新的密码文件, -c创建新文件 -b允许命令行输入密码
[root@web01 ~]# htpasswd -b -c /etc/nginx/auth_conf zls zls

#3.nginx配置调用
server {
   listen 80;
   server_name module.driverzeng.com;
   access_log off;

   location /nginx_status {
       stub_status;
       auth_basic "Auth access Blog Input your Passwd!";
       auth_basic_user_file auth_conf;
   }
}
game记录日志
[root@web01 conf.d]# vim game.conf
server {
listen 80;
server_name game.abc.com;
access_log /var/log/nginx/game.abc.com_access.log main;
location / {
root /code/h5_games;
index index.html;
}
location /favicon.ico {
access_log off;
return 200;
}
location /js/common.js {
access_log /var/log/nginx/js.log main;
}
}
[root@web01 conf.d]# tail -f /var/log/nginx/game.abc.com_access.log
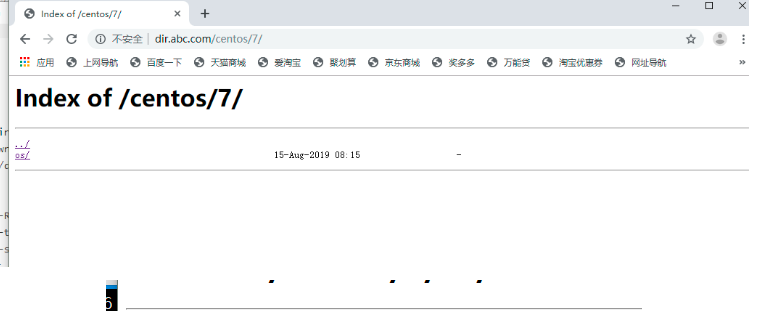
添加日志目录索引模块
[root@web01 conf.d]# vim autoindex.conf
server {
listen 80;
server_name dir.abc.com;
autoindex on;
location / {
root /dir;
}
}
[root@web01 conf.d]# mkdir /dir
[root@web01 conf.d]# chown -R www.www /dir
[root@web01 conf.d]# cd /dir
[root@web01 dir]# ll
total 0
[root@web01 dir]# chown -R www.www /dir
[root@web01 dir]# nginx -t
[root@web01 dir]# nginx -s reload
然后再域名解析那里写 dir.abc.com就可以访问了
接下来模仿阿里云的镜像
[root@web01 dir]# mkdir centos/7/os -p
[root@web01 dir]# chown -R www.www /dir
然后访问一下就会发现和阿里云的一模一样
[root@web01 dir]# cd centos/7/os/
[root@web01 os]# ll
total 0
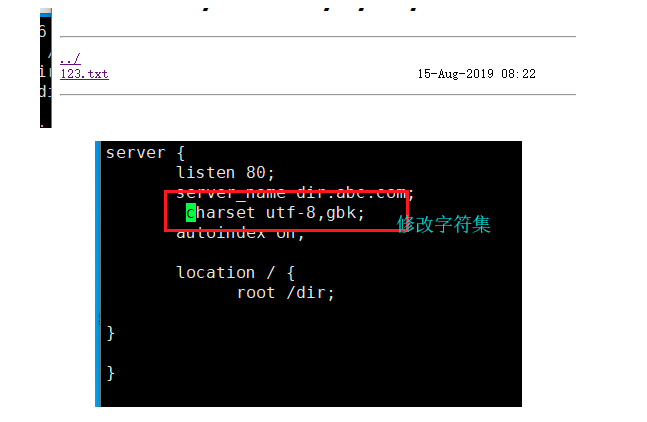
[root@web01 os]# rz 上传一个文件
[root@web01 os]# vim /etc/nginx/conf.d/autoindex.conf
server {
listen 80;
server_name dir.abc.com;
charset utf-8,gbk;
autoindex on;
location / {
root /dir;
autoindex_exact_size :off;
autoindex_localtime on;
}
}
~

状态模块
[root@web01 conf.d]# gzip autoindex.conf
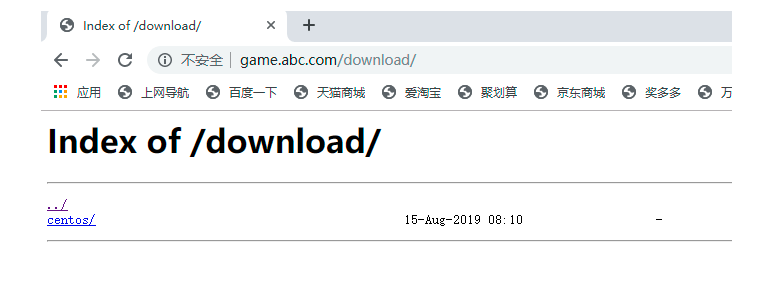
[root@web01 conf.d]# vim game.conf
t
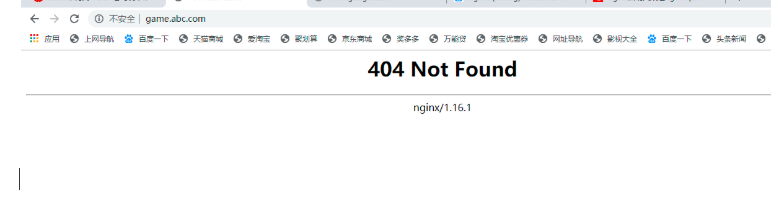
然后访问game.abc.com/download/ 就会出现下面的界面
状态
[root@web01 conf.d]# vim game.conf
server {
listen 80;
server_name game.abc.com;
access_log /var/log/nginx/game.abc.com_access.log main;
location / {
root /code/h5_games;
index index.html;
}
location /download {
alias /dir;
autoindex on;
}
location /status {
stub_status;
}
}
[root@web01 conf.d]# nginx -t
[root@web01 conf.d]# nginx -s reload
访问http://game.abc.com/status
会显示

访问控制模块
[root@web01 conf.d]# yum install -y httpd-tools
[root@web01 conf.d]# htpasswd -b -c /code/aa zhp 123
Adding password for user zhp
[root@web01 conf.d]# ll /code/ 发现下面有一个aa
total 8
-rw-r--r-- 1 root root 42 Aug 15 19:07 aa
drwxr-xr-x 6 root root 108 May 3 14:11 h5_games
-rw-r--r-- 1 www www 5 Aug 14 23:21 index.html
[root@web01 conf.d]# cat /code/aa 查看一下,发现是用户名,然后密码是加密的
zhp:$apr1$r6b8yFQ9$Y1oB/C91Gijxi1ji7mLhO1
[root@web01 conf.d]# vim /etc/nginx/conf.d/auth.conf
server {
listen 80;
server_name dir.abc.com;
location /{
root /dir;
index index.html;
auth_basic "abc";
auth_basic_user_file /code/aa;
}
}
~
~
[root@web01 conf.d]# nginx -t
nginx: the configuration file /etc/nginx/nginx.conf syntax is ok
nginx: configuration file /etc/nginx/nginx.conf test is successful
[root@web01 conf.d]# nginx -s reload
[root@web01 conf.d]# cd /dir/
[root@web01 dir]# ll
total 0
drwxr-xr-x 3 www www 15 Aug 15 16:10 centos
[root@web01 dir]# echo auth > index.html
[root@web01 dir]# ll
total 4
drwxr-xr-x 3 www www 15 Aug 15 16:10 centos
-rw-r--r-- 1 root root 5 Aug 15 19:17 index.html
[root@web01 dir]# chown -R www.www /dir
访问dir.abc.com 会让你输入密码,和用户

[root@web01 conf.d]# vim game.conf
[root@web01 conf.d]# nginx -t
nginx: the configuration file /etc/nginx/nginx.conf syntax is ok
nginx: configuration file /etc/nginx/nginx.conf test is successful
[root@web01 conf.d]# nginx -s reload
server {
listen 80;
server_name game.abc.com;
set $domain "http://www.abc.com"; 设置一个限制 访问www.abc.com 就报404的错
if ($http_referer != $domain){
return 404;
}
location / {
root /dir;
index index.html;
}
}