一、定位和变换票据
定位照片中的不规范票据或矩形文本,并将其变换为正规矩形,以供OCR识别。
# -*- coding:utf-8 -*-
__author__ = 'Leo.Z'

import cv2 as cv
import numpy as np


def show_img(img, win_name):
    cv.imshow(win_name, img)
    cv.waitKey(0)
    cv.destroyAllWindows()


def image_process(img_path):
    # 读入图像
    img = cv.imread(img_path)
    show_img(img, 'img')

    # 转换为灰度图
    gray = cv.cvtColor(img, cv.COLOR_RGB2GRAY)
    # 高斯模糊,消除一些噪声
    gray = cv.GaussianBlur(gray, (5, 5), 0)
    show_img(gray, 'gray')

    # 寻找边缘
    edged = cv.Canny(gray, 50, 120)
    show_img(edged, 'edged')

    # 形态学变换,由于光照影响,有很多小的边缘需要进行腐蚀和膨胀处理
    kernel = np.ones((5, 5), np.uint8)
    morphed = cv.dilate(edged, kernel, iterations=3)
    morphed = cv.erode(morphed, kernel, iterations=3)
    show_img(morphed, 'morphed')

    # 找轮廓
    morphed_copy = morphed.copy()
    cnts, _ = cv.findContours(morphed_copy, cv.RETR_TREE, cv.CHAIN_APPROX_NONE)
    # 排序,并获取其中最大的轮廓
    if len(cnts) is not 0:
        cnts = sorted(cnts, key=cv.contourArea, reverse=True)[:1]
    else:
        print("Did not find contours\n")
        return

    # 用周长的0.1倍作为阈值,对轮廓做近似处理,使其变成一个矩形
    epsilon = 0.1 * cv.arcLength(cnts[0], True)
    approx = cv.approxPolyDP(cnts[0], epsilon, True)

    # 在原图的拷贝上画出轮廓
    ticket_copy = img.copy()
    cv.drawContours(ticket_copy, [approx], -1, (255, 0, 0), 2)
    show_img(ticket_copy, 'ticket_copy')

    # 获取透视变换的原坐标
    if approx.shape[0] is not 4:
        print("Found a non-rect\n")
        return
    src_coor = np.reshape(approx, (4, 2))
    src_coor = np.float32(src_coor)

    # 右上,左上,左下,右下 坐标
    (tr, tl, bl, br) = src_coor

    # 计算宽
    w1 = np.sqrt((tr[0] - tl[0]) ** 2 + (tr[1] - tl[1]) ** 2)
    w2 = np.sqrt((br[0] - bl[0]) ** 2 + (br[1] - bl[1]) ** 2)
    # 求出比较大的w
    max_w = max(int(w1), int(w2))
    # 计算高
    h1 = np.sqrt((bl[0] - tl[0]) ** 2 + (bl[1] - tl[1]) ** 2)
    h2 = np.sqrt((br[0] - tr[0]) ** 2 + (br[1] - tr[1]) ** 2)
    # 求出比较大的h
    max_h = max(int(h1), int(h2))

    # 透视变换的目标坐标
    dst_coor = np.array([[max_w - 1, 0], [0, 0], [0, max_h - 1], [max_w - 1, max_h - 1]], dtype=np.float32)

    # 求转换矩阵
    trans_mat = cv.getPerspectiveTransform(src_coor, dst_coor)
    # 进行转换,将图中对应坐标的图片截取出来,并转换到dst_coor大小
    warped = cv.warpPerspective(img, trans_mat, (max_w, max_h))

    return warped


if __name__ == '__main__':
    wrap = image_process('zhengshu.png')
    show_img(wrap, 'result')
效果如下:
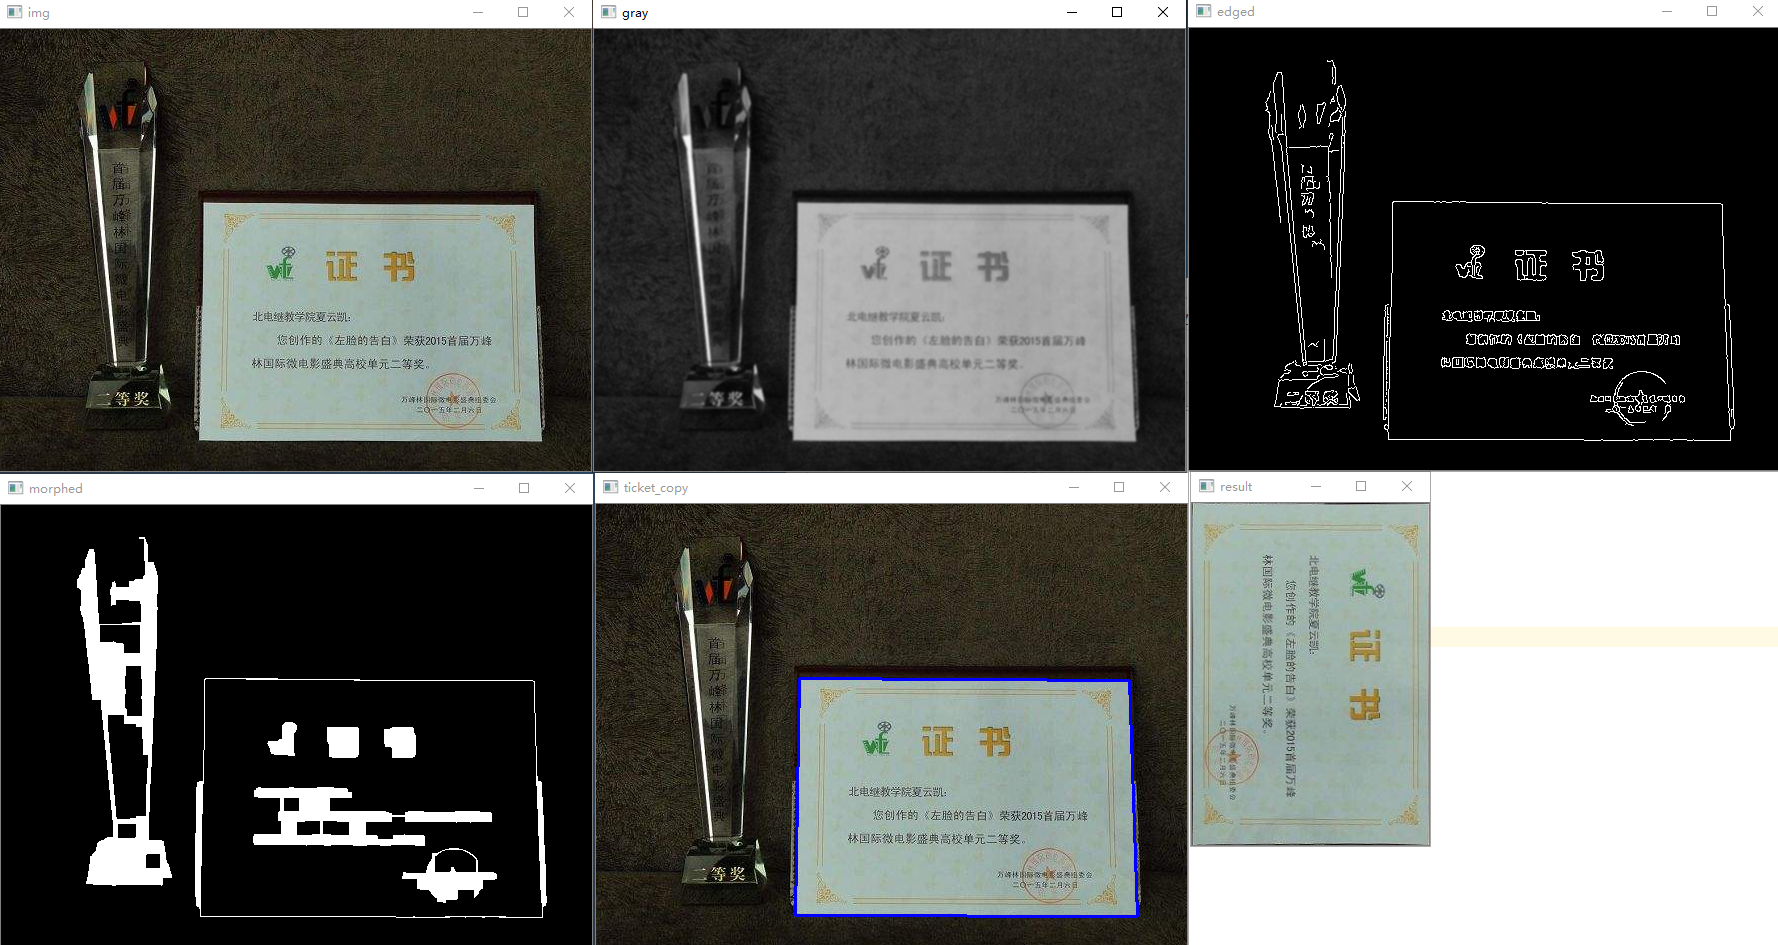
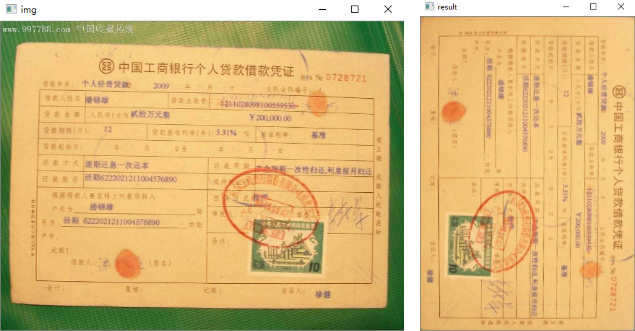
注意:本例是一个相对简单的示例,对于背景复杂,或票据与背景灰度相近时,可能效果不好。本例只作为前面学习内容的一个综合案例。如果要用到实际环境中需要结合更多技术,使其具有更好的鲁棒性。