这是Zabbix系列的第二篇,介绍Zabbix自动部署Agent的脚本实现及自动发现功能。
为什么我们要“自动”呢?因为懒~,我们有60多台windows服务器,如果一台一台的装Agent,很枯燥且很容易出错,所以我们要“自动化”部署。
本文假设读者已经学习了该系列第一篇推荐的朱双印老师的博客,掌握了Zabbix的基本使用。
自动部署
先介绍一下我自动部署脚本的思路:
1. 修改zabbix_agentd.win.conf的Hostname,对,没有猜错,这个是Agent的config档,其他设置一样,只有Hostname每台服务器都不相同。
2. 复制修改后的Agent安装文件到对应服务器,该功能用脚本实现,难道每台服务器都要写一个脚本?不需要,我们只要在调用脚本前修改脚本里对应服务器的IP地址即可。
3. 上述两处修改的数据从哪里来?我们可以写一个配置档,调用配置档即可获取数据。
4. Agent安装文件是复制到对应服务器了,但怎么安装呢?难道要一台台的装?这里推荐一个好用的工具箱,PSTools,可以远程调用脚本进行安装。
经过以上步骤,即可实现自动部署Agent。
在展示我的代码前,先让我们一起学习下PSTools。


◆PsExec - 远程执行进程

◆PsFile - 显示远程打开的文件

◆PsGetSid - 显示计算机或用户的 SID

◆PsInfo - 列出有关系统的信息

◆PsKill - 按名称或进程 ID 终止进程

◆PsList - 列出有关进程的详细信息

◆PsLoggedOn - 查看在本地通过资源共享(包含所有资源)登录的用户

◆PsLogList - 转储事件日志记录

◆PsPasswd - 更改帐户密码

◆PsService - 查看和控制服务

◆PsShutdown - 关闭并重新启动(可选)计算机

◆PsSuspend - 暂停进程
其中,最常用到的是psexec这款工具。知道服务器或者电脑的用户名和密码,你就可以利用它远程执行系统命令。
详细参数:
-u 远程计算机的用户名
-p 远程计算机用户对应密码
-c <[路径]文件名>:拷贝文件到远程机器并运行(注意:运行结束后文件会自动删除)
-d 不等待程序执行完就返回 (意思就是,当你执行一个程序无需等到他结束才返回信息)
-h用于目标系统是Vista或更高版本
psexec \\目标ip -u 用户名 -p 密码 命令或脚本
下面是我的脚本及config档:

<!--配置档,读取该档获取HostName及IP-->
<?xml version="1.0" encoding="UTF-8"?>
<LineSetting>
  <Shop >
    <LineType Name="A_TYPE1">
      <Line ServerName = "A1" SocketIP="10.9.9.1" SocketPort="9000" />
    </LineType>
    <LineType Name="B_TYPE1">
      <Line ServerName = "B10" SocketIP="10.9.9.2" SocketPort="9000" />
    </LineType>
  </shop>
</LineSetting>
//copyAndStart.bat
//复制Agent安装文件到对应服务器

  @echo on ********* starting....****************
net use \\10.9.9.1\D$ /user:admin password
xcopy "C:\Users\lq\Desktop\zabbix" "\\10.9.9.1\D$\zabbix" /s /e /q /i

psexec \\10.9.9.1 -u admin -p password -d -c InstallAndStart.bat
//InstallAndStart.bat
//安装脚本,命令详情请参考Zabbix官方指南

D:\zabbix\zabbix_agentd.exe -i -c D:\zabbix\zabbix_agentd.win.conf
D:\zabbix\zabbix_agentd.exe -s -c D:\zabbix\zabbix_agentd.win.conf
using System;
using System.Collections.Generic;
using System.Linq;
using System.Text;
using System.Threading.Tasks;
using System.Xml;
using System.IO;
using System.Text.RegularExpressions;
using System.Diagnostics;

namespace AddService
{
    class Program
    {
        static void Main(string[] args)
        {
            //该魔术数字是HostName在config行数
            int n=141;
            XmlDocument xml = new XmlDocument();
            xml.Load("HostNameAndIP.xml");
            XmlNodeList lineNodes = xml.GetElementsByTagName("Line");
            foreach (XmlNode node in lineNodes)
            {
                string serverName = ((XmlElement)node).GetAttribute("ServerName");
                string socketIP = ((XmlElement)node).GetAttribute("SocketIP");
                //注意,GetAttribute得到的string是全部的字符,\\就是\\!!
                ChangeHostName(n,serverName);
                ChangeBatIP(socketIP);
                ExeBat();
                System.Threading.Thread.Sleep(3000);
                Console.WriteLine($"{socketIP} {serverName} start up success");
            }
            Console.ReadLine();
        }
        static void ChangeHostName(int n,string serverName)
        {
            StreamReader sr=new StreamReader(@"C:\Users\lq\Desktop\zabbix\zabbix_agentd.win.conf");
            string[] all=sr.ReadToEnd().Split('\n');
            sr.Close();
            StreamWriter sw=new StreamWriter(@"C:\Users\lq\Desktop\zabbix\zabbix_agentd.win.conf");
            string wl="";
            for(int i=0;i<all.Length-1;i++)
            {
                if(i==n-1)
                    wl="Hostname="+serverName+"\n";
                else
                    wl=all[i]+"\n";
                sw.Write(wl);
            }
            sw.Flush();
            sw.Close();
        }
        static void ChangeBatIP(string socketIP)
        {
            FileStream fs=new FileStream("copyAndStart.bat",FileMode.Open,FileAccess.Read);
            StreamReader sr=new StreamReader(fs);
            string con=sr.ReadToEnd();
            Regex regex=new Regex(@"10.9.9.\d{1,3}");
            con=regex.Replace(con,socketIP);
            sr.Close();
            fs.Close();
            FileStream fs2=new FileStream("copyAndStart.bat",FileMode.Create,FileAccess.Write);
            StreamWriter sw= new StreamWriter(fs2);
            sw.Write(con);
            sw.Close();
            fs2.Close();
        }
     //c#执行DOS命令
        static void ExeBat()
        {
            try
            {
                string targetDir=AppDomain.CurrentDomain.BaseDirectory;
                var proc=new Process();
                proc.StartInfo.WorkingDirectory=targetDir;
                proc.StartInfo.FileName="copyAndStart.bat";
                proc.StartInfo.Arguments=string.Format("10");
                //隐藏DOS窗口
                proc.StartInfo.CreateNoWindow=true;
                proc.StartInfo.WindowStyle=ProcessWindowStyle.Hidden;
                proc.Start();
                proc.WaitForExit();
            }
            catch(Exception ex)
            {
                Console.WriteLine("Exception Occurred :{0},{1}", ex.Message, ex.StackTrace.ToString());
            }
        }
    }
}
以上,即实现了Agent的自动部署,但是部署了Agent还不行,还要让Zabbix Server识别并自动添加主机,怎么做呢?请继续往下看。
自动发现
注意这里的自动发现是discovery,和之后介绍的自动发现规则是两码事。
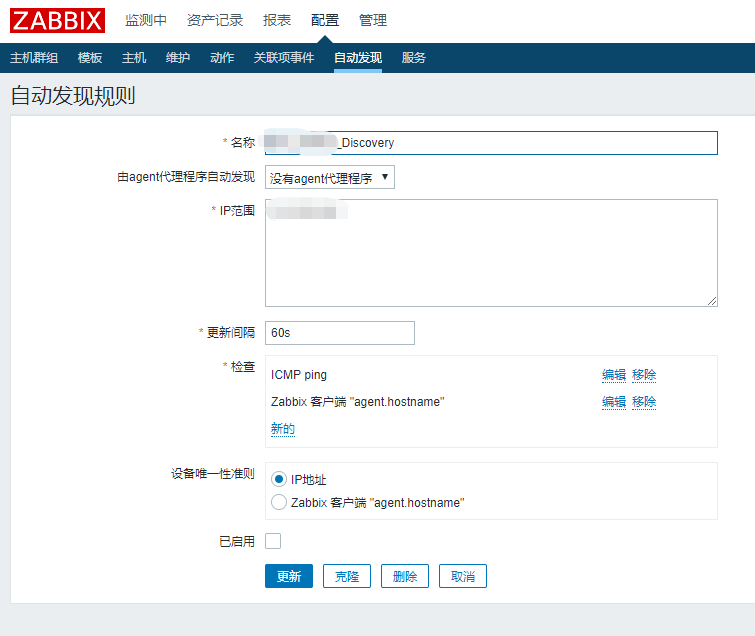
让Zabbix Server识别并自动添加主机比较简单,第一步,在web页面,配置 -> 自动发现 -> 创建发现规则。
第二步,在web页面,配置 -> 动作 -> 自动发现(右上角的事件源) -> 创建动作


经过自动部署和自动发现,我们已经成功的将众多服务器加到Zabbix监控里来了。