执行测试用例类CalculatorTest
设置genymotion可见:
Android Studio界面中,依次单击菜单项 View >Toolbar。即可见改工具按钮。
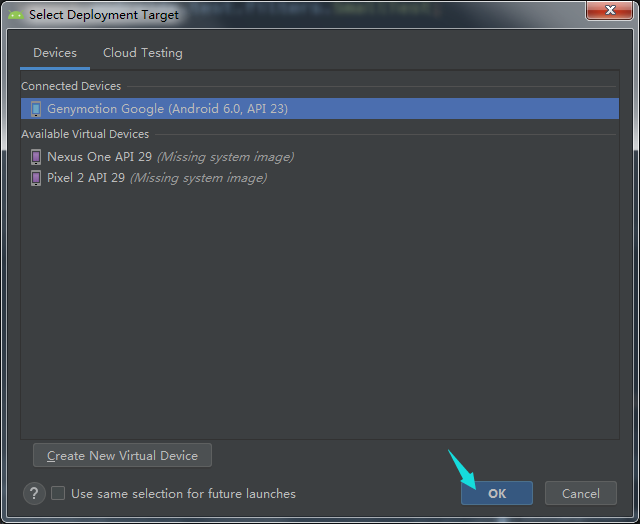
启动genymotion模拟器Google nexus5 :
Android Studio界面中,工具栏中单击粉色GenymotionDevice Manager工具图标按钮。
在弹出的Genymotion Device Manager窗口中,选中Google nexus5 ,单击【Start】。

关闭Genymotion Device Manager窗口。

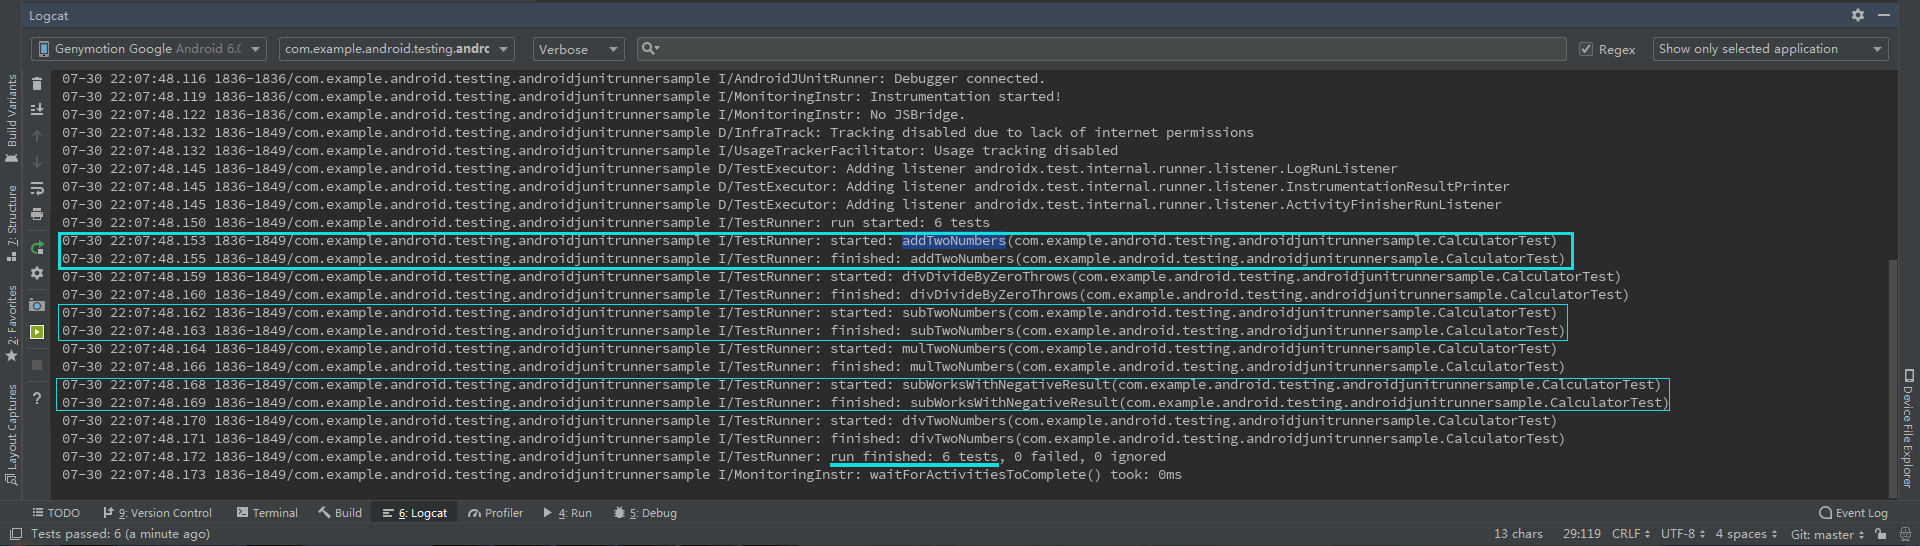
执行测试用例CalculatorTest
弹出Select Deployment Target窗口,选中Genymotion模拟器,单击【OK】。
6条测试用例均执行成功。

1,单元测试:测试用例设计
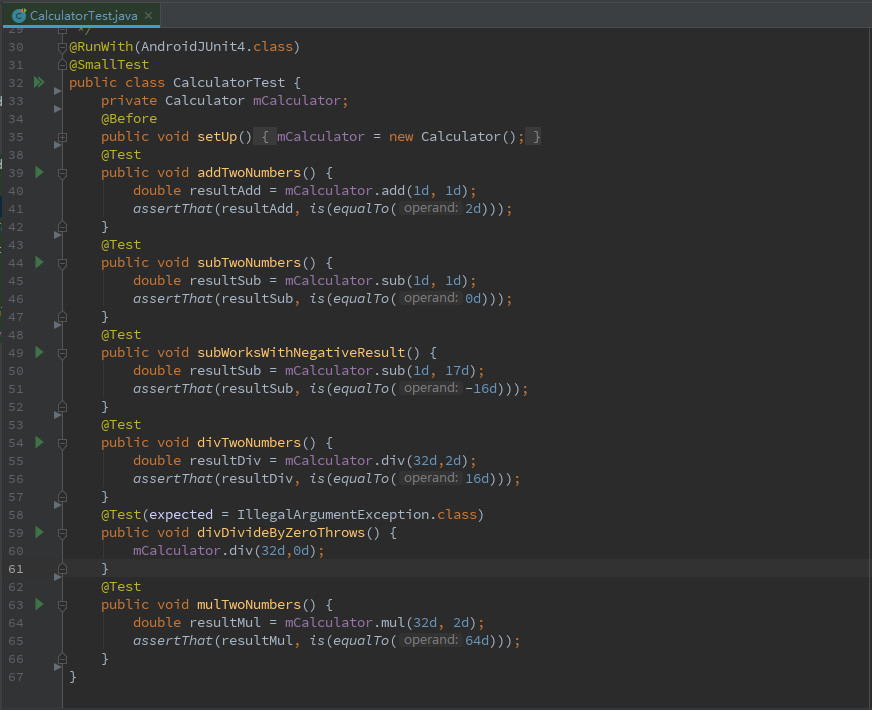
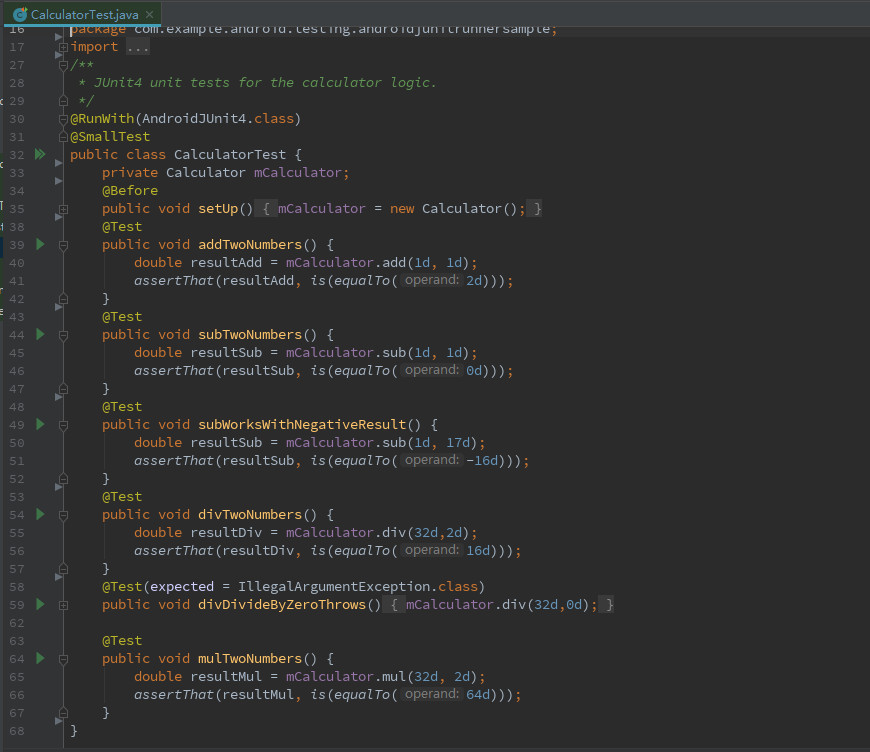
如下是Calculator类,包含加、减、除、乘4个方法。

如下是CalculatorTest类,它是Calculator类的单元测试类。
设计了6个测试用例方法:
addTwoNumbers()测试用例实现调用Calculator类的add()加法方法;
subTwoNumbers()测试用例实现调用Calculator类的sub()减法方法;
subWorksWithNegativeResult()测试用例实现调用Calculator类的sub()减法方法;
divTwoNumbers()测试用例实现调用Calculator类的div()除法方法;
divDivideByZeroThrows()测试用例实现调用Calculator类的div()除法方法;
mulTwoNumbers()测试用例实现调用Calculator类的div()除法方法。
2,单元测试:常用注解
android junit4单元测试用例类跟普通的java代码编写过程最大的区别之一就是注解。
以下是junit4中的常用注解:
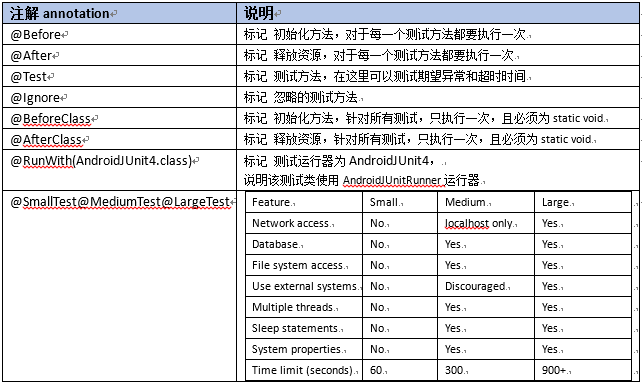
其他注解详见junit4官网:https://junit.org/junit4/
在测试类中这些常用注解的执行顺序是什么呢?
通过AnnotationSequenceTest测试类来验证。
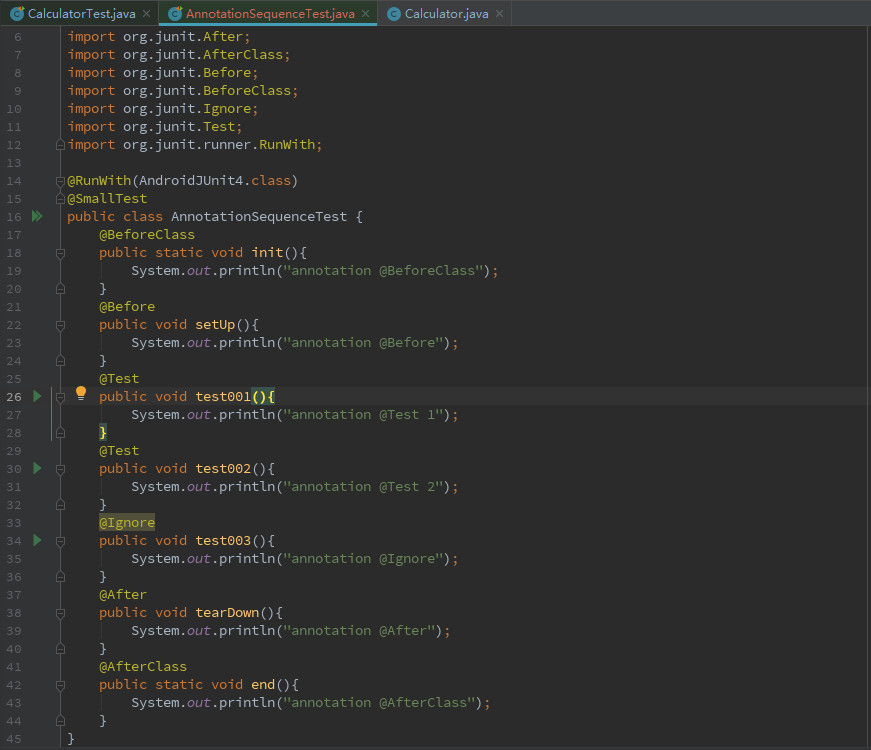
packagecom.example.android.testing.androidjunitrunnersample;
import androidx.test.ext.junit.runners.AndroidJUnit4;
import androidx.test.filters.SmallTest;
import org.junit.After;
import org.junit.AfterClass;
import org.junit.Before;
import org.junit.BeforeClass;
import org.junit.Ignore;
import org.junit.Test;
import org.junit.runner.RunWith;
@RunWith(AndroidJUnit4.class)
@SmallTest
public class AnnotationSequenceTest {
@BeforeClass
public static void init(){
System.out.println("annotation @BeforeClass");
}
@Before
public void setUp(){
System.out.println("annotation @Before");
}
@Test
public void test001(){
System.out.println("annotation @Test 1");
}
@Test
public void test002(){
System.out.println("annotation @Test 2");
}
@Ignore
public void test003(){
System.out.println("annotation@Ignore");
}
@After
public void tearDown(){
System.out.println("annotation @After");
}
@AfterClass
public static void end(){
System.out.println("annotation @AfterClass");
}
}
测试用例执行结果如下所示:
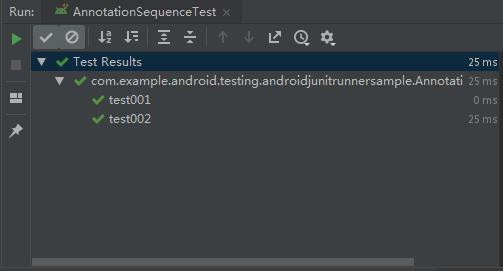
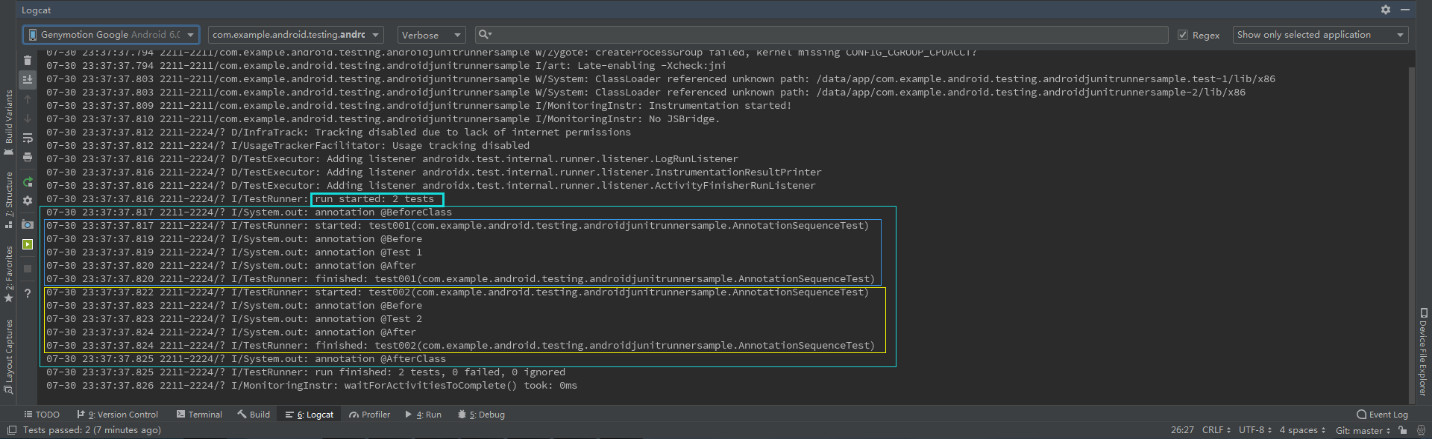
可见:
(1)一个JUnit4的单元测试用例执行顺序为:
@BeforeClass -> @Before -> @Test -> @After ->@AfterClass;
(2)每一个测试方法的调用顺序为:
@Before -> @Test -> @After;
(3)@BeforeClass和@AfterClass仅执行一次
测试java方法的验证点:
(1) 返回值
(2) 属性和状态的改变
(3) 操作行为
(4) 异常抛出
3,单元测试:异常检查
方法一:Junitannotation方式

@Test(expected = IllegalArgumentException.class)
public void divDivideByZeroThrows() {
System.out.println("divDivideByZeroThrows***********************************");
mCalculator.div(32d,0d);
System.out.println("divDivideByZeroThrows==========================="+mCalculator.div(32d,0d));
}

从运行结果Logcat日志可见:
括号里面表明当这个方法抛出IllegalArgumentException时测试成功。
这种方式看起来要简洁多了,但是无法检查异常中的消息。
方法二:ExpectedExceptionrule
单元测试用例:35除以0,设置预期异常类以及异常信息

@Rule
public ExpectedException exception =ExpectedException.none();
@Test
public void divDivideByZeroThrows_test03(){
exception.expect(IllegalArgumentException.class);
exception.expectMessage("zero1");
mCalculator.div(35d,0d);
}
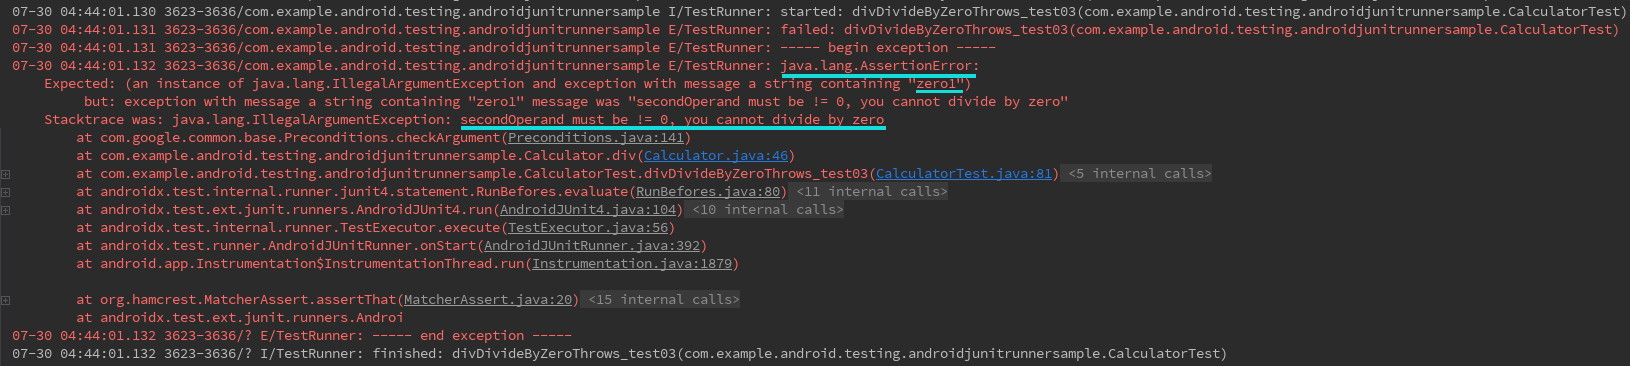
从运行结果Logcat日志可见:
在try块中断言失败,报断言失败错误:预期包含“zero1”、但实际抛出的异常字符串是“secondOperand must be != 0, you cannot divide by zero”。
作 者:Testfan 彩虹
出 处:微信公众号:自动化软件测试平台
版权说明:欢迎转载,但必须注明出处,并在文章页面明显位置给出文章链接