听起来挺高大上的,实际也就那么回事了
一、先来个开胃菜:ansible批量安装客户端
话不多说,直接上内容(这里要注意一下:这里演示的是普通用户登陆远程主机并切换到root用户进行安装,所以主机清单里要添加切换到root用户的密码):
[root@cll-tianygqyyscbf-app-001 myplay]# pwd
/root/myplay
[root@cll-tianygqyyscbf-app-001 myplay]# tree
.
├── files
│   └── zabbix-agent-4.2.3-2.el6.x86_64.rpm
│   └── zabbix_agentd.conf
└── zabbix_agent_install.yml

1 directory, 3 files
[root@cll-tianygqyyscbf-app-001 myplay]# cat zabbix_agent_install.yml
- hosts: test
  remote_user: vmuser

  tasks:
    - name: copy zabbix-agent rpm to server
      copy: src=files/zabbix-agent-4.2.3-2.el6.x86_64.rpm dest=/tmp/
#      when:
#        - ansible_distribution == "CentOS"
#        - ansible_distribution_major_version == "6"
    - name: install rpm package
      become: yes
      become_method: su
      shell: rpm -ivh /tmp/zabbix-agent-4.2.3-2.el6.x86_64.rpm
    - name: copy configure file
      become: yes
      become_method: su
      copy: src=files/zabbix_agentd.conf dest=/etc/zabbix/zabbix_agentd.conf backup=yes
      notify: restart zabbix_agent
    - name: start service
      become: yes
      become_method: su
      service: name=zabbix-agent state=started enabled=yes

  handlers:
    - name: restart zabbix_agent
      become: yes
      become_method: su
      service: name=zabbix-agent state=restarted
[root@cll-tianygqyyscbf-app-001 myplay]#
###########################################################################
[test]
192.168.23.3
[test:vars]
ansible_become_pass='root用户密码'
二、zabbix_proxy安装配置使用
步骤:
- 安装代理软件和配置及启动服务(需要数据库支持:DBA绕过);
- Web管理页面上添加proxy;
1、安装代理软件和配置及启动服务:
1、安装代理软件和配置及启动服务:
1.1、安装zabbix_proxy(不会问我相关源如何配置吧):
# yum install zabbix_proxy_mysql

1.2、MySQL安装大致情况如下:
安装数据库    # yum install mariadb-server
启动服务器    # systemctl start mariadb.service
开机启动    # systemctl enable mariadb.service
创建库    > create database zabbix_proxy CHARACTER set utf8 COLLATE utf8_bin;
授权    >grant all on zabbix_proxy.* to zabbix@'localhost' identified by 'YourKey';
导入基础数据    # zcat /usr/share/doc/zabbix-proxy-mysql-3.0.8/schema.sql.gz|mysql -uzabbix -p123.Com zabbix_proxy

1.3、代理端配置文件如下:
[root@cll-tianygqyyscbf-app-001 zabbix]# grep ^[a-Z] /etc/zabbix/zabbix_proxy.conf
Server=zabbix_server端IP地址
Hostname=zms_proxy
LogFile=/var/log/zabbix/zabbix_proxy.log
LogFileSize=1024
PidFile=/var/run/zabbix/zabbix_proxy.pid
SocketDir=/var/run/zabbix
DBHost=127.0.0.1
DBName=zabbix_proxy
DBUser=zabbix
DBPassword=YourKey
SNMPTrapperFile=/var/log/snmptrap/snmptrap.log
Timeout=15
ExternalScripts=/usr/lib/zabbix/externalscripts
LogSlowQueries=3000
StatsAllowedIP=127.0.0.1
[root@cll-tianygqyyscbf-app-001 zabbix]#
注:为了减轻zabbix_server端压力,proxy一般使用的是主动模式,所以这里Hostname特别重要(务必整个系统中全局唯一)
1.4、启动代理服务器:
启动服务    # /etc/init.d/zabbix-proxy start
开机自启    # chkconfig zabbix-proxy on
2、Web管理页面上添加proxy:

三、自动注册、自动发现
简介:
- 自动注册:zabbix agent主动到zabbix Server上报到,登记;缺点agent有可能找不到Server(配置出错)
- 自动发现:zabbix Server主动发现所有客户端,然后将客户端登记自己的小本本上,缺点zabbix server压力山大(网段大,客户端多),时间消耗多。
这里只演示自动注册
步骤:
- 主机名和agent配置调整配置;
- Web界面上配置;
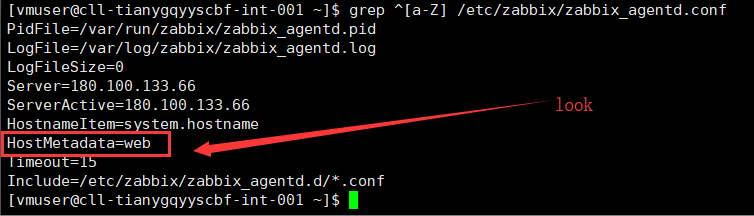
1、主机名或zabbix_agentd.conf文件配置:
前提:
自动注册的主机的主机名要有规律,zabbix_agentd.conf配置文件中HostMetadata值指定一个特征(主要目的是:加入这边10台机器,其中5台是做web的,另外五台是做DB的就可以配置两个注册动作——设置不同的模板);下面给个具体示例:
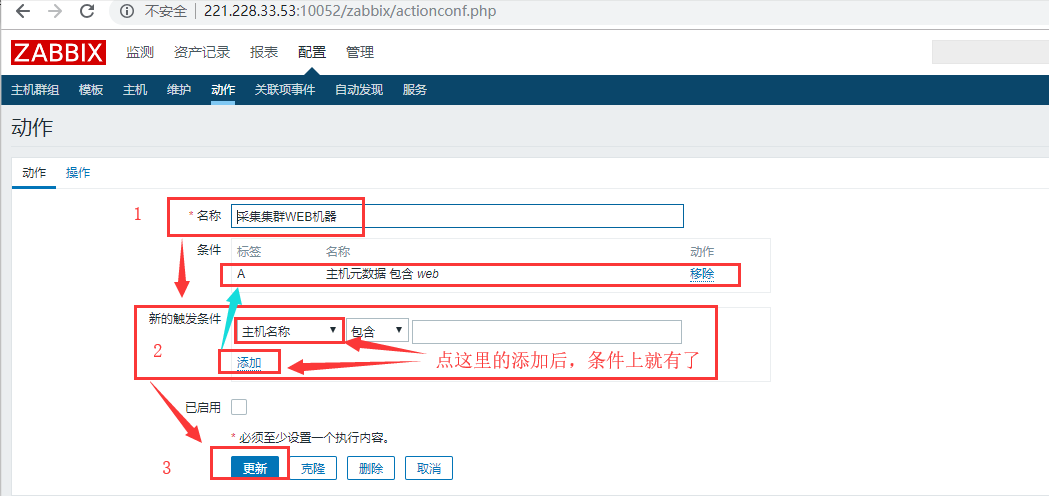
2、Web界面上配置:

好了,就这么多……