流的类继承结构
我们首先看看流的类继承结构,有助于理解下个标签的内容
InputStream
OutputStream
Reader
Writer
File类
File类技能表示一个特定文件的名称,又能代表一个目录下的一组文件的名称。如果它指的是一个文件集,我们就可以对此集合调用list()方法,这个方法会返回一个字符数组。如果我们想取得不同的目录列表,只需要再创建一个不同的File对象就可以了。实际上,FilePath(文件路径)对这个类来说是个更好的名字。
目录列表器
若我们调用不带参的list()方法,便得到File对象包含的全部列表。若我们想获得一个受限列表,如得到所有扩展名为.java的文件,就要用到“目录过滤器”。
public class DirList {
    public static void main(String[] args) {
        File path = new File(".");
        String[] list;
        if (args.length == 0)
            list = path.list();
        else {
            list = path.list(new DirFilter(args[0]));
        }
        Arrays.sort(list, String.CASE_INSENSITIVE_ORDER);
        for (String dirItem : list)
            System.out.println(dirItem);
    }
}

class DirFilter implements FilenameFilter {
    private Pattern pattern;

    public DirFilter(String regex) {
        pattern = Pattern.compile(regex);
    }

    public boolean accept(File dir, String name) {
        return pattern.matcher(name).matches();
    }
} /* Output:
DirectoryDemo.java
DirList.java
DirList2.java
DirList3.java
*///:~
DirFilter类实现了FilenameFilter接口:
public interface FilenameFilter {
    boolean accept(File dir, String name);
}DirFilter这个类存在的原因就是accept()方法。创建这个类的目的在于把accept()方法提供给list()使用,使list()可以回调accept(),进而决定哪些文件包含在列表中。这种结构常常被称为回调。更具体说,这是一个策略模式的例子。list()在提供服务时实现了基本功能,而FilenameFilter提供了这个策略,以便完善list()在提供服务时所需的算法。因为list()接受FilenameFilter对象作为参数,这意味着我们可以传递实现了FilenameFilter接口的任何类的对象,用以选择(甚至在运行时)list()方法的行为方式。策略的目的就是提供了代码行为的灵活性。
list()会为此目录下的每个文件名调用accept(),来判断该文件是否包含在内;判断结果由accept()返回的布尔值表示。
匿名内部类
上面的例子很适合用匿名内部类改进。首先创建一个filter()方法,返回一个纸箱FilenameFilter的引用:
public class DirList2 {
    public static FilenameFilter filter(final String regex) {
        // Creation of anonymous inner class:
        return new FilenameFilter() {
            private Pattern pattern = Pattern.compile(regex);

            public boolean accept(File dir, String name) {
                return pattern.matcher(name).matches();
            }
        }; // End of anonymous inner class
    }

    public static void main(String[] args) {
        File path = new File(".");
        String[] list;
        if (args.length == 0)
            list = path.list();
        else
            list = path.list(filter(args[0]));
        Arrays.sort(list, String.CASE_INSENSITIVE_ORDER);
        for (String dirItem : list)
            System.out.println(dirItem);
    }
} /* Output:
DirectoryDemo.java
DirList.java
DirList2.java
DirList3.java
*///:~
注意,传向filter()的参数必须是final的。这在匿名内部类中是必须的,这样它才能够使用来自该类范围之外的对象。
我们可以使程序变得更小一点,定义一个list()参数的匿名内部类:
public class DirList3 {
    public static void main(final String[] args) {
        File path = new File(".");
        String[] list;
        if (args.length == 0)
            list = path.list();
        else
            list = path.list(new FilenameFilter() {
                private Pattern pattern = Pattern.compile(args[0]);

                public boolean accept(File dir, String name) {
                    return pattern.matcher(name).matches();
                }
            });
        Arrays.sort(list, String.CASE_INSENSITIVE_ORDER);
        for (String dirItem : list)
            System.out.println(dirItem);
    }
}
上面的代码展示了匿名内部类怎样通过创建特定的、一次性的类解决问题。优点是将解决特定问题的代码聚拢在一起,缺点是不易阅读,应该慎用。
下面一个工具类即可以取得一个目录下的所有文件,也可以通过正则表达式筛选文件,挺有用:
public class SortedDirList {
    private File file;

    public SortedDirList(String dirPath) {
        file = new File(dirPath);
    }

    public List<String> list() {
        String[] list;
        if (null != file) {
            list = file.list();
            Arrays.sort(list, String.CASE_INSENSITIVE_ORDER);
            return Arrays.asList(list);
        }
        return new ArrayList<>();
    }

    /**
     * 筛选文件名符合正则表达式的文件
     * @param reg 正则表达式
     * @return
     */
    public List<String> list(final String reg) {
        String[] list;
        if (null != file) {
            list = file.list(
                new FilenameFilter() {
                    private Pattern pattern = Pattern.compile(reg);

                    @Override
                    public boolean accept(File dir, String name) {
                        return pattern.matcher(name).matches();
                    }
                }
            );
            Arrays.sort(list, String.CASE_INSENSITIVE_ORDER);
            return Arrays.asList(list);
        }
        return new ArrayList<>();
    }

    public static void main(String[] args) {
        SortedDirList sortedDirList = new SortedDirList(".");   //.代表当前目录
        System.out.println(sortedDirList.list());
        System.out.println(sortedDirList.list(".*\\.txt"));
    }
}
目录实用工具
程序设计中一项常见任务就是在文件集上执行操作,这些文件要么在本地目录中,要么遍布于整个目录树中。下面的工具类通过local()方法残生由本地目录中的文件构成的File对象数组,或通过walk()方法产生给定目录下的由整个目录树中所有文件构成的List<File>。
public final class Directory {
    public static File[]
    local(File dir, final String regex) {
        return dir.listFiles(new FilenameFilter() {
            private Pattern pattern = Pattern.compile(regex);

            public boolean accept(File dir, String name) {
                return pattern.matcher(
                        new File(name).getName()).matches();
            }
        });
    }

    public static File[]
    local(String path, final String regex) { // Overloaded
        return local(new File(path), regex);
    }

    // A two-tuple for returning a pair of objects:
    public static class TreeInfo implements Iterable<File> {
        public List<File> files = new ArrayList<File>();
        public List<File> dirs = new ArrayList<File>();

        // The default iterable element is the file list:
        public Iterator<File> iterator() {
            return files.iterator();
        }

        void addAll(TreeInfo other) {
            files.addAll(other.files);
            dirs.addAll(other.dirs);
        }

        public String toString() {
            return "dirs: " + PPrint.pformat(dirs) +
                    "\n\nfiles: " + PPrint.pformat(files);
        }
    }

    public static TreeInfo
    walk(String start, String regex) { // Begin recursion
        return recurseDirs(new File(start), regex);
    }

    public static TreeInfo
    walk(File start, String regex) { // Overloaded
        return recurseDirs(start, regex);
    }

    public static TreeInfo walk(File start) { // Everything
        return recurseDirs(start, ".*");
    }

    public static TreeInfo walk(String start) {
        return recurseDirs(new File(start), ".*");
    }

    static TreeInfo recurseDirs(File startDir, String regex) {
        TreeInfo result = new TreeInfo();
        for (File item : startDir.listFiles()) {
            if (item.isDirectory()) {
                result.dirs.add(item);
                result.addAll(recurseDirs(item, regex));
            } else // Regular file
                if (item.getName().matches(regex))
                    result.files.add(item);
        }
        return result;
    }

    // Simple validation test:
    public static void main(String[] args) {
        if (args.length == 0)
            System.out.println(walk("."));
        else
            for (String arg : args)
                System.out.println(walk(arg));
    }
} ///:~
local()方法使用被称为listFile()的File.list()的变体来残生File数组。
walk()方法将开始目录的名字转换为File对象,然后调用recurseDirs(),该方法将递归地遍历目录,并在每次递归中都收集更多的信息。为了区分普通文件盒目录,返回值实际上是一个对象“元组”——一个List持有所有普通文件,另一个持有目录。这里,所有的域都被有意识地设置成了public,因为TreeInfo的使命只是将对象收集起来。
TreeInfo.toString()是为了更容易浏览结果。代码可以在网上下载:https://download.csdn.net/download/m0_37293461/10683933
public class PPrint {
    public static String pformat(Collection<?> c) {
        if (c.size() == 0) return "[]";
        StringBuilder result = new StringBuilder("[");
        for (Object elem : c) {
            if (c.size() != 1)
                result.append("\n  ");
            result.append(elem);
        }
        if (c.size() != 1)
            result.append("\n");
        result.append("]");
        return result.toString();
    }

    public static void pprint(Collection<?> c) {
        System.out.println(pformat(c));
    }

    public static void pprint(Object[] c) {
        System.out.println(pformat(Arrays.asList(c)));
    }
}
我们可以更进一步,创建一个工具,它可以在目录中穿行,通过Strategy对象来处理这些目录中的文件(这是策略设计模式的另一个示例):
public class ProcessFiles {
    public interface Strategy {
        void process(File file);
    }

    private Strategy strategy;
    private String ext;

    public ProcessFiles(Strategy strategy, String ext) {
        this.strategy = strategy;
        this.ext = ext;
    }

    public void start(String[] args) {
        try {
            if (args.length == 0)
                processDirectoryTree(new File("."));
            else
                for (String arg : args) {
                    File fileArg = new File(arg);
                    if (fileArg.isDirectory())
                        processDirectoryTree(fileArg);
                    else {
                        // Allow user to leave off extension:
                        if (!arg.endsWith("." + ext))
                            arg += "." + ext;
                        strategy.process(
                                new File(arg).getCanonicalFile());
                    }
                }
        } catch (IOException e) {
            throw new RuntimeException(e);
        }
    }

    public void
    processDirectoryTree(File root) throws IOException {
        for (File file : Directory.walk(
                root.getAbsolutePath(), ".*\\." + ext))
            strategy.process(file.getCanonicalFile());
    }

    // Demonstration of how to use it:
    public static void main(String[] args) {
        new ProcessFiles(new ProcessFiles.Strategy() {
            public void process(File file) {
                System.out.println(file);
            }
        }, "java").start(args);
    }
}
Strategy接口内嵌在ProcessFiles中,使得如果你希望实现它,就必须实现ProcessFiles.Strategy。
目录的检查与创建
File不仅仅只代表存在的文件或目录。可以用来创建新目录或不存在的整个目录路径。还可以检查文件特性(大小,最后修改日期,读/写),检查整个File对象是一个文件还是一个目录,并可以删除文件。下面展示了一些File类的方法:
private static void fileData(File f) {
    System.out.println(
            "Absolute path: " + f.getAbsolutePath() +
                    "\n Can read: " + f.canRead() +
                    "\n Can write: " + f.canWrite() +
                    "\n getName: " + f.getName() +
                    "\n getParent: " + f.getParent() +
                    "\n getPath: " + f.getPath() +
                    "\n length: " + f.length() +
                    "\n lastModified: " + f.lastModified());
    if (f.isFile())
        System.out.println("It's a file");
    else if (f.isDirectory())
        System.out.println("It's a directory");
}
输入与输出
编程语言的I/O类库中常使用流这个抽象概念,“流”屏蔽了实际的I/O设备中处理数据的细节。
java类库中的I/O类分为输入和输出两部分,可以在JDK文档里的类层次结构中看到。
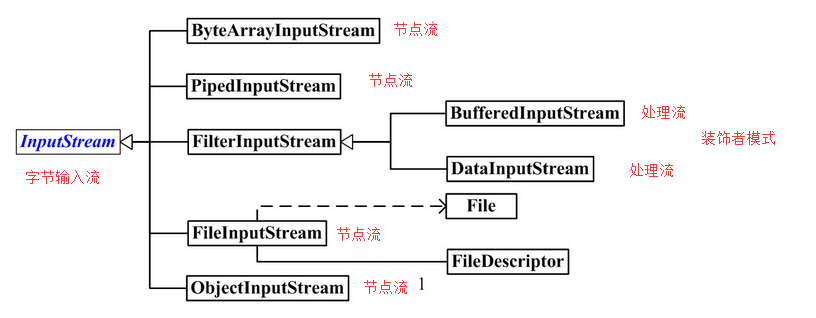
InputStream类型
InputStream的作用是用来表示那些从不同数据源产生输入的类。这些数据源包括:
- 字节数组。
- String对象。
- 文件。
- “管道”,工作方式与实际管道相似,即,从一端输入,从另一端输出
- 一个由其他种类的流组成的序列,以便我们可以将它们手机和并到一个流内
- 其他数据源,如Internet连接等
| 类 | 功能 | 构造器参数/如何使用 |
|---|---|---|
| ByteArrayInputStream | 允许内存的缓冲区当作InputStream使用 | 缓冲区,字节将从中取出/ 作为一种数据源:将其与FilterInputStream对象相连以提供有用接口 |
| StringBufferInputStream | 将String转换成InputStream | 字符串,底层实现实际使用StringBuffer/ 作为一种数据源:将其与FilterInputStream对象相连以提供有用接口 |
| FileInputStream | 用于从文件中读取信息 | 字符串,表示文件名、文件或FileDescriptor对象/ 作为一种数据源:将其与FilterInputStream对象相连以提供有用接口 |
| PipedInputStream | 产生用于写入相关PipedOutputStream的数据,实现“管道化”概念 | 作为多线程中数据源:将其与FilterInput-Stream对象相连以提供有用接口 |
| SequenceInputStream | 将两个或多个InputStream对象转换成单一InputStream | 两个InputStream对象或一个容纳InputStream对象的容器Enumeration/ 作为一种数据源:将其与FilterInputStream对象相连以提供有用接口 |
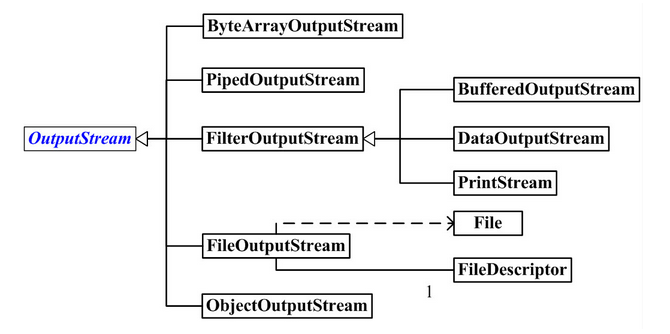
OutputStream类型
改类别的类决定了输出所要去往的目标:字节数组()
添加属性和有用的接口
装饰器在第15章引入。java I/O类库需要多种不同功能的组合,这正是使用装饰器模式的理由。
装饰器提供了相当多的灵活性(我们可以很容易地混合和匹配属性),但是它同时增加了代码的复杂性。java I/O类库操作不便的原因在于:我们必须创建许多类——“核心”I/O类型加上所有的装饰器,才能得到我们所希望的单个I/O对象。
FilterInputStream和FilterOutputStream是用来提供装饰器类接口以控制特定输入流和输出流的两个类,它们分别由InputStream和OutputStream派生而来,这两个类是装饰器的必要条件。
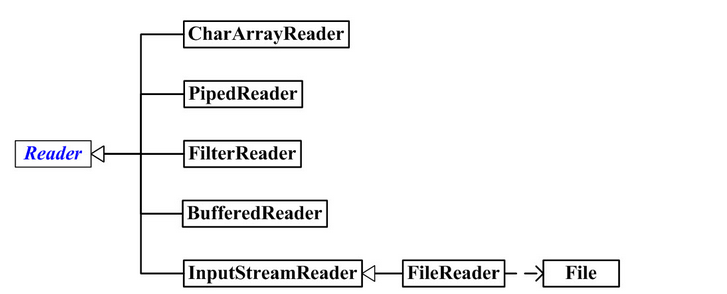
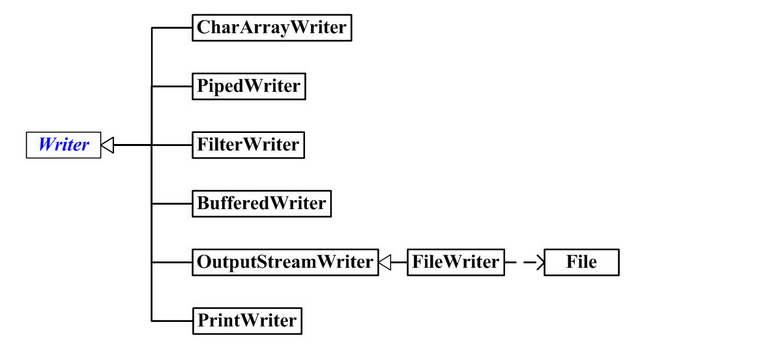
Reader和Writer
InputStream和OutputStreamt在面向字节形式的I/O中提供极有价值的功能,Reader和Writer则提供兼容Unicode与面向字符的I/O功能。
有时我们必须把来自“字节”层次结构中的类和“字符”层次结构中的类结合起来使用,就要用到“适配器”类:InputStreamReader可以把InputStream转换为Reader,而OutputStreamWriter可以把OutputStream转换为Writer。
数据的来源和去处
几乎所有原始的java I/O流都有相应的Reader和Writer来提供Unicode操作。但也有需要InputStream和OutputStream的情况,比如java.util.zip类库就是面向字节的。我们可以先尝试使用面向字符的,不行再用面向字节的。
更改流的行为
对于InputStream和OutputStream来说,我们会使用FilterInputStream和FilterOutputStream的修饰器子类来修改“流”以满足特殊需要。Reader和Writer的类继承层次结构继承沿用相同的思想——但是并不完全相同。
无论我们何时使用readLine(),都不应该使用DataInputStream(会遭到编译器强烈反对),而应该使用BufferedReader。除了这一点DataInputStream仍是I/O类库的首选成员。
自我独立的类:RandomAccessFile
RandomAccessFile适用于大小已知的记录组成的文件,所以我们可以使用seek()将记录从一处转移到另一处,然后读取或者修改记录。文件中记录的大小不一定都相同,只要我们能够确定那些记录有多大以及它们在文件中的位置即可。
除了实现DataInput和DataOutput接口,它和InputStream或OutputStream没有任何关联,它是一个完全独立的类。这么做是因为RandomAccessFile拥有和别的I/O类型本质不同的行为,因为我们可以在一个文件内向前或向后移动。
I/O流的典型使用方式
尽管可以通过不同的方式组合I/O流类,但我们可能也就只能用到其中的几种组合。下面的例子可以作为经典的I/O用法的基本参考。
缓冲输入文件(BufferedReader)
如果想要打开一个文件用于字符输入,可以使用以String或File对象作为文件名的FileInputReader,为了提高速度。为了提高速度,我们洗完归队那个文件进行缓冲,那么我们将所产生的引用传给一个BufferedReader构造器。由于BufferedReader也提供readLine()方法,所以这是我们的最终对象和进行读取的接口。当readLine()将返回null时,你就达到了文件的末尾。
public class BufferedInputFile {
    // Throw exceptions to console:
    public static String
    read(String filename) throws IOException {
        // Reading input by lines:
        BufferedReader in = new BufferedReader(
                new FileReader(filename));
        String s;
        StringBuilder sb = new StringBuilder();
        while ((s = in.readLine()) != null)
            sb.append(s + "\n");
        in.close();
        return sb.toString();
    }

    public static void main(String[] args)
            throws IOException {
        System.out.print(read("D:\\workspace\\thinking-In-Java-master\\src\\main\\java\\io\\BufferedInputFile.java"));
    }
}
字符串sb用来积累文件的全部内容(包括必须添加的换行符,因为readLine()已将它们删掉了)。最后,调用close()关闭文件。
从内存输入
下面的示例中,从BufferedInputFile.read()读入的String结果被用来创建一个StringReader。然后调用read()每次读取一个字符。
public class MemoryInput {
    public static void main(String[] args)
            throws IOException {
        StringReader in = new StringReader(
                BufferedInputFile.read("D:\\workspace\\thinking-In-Java-master\\src\\main\\java\\io\\MemoryInput.java"));
        int c;
        while ((c = in.read()) != -1)
            System.out.print((char) c);
    }
}
格式化的内存输入
要读取格式化数据,可以使用DataInputStream,它是一个面向字节的I/O类(不是面向字符的)。因此我们必须使用InputStream类而不是Reader类。
public class FormattedMemoryInput {
    public static void main(String[] args)
            throws IOException {
        try {
            DataInputStream in = new DataInputStream(
                    new ByteArrayInputStream(
                            BufferedInputFile.read(
                                    "D:\\workspace\\thinking-In-Java-master\\src\\main\\java\\io\\FormattedMemoryInput.java").getBytes()));
            while (true)
                System.out.print((char) in.readByte());
        } catch (EOFException e) {
            System.err.println("End of stream");
        }
    }
}
必须为ByteArrayInputStream提供字节数组,为了产生改数组String包含了一个可以实现此项工作的getBytes()方法。
如果我们从DataInputStream用readByte()一次一个字节地读取字符,那么任何字节的值都是合法的结果,因此返回值不能用来检测输入是否结束。我们可以用arailable()方法查看还有多少克供存取的字符。下面例子演示了如何一次一个字节读取文件。
public class TestEOF {
    public static void main(String[] args)
            throws IOException {
        DataInputStream in = new DataInputStream(
                new BufferedInputStream(
                        new FileInputStream("D:\\workspace\\thinking-In-Java-master\\src\\main\\java\\io\\TestEOF.java")));
        while (in.available() != 0)
            System.out.print((char) in.readByte());
    }
} /* (Execute to see output) *///:~
基本的文件输出
FileWriter对象可以向文件写入数据。实际上,我们通常会用BufferedWriter将其包装起来用以缓冲输出(尝试移除此包装来感受对性能的印象——缓冲旺旺能显著增加I/O性能)
public class BasicFileOutput {
    static String file = "D:\\BasicFileOutput.out";

    public static void main(String[] args)
            throws IOException {
        BufferedReader in = new BufferedReader(
                new StringReader(
                        BufferedInputFile.read("D:\\workspace\\thinking-In-Java-master\\src\\main\\java\\io\\BasicFileOutput.java")));
        PrintWriter out = new PrintWriter(
                new BufferedWriter(new FileWriter(file)));
        int lineCount = 1;
        String s;
        while ((s = in.readLine()) != null)
            out.println(lineCount++ + ": " + s);
        out.close();    //1
        // Show the stored file:
        System.out.println(BufferedInputFile.read(file));
    }
}
如果不为所有的输出文件调用close(),就会发现缓冲区内容不会被刷新清空。
文本文件输出的快捷方式
java se5在PrintWriter中添加了一个辅助构造器,使得你不必在每次希望创建文本文件并向其中写入时,都去执行所有的装饰工作。
public class FileOutputShortcut {
    static String file = "FileOutputShortcut.out";

    public static void main(String[] args)
            throws IOException {
        BufferedReader in = new BufferedReader(
                new StringReader(
                        BufferedInputFile.read("FileOutputShortcut.java")));
        // Here's the shortcut:
        PrintWriter out = new PrintWriter(file);
        int lineCount = 1;
        String s;
        while ((s = in.readLine()) != null)
            out.println(lineCount++ + ": " + s);
        out.close();
        // Show the stored file:
        System.out.println(BufferedInputFile.read(file));
    }
} /* (Execute to see output) *///:~
存储和恢复数据(DataOutputStream/DataInputStream)
PrintWriter可以对数据进行格式化,以便人们阅读。但是为了输出可供另一个“流”恢复数据,我们需要用DataOutputStream写入数据,并用DataInputStream恢复数据,它们都是面向字节的。
public class StoringAndRecoveringData {
    public static void main(String[] args)
            throws IOException {
        DataOutputStream out = new DataOutputStream(
                new BufferedOutputStream(
                        new FileOutputStream("Data.txt")));
        out.writeDouble(3.14159);
        out.writeUTF("That was pi");
        out.writeDouble(1.41413);
        out.writeUTF("Square root of 2");
        out.close();
        DataInputStream in = new DataInputStream(
                new BufferedInputStream(
                        new FileInputStream("Data.txt")));
        System.out.println(in.readDouble());
        // Only readUTF() will recover the
        // Java-UTF String properly:
        System.out.println(in.readUTF());
        System.out.println(in.readDouble());
        System.out.println(in.readUTF());
    }
} /* Output:
3.14159
That was pi
1.41413
Square root of 2
*///:~
如果我们使用DataOutputStream写入数据,java保证我们可以使用用DataInputStream准确地读取数据——无论读与写的平台多么不同。这很重要!
读写随机访问文件
使用RandomAccessFile,类似于组合使用了DataInputStream和DataOutputStream(因为它是实现了相同的接口:DataInput和DataOutput)。另外我们可以看到,利用seek()可以在文件中到处移动,并修改文件中的某个值。
在使用RandomAccessFile,必须知道排版,才能正确操作它。
public class UsingRandomAccessFile {
    static String file = "rtest.dat";

    static void display() throws IOException {
        RandomAccessFile rf = new RandomAccessFile(file, "r");
        for (int i = 0; i < 7; i++)
            System.out.println("Value " + i + ": " + rf.readDouble());
        System.out.println(rf.readUTF());
        rf.close();
    }

    public static void main(String[] args)
            throws IOException {
        RandomAccessFile rf = new RandomAccessFile(file, "rw");
        for (int i = 0; i < 7; i++)
            rf.writeDouble(i * 1.414);
        rf.writeUTF("The end of the file");
        rf.close();
        display();
        rf = new RandomAccessFile(file, "rw");
        rf.seek(5 * 8);     //double是8字节长度,查找第5个双精度,所以5*8
        rf.writeDouble(47.0001);
        rf.close();
        display();
    }
}
display()方法打开了一个文件,并以double值的形式显示了其中的七个元素。因为double总是8字节长度,为了用seek()查找第五个双精度值,需用5*8来产生查找位置。
管道流
属于多线程,在21章再讲。
文件读写的实用工具
一个很常见的任务化程序是读取文件到内存。修改,然后再写出。而java I/O缺少这些常用操作的功能。
public class TextFile extends ArrayList<String> {
    // Read a file as a single string:
    public static String read(String fileName) {
        StringBuilder sb = new StringBuilder();
        try {
            BufferedReader in = new BufferedReader(new FileReader(
                    new File(fileName).getAbsoluteFile()));
            try {
                String s;
                while ((s = in.readLine()) != null) {   //readLine()会将换行符去掉,所以读出来的需要重新加上
                    sb.append(s);
                    sb.append("\n");
                }
            } finally {
                in.close();
            }
        } catch (IOException e) {
            throw new RuntimeException(e);
        }
        return sb.toString();
    }

    // Write a single file in one method call:
    public static void write(String fileName, String text) {
        try {
            PrintWriter out = new PrintWriter(
                    new File(fileName).getAbsoluteFile());
            try {
                out.print(text);
            } finally {
                out.close();
            }
        } catch (IOException e) {
            throw new RuntimeException(e);
        }
    }

    // Read a file, split by any regular expression:
    public TextFile(String fileName, String splitter) {
        super(Arrays.asList(read(fileName).split(splitter)));
        // Regular expression split() often leaves an empty
        // String at the first position:
        if (get(0).equals("")) remove(0);
    }

    // Normally read by lines:
    public TextFile(String fileName) {
        this(fileName, "\n");
    }

    public void write(String fileName) {
        try {
            PrintWriter out = new PrintWriter(
                    new File(fileName).getAbsoluteFile());
            try {
                for (String item : this)
                    out.println(item);
            } finally {
                out.close();
            }
        } catch (IOException e) {
            throw new RuntimeException(e);
        }
    }

    // Simple test:
    public static void main(String[] args) {
        String file = read("TextFile.java");
        write("test.txt", file);
        TextFile text = new TextFile("test.txt");
        text.write("test2.txt");
        // Break into unique sorted list of words:
        TreeSet<String> words = new TreeSet<String>(
                new TextFile("TextFile.java", "\\W+"));
        // Display the capitalized words:
        System.out.println(words.headSet("a"));
    }
}
read()将每行添加到StringBuffer,并且为每行加上换行符,因为在读的过程中换行符会被去除掉。接着返回一个包含整个文件的字符串。write()打开文本并将其写入文件。
注意,在任何打开文件的代码中的finally子句中,都要添加对文件的close()调用。
因为这个类希望将读取和写入文件的过程简单化,因此所有的IOException都被转型为RuntimeException(可不被捕获)。
读取二进制文件
这个工具与TextFile类似,它简化了读取二进制文件的过程:
public class BinaryFile {
    public static byte[] read(File bFile) throws IOException {
        BufferedInputStream bf = new BufferedInputStream(
                new FileInputStream(bFile));
        try {
            byte[] data = new byte[bf.available()];
            bf.read(data);
            return data;
        } finally {
            bf.close();
        }
    }

    public static byte[]
    read(String bFile) throws IOException {
        return read(new File(bFile).getAbsoluteFile());
    }
} ///:~
标准I/O
从标准输入中读取
在标准I/O模型中,java提供了System.in、System.out和System.err。System.out和System.err都事先包装成了printStream对象,这样我们可以立即使用System.out和System.err。但是System.in并未对其包装。
System.in和大多数流一样,通常应对其进行缓冲:
public class Echo {
    public static void main(String[] args)
            throws IOException {
        BufferedReader stdin = new BufferedReader(
                new InputStreamReader(System.in));
        String s;
        while ((s = stdin.readLine()) != null && s.length() != 0)
            System.out.println(s);
        // An empty line or Ctrl-Z terminates the program
    }
} ///:~
将System.out转换成PrintWriter
System.out是一个PrintStream,而PrintStream是一个OutputStream。PrintWriter有一个可以接受OutputStream作为参数的构造器。
public class ChangeSystemOut {
    public static void main(String[] args) {
        PrintWriter out = new PrintWriter(System.out, true);
        out.println("Hello, world");
    }
} /* Output:
Hello, world
*///:~
标准I/O重定向
java的System类提供了一些简单静态方法调用,以允许我们对标准输入、输出和错误I/O流进行重定向:
setIn(InputStream)
setOut(PrintStream)
setErr(PrintStream)
如果我们突然开始在显示器上创建大量输出,而这些输出滚得太快导致无法阅读时,重定向输出就显得极为有用。对于我们想重复测试某个特定用户的输入序列的命令程序来说,重定向输入就很有价值:
public class Redirecting {
    public static void main(String[] args)
            throws IOException {
        PrintStream console = System.out;
        BufferedInputStream in = new BufferedInputStream(
                new FileInputStream("D:\\workspace\\thinking-In-Java-master\\src\\main\\java\\io\\Redirecting.java"));
        PrintStream out = new PrintStream(
                new BufferedOutputStream(
                        new FileOutputStream("test.out")));

        //1 注意,这里重定向到自定义的in、out。
        System.setIn(in);
        System.setOut(out);
        System.setErr(out);
        BufferedReader br = new BufferedReader(
                new InputStreamReader(System.in));
        String s;
        while ((s = br.readLine()) != null)
            System.out.println(s);
        out.close(); // Remember this!
        System.setOut(console);
    }
}
在1中,System.in和System.out都重定向为自定义的in、out。I/O重定向操纵的是字节流,而不是字符流。
新I/O
所使用的结构更接近于操作系统执行I/O的方式:通道和缓冲器。
唯一直接与通道交互的缓冲器是ByteBuffer——也就是说,可以存储未加工字节的缓冲器。
在旧I/O类库中有三个类被修改了,用以产生FileChannel:FileInputStream、FileOutputStream、RandomAccessFile(既读又写),这些都是字节操作的。Reader和Writer这种字符模式类不能用于产生通道,但Channels类提供了实用方法,用来在通道中产生Reader和Writer。
下面例子演示了三种流,产生可读、可读可写及可读的通道。
public class GetChannel {
    private static final int BSIZE = 1024;

    public static void main(String[] args) throws Exception {
        // Write a file:
        FileChannel fc =
                new FileOutputStream("data.txt").getChannel();  //1
        fc.write(ByteBuffer.wrap("Some text ".getBytes()));
        fc.close();
        // Add to the end of the file:
        fc = new RandomAccessFile("data.txt", "rw").getChannel();   //2
        fc.position(fc.size());     // 移动到文件最后位置
        fc.write(ByteBuffer.wrap("Some more".getBytes()));
        fc.close();
        // Read the file:
        fc = new FileInputStream("data.txt").getChannel();  //3
        ByteBuffer buff = ByteBuffer.allocate(BSIZE);
        fc.read(buff);
        buff.flip();
        while (buff.hasRemaining())
            System.out.print((char) buff.get());
    }
} /* Output:
Some text Some more
*///:~
对于这里所展示的任何流类,getChannel都会产生一个FileChannel(通道)。一旦调用read()来告知FileChannel向ByteBuffer存储字节,就必须调用缓冲器上的flip(),让它做好让别人读取字节的准备。
public class ChannelCopy {
    private static final int BSIZE = 1024;

    public static void main(String[] args) throws Exception {
        if (args.length != 2) {
            System.out.println("arguments: sourcefile destfile");
            System.exit(1);
        }
        FileChannel
                in = new FileInputStream(args[0]).getChannel(),
                out = new FileOutputStream(args[1]).getChannel();
        ByteBuffer buffer = ByteBuffer.allocate(BSIZE);
        while (in.read(buffer) != -1) {
            buffer.flip(); // Prepare for writing
            out.write(buffer);
            buffer.clear();  // Prepare for reading
        }
    }
}
转换数据
回头看GetChannel.java这个程序会发现,为了输出文件中的信息,我们必须每次只读取一个字节的数据,然后将每个byte类型强制转换成char类型。缓冲器容纳的是普通的字节,为了把它们转换成字符,要么在将其从缓冲器输出时对它们进行解码。可以使用java.nio.charset.Charset类实现这些功能,该类提供了把数据编码成多种不同类型的字符集工具:
获取基本类型
尽管ByteBuffer只能保存字节类型的数据,但是它具有可以从其所容纳的字节中产生出各种不同基本类型值的方法。rewind()方法是为了返回数据开始部分。
public class GetData {
private static final int BSIZE = 1024;
public static void main(String[] args) {
ByteBuffer bb = ByteBuffer.allocate(BSIZE);
// Allocation automatically zeroes the ByteBuffer:
int i = 0;
while (i++ < bb.limit())
if (bb.get() != 0)
print("nonzero");
print("i = " + i);
bb.rewind();
// Store and read a char array:
bb.asCharBuffer().put("Howdy!");
char c;
while ((c = bb.getChar()) != 0)
printnb(c + " ");
print();
bb.rewind();
// Store and read a short:
bb.asShortBuffer().put((short) 471142);
print(bb.getShort());
bb.rewind();
// Store and read an int:
bb.asIntBuffer().put(99471142);
print(bb.getInt());
bb.rewind();
// Store and read a long:
bb.asLongBuffer().put(99471142);
print(bb.getLong());
bb.rewind();
// Store and read a float:
bb.asFloatBuffer().put(99471142);
print(bb.getFloat());
bb.rewind();
// Store and read a double:
bb.asDoubleBuffer().put(99471142);
print(bb.getDouble());
bb.rewind();
}
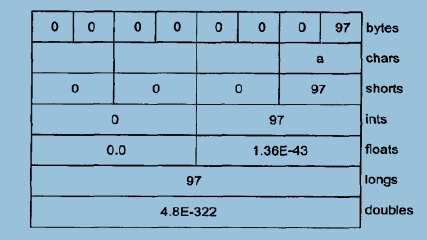
} 在分配一个ByteBuffer之后,可以通过检查它的值来查看缓冲器的分配方式是否将其内容自动置0——它确实这样做了。这里一共检测了1024个值(由缓冲器的limit()决定),并且所有的值都是0.
向ByteBuffer插入基本类型数据最简单的方法是:利用asCharBuffer()、asShortBuffer()获得该缓冲器上的视图,然后再用视图的put()方法。只有asShortBuffer()需要转换类型使用put,其余都可直接put。
视图缓冲器
视图缓冲器可以让我们通过某个特定的基本数据类型的视窗查看其底层的ByteBuffer。ByteBuffer是实际存储数据的地方,因此,对视图的任何修改都会映射称为对ByteBuffer中数据的修改。视图允许我们从ByteBuffer一次一个地或成批(放入数组中)读取基本类型值。下面是IntBuffer操纵ByteBuffer中的int型数据:
public class IntBufferDemo {
    private static final int BSIZE = 1024;

    public static void main(String[] args) {
        ByteBuffer bb = ByteBuffer.allocate(BSIZE);
        IntBuffer ib = bb.asIntBuffer();
        // Store an array of int:
        ib.put(new int[]{11, 42, 47, 99, 143, 811, 1016});
        // Absolute location read and write:
        System.out.println(ib.get(3));
        ib.put(3, 1811);
        // Setting a new limit before rewinding the buffer.
        ib.flip();
        while (ib.hasRemaining()) {
            int i = ib.get();
            System.out.println(i);
        }
    }
}
用put()方法存储一整个数组,接着get()和put()调用直接访问底层ByteBuffer中的某个整数位置。
public class ViewBuffers {
    public static void main(String[] args) {
        ByteBuffer bb = ByteBuffer.wrap(
                new byte[]{0, 0, 0, 0, 0, 0, 0, 'a'});
        bb.rewind();
        printnb("Byte Buffer ");
        while (bb.hasRemaining())
            printnb(bb.position() + " -> " + bb.get() + ", ");
        print();
        CharBuffer cb =
                ((ByteBuffer) bb.rewind()).asCharBuffer();
        printnb("Char Buffer ");
        while (cb.hasRemaining())
            printnb(cb.position() + " -> " + cb.get() + ", ");
        print();
        FloatBuffer fb =
                ((ByteBuffer) bb.rewind()).asFloatBuffer();
        printnb("Float Buffer ");
        while (fb.hasRemaining())
            printnb(fb.position() + " -> " + fb.get() + ", ");
        print();
        IntBuffer ib =
                ((ByteBuffer) bb.rewind()).asIntBuffer();
        printnb("Int Buffer ");
        while (ib.hasRemaining())
            printnb(ib.position() + " -> " + ib.get() + ", ");
        print();
        LongBuffer lb =
                ((ByteBuffer) bb.rewind()).asLongBuffer();
        printnb("Long Buffer ");
        while (lb.hasRemaining())
            printnb(lb.position() + " -> " + lb.get() + ", ");
        print();
        ShortBuffer sb =
                ((ByteBuffer) bb.rewind()).asShortBuffer();
        printnb("Short Buffer ");
        while (sb.hasRemaining())
            printnb(sb.position() + " -> " + sb.get() + ", ");
        print();
        DoubleBuffer db =
                ((ByteBuffer) bb.rewind()).asDoubleBuffer();
        printnb("Double Buffer ");
        while (db.hasRemaining())
            printnb(db.position() + " -> " + db.get() + ", ");
    }
}
ByteBuffer通过一个被“包装”过的8字节数组产生,然后通过各种不同的基本类型的视图缓冲器显示出来。我们可以从下图看到不同类型的缓冲器读取时,数据的显示方式:
字节存放次序
不同的机器可能会使用不同的字节排序方式来存储数据。
- 高位优先:将最重要的字节存放在地址最低的存储器单元。
- 低位优先:将最重要的字节放在地址最高的存储器单元。
当字节大于一个字节时,就要考虑字节的顺序问题。ByteBuffer是以高位优先的形式存储数据的。可以使用带参数的ByteOrder.BIG_ENDIAN或ByteOrder.LITTLE_ENDIAN的order()方法改变ByteBuffer的字节排序方式。
用缓冲器操纵数据
下面的图阐明了nio类之间的关系,便于我们理解怎么移动和转换数据。

注意:ByteBuffer是将数据移进移出融到的唯一方式,并且我们只能创建一个独立的基本类型的缓冲器,或者使用“as”从ByteBuffer中获得。
缓冲器的细节
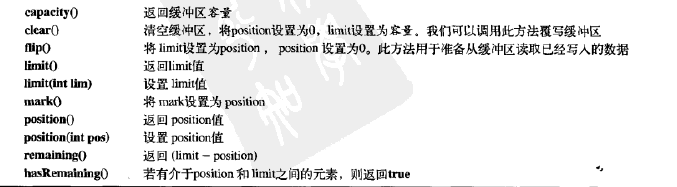
Buffer由数据和可以高效地访问及操纵这些数据的四个索引组成,四个索引:mark(标记),position(位置),limit(界限)和capacity(容量)。下面是操作四个索引的方法:
下面是一个简单使用缓冲器的示例:
public class UsingBuffers {
    private static void symmetricScramble(CharBuffer buffer) {
        while (buffer.hasRemaining()) {
            buffer.mark();
            char c1 = buffer.get();
            char c2 = buffer.get();
            buffer.reset();
            buffer.put(c2).put(c1);
        }
    }

    public static void main(String[] args) {
        char[] data = "UsingBuffers".toCharArray();
        ByteBuffer bb = ByteBuffer.allocate(data.length * 2);
        CharBuffer cb = bb.asCharBuffer();
        cb.put(data);
        print(cb.rewind());
        symmetricScramble(cb);
        print(cb.rewind());
        symmetricScramble(cb);
        print(cb.rewind());
    }
} /* Output:
UsingBuffers
sUniBgfuefsr
UsingBuffers
*///:~
在本例中使用的是底层的ByteBuffer,下面是symmetricScramble方法中缓冲器的样子:
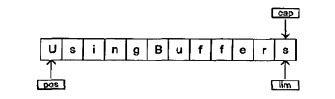
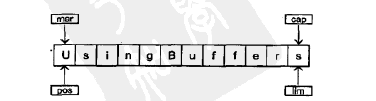
position指向缓冲器的第一个元素,capacity和limit指向最后一个元素。
在symmetricScramble方法中,迭代执行while循环知道position等于limit,当调用缓冲器相对的get()或put()函数,position指针就会随之相应改变。也可以调用带有参数的get()和put()方法,带参数的get()和put()函数不会改变缓冲器的position指针。
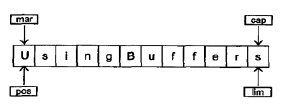
当操纵while循环时,使用mark()调用来设置mark的值:
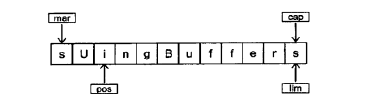
两个相对的get()调用后,缓冲器如下:
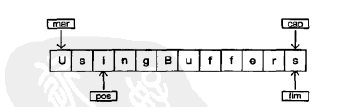
为了实现交换,可以使用绝对的(带参的)put()来实现,在程序中使用reset()将position的值设置为mark的值,然后两个put()先写c2,再写c1实现交换。
在下一次循环迭代期间,将mark设置成position的当前值:
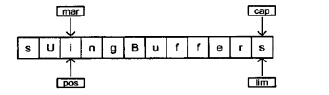
当再一次调用symmetricScramble()功能时,会对CharBuffer进行同样的处理,并将其恢复到初始状态。
内存映射文件
内存映射文件允许我们创建和修改那些因为太大而不能放入内存的文件。有了内存映射文件,我们就可以假定整个文件都放在内存中,而且可以完全把它当作非常大的数组访问。这种方法极大地简化了用于修改文件的代码。例子:
public class LargeMappedFiles {
    static int length = 0x8FFFFFF; // 128 MB

    public static void main(String[] args) throws Exception {
        MappedByteBuffer out =
                new RandomAccessFile("test.dat", "rw").getChannel()
                        .map(FileChannel.MapMode.READ_WRITE, 0, length);    //1
        for (int i = 0; i < length; i++)
            out.put((byte) 'x');
        print("Finished writing");
        for (int i = length / 2; i < length / 2 + 6; i++)
            printnb((char) out.get(i));
    }
}
为了能读能写,我们使用RandomAccessFile来获取文件通道,然后调用map()产生映射。我们必须制定初始位置和映射区域长度。这意味我们可以映射某个文件的较小部分。
MappedByBuffer由ByteBuffer继承而来,因此它具有ByteBuffer的所有方法。
性能
下面程序进行了简单的性能比较:
public class MappedIO {
    private static int numOfInts = 4000000;
    private static int numOfUbuffInts = 200000;

    private abstract static class Tester {
        private String name;

        public Tester(String name) {
            this.name = name;
        }

        public void runTest() {
            System.out.print(name + ": ");
            try {
                long start = System.nanoTime();
                test();
                double duration = System.nanoTime() - start;
                System.out.format("%.2f\n", duration / 1.0e9);
            } catch (IOException e) {
                throw new RuntimeException(e);
            }
        }

        public abstract void test() throws IOException;
    }

    private static Tester[] tests = {
            new Tester("Stream Write") {
                public void test() throws IOException {
                    DataOutputStream dos = new DataOutputStream(
                            new BufferedOutputStream(
                                    new FileOutputStream(new File("temp.tmp"))));
                    for (int i = 0; i < numOfInts; i++)
                        dos.writeInt(i);
                    dos.close();
                }
            },
            new Tester("Mapped Write") {
                public void test() throws IOException {
                    FileChannel fc =
                            new RandomAccessFile("temp.tmp", "rw")
                                    .getChannel();
                    IntBuffer ib = fc.map(
                            FileChannel.MapMode.READ_WRITE, 0, fc.size())
                            .asIntBuffer();
                    for (int i = 0; i < numOfInts; i++)
                        ib.put(i);
                    fc.close();
                }
            },
            new Tester("Stream Read") {
                public void test() throws IOException {
                    DataInputStream dis = new DataInputStream(
                            new BufferedInputStream(
                                    new FileInputStream("temp.tmp")));
                    for (int i = 0; i < numOfInts; i++)
                        dis.readInt();
                    dis.close();
                }
            },
            new Tester("Mapped Read") {
                public void test() throws IOException {
                    FileChannel fc = new FileInputStream(
                            new File("temp.tmp")).getChannel();
                    IntBuffer ib = fc.map(
                            FileChannel.MapMode.READ_ONLY, 0, fc.size())
                            .asIntBuffer();
                    while (ib.hasRemaining())
                        ib.get();
                    fc.close();
                }
            },
            new Tester("Stream Read/Write") {
                public void test() throws IOException {
                    RandomAccessFile raf = new RandomAccessFile(
                            new File("temp.tmp"), "rw");
                    raf.writeInt(1);
                    for (int i = 0; i < numOfUbuffInts; i++) {
                        raf.seek(raf.length() - 4);
                        raf.writeInt(raf.readInt());
                    }
                    raf.close();
                }
            },
            new Tester("Mapped Read/Write") {
                public void test() throws IOException {
                    FileChannel fc = new RandomAccessFile(
                            new File("temp.tmp"), "rw").getChannel();
                    IntBuffer ib = fc.map(
                            FileChannel.MapMode.READ_WRITE, 0, fc.size())
                            .asIntBuffer();
                    ib.put(0);
                    for (int i = 1; i < numOfUbuffInts; i++)
                        ib.put(ib.get(i - 1));
                    fc.close();
                }
            }
    };

    public static void main(String[] args) {
        for (Tester test : tests)
            test.runTest();
    }
} /* Output: (90% match)
Stream Write: 0.56
Mapped Write: 0.12
Stream Read: 0.80
Mapped Read: 0.07
Stream Read/Write: 5.32
Mapped Read/Write: 0.02
*///:~上面的测试中,runTest()是一种模板方法。测试的结果显然说明,即使建立映射文件的花费很大,但是整体受益比起I/O流来说还是显著的。
文件加锁
jdk1.4引入了文件加锁机制,它允许我们同步访问某个作为共享资源的文件。竞争同一文件 的两个线程可能在不同的java虚拟机上,也可能一个是java线程,另一个是操作系统的本地线程。文件锁对其他的操作系统进程是可见的,因为java的文件加锁直接映射到了本地操作系统的加锁工具。
下面是文件加锁的简单例子:
public class FileLocking {
    public static void main(String[] args) throws Exception {
        FileOutputStream fos = new FileOutputStream("file.txt");
        FileLock fl = fos.getChannel().tryLock();
        if (fl != null) {
            System.out.println("Locked File");
            TimeUnit.MILLISECONDS.sleep(100);
            fl.release();
            System.out.println("Released Lock");
        }
        fos.close();
    }
}
通过对FileChannel调用tryLock()或lock(),就可以获得整个文件的FileLock。(Socket-Channel、DatagramChannel和ServerSocketChannel不需要加锁,因为它们是从单进程实体继承而来;我们通常不在两个进程之间共享网络socket)。
tryLock()是非阻塞式的,它设法获取锁,但是如果不能获得(当其他一些进程已经持有相同的锁,并且不共享时),它将直接从方法调用返回。
lock()则是阻塞的,它要阻塞进程直至锁可以获得,或调用lock()线程中断,或调用lock()通道关闭。使用FileLock.release()可以释放锁。
可以对文件的一部分上锁:
public abstract FileLock tryLock(long position, long size, boolean shared)
    throws IOException;
或:
public abstract FileLock lock(long position, long size, boolean shared)
    throws IOException;
其中,加锁的区域由size-position决定。第三个参数指定是否共享锁。
无参的锁根据文件尺寸变化而变化,而固定尺寸的锁不随文件尺寸变化而变化。
对独占锁或共享锁的支持必须由底层的操作系统提供。若操作系统不支持共享锁并为每个请求都创建一个锁,那么它就会使用独占锁。锁的类型(共享或独占)可通过FileLock.isShared()进行查询。
对映射文件的部分加锁
如前所述,我们可能需要对巨大的文件的一部分加锁,以便其他进程可修改文件未加锁的部分。
下面例子中有两个线程,分别加锁不同部分:
public class LockingMappedFiles {
    static final int LENGTH = 0x8FFFFFF; // 128 MB
    static FileChannel fc;

    public static void main(String[] args) throws Exception {
        fc =
                new RandomAccessFile("test.dat", "rw").getChannel();
        MappedByteBuffer out =
                fc.map(FileChannel.MapMode.READ_WRITE, 0, LENGTH);
        for (int i = 0; i < LENGTH; i++)
            out.put((byte) 'x');
        new LockAndModify(out, 0, 0 + LENGTH / 3);
        new LockAndModify(out, LENGTH / 2, LENGTH / 2 + LENGTH / 4);
    }

    private static class LockAndModify extends Thread {
        private ByteBuffer buff;
        private int start, end;

        LockAndModify(ByteBuffer mbb, int start, int end) {
            this.start = start;
            this.end = end;
            mbb.limit(end);
            mbb.position(start);
            buff = mbb.slice(); //1`
            start();
        }

        public void run() {
            try {
                // Exclusive lock with no overlap:
                FileLock fl = fc.lock(start, end, false);
                System.out.println("Locked: " + start + " to " + end);
                // Perform modification:
                while (buff.position() < buff.limit() - 1)
                    buff.put((byte) (buff.get() + 1));
                fl.release();
                System.out.println("Released: " + start + " to " + end);
            } catch (IOException e) {
                throw new RuntimeException(e);
            }
        }
    }
}
在1`处,LockAndModify创建了缓冲区和用于修改的slice(),然后在run()中,获得文件通道上的锁(不能获得缓冲器上的锁,只能获取通道的锁)。lock()使部分文件具有独占访问权。
如果有java虚拟机,它会自动释放锁,或者关闭加锁的通道。不过也可以显示地FileLock调用release()来释放锁。
压缩
java I/O类库支持压缩格式的数据流,可以用它们对其他I/O类进行封装,以提供压缩功能。
这些类属于InputStream和OutputStream继承层次结构的一部分(属字节操作)。有时我们可能被迫要混合使用两种类型的数据流
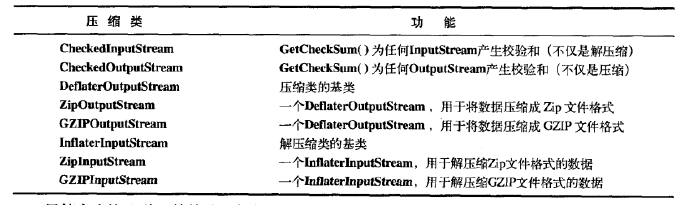
尽管有许多压缩算法,但是最Zip和GZIP是最常用的。