注意!
laravel/homestead box项目地址已经不再是原来的
而已经变更成
所以本文中的操作以及链接也进行了相应的更新。
对于一个偏爱
Windows的人来说,能够在
Windows操作环境下进行程序的开发,无异于一大享受。那么今天我们一起来看一下如何在
Windows 10操作系统中进行
Laravel的开发。
当然,方法不止一种,如果你的电脑上已经下载了PHP,安装了Apache或NGINX,并且有偏爱的数据库系统,那么基本上你已经可以开始写代码了。而我们今天要介绍的是使用Vagrant,在Homestead中进行Laravel的开发。
Vagrant是一款基于Virtual Box的虚拟机环境,可以安装多种Box(即预先配置好的开发环境),达到多种开发环境可以快速切换并且不需要担心Package Dependencies。
Homestead是Laravel官方创建的Vagrant Box,虚拟机的环境目前搭载的是Ubuntu 16.04 LTS,已经集成了Laravel所需的开发环境及工具,包含了最新版本的PHP,MySQL服务器以及NGINX。
那么我们需要做的几个步骤如下:
- 下载并安装Vagrant及Virtual Box。
- 下载Homestead并配置。
- 创建一个新的Laravel项目。
我们需要的:
- Git Bash
- Vagrant
- Virtual Box
- Homestead
注意:Laravel官方推荐的Shell是Git Bash。因为Git Bash自动将~(tilde)映射到用户根目录下(例如,C:\Users\MyUserName),而如果使用Windows自带的cmd,那么需要使用%HOMEDRIVE%%HOMEPATH%环境变量来进入正确的文件夹。
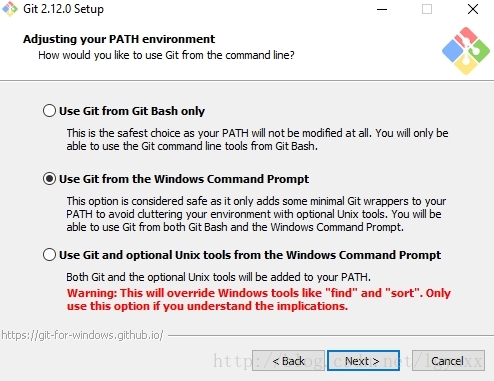
好了那么我们开始行动!首先需要我们先下载Git Bash:
直接下载可能很慢,我们可以右键复制下载链接,使用迅雷等下载工具下载。
安装Git很简单,按默认选项安装就可了:
安装完成后,我们就可以进行下一步了:
安装Vagrant及Virtual Box。
Vagrant的下载地址:https://www.vagrantup.com/downloads.html
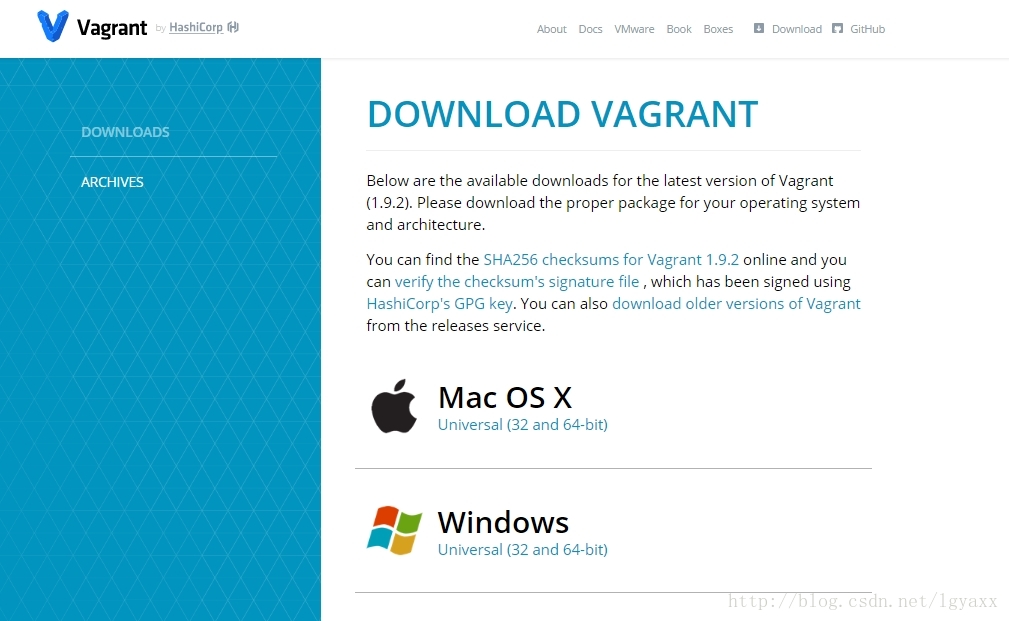
请选择Windows版本进行下载并安装。
Virtual Box的下载地址:https://www.virtualbox.org/wiki/Downloads
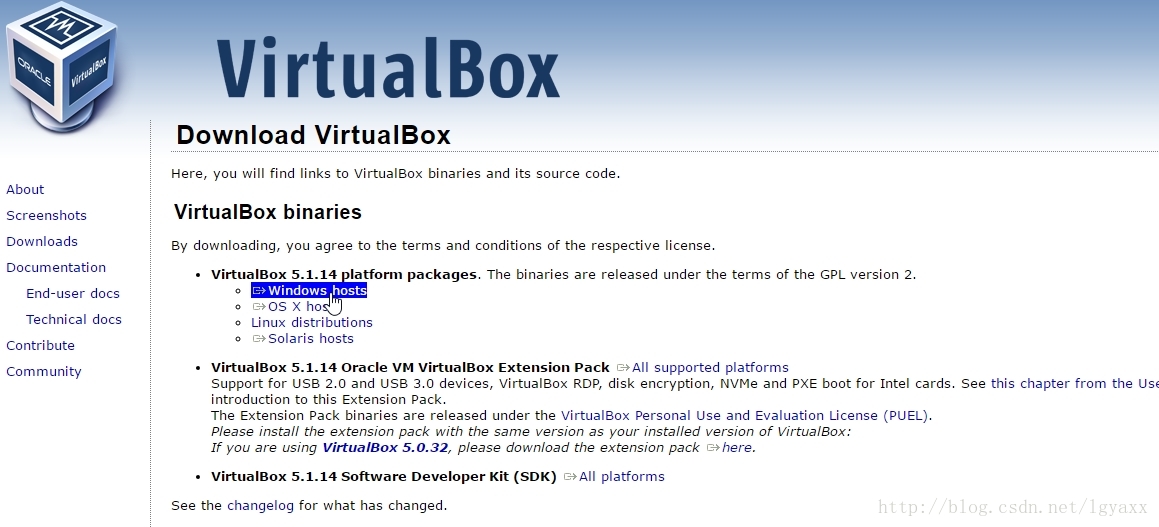
请选择高亮的链接下载Windows版本并安装。
注意:若下载最新5.2+版本的VirtualBox,请确保你的Vagrant版本在v2.0以上,因为新版的VB与Vagrant老版本不兼容。
完成之后,我们就可以开始安装Homestead了。
如果你在国外,或者你所在的地区对于CLI方式下载安装Homestead网速没有问题,那么可以打开Git Bash,输入
由于Homestead项目地址的变更,现在单独的vagrant box add laravel/homestead命令暂时无法使用,我们可以到以下地址下载最新版本(目前为5.1.0)的Homestead Box(可以使用下载工具):
https://app.vagrantup.com/laravel/boxes/homestead/versions/5.1.0/providers/virtualbox.box
https://vagrantcloud.com/laravel/boxes/homestead/versions/5.1.0/providers/virtualbox.box
如果你需要下载不同版本(或最新版本),请将以上地址中versions/后的数字版本号替换成相应的版本号。
下载完成后,我们将下载的文件命名为homestead-5.1.0.box。接下来,我们cd到相应的文件夹(假设下载文件目录在Downloads文件夹下,运行以下命令:
eagle@EagleEye:~/Downloads$ vagrant box add laravel/homestead ./homestead-5.1.0.box''会开始安装我们下载的Homestead盒子。

完成后,你会发现自己的用户文件夹里多出了一个.vagrant.d的文件夹(C:\Users\MyUserName.vagrant.d)。
将文件夹中名为0的文件夹改名为我们下载的Homestead的版本号,图片还没有更新,我们应该改成5.1.0。
接下来,非常重要的一个步骤:
我们打开这个文件夹,找到以下路径:
C:\Users\MyUserName\.vagrant.d\boxes\laravel-VAGRANTSLASH-homestead''在该文件夹下新建一个叫metadata_url的空白文件(注意不要有任何文件名后缀,如果你的系统设置了自动隐藏后缀名,请将隐藏去掉,确认文件无任何后缀):
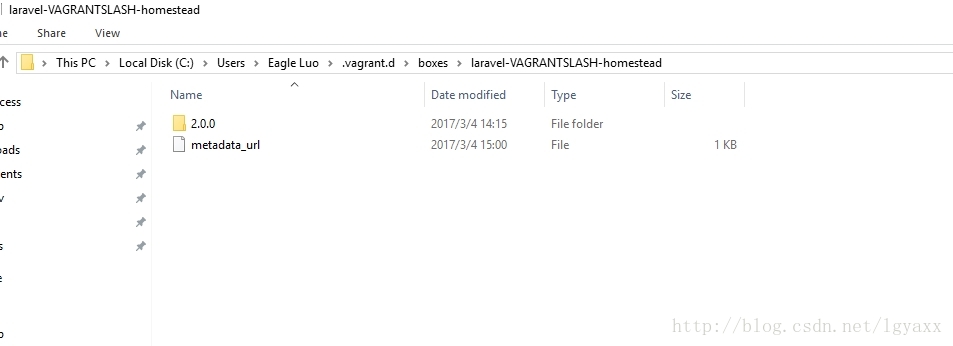
文件的内容里,添加以下链接:
https://app.vagrantup.com/laravel/boxes/homestead''注意,不要留任何空白字符,保存文件。
完成之后,我们就可以开始配置Homestead了。
在Git Bash里输入
$ git clone https://github.com/laravel/homestead.git ~/homestead''
下载好了Homestead之后,我们就可以建立Homestead.yaml配置文件了:
$ cd ~/homestead

# 创建Homestead初始配置
$ bash init.sh''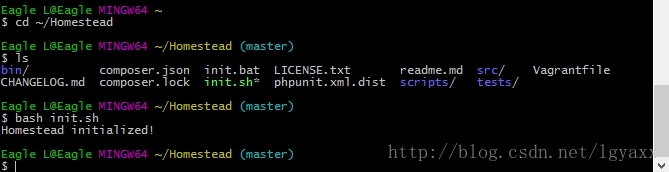
然后在~/Homestead文件夹中,我们可以看到多出了一个叫Homestead.yaml的文件。使用notepad++打开它,可以看到内容如下:
---
ip: "192.168.10.10"
memory: 2048
cpus: 1
provider: virtualbox

authorize: ~/.ssh/id_rsa.pub

keys:
    - ~/.ssh/id_rsa

folders:
    - map: ~/Code
      to: /home/vagrant/Code

sites:
    - map: homestead.app
      to: /home/vagrant/Code/laravel/public

databases:
    - homestead

# blackfire:
#     - id: foo
#       token: bar
#       client-id: foo
#       client-token: bar

# ports:
#     - send: 50000
#       to: 5000
#     - send: 7777
#       to: 777
#       protocol: udp
''
我们一条一条来配置。
首先我们需要建立SSH Key并且填入路径。在Git Bash中,输入:
$ ssh-keygen -t rsa''
完成后,我们会在用户根目录下看到一个.ssh文件夹,里面分别有
id_rsa.pub
id_rsa''
两个文件,分别对应配置文件中
authorize: ~/.ssh/id_rsa.pub

keys:
    - ~/.ssh/id_rsa
''
接下来我们看到这两段配置
folders:
    - map: ~/Code
      to: /home/vagrant/Code

sites:
    - map: homestead.app
to: /home/vagrant/Code/laravel/public''其中folders中,将map后面的文件夹(即~/Code)映射到Homestead中的/home/vagrant/Code。这就像我们常见到的和虚拟机中系统共享文件夹类似,我们把本机的~/Code文件夹分享给Homestead,所以我们可以很方便地使用自己喜欢的IDE(比如PhpStorm)进行开发,在~/Code中所进行的修改会如实反应在Homestead对应的文件夹中。
在sites中,我们定义了homestead.app指向/home/vagrant/Code/laravel/public这个文件夹,即Laravel项目的public文件夹。这样在浏览器中输入homestead.app,我们就可以直接看到项目主页了。
注意:以上的文件夹及映射是可以根据用户喜好更改的,比如我喜欢把我的开发文件夹叫做webdev,在里面我新建了一个叫phantastic.test的项目,那么以上的配置,我就可以做出相应修改:
folders:
    - map: ~/webdev
      to: /var/www

sites:
    - map: phantastic.test
to: /var/www/phantastic/public''这里我将~/webdev文件夹映射到了虚拟机内的/var/www文件夹。
下一步我们要在hosts文件中添加一行:
192.168.10.10 phantastic.test''Windows的hosts文件在以下路径:
C:\Windows\System32\drivers\etc\''用notepad++打开即可:
# Copyright (c) 1993-2009 Microsoft Corp.
#
# This is a sample HOSTS file used by Microsoft TCP/IP for Windows.
#
# This file contains the mappings of IP addresses to host names. Each
# entry should be kept on an individual line. The IP address should
# be placed in the first column followed by the corresponding host name.
# The IP address and the host name should be separated by at least one
# space.
#
# Additionally, comments (such as these) may be inserted on individual
# lines or following the machine name denoted by a '#' symbol.
#
# For example:
#
#      102.54.94.97     rhino.acme.com          # source server
#       38.25.63.10     x.acme.com              # x client host
# localhost name resolution is handled within DNS itself.
#   127.0.0.1       localhost
#   ::1             localhost

# 添加上这一行,将phantastic.test替换成自己的项目名称
192.168.10.10 phantastic.test
接下来我们来看
databases:
    - homestead''
在这里,我们每添加一个数据库名字,那么Homestead将会自动创建一个该名字的数据库来供我们操作。
在这里,我添加了一个新的数据库:
databases:
    - homestead
- phantastic''注意:不要使用tab来留空,否则会报错(可以是用空格对齐)。
虚拟机环境下默认的MySQL服务器管理员用户名为homestead,密码是secret。
每个项目如果需要更改默认使用的数据库等配置,可以在创建Laravel项目后配置根目录下的.env文件(具体配置将不在本文中叙述)。
将Homestead.yaml保存,我们就可以启动Vagrant了!激动吗?
以管理员的身份打开Git Bash,输入
$ cd ~/homestead
$ vagrant up''
我们会看到,Vagrant已经顺利运行了!
接下来,要进入Homestead,我们输入
$ vagrant ssh''
还差一步,我们就大工告成:
# cd 进入我们共享的文件夹 (请根据你配置中的映射目录来输入相应文件夹)
$ cd /var/www

# 创建一个新的laravel项目
$ laravel new my_new_project''
现在开始,我们可以开始Laravel的开发了!
另外,如果在安装过程中出现以下错误:
Vagrant was unable to mount VirtualBox shared folders. This is usually because the filesystem “vboxsf” is not available. This filesystem is made available via the VirtualBox Guest Additions and kernel module. Please verify that these guest additions are properly installed in the guest. This is not a bug in Vagrant and is usually caused by a faulty Vagrant box. For context, the command attempted was:
mount -t vboxsf -o uid=1000,gid=1000 vagrant /vagrant
解决办法如下(已测试):
降级VirtualBox或者修改以下目录下的文件中的第206行:
C:\HashiCorp\Vagrant\embedded\gems\gems\vagrant-1.9.2\lib\vagrant\util\platform.rb在我的配置文件中,第206行为
“\\?\” + path.gsub(“/”, “\”)
我们只需要把前面的代码删掉,留下
path.gsub(“/”, “\”)
再运行vagrant up即可。
在stackoverflow上有人说自己的配置为:
Before edit: “\?\” + path.gsub(“/”, “\”)
After edit: path.gsub(“/”, “\”)
如果有一样的配置,按照上面的方法操作即可。
注意!
laravel/homestead box项目地址已经不再是原来的