【参考文献】
https://blog.csdn.net/change_from_now/article/details/36668017
https://blog.csdn.net/liuweiballack/article/details/50331909
一、概述
使用应用内结算(In-app Billing)时,我们的应用通过相应的API来访问In-app Billing服务。应用不直接与Google Play服务器通信,而是通过进程间通信(IPC)向Google Play发送结算请求并接收Google Play返回的响应。
In-app Billing在使用之前需要注意以下几点:
- 只能用来销售数字内容,不能销售实体商品
- 应用一旦被购买,无法进行退款服务 Google
- Play不提供内容交付,开发者需要自行交付在应用内购买的数字内容
- 一个应用不能购买另一个应用发布的商品
目前使用的In-app Billing是第3版,需要运行在Android2.2或更高版本,而且要求设备安装了最新版本的Google Play商店。第三版支持两种商品:托管的应用内商品(Managed product)和订阅(Subscription)。
托管的应用商品:由Google Play跟踪和管理其所有权信息的商品,托管的商品在被购买后,必须先向Google Play发送消耗请求进行消耗,然后才能供用户再次购买。
订阅:允许开发者通过按月或按年结算的方式在应用内向用户销售内容、服务或功能,订阅无法消耗。
二、Google Play购买流程
购买开始时,应用需要针对相应的应用内商品发送结算请求。然后,Google Play 会处理此次交易的所有结帐详情,包括请求和验证付款方式以及处理财务交易。
当结帐流程完成后,Google Play 会向应用发送购买详情,例如订单号、订单日期和时间以及所付价格。应用不需要处理任何财务交易,这些事宜完全Google Play负责。
具体流程如下所示:
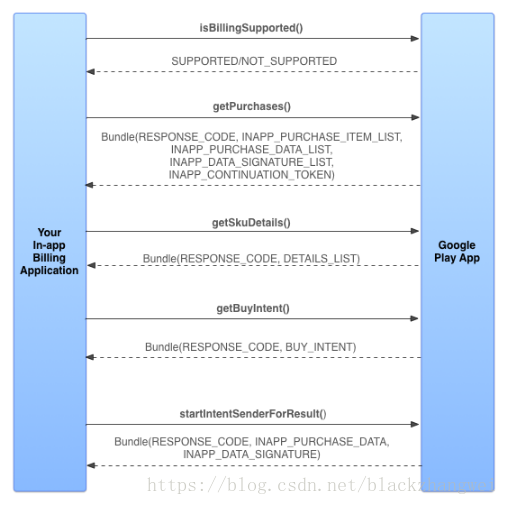
- 应用向Google Play发送isBillingSupported 请求,确定当前使用的应用内结算 API 目标版本是否受支持;
- 启动或用户登录时,向Google Play进行查询,确定用户拥有哪些商品,发送getPurchases 请求;
- 通知用户商品是否可供购买,发送getSkuDetails 请求;
- 提示用户购买,发送getBuyIntent 请求。
三、消耗托管的应用内商品
应用内商品一经售出,就会被视为“被拥有”。处于“被拥有”状态的应用内商品无法再通过 Google Play 购买。必须对“被拥有”的应用内商品发送消耗请求,然后 Google Play 才能再次将其设成可购买状态。消耗应用内商品会将商品切换回“未被拥有”状态并删除之前的购买数据。
通过发送consumePurchase 提出消耗请求。
接入之前的准备
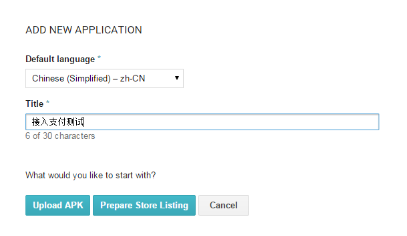
一、在 Google Play Developer Console 创建应用
- 注册一个开发者账号,按提示绑定信用卡并支付25美金;
- 创建一个新的app,填写应用名称;
- 点击上图中的Prepare Store Listing,按照提示填写app的基本信息,信息一定要填写完整,否则无法正常发布应用;
- 在Services & APIs中,找到license key记录下来。
- //Check Google Play
- protected boolean isHaveGooglePlay(Context context, String packageName)
- {
- //Get PackageManager
- final PackageManager packageManager = context.getPackageManager();
- //Get The All Install App Package Name
- List<PackageInfo> pInfo = packageManager.getInstalledPackages(0);
- //Create Name List
- List<String> pName = new ArrayList<String>();
- //Add Package Name into Name List
- if(pInfo != null){
- for(int i=0; i<pInfo.size(); i++){
- String pn = pInfo.get(i).packageName;
- pName.add(pn);
- //Log.v("Package Name", "PackAgeName: = " + pn);
- }
- }
- //Check
- return pName.contains(packageName);
- }
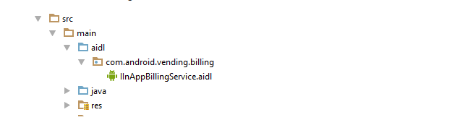
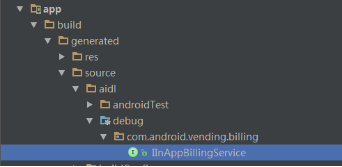
二、添加In-app Billing库文件(以Android Studio为例)
- 在yourSDKpath/extras/google/market_billing/中找到文件IInAppBillingService.aidl,在src/main中创建文件夹aidl,然后创建package‘com.android.vending.billing’ 如图所示
- 点击执行rebuild,在下图所示位置看到IInAppBillingService.java文件,即为导入成功
- 将market_billing/samples/TrivialDrive 中util包整个复制到项目中。
三、声明权限
在AndroidManifest.xml中声明权限:
<uses-permission android:name="com.android.vending.BILLING" />- 1
四、初始化与Google Play的连接
1、初始化IabHelper
IabHelper mHelper;

@Override
public void onCreate(Bundle savedInstanceState) {
    // ...
    String base64EncodedPublicKey;

    // compute your public key and store it in base64EncodedPublicKey
    mHelper = new IabHelper(this, base64EncodedPublicKey);
}- 1
- 2
- 3
- 4
- 5
- 6
- 7
- 8
- 9
- 10
2、调用startSetup方法
mHelper.startSetup(new IabHelper.OnIabSetupFinishedListener() {
@Override
public void onIabSetupFinished(IabResult result) {
    if (!result.isSuccess()) {
        Log.e(TAG, "Problem setting up In-app Billing: " + result);
    }

    if (mHelper == null) {
        return;
    }
}
});- 1
- 2
- 3
- 4
- 5
- 6
- 7
- 8
- 9
- 10
- 11
- 12
3、在Activity的onDestory()中解绑
@Override
protected void onDestroy() {
    super.onDestroy();
    if (mHelper != null) {
        mHelper.dispose();
    }
    mHelper = null;
}- 1
- 2
- 3
- 4
- 5
- 6
- 7
- 8
创建应用内购买的商品
一、上传APK并发布
进入APK面板,上传一个带有签名的APK文件,文件可以上传到PRODUCTION、BETA TESTING、ALPHA TESTING中任意一个中,三者区别见附录1。下面的流程以BETA测试为例。
- 进入BETA TESTING页面,上传带有签名的APK文件;
- 进入Content Rating页面,填写内容分级调查问卷,填完进行评估,根据结果接受评估或者重新填写;
- 进入Pricing&Distribution页面,选择应用是付费还是免费,之后选择产品要发布的国家和地区;
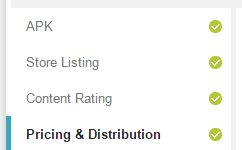
- 确保如图所示四个内容都显示为绿色对勾,即可发布应用;
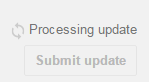
- 点击Publish app发布,如果按钮显示为灰色,可以点击按钮上方的Why can’t I publish?查看还需要添加的内容,应用发布之后需要等候几个小时。在任一页面可以查看App的发布状态,如左图所示为正在发布,右图显示已经发布成功。
二、选择测试方法(BETA测试为例)
待APP发布完成之后,选择一个测试方法,测试方法有三种(详见附录),此处以封闭式Beta测试为例。
- 登录Google Play开发者控制台
- 选择相应应用,点击左侧菜单中的APK
- 选择Beta测试,进入“封闭式测试“
- 创建列表或选择已有列表
- 将Opt-in URL中链接发送给测试人员
- 测试人员需要点击测试连接并选择加入测试
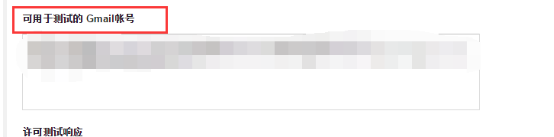
注意:测试时可以选择测试账号是否需要真实支付。比如应用在进行大范围测试时,需要用户可以进行真实的付款操作,而内部测试人员可以进行支付测试,但无需真实付款。可以将内部测试的账号配置到Google Play后台。
配置如下:
将账号填入下图
三、创建商品
- 点击左侧菜单中“In-app Products”,选择”Add new Product“
- In-app Billing第3版支持类型为’Managed product’和’Subscription’的商品
- 配置product ID时要保证product ID是唯一的,product ID也叫做SKU,product ID在查询商品和购买商品时需要用到
- 带商品信息填写完成,将其状态置为active
客户端相关内容实现
客户端实现具体内容详见官方Demo,此处只简单举例说明(示例代码不全,参照Demo)。
一、查询商品详情
通过创建商品时添加的product ID,可以在客户端查询商品的详情,调用queryInventoryAsync(boolean, List, QueryInventoryFinishedListener)
- boolean:是否返回商品详情(此处应设置为true)
- List:要查询的product IDs(SKUs)
- QueryInventoryFinishedListener:监听查询结果
如果查询成功,返回结果封装在Inventory 对象中。
代码示例:
List<String> productNameList = new ArrayList<>();
productNameList.add(PRODUCT_ONE);
productNameList.add(PRODUCT_TWO);
mHelper.queryInventoryAsync(true, productNameList, new IabHelper.QueryInventoryFinishedListener() {
    @Override
    public void onQueryInventoryFinished(IabResult result, Inventory inventory) {
        String price = inventory.getSkuDetails(PRODUCT_ONE).getPrice();
    }
});- 1
- 2
- 3
- 4
- 5
- 6
- 7
- 8
- 9
二、购买托管的商品
购买商品时也需要product ID,调用launchPurchaseFlow(Activity, String, int, OnIabPurchaseFinishedListener, String)
- Activity:调用launchPurchaseFlow的activity
- String:product ID,确保是ID而不是商品名称
- Int:request code值,可以是任何正整数,Google Play会将该值随购买的回复一起返回给Activity的onActivityResult
- OnIabPurchaseFinishedListener:购买请求完成的监听器
- String:字符串标记,惟一的标示购买请求,可以为空。如果你指定一个字符串值,谷歌将返回此字符串以及购买响应。在实际项目中最好由服务器随机生成一个字符串使用
如果购买成功,返回结果封装在Purchase 对象里。
类型为‘Managed product’的商品可以重复购买,但再次购买之前一定要先向Google Play发送商品消耗的请求,否则无法购买。
代码示例:
mHelper.launchPurchaseFlow(this, productId, REQUEST_CODE, new IabHelper.OnIabPurchaseFinishedListener() {
            @Override
            public void onIabPurchaseFinished(IabResult result, Purchase info) {

            }
}, "XXXXXXX");- 1
- 2
- 3
- 4
- 5
- 6
三、购买订阅内容
在购买订阅内容时,调用的方法与购买托管的商品不一样,强行调用同一个方法,会在确认购买时接收到Google Play返回的错误信息。
调用launchSubscriptionPurchaseFlow(Activity, String, int,OnIabPurchaseFinishedListener, String), 参数解释参照2中内容。
代码示例:
mHelper.launchSubscriptionPurchaseFlow(this, productId, REQUEST_CODE, new IabHelper.OnIabPurchaseFinishedListener() {
    @Override
    public void onIabPurchaseFinished(IabResult result, Purchase info) {

}
}, "purchase subscription");- 1
- 2
- 3
- 4
- 5
- 6
四、查询已购买商品
查询用户已经购买的商品,调用queryInventoryAsync(QueryInventoryFinishedListener)
注意:查询已购买商品时,查询到的是当前登录到Google Play上的用户已购买到的商品。
代码实例:
mHelper.queryInventoryAsync(new IabHelper.QueryInventoryFinishedListener() {
    @Override
    public void onQueryInventoryFinished(IabResult result, Inventory inv) {

    }
});- 1
- 2
- 3
- 4
- 5
- 6
五、消耗托管的商品
一旦一个商品被购买,它将被认为是“被拥有”状态,处于该状态下的商品无法被同一用户再次购买。因此需要发送根据需求向Google Play发送消耗请求,调用consumeAsync(Purchase, OnConsumeFinishedListener)
- Purchase:要消耗的商品
- OnConsumeFinishedListener:消耗完成之后的监听
代码示例:
mHelper.consumeAsync(purchase, new IabHelper.OnConsumeFinishedListener() {
        @Override
        public void onConsumeFinished(Purchase purchase, IabResult result) {

        }
});- 1
- 2
- 3
- 4
- 5
- 6
测试注意事项
由于配置比较复杂,在项目测试的时候,如果遇到“应用无法购买”的问题,请检查以下几点是否完成:
- 确保上传了带有签名的APK文件;
- 确保设备上安装了带有签名的APK,而不是调试版;
- 确保在测试中添加了测试人员;
- 确保设备登录的账号属于测试账号;
- 确保测试账号激活了测试链接(最容易忽略);
- 确保设备上的应用版本号和版本名称与Google开发者后台上传的APK一致;
- 确保商品状态为Active。
http://developer.android.com/intl/zh-cn/google/play/billing/index.html
http://developer.android.com/intl/zh-cn/training/in-app-billing/index.html
上文只是简单介绍说明,下文会详细说明
(1)Google Play Service
下载的Google Play Service包里会有一个库工程
/**
 * Check the device to make sure it has the Google Play Services APK.If
 * it doesn't, display a dialog that allows users to download the APK from
 * the Google Play Store or enable it in the device's system settings
 */
private boolean checkPlayServices()
{
    int resultCode = GooglePlayServicesUtil.isGooglePlayServicesAvailable(this);
    if(resultCode != ConnectionResult.SUCCESS)
    {
        if(GooglePlayServicesUtil.isUserRecoverableError(resultCode))
        {
            GooglePlayServicesUtil.getErrorDialog(resultCode, this,
                    PLAY_SERVICES_RESOLUTION_REQUEST).show();
        }
        else
        {
            Log.i(TAG, "This device is not supported");
            finish();
        }
        return false;
    }
    return true;
}
如果当前设备的Google Service不可用,就会弹出提示,引导用户去设置安装。如果此设备不支持的话,就也不需要检测Google billing是否可用了。多说一句,Google Play Service可以做很多事的,如果觉得只用上面的功能太简单的话,就可以考虑把应用自动更新也加上,当你在Google Play上传了新版程序后,Google Play会帮你提示用户更新程序。还有一个比较好玩的就是如果引入了这个库工程后,就可以加GCM了(Google Cloud Messaging),就是消息推送推送功能,当然这个比较麻烦,有兴趣的可以去加加看。
(2)遍历包名
Google Play的程序包名是"com.android.vending",运行在设备上的Google Play Service的包名是"com.google.android.gms",可以在程序启动的时候遍历下设备上的包名,如果没有这两个东西就引导用户去安装。
遍历包名方法
//Check Google Play
protected boolean isHaveGooglePlay(Context context, String packageName)
{
    //Get PackageManager
    final PackageManager packageManager = context.getPackageManager();

    //Get The All Install App Package Name
    List<PackageInfo> pInfo = packageManager.getInstalledPackages(0);

    //Create Name List
    List<String> pName = new ArrayList<String>();

    //Add Package Name into Name List
    if(pInfo != null){
        for(int i=0; i<pInfo.size(); i++){
            String pn = pInfo.get(i).packageName;
            pName.add(pn);

            //Log.v("Package Name", "PackAgeName: = " + pn);
        }
    }

    //Check
    return pName.contains(packageName);
}
提示安装方法
Uri uri = Uri.parse("market://details?id=" + "要安装程序的包名");
            Intent it = new Intent(Intent.ACTION_VIEW, uri);
            startActivity(it);
上面这个方法会打开你手机上的应用商店,定位到要安装的程序。
不过还是推荐用Google Play Service来检测,貌似第二种,即使有的用户装了Google Play(像国内用户),也不支持Google Play Service的。
3.添加代码(终于要加支付代码了)
把上篇下载的samples里util的代码全部拷到你的工程里,可以新建一个包,放到里面。

这个说明一下,其实这个例子的代码还是不错的,本着天下代码一大抄和拿来主义,就直接拿来用吧!当然如果你觉得这个代码写的不好,或者不适用你的工程,你就可以依据文档自己写适用的代码。当然文档里说过,为了防止别人破解你的游戏,最好把里面的变量和方法都改下名字,毕竟这里的代码任何人都看得到。我的做法是照搬过来了,只是把IabHelper.java改造了下,因为这个是整个支付的关键,其他都是辅助的,可以不管。
把这里的代码拷完,把该import的都import了,你就可以照samples中的代码开写自己的支付了。针对单机游戏,就需要考虑这个代码改造和本地的验证,加密了。针对网络游戏就要简单了。因为我其实对java不太熟悉 ,所以单机的加密,base验证,混淆什么的就不做介绍了。下面主要说网络游戏。
(1)IabHelper.java
这个是支付的关键代码,其中已经把设置billing,商品查询,商品购买,商品回调,商品验证以及回调方法都写好了,你直接参照samples用就可以了。
01.设置billing
就是开篇所说的绑定ServiceConnection到IInAppBillingService。功能很完善,包括成功和失败都有回调,还有各种异常。在你程序的启动Activity里检测完设备是否Google Play Service后,就可以new一个IabHelper,来调用这个方法,根据不同的回调里做相应的处理。
/**
     * Starts the setup process. This will start up the setup process asynchronously.
     * You will be notified through the listener when the setup process is complete.
     * This method is safe to call from a UI thread.
     *
     * @param listener The listener to notify when the setup process is complete.
     */
    public void startSetup(final OnIabSetupFinishedListener listener) {
        // If already set up, can't do it again.
        checkNotDisposed();
        if (mSetupDone) throw new IllegalStateException("IAB helper is already set up.");

        // Connection to IAB service
        logDebug("Starting in-app billing setup.");
        mServiceConn = new ServiceConnection() {
            @Override
            public void onServiceDisconnected(ComponentName name) {
                logDebug("Billing service disconnected.");
                mService = null;
            }

            @Override
            public void onServiceConnected(ComponentName name, IBinder service) {
                if (mDisposed) return;
                logDebug("Billing service connected.");
                mService = IInAppBillingService.Stub.asInterface(service);
                String packageName = mContext.getPackageName();
                try {
                    logDebug("Checking for in-app billing 3 support.");

                    // check for in-app billing v3 support
                    int response = mService.isBillingSupported(3, packageName, ITEM_TYPE_INAPP);
                    if (response != BILLING_RESPONSE_RESULT_OK) {
                        if (listener != null) listener.onIabSetupFinished(new IabResult(response,
                                "Error checking for billing v3 support."));

                        // if in-app purchases aren't supported, neither are subscriptions.
                        mSubscriptionsSupported = false;
                        return;
                    }
                    logDebug("In-app billing version 3 supported for " + packageName);

                    // check for v3 subscriptions support
                    response = mService.isBillingSupported(3, packageName, ITEM_TYPE_SUBS);
                    if (response == BILLING_RESPONSE_RESULT_OK) {
                        logDebug("Subscriptions AVAILABLE.");
                        mSubscriptionsSupported = true;
                    }
                    else {
                        logDebug("Subscriptions NOT AVAILABLE. Response: " + response);
                    }

                    mSetupDone = true;
                }
                catch (RemoteException e) {
                    if (listener != null) {
                        listener.onIabSetupFinished(new IabResult(IABHELPER_REMOTE_EXCEPTION,
                                                    "RemoteException while setting up in-app billing."));
                    }
                    e.printStackTrace();
                    return;
                }

                if (listener != null) {
                    listener.onIabSetupFinished(new IabResult(BILLING_RESPONSE_RESULT_OK, "Setup successful."));
                }
            }
        };

        Intent serviceIntent = new Intent("com.android.vending.billing.InAppBillingService.BIND");
        serviceIntent.setPackage("com.android.vending");
        if (!mContext.getPackageManager().queryIntentServices(serviceIntent, 0).isEmpty()) {
            // service available to handle that Intent
            mContext.bindService(serviceIntent, mServiceConn, Context.BIND_AUTO_CREATE);
        }
        else {
            // no service available to handle that Intent
            if (listener != null) {
                listener.onIabSetupFinished(
                        new IabResult(BILLING_RESPONSE_RESULT_BILLING_UNAVAILABLE,
                        "Billing service unavailable on device."));
            }
        }
    }
simple 里面的代码
// Create the helper, passing it our context and the public key to verify signatures with
        Log.d(TAG, "Creating IAB helper.");
        mHelper = new IabHelper(this, base64EncodedPublicKey);


        // enable debug logging (for a production application, you should set this to false).
        mHelper.enableDebugLogging(true);


        // Start setup. This is asynchronous and the specified listener
        // will be called once setup completes.
        Log.d(TAG, "Starting setup.");
        mHelper.startSetup(new IabHelper.OnIabSetupFinishedListener() {
            public void onIabSetupFinished(IabResult result) {
                Log.d(TAG, "Setup finished.");


                if (!result.isSuccess()) {
                    // Oh noes, there was a problem.
                    complain("Problem setting up in-app billing: " + result);
                    return;
                }


                // Have we been disposed of in the meantime? If so, quit.
                if (mHelper == null) return;


                // IAB is fully set up. Now, let's get an inventory of stuff we own.
                Log.d(TAG, "Setup successful. Querying inventory.");
                mHelper.queryInventoryAsync(mGotInventoryListener);
            }
        });
    }
02.查询商品
在setup方法的最后有一个
mHelper.queryInventoryAsync(mGotInventoryListener);
是用来查询你目前拥有的商品的。其中的回调的代码如下
// Listener that's called when we finish querying the items and subscriptions we own
    IabHelper.QueryInventoryFinishedListener mGotInventoryListener = new IabHelper.QueryInventoryFinishedListener() {
        public void onQueryInventoryFinished(IabResult result, Inventory inventory) {
            Log.d(TAG, "Query inventory finished.");

            // Have we been disposed of in the meantime? If so, quit.
            if (mHelper == null) return;

            // Is it a failure?
            if (result.isFailure()) {
                complain("Failed to query inventory: " + result);
                return;
            }

            Log.d(TAG, "Query inventory was successful.");

            /*
             * Check for items we own. Notice that for each purchase, we check
             * the developer payload to see if it's correct! See
             * verifyDeveloperPayload().
             */

            // Do we have the premium upgrade?
            Purchase premiumPurchase = inventory.getPurchase(SKU_PREMIUM);
            mIsPremium = (premiumPurchase != null && verifyDeveloperPayload(premiumPurchase));
            Log.d(TAG, "User is " + (mIsPremium ? "PREMIUM" : "NOT PREMIUM"));

            // Do we have the infinite gas plan?
            Purchase infiniteGasPurchase = inventory.getPurchase(SKU_INFINITE_GAS);
            mSubscribedToInfiniteGas = (infiniteGasPurchase != null &&
                    verifyDeveloperPayload(infiniteGasPurchase));
            Log.d(TAG, "User " + (mSubscribedToInfiniteGas ? "HAS" : "DOES NOT HAVE")
                        + " infinite gas subscription.");
            if (mSubscribedToInfiniteGas) mTank = TANK_MAX;

            // Check for gas delivery -- if we own gas, we should fill up the tank immediately
            Purchase gasPurchase = inventory.getPurchase(SKU_GAS);
            if (gasPurchase != null && verifyDeveloperPayload(gasPurchase)) {
                Log.d(TAG, "We have gas. Consuming it.");
                mHelper.consumeAsync(inventory.getPurchase(SKU_GAS), mConsumeFinishedListener);
                return;
            }

            updateUi();
            setWaitScreen(false);
            Log.d(TAG, "Initial inventory query finished; enabling main UI.");
        }
    };
因为目前我们的内购商品是可重复购买的,所以在成功查询到我们已经购买的商品后进行了消耗商品操作。消耗的代码在这里
// Check for gas delivery -- if we own gas, we should fill up the tank immediately
Purchase gasPurchase = inventory.getPurchase(SKU_GAS);
if (gasPurchase != null && verifyDeveloperPayload(gasPurchase)) {
    Log.d(TAG, "We have gas. Consuming it.");
    mHelper.consumeAsync(inventory.getPurchase(SKU_GAS), mConsumeFinishedListener);
    return;
}
在讲消耗前,先解释下以上这么操作的原因。在内购商品那里讲过,如果是设置的是可重复商品,当你在成功购买这个商品后是需要主动消耗的,只有消耗成功后才可以再次购买。可能有些人觉得这种设定不好,我的商品本来就是可重复购买的,为什么还要在买成功后通知Google Play消耗掉商品呢(可能本身商品没用消耗掉,这只是一种叫法)?我个人觉得这样设定,第一,可以避免用户重复下单购买,第二,可以保证每笔消费订单的唯一。有了以上两点就可以很好地处理漏单。 so,上面代码在成功设置billing后,第一个操作就是查询拥有的商品,就是做的漏单处理。因为支付过程其实就是你的应用程序----->Google Play程序(通过Google Play Service)------>Google服务器------->Google Play程序(通过Google Play Service)------>你的应用程序。这样一个交互过程,还需要网络支持,所以每次支付操作不会保证百分百成功,这样就会产生漏单现象,就是用户付费成功了,但是Google Play在通知你的应用程序支付结果时,因为某些原因断掉了,这样你的程序就不知道支付是否操作成功了,so,只好在下次进游戏时查查有没有已经购买的,但是还没有消耗的商品,有的话就消耗掉,然后再把商品发送给用户。因为这个商品在消耗之前,用户是无法再次购买的,所以单个用户就只会对应单一的漏单,不会有重复的漏单。这些信息都是存到Google服务器上的,直接调代码里的查询代码就可以了。
02.消耗商品
消耗商品会在两个地方出现。一,查询商品中所说的漏单中,二,就是你每次购买成功后的消耗。消耗商品也有一个回调,如下
// Called when consumption is complete
   IabHelper.OnConsumeFinishedListener mConsumeFinishedListener = new IabHelper.OnConsumeFinishedListener() {
       public void onConsumeFinished(Purchase purchase, IabResult result) {
           Log.d(TAG, "Consumption finished. Purchase: " + purchase + ", result: " + result);

           // if we were disposed of in the meantime, quit.
           if (mHelper == null) return;

           // We know this is the "gas" sku because it's the only one we consume,
           // so we don't check which sku was consumed. If you have more than one
           // sku, you probably should check...
           if (result.isSuccess()) {
               // successfully consumed, so we apply the effects of the item in our
               // game world's logic, which in our case means filling the gas tank a bit
               Log.d(TAG, "Consumption successful. Provisioning.");
               mTank = mTank == TANK_MAX ? TANK_MAX : mTank + 1;
               saveData();
               alert("You filled 1/4 tank. Your tank is now " + String.valueOf(mTank) + "/4 full!");
           }
           else {
               complain("Error while consuming: " + result);
           }
           updateUi();
           setWaitScreen(false);
           Log.d(TAG, "End consumption flow.");
       }
   };
代码比较简单,针对自己的游戏逻辑,在里面稍做改动即可。
03.购买商品
按重要程度,购买商品应该排在第一位的,只是按支付流程走的话,购买商品却不是第一位,这里就根据支付流程来走吧。
/**
    * Initiate the UI flow for an in-app purchase. Call this method to initiate an in-app purchase,
    * which will involve bringing up the Google Play screen. The calling activity will be paused while
    * the user interacts with Google Play, and the result will be delivered via the activity's
    * {@link android.app.Activity#onActivityResult} method, at which point you must call
    * this object's {@link #handleActivityResult} method to continue the purchase flow. This method
    * MUST be called from the UI thread of the Activity.
    *
    * @param act The calling activity.
    * @param sku The sku of the item to purchase.
    * @param itemType indicates if it's a product or a subscription (ITEM_TYPE_INAPP or ITEM_TYPE_SUBS)
    * @param requestCode A request code (to differentiate from other responses --
    *     as in {@link android.app.Activity#startActivityForResult}).
    * @param listener The listener to notify when the purchase process finishes
    * @param extraData Extra data (developer payload), which will be returned with the purchase data
    *     when the purchase completes. This extra data will be permanently bound to that purchase
    *     and will always be returned when the purchase is queried.
    */
   public void launchPurchaseFlow(Activity act, String sku, String itemType, int requestCode,
                       OnIabPurchaseFinishedListener listener, String extraData) {
       checkNotDisposed();
       checkSetupDone("launchPurchaseFlow");
       flagStartAsync("launchPurchaseFlow");
       IabResult result;

       if (itemType.equals(ITEM_TYPE_SUBS) && !mSubscriptionsSupported) {
           IabResult r = new IabResult(IABHELPER_SUBSCRIPTIONS_NOT_AVAILABLE,
                   "Subscriptions are not available.");
           flagEndAsync();
           if (listener != null) listener.onIabPurchaseFinished(r, null);
           return;
       }

       try {
           logDebug("Constructing buy intent for " + sku + ", item type: " + itemType);
           Bundle buyIntentBundle = mService.getBuyIntent(3, mContext.getPackageName(), sku, itemType, extraData);
           int response = getResponseCodeFromBundle(buyIntentBundle);
           if (response != BILLING_RESPONSE_RESULT_OK) {
               logError("Unable to buy item, Error response: " + getResponseDesc(response));
               flagEndAsync();
               result = new IabResult(response, "Unable to buy item");
               if (listener != null) listener.onIabPurchaseFinished(result, null);
               return;
           }

           PendingIntent pendingIntent = buyIntentBundle.getParcelable(RESPONSE_BUY_INTENT);
           logDebug("Launching buy intent for " + sku + ". Request code: " + requestCode);
           mRequestCode = requestCode;
           mPurchaseListener = listener;
           mPurchasingItemType = itemType;
           act.startIntentSenderForResult(pendingIntent.getIntentSender(),
                                          requestCode, new Intent(),
                                          Integer.valueOf(0), Integer.valueOf(0),
                                          Integer.valueOf(0));
       }
       catch (SendIntentException e) {
           logError("SendIntentException while launching purchase flow for sku " + sku);
           e.printStackTrace();
           flagEndAsync();

           result = new IabResult(IABHELPER_SEND_INTENT_FAILED, "Failed to send intent.");
           if (listener != null) listener.onIabPurchaseFinished(result, null);
       }
       catch (RemoteException e) {
           logError("RemoteException while launching purchase flow for sku " + sku);
           e.printStackTrace();
           flagEndAsync();

           result = new IabResult(IABHELPER_REMOTE_EXCEPTION, "Remote exception while starting purchase flow");
           if (listener != null) listener.onIabPurchaseFinished(result, null);
       }
   }
以上是IabHelper中的支付购买代码,其中包括了重复购买商品类型和一次购买商品类型的处理。主要的代码是try里面的这一块
try {
    logDebug("Constructing buy intent for " + sku + ", item type: " + itemType);
    Bundle buyIntentBundle = mService.getBuyIntent(3, mContext.getPackageName(), sku, itemType, extraData);
    int response = getResponseCodeFromBundle(buyIntentBundle);
    if (response != BILLING_RESPONSE_RESULT_OK) {
        logError("Unable to buy item, Error response: " + getResponseDesc(response));
        flagEndAsync();
        result = new IabResult(response, "Unable to buy item");
        if (listener != null) listener.onIabPurchaseFinished(result, null);
        return;
    }

    PendingIntent pendingIntent = buyIntentBundle.getParcelable(RESPONSE_BUY_INTENT);
    logDebug("Launching buy intent for " + sku + ". Request code: " + requestCode);
    mRequestCode = requestCode;
    mPurchaseListener = listener;
    mPurchasingItemType = itemType;
    act.startIntentSenderForResult(pendingIntent.getIntentSender(),
                                   requestCode, new Intent(),
                                   Integer.valueOf(0), Integer.valueOf(0),
                                   Integer.valueOf(0));
}
一,调用In-app Billing中的getBuyIntent方法,会传几个参数,第一个参数 3 代表的是当前所用的支付API的版本,第二个参数是你的包名,第三个参数就是你内购商品的ID,第四个参数是这次购买的类型,“inapp”和"subs",我们用的是第一个,第二个是只能购买一次的类型,第五个参数是订单号。需要讲的只有第三个和第五个参数。
第三个参数,商品Id,就是你在Google开发者后台上设置的内购商品的名字。每个商品的名字要唯一。推荐用商品名字加下划线加价格的组合,比如"crystal_0.99",这样你一看名字就知道这个商品的价格是0.99美金,商品是水晶。
第五个参数,订单号。如果本地有支付服务器的话,这个订单号可以由支付服务器生成,然后再传给客户端,这样的话本地服务器也可以记录下订单信息,方便以后的查询和操作。订单号的格式推荐用时间戳加商品名字和价格,这样也可以容易看出订单信息。这个订单号会传给Google,购买成功后Google会原样传给你,所以也可以在其中加个标示信息,可以做下比对。可以用来存储开发人员想要存储数据的
二,在getBuyIntent成功后,返回的Bundle中会有个BILLING_RESPONSE_RESULT_OK返回码,这就代表成功了。然后再用这个Bundle得到一个PendingIntent.如上面代码演示。
三,进行支付
act.startIntentSenderForResult(pendingIntent.getIntentSender(),
                               requestCode, new Intent(),
                               Integer.valueOf(0), Integer.valueOf(0),
                               Integer.valueOf(0));
这个方法是Activity中的一个方法,调用这个方法后,回有一个回调来接收结果。除了第一个PengdingIntent参数外,其他的可以按参数类型随便写。
四,支付完成
/**
    * Handles an activity result that's part of the purchase flow in in-app billing. If you
    * are calling {@link #launchPurchaseFlow}, then you must call this method from your
    * Activity's {@link android.app.Activity@onActivityResult} method. This method
    * MUST be called from the UI thread of the Activity.
    *
    * @param requestCode The requestCode as you received it.
    * @param resultCode The resultCode as you received it.
    * @param data The data (Intent) as you received it.
    * @return Returns true if the result was related to a purchase flow and was handled;
    *     false if the result was not related to a purchase, in which case you should
    *     handle it normally.
    */
   public boolean handleActivityResult(int requestCode, int resultCode, Intent data) {
       IabResult result;
       if (requestCode != mRequestCode) return false;

       checkNotDisposed();
       checkSetupDone("handleActivityResult");

       // end of async purchase operation that started on launchPurchaseFlow
       flagEndAsync();

       if (data == null) {
           logError("Null data in IAB activity result.");
           result = new IabResult(IABHELPER_BAD_RESPONSE, "Null data in IAB result");
           if (mPurchaseListener != null) mPurchaseListener.onIabPurchaseFinished(result, null);
           return true;
       }

       int responseCode = getResponseCodeFromIntent(data);
       String purchaseData = data.getStringExtra(RESPONSE_INAPP_PURCHASE_DATA);
       String dataSignature = data.getStringExtra(RESPONSE_INAPP_SIGNATURE);

       if (resultCode == Activity.RESULT_OK && responseCode == BILLING_RESPONSE_RESULT_OK) {
           logDebug("Successful resultcode from purchase activity.");
           logDebug("Purchase data: " + purchaseData);
           logDebug("Data signature: " + dataSignature);
           logDebug("Extras: " + data.getExtras());
           logDebug("Expected item type: " + mPurchasingItemType);

           if (purchaseData == null || dataSignature == null) {
               logError("BUG: either purchaseData or dataSignature is null.");
               logDebug("Extras: " + data.getExtras().toString());
               result = new IabResult(IABHELPER_UNKNOWN_ERROR, "IAB returned null purchaseData or dataSignature");
               if (mPurchaseListener != null) mPurchaseListener.onIabPurchaseFinished(result, null);
               return true;
           }

           Purchase purchase = null;
           try {
               purchase = new Purchase(mPurchasingItemType, purchaseData, dataSignature);
               String sku = purchase.getSku();

               // Verify signature
               if (!Security.verifyPurchase(mSignatureBase64, purchaseData, dataSignature)) {
                   logError("Purchase signature verification FAILED for sku " + sku);
                   result = new IabResult(IABHELPER_VERIFICATION_FAILED, "Signature verification failed for sku " + sku);
                   if (mPurchaseListener != null) mPurchaseListener.onIabPurchaseFinished(result, purchase);
                   return true;
               }
               logDebug("Purchase signature successfully verified.");
           }
           catch (JSONException e) {
               logError("Failed to parse purchase data.");
               e.printStackTrace();
               result = new IabResult(IABHELPER_BAD_RESPONSE, "Failed to parse purchase data.");
               if (mPurchaseListener != null) mPurchaseListener.onIabPurchaseFinished(result, null);
               return true;
           }

           if (mPurchaseListener != null) {
               mPurchaseListener.onIabPurchaseFinished(new IabResult(BILLING_RESPONSE_RESULT_OK, "Success"), purchase);
           }
       }
       else if (resultCode == Activity.RESULT_OK) {
           // result code was OK, but in-app billing response was not OK.
           logDebug("Result code was OK but in-app billing response was not OK: " + getResponseDesc(responseCode));
           if (mPurchaseListener != null) {
               result = new IabResult(responseCode, "Problem purchashing item.");
               mPurchaseListener.onIabPurchaseFinished(result, null);
           }
       }
       else if (resultCode == Activity.RESULT_CANCELED) {
           logDebug("Purchase canceled - Response: " + getResponseDesc(responseCode));
           result = new IabResult(IABHELPER_USER_CANCELLED, "User canceled.");
           if (mPurchaseListener != null) mPurchaseListener.onIabPurchaseFinished(result, null);
       }
       else {
           logError("Purchase failed. Result code: " + Integer.toString(resultCode)
                   + ". Response: " + getResponseDesc(responseCode));
           result = new IabResult(IABHELPER_UNKNOWN_PURCHASE_RESPONSE, "Unknown purchase response.");
           if (mPurchaseListener != null) mPurchaseListener.onIabPurchaseFinished(result, null);
       }
       return true;
   }

   public Inventory queryInventory(boolean querySkuDetails, List<String> moreSkus) throws IabException {
       return queryInventory(querySkuDetails, moreSkus, null);
   }
支付结果返回后会调用上面这个方法,对于支付失败和其中的错误,代码写的很清楚,可以自行处理。关于上面的这个方法,这里简单说一下流程,看看这个方法是从哪调用的。首先去Sample里的MainActivity找到那个 onActivityResult 方法
protected void onActivityResult(int requestCode, int resultCode, Intent data) {
    Log.d(TAG, "onActivityResult(" + requestCode + "," + resultCode + "," + data);
    if (mHelper == null) return;

    // Pass on the activity result to the helper for handling
    if (!mHelper.handleActivityResult(requestCode, resultCode, data)) {
        // not handled, so handle it ourselves (here's where you'd
        // perform any handling of activity results not related to in-app
        // billing...
        super.onActivityResult(requestCode, resultCode, data);
    }
    else {
        Log.d(TAG, "onActivityResult handled by IABUtil.");
    }
}
这个方法会在支付结束,你的程序重新回到前台的时候调用。在这个方法中可以看到
!mHelper.handleActivityResult(requestCode, resultCode, data)这里调用了 IabHelper 里的 handleActivityResult 方法。然后再到此方法里会看到调用 PurchseListener 的地方
if (mPurchaseListener != null) {
                mPurchaseListener.onIabPurchaseFinished(new IabResult(BILLING_RESPONSE_RESULT_OK, "Success"), purchase);
            }
至此就可以知道 OnIabPurchaseFinishedListener 是从哪调用的了。然后在 handleActivityResult 方法里还可以看到这段代码
// Verify signature
               if (!Security.verifyPurchase(mSignatureBase64, purchaseData, dataSignature)) {
                   logError("Purchase signature verification FAILED for sku " + sku);
                   result = new IabResult(IABHELPER_VERIFICATION_FAILED, "Signature verification failed for sku " + sku);
                   if (mPurchaseListener != null) mPurchaseListener.onIabPurchaseFinished(result, purchase);
                   return true;
               }
               logDebug("Purchase signature successfully verified.");
也是有童鞋在问,我购买结束后,Google Play都提示购买成功了,但是在 OnIabPurchaseFinishedListener 却还是失败的,失败的信息就是
Purchase signature verification FAILED for sku xxx
这个错误信息就是从这里输出的,至于为何出现这个错误,就是因为 Sample 里的本地验证失败了(其实已经购买成功了)。出现这个比较多的情况就是因为使用Google保留测试ID:
android.test.purchased
因为在 Security.java 中 会验证失败
public static boolean verifyPurchase(String base64PublicKey, String signedData, String signature) {
     if (TextUtils.isEmpty(signedData) || TextUtils.isEmpty(base64PublicKey) ||
             TextUtils.isEmpty(signature)) {
         Log.e(TAG, "Purchase verification failed: missing data.");
         return false;
     }

     PublicKey key = Security.generatePublicKey(base64PublicKey);
     return Security.verify(key, signedData, signature);
 }
或者是 base64PublicKey 为空,又或者是 signature 是空,就会验证失败。
解决方法:
1.使用本地验证。就去看看 Security 中的方法,然后仔细检查看是哪里出问题了。
2.使用服务器验证。就去改造下 IabHelper 中的 handleActivityResult f方法,不再使用本地的 Security 做验证,如何操作可以看下面的内容。
Sample里的Security还有一个坑,就是在你成功购买商品后,但是没有消耗,下次再登录游戏进行查询的时候会报个错误
Failed to query inventory: IabResult: Error refreshing inventory (querying owned items). (response: -1003:Purchase signature verification failed)
之所以出现这个错误,是因为在查询的时候,也会运行 Security 中的 verifyPurchase 方法。追本溯源,一步一步的查找代码,会在 IabHelper 中的
int queryPurchases(Inventory inv, String itemType) throws JSONException, RemoteException {... ...}
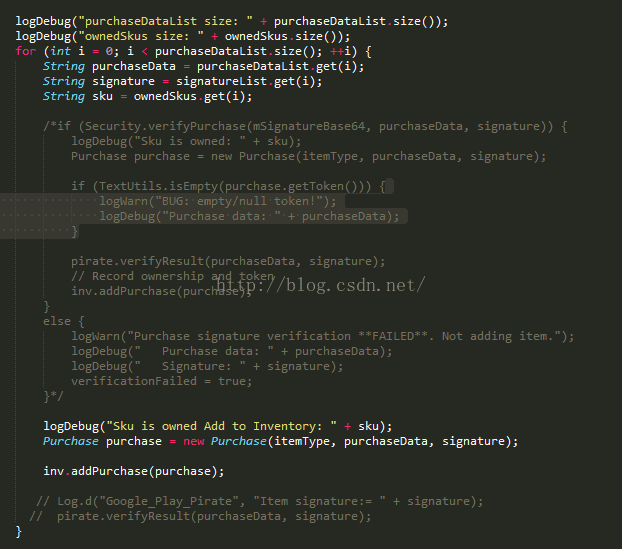
如果是服务器做验证的话,就如上图示,把验证注释掉,如果是本地验证的话,就去查找 Security 中的 verifyPurchase 方法,看看哪里出错了,哪里传的值为空。
注意
把验证代码注释掉的时候记得把生成 Purchase 的那两行代码提出来,否则你在查询的时候不会返回查询到的商品。仔细看Sample的代码的话,你会发现其实很多回调监听都是从IabHelper中调用的。两行代码如下:
Purchase purchase = new Purchase(itemType, purchaseData, signature);

                inv.addPurchase(purchase);
根据查询到的数据生成一个 purchase,然后把这个purchase 加入到 Inventory中,这样你就可以在查询成功的时候通过调用
inventory.getPurchase 方法来获取已经购买但是未消耗的商品了。
现在来关注支付成功后的结果验证。在上面方法中会从支付结果的数据中取得两个json数据。
int responseCode = getResponseCodeFromIntent(data);
String purchaseData = data.getStringExtra(RESPONSE_INAPP_PURCHASE_DATA);
String dataSignature = data.getStringExtra(RESPONSE_INAPP_SIGNATURE);
就是purchaseData和dataSignature。验证支付就是需要这两个参数和publicKey,例子里的验证方法是写在Security.java里的。里面写了三个方法来完成支付结果的验证。
对于有本地支付服务器的游戏来说,这个操作就可以放到服务端了,客户端只需要把purchaseData和dataSignature传给支付服务器即可。然后有支付服务器把验证结果传给客户端,再做成功和失败的处理。成功后则要进行消耗商品的操作。对于没有支付服务器的游戏来说,我个人觉得本地的操作要达到安全,还是比较难的。不过对于服务器验证支付结果,也是存在风险的,只是风险要小。
/**
    * Verifies that the data was signed with the given signature, and returns
    * the verified purchase. The data is in JSON format and signed
    * with a private key. The data also contains the {@link PurchaseState}
    * and product ID of the purchase.
    * @param base64PublicKey the base64-encoded public key to use for verifying.
    * @param signedData the signed JSON string (signed, not encrypted)
    * @param signature the signature for the data, signed with the private key
    */
   public static boolean verifyPurchase(String base64PublicKey, String signedData, String signature) {
       if (TextUtils.isEmpty(signedData) || TextUtils.isEmpty(base64PublicKey) ||
               TextUtils.isEmpty(signature)) {
           Log.e(TAG, "Purchase verification failed: missing data.");
           return false;
       }

       PublicKey key = Security.generatePublicKey(base64PublicKey);
       return Security.verify(key, signedData, signature);
   }

   /**
    * Generates a PublicKey instance from a string containing the
    * Base64-encoded public key.
    *
    * @param encodedPublicKey Base64-encoded public key
    * @throws IllegalArgumentException if encodedPublicKey is invalid
    */
   public static PublicKey generatePublicKey(String encodedPublicKey) {
       try {
           byte[] decodedKey = Base64.decode(encodedPublicKey);
           KeyFactory keyFactory = KeyFactory.getInstance(KEY_FACTORY_ALGORITHM);
           return keyFactory.generatePublic(new X509EncodedKeySpec(decodedKey));
       } catch (NoSuchAlgorithmException e) {
           throw new RuntimeException(e);
       } catch (InvalidKeySpecException e) {
           Log.e(TAG, "Invalid key specification.");
           throw new IllegalArgumentException(e);
       } catch (Base64DecoderException e) {
           Log.e(TAG, "Base64 decoding failed.");
           throw new IllegalArgumentException(e);
       }
   }

   /**
    * Verifies that the signature from the server matches the computed
    * signature on the data.  Returns true if the data is correctly signed.
    *
    * @param publicKey public key associated with the developer account
    * @param signedData signed data from server
    * @param signature server signature
    * @return true if the data and signature match
    */
   public static boolean verify(PublicKey publicKey, String signedData, String signature) {
       Signature sig;
       try {
           sig = Signature.getInstance(SIGNATURE_ALGORITHM);
           sig.initVerify(publicKey);
           sig.update(signedData.getBytes());
           if (!sig.verify(Base64.decode(signature))) {
               Log.e(TAG, "Signature verification failed.");
               return false;
           }
           return true;
       } catch (NoSuchAlgorithmException e) {
           Log.e(TAG, "NoSuchAlgorithmException.");
       } catch (InvalidKeyException e) {
           Log.e(TAG, "Invalid key specification.");
       } catch (SignatureException e) {
           Log.e(TAG, "Signature exception.");
       } catch (Base64DecoderException e) {
           Log.e(TAG, "Base64 decoding failed.");
       }
       return false;
   }
PublicKey: base64EncodedPublicKey
这个PublicKey是用来验证支付结果的,所以这绝对是个Key,不可以让其他人知道的,这个Key放到支付服务器端,本地不存。如果是拷贝Sample里的代码使用,会发现在 new IabHelper 的时候会在构造方法里传递这个
其实Sample只是用这个 PublicKey 做本地验证的,和初始化无关,你仔细看下 IabHelper 源码就知道了,所以本地不存这个 PublicKey,当 new IabHelper 的时候,可以随便传个字符串,也可把 IabHelper 构造方法改一下,不再传这个值。
samples里的这段代码写的很有意思,能看出笑点不?
单机游戏的话,想办法把这个key存到某个地方加个密什么的,最好不要直接写到代码里。(其实对于单机游戏,如果没有自己的服务器来验证支付结果,本地不管如何操作,都是很容易被破解的,如果游戏比较大卖,推荐自己写个支付服务器端来验证支付结果)
/* base64EncodedPublicKey should be YOUR APPLICATION'S PUBLIC KEY
 * (that you got from the Google Play developer console). This is not your
 * developer public key, it's the *app-specific* public key.
 *
 * Instead of just storing the entire literal string here embedded in the
 * program,  construct the key at runtime from pieces or
 * use bit manipulation (for example, XOR with some other string) to hide
 * the actual key.  The key itself is not secret information, but we don't
 * want to make it easy for an attacker to replace the public key with one
 * of their own and then fake messages from the server.
 */
String base64EncodedPublicKey = "CONSTRUCT_YOUR_KEY_AND_PLACE_IT_HERE";

// Some sanity checks to see if the developer (that's you!) really followed the
// instructions to run this sample (don't put these checks on your app!)
if (base64EncodedPublicKey.contains("CONSTRUCT_YOUR")) {
    throw new RuntimeException("Please put your app's public key in MainActivity.java. See README.");
}
if (getPackageName().startsWith("com.example")) {
    throw new RuntimeException("Please change the sample's package name! See README.");
}
本地服务器验证补充:
关于支付结果的验证,本地服务器除了用publicKey做签名验证外,还可以到Google后台请求下支付结果验证。这个需要本地服务器和Google服务器交互通信。可以参考这个文档。

参考地址:
https://developer.android.google.cn/google/play/developer-api.html#publishing_api_overview
不过对于国内的开发者而言,在Google日益被封锁加重的情况下,在与Google服务器通信上绝对会有障碍,因为通信阻碍,会导致你验证失败,所以这个功能可选,有兴趣的可以添加上。
补充1:
如果是直接用samples的代码的话还需要注意几点。第一,把错误提示改成用户友好型的。因为samples的错误提示主要是给开发者看的,所以提示的很详细,但是用户不需要,你只要告诉用户成功,失败以及简单的失败原因就行了。第二,在发布正式版时把打印信息关掉。第三,修改类名和变量名。
补充2:
如果在测试支付时遇到一下错误,可做的处理。
1.当前应用程序不支持购买此商品:确定你手机上装的程序包名和签名和后台上传的一致。p.s.上传后台后APK需要等一段时间才能生效。
2.购买的商品不存在 :确保你代码里的商品名字和后台的一致,如果一致,则可能需要等一两个小时再测试,Google后台的问题。
3.loading了很长时间,最后给你提示未知错误:这个不管它,Google后台的问题,等会再测。
最后国内开发者确保是在vpn下进行测试!!!!
写在后面:
以上就是Google In-app Billing的代码添加了,其实就是把samples讲了一下,所以还是推荐去看下官方文档和samples吧,在那里你会学到更多。
1. 最近有童鞋在问,测试支付时遇到账号未认证的错误,怎么解决。我当时测试的时候没遇见这个错误,个人估计可能是你的应用还没有通过谷歌的审核,上传后台要等半个小时或者一个小时。当然如果不是这个原因的话,请解决了此问题的童鞋私信我,我把它加到博客里,这样可以帮助其他人,先谢过啦。
2.最近在搞unity,所以很少上 CSDN了(也很久没更新博客了,惭愧啊惭愧)。留个邮箱吧,有问题的可以发邮件给我 [email protected] 。努力学习,共同进步!
关于 Authentication is required. You need to sign into your Google Account. 的解决。
1.先前有童鞋问过这个问题,就是支付测试时提示账号未认证,需要登录Google账号。目前已知的解决办法就是在手机上使用测试账号(在上篇介绍过如何设置测试账号),不要用普通的Google账号。
P.S.添加使用的测试账号,只要是Gmail账号即可,但是不要用自己的开发者账号,就是说不要在测试机上登陆开发者账号进行测试,切记,切记。否则就会出现
"无法购买您要买的商品" 的错误!
2.在 android 5.0 上测试时遇见

int responseCode = getResponseCodeFromIntent(data);
String purchaseData = data.getStringExtra(RESPONSE_INAPP_PURCHASE_DATA);
String dataSignature = data.getStringExtra(RESPONSE_INAPP_SIGNATURE);