一.安装ansible
server1:
1.安装ansible
[root@server1 ~]# ls
ansible-2.7.8-1.el7.noarch.rpm
ansible-tower-setup-bundle-3.4.2-1.el7.tar.gz
libtomcrypt-1.17-25.el7.x86_64.rpm
libtommath-0.42.0-5.el7.x86_64.rpm
python2-crypto-2.6.1-13.el7.x86_64.rpm
python2-jmespath-0.9.0-1.el7.noarch.rpm
python-httplib2-0.9.2-0.1.el7.noarch.rpm
python-keyczar-0.71c-2.el7.noarch.rpm
python-paramiko-2.1.1-0.9.el7.noarch.rpm
sshpass-1.06-1.el7.x86_64.rpm
[root@server1 ]# yum install -y *rpm

2.添加执行用户 配置文件
[root@server1 ~]# useradd devops
[root@server1 ~]# id devops
uid=1000(devops) gid=1000(devops) groups=1000(devops)
[root@server1 ~]# passwd devops
Changing password for user devops.
New password:
BAD PASSWORD: The password is shorter than 8 characters
Retype new password:
passwd: all authentication tokens updated successfully.
3. server2:上建立一个一样的用户,id也要一样
[root@server2 ~]# useradd devops
[root@server2 ~]# id devops
uid=1000(devops) gid=1000(devops) groups=1000(devops)
[root@server2 ~]# passwd devops
Changing password for user devops.
New password:
BAD PASSWORD: The password is shorter than 8 characters
Retype new password:
passwd: all authentication tokens updated successfully.
server3:上建立一个一样的用户,id也要一样
[root@server3 ~]# useradd devops
[root@server3 ~]# id devops
uid=1000(devops) gid=1000(devops) groups=1000(devops)
[root@server3 ~]# passwd devops
Changing password for user devops.
New password:
BAD PASSWORD: The password is shorter than 8 characters
Retype new password:
passwd: all authentication tokens updated successfully.
4. server1:在devops用户主目录,创建cfg文件:
[root@server1 ansible]# cd
[root@server1 ~]# su - devops
[devops@server1 ~]$ mkdir ansible
[devops@server1 ~]$ cd ansible/
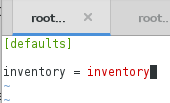
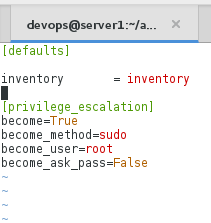
[devops@server1 ansible]$ vim ansible.cfg
[defaults]
inventory = inventory #读取当前文件inventory
5. 编辑文件inventory
[devops@server1 ansible]$ ls
ansible.cfg
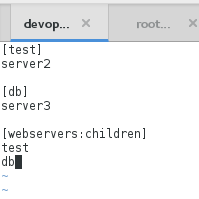
[devops@server1 ansible]$ vim inventory
[test]
server2
[db]
server3

[webservers:children]
test
db
6. 免密
[devops@server1 ansible]$ ssh-keygen
Generating public/private rsa key pair.
Enter file in which to save the key (/home/devops/.ssh/id_rsa):
Created directory '/home/devops/.ssh'.
Enter passphrase (empty for no passphrase):
Enter same passphrase again:
Your identification has been saved in /home/devops/.ssh/id_rsa.
Your public key has been saved in /home/devops/.ssh/id_rsa.pub.
The key fingerprint is:
1d:f1:83:9f:71:17:67:71:36:ef:bf:25:6d:6b:19:dc devops@server1
The key's randomart image is:
+--[ RSA 2048]----+
|          .    +*|
|           +   o*|
|          o + . o|
|         . o = o |
|        S . o . o|
|               +E|
|              . B|
|               =+|
|              .o |
+-----------------+

[devops@server1 ansible]$ ssh-copy-id server2
[devops@server1 ansible]$ ssh-copy-id server3

7. 查看可用主机
[devops@server1 ansible]$ ansible all --list-hosts
  hosts (2):
    server3
    server2
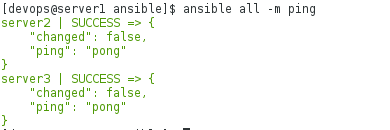
8.测试ping模块
 [devops@server1 ansible]$ ansible all -m ping #-m 调用模块
    server2 | SUCCESS => {
        "changed": false,
        "ping": "pong"
    }
    server3 | SUCCESS => {
        "changed": false,
        "ping": "pong"
    }
二.ansible命令
| -a | 模块参数 |
| -f | 线程数,并发 |
| -i | 指定inventory文件 |
| -m shell | 执行shell脚本 |
| -a | 指定指令 |
1.-a
[devops@server1 ansible]$ ansible test -a 'df -h'

2.-m 模块
[devops@server1 ansible]$ ansible test -m copy -a 'src=/etc/passwd dest=/tmp/passwd'
[devops@server1 ansible]$ ansible test -a 'ls /tmp/passwd'

3.权限的查看和修改
[devops@server1 ansible]$ ansible test -a 'ls -l /tmp/passwd'
[devops@server1 ansible]$ ansible test -m file -a 'dest=/tmp/passwd mode=600'

[devops@server1 ansible]$ ansible test -a 'ls -l /tmp/passwd'

server2:
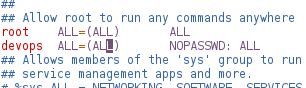
[root@server2 ~]# vim /etc/sudoers #强制保存退出
devops      ALL=(ALL)       NOPASSWD: ALL
server3中:
[root@server3 ~]# vim /etc/sudoers
devops      ALL=(ALL)       NOPASSWD: ALL

4.设置默认root执行
[devops@server1 ansible]$ vim ansible.cfg
[defaults]

inventory       = inventory

[privilege_escalation] #写到ansible.cfg中下载就不用加-b
become=True
become_method=sudo
become_user=root
become_ask_pass=False
5.查看帮助文档
[devops@server1 ansible]$ ansible-doc yum

6.下载httpd
[devops@server1 ansible]$ ansible test -m yum -a 'name=httpd state=present' -b

[devops@server1 ansible]$ ansible test -a 'rpm -q httpd'

[devops@server1 ansible]$ ansible webservers -m yum -a 'name=httpd state=present' #不加-b就可以下载

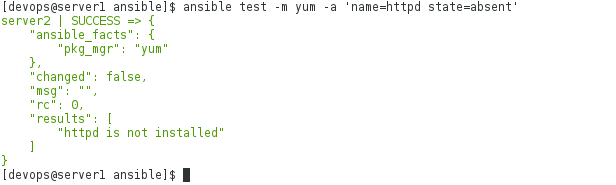
7.卸载httpd从test中
[devops@server1 ansible]$ ansible test -m yum -a 'name=httpd state=absent'

再次卸载会告诉你httpd未安装
[devops@server1 ansible]$ ansible test -m yum -a 'name=httpd state=absent'
 8.开启db中server3的httpd服务
[devops@server1 ansible]$ ansible db -m service -a 'name=httpd state=started'

9.访问server3(此时所有主机的火墙是关闭状态)
[devops@server1 ansible]$ curl server3
 10.编辑默认发布页
[devops@server1 ansible]$ ansible db -m copy -a 'content="www.redhat.org\n" dest=/var/www/html/index.html' #记得加换行符
[devops@server1 ansible]$ curl server3

11.开火墙
[devops@server1 ansible]$ ansible db -m service -a 'name=firewalld state=started'

12.设置火墙开机自启
[devops@server1 ansible]$ ansible db -m service -a 'name=firewalld state=started enabled=true'

13.开启火墙但未写入策略所以不能连接
[devops@server1 ansible]$ curl server3
curl: (7) Failed connect to server3:80; No route to host
14.写入策略
[devops@server1 ansible]$ ansible db -m firewalld -a 'service=http state=enabled permanent=yes immediate=yes'
server3 | CHANGED => {
    "changed": true,
    "msg": "Permanent and Non-Permanent(immediate) operation, Changed service http to enabled"
}

[devops@server1 ansible]$ curl server3
www.redhat.org

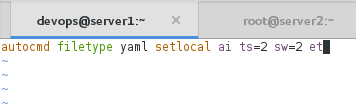
15.修改ansible中的yml类型文件的tab键和空格键
[devops@server1 ansible]$ cd
[devops@server1 ~]$ vim .vimrc
autocmd filetype yaml setlocal ai ts=2 sw=2 et
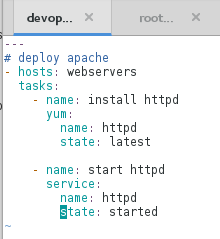
16.编写playbook.yml文件
[devops@server1 ~]$ cd ansible/
[devops@server1 ansible]$ vim playbook.yml
---
# deploy apache
- hosts: webservers
  tasks:
    - name: install httpd
      yum:
        name: httpd
        state: latest

    - name: start httpd
      service:
        name: httpd
        state: started
17.语法检测
[devops@server1 ansible]$ ansible-playbook playbook.yml --syntax-check

playbook: playbook.yml
18.添加默认发布页
[devops@server1 ansible]$ vim playbook.yml
---
# deploy apache
- hosts: webservers
  tasks:
    - name: install httpd
      yum:
        name: httpd
        state: latest

    - name: create index.html
      copy:
        content: "www.redhat.org\n"
        dest: /var/www/html/index.html

    - name: start httpd
      service:
        name: httpd
        state: started

[devops@server1 ansible]$ ansible-playbook playbook.yml --syntax-check

playbook: playbook.yml
把之前test中的httpd重新下载,配置和db中的一样,开启服务,编写默认页,开启火墙,配置策略
[devops@server1 ansible]$ ansible test -m yum -a 'name=httpd state=present'
[devops@server1 ansible]$ ansible test -m copy -a 'content="www.redhat.org\n" dest=/var/www/html/index.html'
[devops@server1 ansible]$ ansible test -m service -a 'name=httpd state=started'
[devops@server1 ansible]$ ansible test -m firewalld -a 'service=http state=enabled permanent=yes immediate=yes'
19.测试
[devops@server1 ansible]$ curl server2
www.redhat.org
[devops@server1 ansible]$ curl server3
www.redhat.org
19.查看setup模块
[devops@server1 ansible]$ ansible test -m setup
 20.过滤查看主机
[devops@server1 ansible]$ ansible test -m setup | grep hostname
        "ansible_hostname": "server2",
[devops@server1 ansible]$ ansible test -m setup | grep fqdn
        "ansible_fqdn": "server2",

21.配置httpd
[devops@server1 ansible]$ vim playbook.yml
---
# deploy apache
- hosts: webservers
  tasks:
    - name: install httpd
      yum:
        name: httpd
        state: latest

    - name: create index.html
      copy:
        content: "www.redhat.org\n"
        dest: /var/www/html/index.html

    - name: configure httpd
      copy:
        src: files/httpd.conf
        dest: /etc/httpd/conf/httpd.conf

    - name: start httpd
      service:
        name: httpd
        state: started

[devops@server1 ansible]$ mkdir files
[devops@server1 ansible]$ cd files/
[devops@server1 files]$ ls
[devops@server1 files]$ scp server3:/etc/httpd/conf/httpd.conf .
httpd.conf    100%   11KB  11.5KB/s   00:00
[devops@server1 files]$ cd -
/home/devops/ansible
[devops@server1 ansible]$ ansible-playbook playbook.yml --syntax-check

playbook: playbook.yml
[devops@server1 ansible]$ ansible-playbook playbook.yml

[devops@server1 ansible]$ vim playbook.yml
---
# deploy apache
- hosts: webservers
  tasks:
    - name: install httpd
      yum:
        name: httpd
        state: latest

    - name: create index.html
      copy:
        content: "www.redhat.org\n"
        dest: /var/www/html/index.html

    - name: configure httpd
      copy:
        src: files/httpd.conf
        dest: /etc/httpd/conf/httpd.conf
        owner: root
        group: root
        mode: 644


    - name: start httpd
      service:
        name: httpd
        state: started

[devops@server1 ansible]$ ansible-playbook playbook.yml --syntax-check

playbook: playbook.yml
[devops@server1 ansible]$ ansible-playbook playbook.yml

 [devops@server1 ansible]$ cd files/
 [devops@server1 files]$ ls
 httpd.conf
 [devops@server1 files]$ vim httpd.conf #修改端口
[devops@server1 files]$ md5sum httpd.conf
04e9239e7bd5d5b9b85864226d60eee5  httpd.conf
对比server2和3的
[root@server2 ~]# md5sum /etc/httpd/conf/httpd.conf
f5e7449c0f17bc856e86011cb5d152ba  /etc/httpd/conf/httpd.conf

[root@server3 ~]# md5sum /etc/httpd/conf/httpd.conf
f5e7449c0f17bc856e86011cb5d152ba  /etc/httpd/conf/httpd.conf

[devops@server1 files]$ cd -
/home/devops/ansible
[devops@server1 ansible]$ ansible-playbook playbook.yml

查看server2和server3的发现端口未改变,因为httpd服务没有重启
[root@server2 ~]# netstat -antlp

[root@server3 ~]# netstat -antlp

22.设置开机自启
[devops@server1 ansible]$ vim playbook.yml
 ---
# deploy apache
- hosts: webservers
  tasks:
    - name: install httpd
      yum:
        name: httpd
        state: latest

    - name: create index.html
      copy:
        content: "www.redhat.org\n"
        dest: /var/www/html/index.html

    - name: configure httpd
      copy:
        src: files/httpd.conf
        dest: /etc/httpd/conf/httpd.conf
        owner: root
        group: root
        mode: 644


    - name: start httpd
      service:
        name: httpd
        state: started
        enabled: true

[devops@server1 ansible]$ ansible-playbook playbook.yml
 23.server2,3查看是否是开机自启
[root@server2 ~]# systemctl is-enabled httpd
enabled
[root@server3 ~]# systemctl is-enabled httpd
enabled
24.修改重新启动
[devops@server1 ansible]$ vim playbook.yml
# deploy apache
- hosts: webservers
  tasks:
    - name: install httpd
      yum:
        name: httpd
        state: latest

    - name: create index.html
      copy:
        content: "www.redhat.org\n"
        dest: /var/www/html/index.html

    - name: configure httpd
      copy:
        src: files/httpd.conf
        dest: /etc/httpd/conf/httpd.conf
        owner: root
        group: root
        mode: 644
      notify: restart httpd


    - name: start httpd
      service:
        name: httpd
        state: started
        enabled: true

  handlers:
    - name: restart httpd
      service:
        name: httpd
        state: restarted

[devops@server1 ansible]$ ansible-playbook playbook.yml --syntax-check

playbook: playbook.yml
[devops@server1 ansible]$ ansible-playbook playbook.yml #看见改变说明成功

在server2和3中查看端口已经改变
[root@server2 ~]# netstat -antlp
[root@server3 ~]# netstat -antlp


三.使用jinja语句设置变量
1.使用jinja语句设置变量
首先将httpd的端口修改回80
[devops@server1 ansible]$ ansible-playbook playbook.yml
此时端口已经修改成功
[root@server2 ~]# netstat -antlp
Active Internet connections (servers and established)
Proto Recv-Q Send-Q Local Address           Foreign Address         State       PID/Program name
tcp        0      0 0.0.0.0:22              0.0.0.0:*               LISTEN      637/sshd
tcp        0      0 127.0.0.1:25            0.0.0.0:*               LISTEN      774/master
tcp        0      0 172.25.70.2:22          172.25.70.250:54518     ESTABLISHED 1047/sshd: root@pts
tcp6       0      0 :::80                   :::*                    LISTEN      2239/httpd
tcp6       0      0 :::22                   :::*                    LISTEN      637/sshd
tcp6       0      0 ::1:25                  :::*
[devops@server1 ansible]$ vim playbook.yml
---
# deploy apache
- hosts: webservers
  tasks:
    - name: install httpd
      yum:
        name: httpd
        state: latest

    - name: create index.html
      copy:
        content: "{{ ansible_facts['hostname'] }}\n"
        dest: /var/www/html/index.html

    - name: configure httpd
      copy:
        src: files/httpd.conf
        dest: /etc/httpd/conf/httpd.conf
        owner: root
        group: root
        mode: 644
      notify: restart httpd

    - name: start httpd
      service:
        name: httpd
        state: started
        enabled: true

  handlers:
    - name: restart httpd
      service:
        name: httpd
        state: restarted

[devops@server1 ansible]$ ansible-playbook playbook.yml --syntax-check

playbook: playbook.yml
[devops@server1 ansible]$ ansible-playbook playbook.yml

[devops@server1 ansible]$ curl server2
server2
[devops@server1 ansible]$ curl server3
server3
2.添加主机ip
[devops@server1 ansible]$ vim playbook.yml
---
# deploy apache
- hosts: webservers
  tasks:
    - name: install httpd
      yum:
        name: httpd
        state: latest

    - name: create index.html
      copy:
        content: "{{ ansible_facts['hostname'] }} {{ ansible_facts['default_ipv4']['address'] }}\n"
        dest: /var/www/html/index.html

    - name: configure httpd
      copy:
        src: files/httpd.conf
        dest: /etc/httpd/conf/httpd.conf
        owner: root
        group: root
        mode: 644
      notify: restart httpd

    - name: start httpd
      service:
        name: httpd
        state: started
        enabled: true

  handlers:
    - name: restart httpd
      service:
        name: httpd
        state: restarted

[devops@server1 ansible]$ ansible-playbook playbook.yml

[devops@server1 ansible]$ curl server2
server2 172.25.70.2
[devops@server1 ansible]$ curl server3
server3 172.25.70.3

3.添加vars
[devops@server1 ansible]$ vim playbook.yml
---
# deploy apache
- hosts: webservers
  vars:
    http_port: 8080
  tasks:
    - name: install httpd
      yum:
        name: httpd
        state: latest

    - name: create index.html
      copy:
        content: "{{ ansible_facts['hostname'] }} {{ ansible_facts['default_ipv4']['address'] }}\n"
        dest: /var/www/html/index.html

    - name: configure httpd
      copy:
        src: files/httpd.conf
        dest: /etc/httpd/conf/httpd.conf
        owner: root
        group: root
        mode: 644
      notify: restart httpd

    - name: start httpd
      service:
        name: httpd
        state: started
        enabled: true

  handlers:
    - name: restart httpd
      service:
        name: httpd
        state: restarted

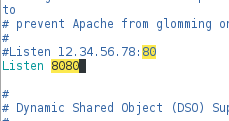
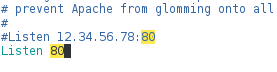
[devops@server1 ansible]$ vim httpd.conf.j2
Listen {{ http_port }}
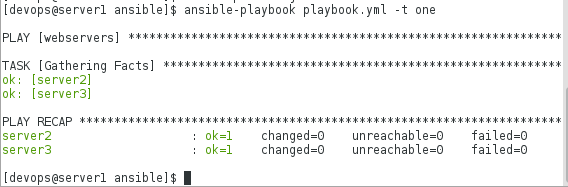
[devops@server1 ansible]$ ansible-playbook playbook.yml -t one #根据tags名执行某部分
PLAY [webservers] **************************************************************
TASK [Gathering Facts] *********************************************************
ok: [server2]
ok: [server3]
PLAY RECAP *********************************************************************
server2 : ok=1 changed=0 unreachable=0 failed=0
server3 : ok=1 changed=0 unreachable=0 failed=0
[devops@server1 ansible]$ ansible-playbook playbook.yml
[devops@server1 ansible]$ ansible webservers -a 'netstat -anltp'
 4.查看主机信息
[devops@server1 ansible]$ ansible test -m setup

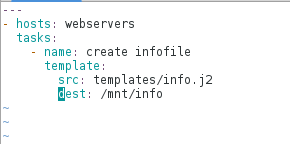
[devops@server1 ansible]$ vim hostinfo.yml
---
- hosts: webservers
  tasks:
    - name: create infofile
      template:
        src: templates/info.j2
        dest: /mnt/info
[devops@server1 ansible]$ mkdir templates
[devops@server1 ansible]$ cd templates/
[devops@server1 templates]$ vim info.j2
主机名:{{ ansible_facts['hostname'] }}
主机IP地址:{{ ansible_facts['default_ipv4']['address'] }}
跟分区大小:{{ ansible_facts['devices']['dm-0']['size'] }}
系统内核:{{ ansible_facts['kernel'] }}

[devops@server1 ansible]$ ansible-playbook hostinfo.yml

[devops@server1 ansible]$ ansible all -a 'ls -l /mnt/info'
server3 | CHANGED | rc=0 >>
-rw-r--r-- 1 root root 112 Jun 19 04:31 /mnt/info

server2 | CHANGED | rc=0 >>
-rw-r--r-- 1 root root 112 Jun 19 04:31 /mnt/info

[devops@server1 ansible]$ ansible all -a 'cat /mnt/info'
server3 | CHANGED | rc=0 >>
主机名:server3
主机IP地址:172.25.70.3
跟分区大小:8.00 GB
系统内核:3.10.0-514.el7.x86_64

server2 | CHANGED | rc=0 >>
主机名:server2
主机IP地址:172.25.70.2
跟分区大小:8.00 GB
系统内核:3.10.0-514.el7.x86_64

四.
1.不同主机下载不同服务
[devops@server1 ansible]$ vim install.yml
---
- hosts: all
  tasks:
    - name: install httpd
      yum:
        name: httpd
        state: present
      when: ansible_facts['hostname'] == 'server2'

    - name: install mariadb
      yum:
        name: mariadb
        state: present
      when: ansible_facts['hostname'] == 'server3'

[devops@server1 ansible]$ ansible-playbook install.yml

2.使用循环 下载多个服务
[devops@server1 ansible]$ vim install.yml
    ---
- hosts: all
  tasks:
    - name: install httpd
      yum:
        name: "{{ item }}"
        state: present
      when: ansible_facts['hostname'] == 'server2'
      loop:
        - httpd
        - mariadb
        - php
        - php-mysql

    - name: install mariadb
      yum:
        name: mariadb
        state: present
      when: ansible_facts['hostname'] == 'server3'

[devops@server1 ansible]$ ansible-playbook install.yml

3.给多个主机设置hosts文件
[devops@server1 ansible]$ vim install.yml
---
- hosts: all
  tasks:
    - name: create infofile
      template:
        src: templates/info.j2
        dest: /mnt/info

    - name: create hosts
      template:
        src: templates/hosts.j2
        dest: /etc/hosts                                  owner: root                                       group: root
        mode: 0644

[devops@server1 ansible]$ cd templates/
[devops@server1 templates]$ vim host.j2
127.0.0.1   localhost localhost.localdomain localhost4 localhost4.localdomain4
::1         localhost localhost.localdomain localhost6 localhost6.localdomain6
{% for host in groups['webservers'] %}
{{ hostvars[host]['ansible_facts']['eth0']['ipv4']['address'] }}  {{ hostvars[host]['ansible_facts']['hostname'] }}
{% endfor %}

批量添加用户
[devops@server1 templates]$ cd ..
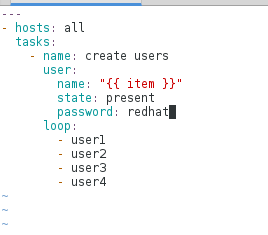
[devops@server1 ansible]$ vim adduser.yml
---
- hosts: all
tasks:
- name: create users
user:
name: "{{ item }}"
state: present
password: redhat
loop:
- user1
- user2
- user3
- user4
state中present和installed,absent和removed通过源码可知是一样的
源码:
if state in ['installed', 'present']:
    if disable_gpg_check:
        yum_basecmd.append('--nogpgcheck')
    res = install(module, pkgs, repoq, yum_basecmd, conf_file, en_repos, dis_repos)
elif state in ['removed', 'absent']:
    res = remove(module, pkgs, repoq, yum_basecmd, conf_file, en_repos, dis_repos)
elif state == 'latest':
    if disable_gpg_check:
        yum_basecmd.append('--nogpgcheck')
    res = latest(module, pkgs, repoq, yum_basecmd, conf_file, en_repos, dis_repos)
else:
    # should be caught by AnsibleModule argument_spec
    module.fail_json(msg="we should never get here unless this all"
            " failed", changed=False, results='', errors='unexpected state')
return res
[devops@server1 ansible]$ ansible-playbook adduser.yml
 加密用户信息
[devops@server1 ansible]$ mkdir vars
[devops@server1 ansible]$ cd vars/
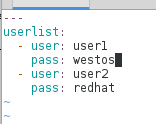
[devops@server1 vars]$ vim userlist.yml
---
userlist:
- user: user1
pass: westos
- user: user2
pass: redhat
[devops@server1 vars]$ ansible-vault encrypt userlist.yml
New Vault password:
Confirm New Vault password:
Encryption successful
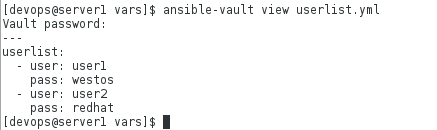
[devops@server1 vars]$ cat userlist.yml

[devops@server1 vars]$ ansible-vault view userlist.yml
Vault password:
---
userlist:
  - user: user1
    pass: westos
  - user: user2
    pass: redhat
删除用户
[devops@server1 vars]$ cd ..
[devops@server1 ansible]$ vim adduser.yml
---
- hosts: all
  vars_files:
    - vars/userlist.yml
  tasks:
    - name: create users
      user:
        name: "{{ item }}"
        state: absent
        password: westos
      loop: "{{ userlist }}"

[devops@server1 ansible]$ ansible-playbook adduser.yml --ask-vault-pass
