JPEG图片叠加PNG图片水印
本文的主要目的是将一张JPEG的图片叠加一张PNG格式的水印,很多基础理论知识本文并没有涉及,博主也不是很懂。但是JPEG的编解码,PNG的解码大家还是可以参照完成的。本文的代码上传到了CSDN,基础好的同学可以直接下载使用就好了,积分有点多,要5积分,手快了没有看到在哪里设置,上传到这里主要是想搞点积分。
https://download.csdn.net/download/qq_31878855/11160413。
实在没有积分的可以私聊我。
一、JEPG图片解码
JPEG图像解码需要用到开源的解码库,IJG是一个非正式的组,它为JPEG图像压缩编写和发布一个广泛使用的免费库。目前最新的版本是2018年1月14日发布的9c版本。Linux下载地址http://www.ijg.org/files/jpegsrc.v9c.tar.gz。
本文所使用的是8c版本,
http://www.ijg.org/files/jpegsrc.v8c.tar.gz。
1.解压
tar -zxvf jpegsrc.v8c.tar.gz
2.编译JPEG库
cd jpeg-8c/ #cd到解压目录
mkdir tmp #创建一个临时文件夹,用于存放安装文件
./configure --prefix=$(pwd)/tmp #配置并生成Makefile
make && make install #编译并安装
生成文件如下图所示:

3.编写解码JPEG图片代码。
①函数介绍
//写输出bmp文件的头部分,文件信息由库中解码函数提供
void write_bmp_header(j_decompress_ptr cinfo, FILE *output_file)
{
        char bmpfileheader[14];
        char bmpinfoheader[40];
        long headersize, bfSize;
        int bits_per_pixel, cmap_entries;
        int step;
        /* Compute colormap size and total file size */
        if (cinfo->out_color_space == JCS_RGB) {
                if (cinfo->quantize_colors) {
                        /* Colormapped RGB */
                        bits_per_pixel = 8;
                        cmap_entries = 256;
                } else {
                        /* Unquantized, full color RGB */
                        bits_per_pixel = 24;
                        cmap_entries = 0;
                }
        } else {
                /* Grayscale output.  We need to fake a 256-entry colormap. */
                bits_per_pixel = 8;
                cmap_entries = 256;
        }
        step = cinfo->output_width * cinfo->output_components;
        while ((step & 3) != 0) step++;
        /* File size */
        headersize = 14 + 40 + cmap_entries * 4; /* Header and colormap */

        bfSize = headersize + (long) step * (long) cinfo->output_height;

        /* Set unused fields of header to 0 */
        memset(bmpfileheader, 0, sizeof(bmpfileheader));
        memset(bmpinfoheader, 0 ,sizeof(bmpinfoheader));

        /* Fill the file header */
        bmpfileheader[0] = 0x42;/* first 2 bytes are ASCII 'B', 'M' */
        bmpfileheader[1] = 0x4D;
        PUT_4B(bmpfileheader, 2, bfSize); /* bfSize */
        /* we leave bfReserved1 & bfReserved2 = 0 */
        PUT_4B(bmpfileheader, 10, headersize); /* bfOffBits */

        /* Fill the info header (Microsoft calls this a BITMAPINFOHEADER) */
        PUT_2B(bmpinfoheader, 0, 40);   /* biSize */
        PUT_4B(bmpinfoheader, 4, cinfo->output_width); /* biWidth */
        PUT_4B(bmpinfoheader, 8, cinfo->output_height); /* biHeight */
        PUT_2B(bmpinfoheader, 12, 1);   /* biPlanes - must be 1 */
        PUT_2B(bmpinfoheader, 14, bits_per_pixel); /* biBitCount */
        /* we leave biCompression = 0, for none */
        /* we leave biSizeImage = 0; this is correct for uncompressed data */
        if (cinfo->density_unit == 2) { /* if have density in dots/cm, then */
                PUT_4B(bmpinfoheader, 26, (INT32) (cinfo->X_density*100)); /* XPels/M */
                PUT_4B(bmpinfoheader, 30, (INT32) (cinfo->Y_density*100)); /* XPels/M */
        }
        PUT_2B(bmpinfoheader, 32, cmap_entries); /* biClrUsed */
        /* we leave biClrImportant = 0 */
        if (fwrite(bmpfileheader, 1, 14, output_file) != (size_t) 14) {
                printf("write bmpfileheader error\n");
        }
        if (fwrite(bmpinfoheader, 1, 40, output_file) != (size_t) 40) {
                printf("write bmpinfoheader error\n");
        }
        if (cmap_entries > 0) {
        }
}
// 写入bmp图像 rgb 数据
void write_pixel_data(j_decompress_ptr cinfo, unsigned char *output_buffer, FILE *output_file)
{
        int rows, cols;
        int row_width;
        int step;

        int x=20,y=cinfo->output_height -watermask_info.height -20 ;
        unsigned char *tmp = NULL;
unsigned char *pdata;

        row_width = cinfo->output_width * cinfo->output_components;
        step = row_width;
        while ((step & 3) != 0) step++;

        pdata = (unsigned char *)malloc(step);
        memset(pdata, 0, step);
				printf("cinfo->output_components=%d,\n",cinfo->output_components);
        tmp = output_buffer + row_width * (cinfo->output_height - 1);


        int i;

        for (rows = 0; rows < cinfo->output_height; rows++) {
                for (cols = 0; cols < row_width; cols += 3) {
                        pdata[cols + 2] = tmp[cols + 0];
                        pdata[cols + 1] = tmp[cols + 1];
                        pdata[cols + 0] = tmp[cols + 2];
                  //       pdata[cols + 0] = tmp[cols + 0];
                   //     pdata[cols + 1] = tmp[cols + 1];
                   //     pdata[cols + 2] = tmp[cols + 2];
                }
                tmp -= row_width;
 #if 0     // 这里是叠加一个bmp图片水印,bmp的图片不是透明的叠加出来效果不好 //watermask_info 就是水印的数据
                if( rows >= y  &&  rows <y+watermask_info.height  ){
                	for( i=0;i<watermask_info.width*3;i++)
                	{
                		pdata[ x*3+i]  = watermask_info.data[i+(rows - y )*watermask_info.width*3];
                	}
                }
#endif
                fwrite(pdata, 1, step, output_file);
        }
				free(watermask_info.data);
        free(pdata);
}
// 解码函数
int decode_jpeg_file(const char *input_filename, const char *output_filename)
{
        struct jpeg_decompress_struct cinfo; //jpeg使用的对象结构体
        struct jpeg_error_mgr jerr;       // jpeg错误处理结构体
        FILE *input_file;
        FILE *output_file;
        JSAMPARRAY buffer;//IJG还定义了JSAMPROW和JSAMPARRAY,分别表示一行JSAMPLE和一个2D的JSAMPLE数组
        int row_width;

        unsigned char *output_buffer;
        unsigned char *tmp = NULL;

        cinfo.err = jpeg_std_error(&jerr); //将错误结构体绑定到jpeg对象上
// 输入文件 需要解码的jpg图片
        if ((input_file = fopen(input_filename, "rb")) == NULL) {
                fprintf(stderr, "can't open %s\n", input_filename);
                return -1;
        }
//输出文件,解码后的bmp文件
        if ((output_file = fopen(output_filename, "wb")) == NULL) {
                fprintf(stderr, "can't open %s\n", output_filename);
                return -1;
        }

        jpeg_create_decompress(&cinfo);  //初始化jpeg 对象

        /* Specify data source for decompression */
        jpeg_stdio_src(&cinfo, input_file); //利用标准C中的文件指针传递要打开的jpg文件
        /* Read file header, set default decompression parameters */
        (void) jpeg_read_header(&cinfo, TRUE); //IJG将图像的缺省信息填充到cinfo结构中以便程序使用。

        /* Start decompressor */
        (void) jpeg_start_decompress(&cinfo);

        row_width = cinfo.output_width * cinfo.output_components;//每个像素中的颜色通道数cinfo.output_components(比如灰度为1,全彩色为3)等。

/*JPOOL_IMAGE表示分配的内存空间将在调用jpeg_finish_compress,jpeg_finish_decompress,jpeg_abort后被释放,而如果此参数改为JPOOL_PERMANENT则表示内存将一直到JPEG对象被销毁时才被释放。row_stride如上所说,是每行数据的实际大小。最后一个参数是要分配多少行数据。此处只分配了一行。*/
        buffer = (*cinfo.mem->alloc_sarray)
                ((j_common_ptr) &cinfo, JPOOL_IMAGE, row_width, 1);

        write_bmp_header(&cinfo, output_file); //填充bmp 的头,输出的bmp文件

        output_buffer = (unsigned char *)malloc(row_width * cinfo.output_height);
        memset(output_buffer, 0, row_width * cinfo.output_height);
        tmp = output_buffer;
				/*output_scanline表示当前已经读取的行数,如此即可依次读出图像的所有数据,并填充到缓冲区中,参数1表示的是每次读取的行数。*/
        /* Process data */
        while (cinfo.output_scanline < cinfo.output_height) {
                (void) jpeg_read_scanlines(&cinfo, buffer, 1);// 读出解码后的数据

                memcpy(tmp, *buffer, row_width);// 保存到输出buff中
                tmp += row_width;
        }
        write_pixel_data(&cinfo, output_buffer, output_file); //写入bmp中
        free(output_buffer);
        (void) jpeg_finish_decompress(&cinfo); //解压缩完毕
        jpeg_destroy_decompress(&cinfo);//释放资源
        /* Close files, if we opened them */
        fclose(input_file);
        fclose(output_file);
        return 0;
}
//工具函数,宏
#define PUT_2B(array,offset,value)  \
        (array[offset] = (char) ((value) & 0xFF), \
         array[offset+1] = (char) (((value) >> 8) & 0xFF))
#define PUT_4B(array,offset,value)  \
        (array[offset] = (char) ((value) & 0xFF), \
         array[offset+1] = (char) (((value) >> 8) & 0xFF), \
         array[offset+2] = (char) (((value) >> 16) & 0xFF), \
         array[offset+3] = (char) (((value) >> 24) & 0xFF))
int get_2b(unsigned char*a,int offset)
{
    return a[offset+1]<<8|a[offset];
}
int get_4b(unsigned char*a,int offset)
{
    return (a[offset+3]<<24)|(a[offset+2]<<16)|(a[offset+1]<<8)|a[offset];
}
②调用上面的函数
int decode_jpeg_file(const char *input_filename, const char *output_filename);
input_filename // 为需要解码的图像文件名
output_filename //输出解码后bmp文件的文件名,会自动创建
③编译
gcc jpeg_decode.c -l jpeg -L jpeg-8c/tmp/lib/ -o jpeg_decode.app
4.成功解码
没有运行之前

运行./jpeg_decode.app,之后生成tt.bmp文件。

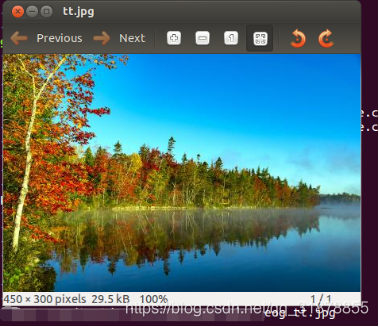
打开tt.bmp

成功的将jpeg图片解码成了bmp图片。
大小对比:

解码成功后的BMP文件比JPEG格式的文件大了许多。
二、JEPG图片编码
现在找一张bmp图片,把它编码成jpeg文件格式。
1.代码编写
①解析原始的bmp图片,获取图像高度,宽度等信息。
void read_bmp_header(char *bmpfilename)
{
    unsigned char bmpfileheader[14];//¿¿¿
    unsigned char bmpinfoheader[40];//¿¿¿
    bmpfile=fopen(bmpfilename,"r");//
    if(bmpfile<0)
    printf("open bmp file error!\n");
    printf("open bmp file success!\n");
    fread(bmpfileheader,14,1,bmpfile);
    int type=get_2b(bmpfileheader,0);
    printf("type=0x%x\n",type);
    int filesize=get_4b(bmpfileheader,2);
    printf("filesize=%d bytes\n",filesize);
    headersize=get_4b(bmpfileheader,10);
    printf("headersize=%d bytes\n",headersize);
    if(headersize>54)
        printf("colormap size=%d bytes\n",headersize-54);
    fseek(bmpfile,14,SEEK_SET);
    fread(bmpinfoheader,40,1,bmpfile);
    image_width=get_4b(bmpinfoheader,4);
    while (image_width%4!=0)
        image_width++;
    printf("weight=%d\n",image_width);
    image_height=get_4b(bmpinfoheader,8);
    printf("height=%d\n",image_height);
    bits_per_pixel=get_2b(bmpinfoheader,14);
    printf("bits_per_pixel=%d\n",bits_per_pixel);
    depth=bits_per_pixel/8;
    image_size=image_width*image_height*depth;
    src_data=(unsigned char *)malloc(image_size);
    fseek(bmpfile,headersize,SEEK_SET);
    fread(src_data,sizeof(unsigned char)*image_size,1,bmpfile);
    fclose(bmpfile);
}
② 编码JEPG图片,将bmp中的rgb原始数据编码成jpeg格式。
void encode_jpeg_file (char * outfilename, unsigned char * buffer,int quality)
{
    struct jpeg_compress_struct cinfo;
    struct jpeg_error_mgr jerr;
    FILE * outfile;
    unsigned char *dst_data;
    int i,j;
    //char *point;
    JSAMPROW  row_pointer[1];
    //js amparray buffer;
    int row_stride;
    cinfo.err = jpeg_std_error(&jerr);
    jpeg_create_compress(&cinfo);
    if ((outfile = fopen(outfilename, "wb")) == NULL) {
    fprintf(stderr, "can't open %s\n", outfilename);
    exit(1);
    }
    jpeg_stdio_dest(&cinfo, outfile);
    cinfo.image_width = image_width;     /* image width and height, in pixels */
    cinfo.image_height = image_height;
    cinfo.input_components =  depth;        /* # of color components per pixel */
   // cinfo.in_color_space = (depth==3) ? jcs_rgb : jcs_grayscale;     /* colorspace of input image */
   cinfo.in_color_space = (depth==3) ? JCS_RGB : JCS_GRAYSCALE;
   	printf("in_color_space = %d ,input_components =%d JCS_RGB= %d \n",cinfo.in_color_space, cinfo.input_components,JCS_RGB);
    jpeg_set_defaults(&cinfo);
    jpeg_set_quality(&cinfo, quality, TRUE /* limit to baseline-jpeg values */);
    dst_data=(unsigned char *)malloc(image_size*sizeof(unsigned char));
    //bgr->rgb
    #if 1
    for(i=0;i<image_height;i++){
        for(j=0;j<image_width;j++)
        {
            if(depth==1)//¿¿¿
                *(dst_data+i*image_width+j)=*(src_data+i*image_width+j);
            else //¿¿¿
                {
            *(dst_data+i*image_width*depth+j*3+0)=*(src_data+i*image_width*depth+j*3+2);
                    *(dst_data+i*image_width*depth+j*3+1)=*(src_data+i*image_width*depth+j*3+1);
                   *(dst_data+i*image_width*depth+j*3+2)=*(src_data+i*image_width*depth+j*3+0);
                   // dst_data[j + 2] = src_data[j + 0];
                   // dst_data[j + 1] = src_data[j + 1];
                    //dst_data[j + 0] = src_data[j + 2];
                }
        }
    }
    #endif
    //dst_data=src_data;
    jpeg_start_compress(&cinfo, TRUE);

    row_stride = image_width * cinfo.input_components;    /* js amples per row in image_buffer */

    while (cinfo.next_scanline < cinfo.image_height) {
         row_pointer[0] = & dst_data[(cinfo.image_height - cinfo.next_scanline - 1) * row_stride];//cinfo.next_scanline * row_stride
        // row_pointer[0] = & dst_data[cinfo.next_scanline  * row_stride];
         (void) jpeg_write_scanlines(&cinfo, row_pointer, 1);

    }

    jpeg_finish_compress(&cinfo);
    fclose(outfile);
    jpeg_destroy_compress(&cinfo);
    free(src_data);
    free(dst_data);
}
③ 调用上诉函数
先调用 read_bmp_header()获取需要编码的bmp图片信息,在调用encode_jpeg_file函数编码jpeg数据并保存为jeg格式的图片。
2.编译
gcc jpeg_encode.c -l jpeg -L jpeg-8c/tmp/lib/ -o jpeg_encode.app
3.成功编码
没运行之前文件如下:

运行app(如果出现找不到共享库的错误,参照下PNG那节,导出共享库路径)
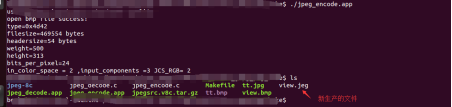
打开文件对比,
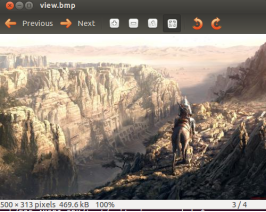
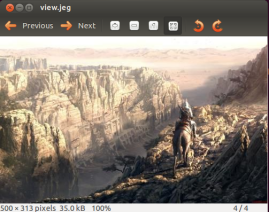
可以发现上面两张照片效果无明显差别但是文件大小确小了很多。
三、PNG解码
水印文件一般为PNG格式的文件,32bit带透明数据。想要叠加水印还的解码PNG格式的图片。
1.下载库
解码PNG格式的文件需要用到libpng库,网上搜索
libpng download 。
又升级了libpng-1.6.36.tar.xz ,下载地址 https://downloads.sourceforge.net/libpng/libpng-1.6.36.tar.xz。
不过我用的是1.6.34版本。
2.解压并编译
tar -zxvf libpng-1.6.34.tar.gz
cd libpng-1.6.34
mkdir tmp
./configure --prefix=KaTeX parse error: Expected 'EOF', got '&' at position 18: …wd)/tmp make &̲& make install …(pwd)/tmp --host=arm-linux 也可以使用CC变量。
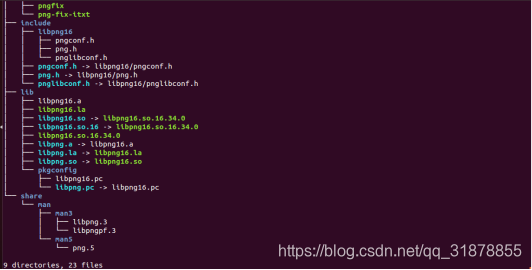
生成目录如下:
3.编写代码
① 解码函数
偷了个懒没有保存为bmp文件,直接保存为rgb的裸数据流文件,后面图片叠加的时候也不用解析bmp文件了。水印文件也不用经常换,后面直接放到h文件了。
char*  decode_png(char* name)
{
 int i, j;
 int m_width, m_height;
 png_infop info_ptr;             //图片信息的结构体
 png_structp png_ptr;         //初始化结构体,初始生成,调用api时注意传入

 FILE* file = fopen(name, "rb");    //打开的文件名
 printf("%s, %d\n", __FUNCTION__, __LINE__);

 png_ptr = png_create_read_struct(PNG_LIBPNG_VER_STRING, 0, 0, 0);   //创建初始化libpng库结构体
  info_ptr = png_create_info_struct(png_ptr);                                                 //创建图片信息结构体
 setjmp(png_jmpbuf(png_ptr));                              //设置错误的返回点
 // 这句很重要
 png_init_io(png_ptr, file);         //把文件加载到libpng库结构体中
 // 读文件了
 png_read_png(png_ptr, info_ptr, PNG_TRANSFORM_EXPAND, 0);        //读文件内容到info_ptr中
 // 得到文件的宽高色深
 if ((png_ptr != NULL) && (info_ptr != NULL))
 {
  m_width = png_get_image_width(png_ptr, info_ptr);
  m_height = png_get_image_height(png_ptr, info_ptr);                          //通过png库中的api获取图片的宽度和高度
  printf("%s, %d, m_width =%d, m_height = %d\n", __FUNCTION__, __LINE__, m_width, m_height);
 }
 int color_type = png_get_color_type(png_ptr, info_ptr);                          //通过api获取color_type
 printf("%s, %d, color_type = %d\n", __FUNCTION__, __LINE__, color_type);


 int size = m_height * m_width * 4;
 unsigned char *bgra = NULL;
 bgra = malloc(size);
 if (NULL == bgra)
 {
  printf("%s, %d, bgra == NULL\n", __FUNCTION__, __LINE__);
  return;
 }
 int pos = 0;
 // row_pointers里边就是传说中的rgb数据了
 png_bytep* row_pointers = png_get_rows(png_ptr, info_ptr);
 // 拷贝!!注意,如果你读取的png没有A通道,就要3位3位的读。还有就是注意字节对其的问题,最简单的就是别用不能被4整除的宽度就行了。读过你实在想用,就要在这里加上相关的对齐处理。
 for(i = 0; i < m_height; i++)
 {
    for(j = 0; j < (4 * m_width); j += 4)
    {
     bgra[pos++] = row_pointers[i][j + 2]; // blue
     bgra[pos++] = row_pointers[i][j + 1]; // green
     bgra[pos++] = row_pointers[i][j];   // red
     bgra[pos++] = row_pointers[i][j + 3]; // alpha
    }
 }
 // 好了,你可以用这个数据作任何的事情了。。。把它显示出来或者打印出来都行。
/* for (i = 0; i < size; i++ )
 {
  printf("%s, %d, bgra[%d] = %d\n", __FUNCTION__, __LINE__,  i, bgra[i]);
 }
 */
 char tmp[10]={0};
//保存rgb裸流文件咯,省时省力
 FILE * f = fopen("savepng.bin","wb");
 for (i = 0; i < size; i++ )
 {
 // printf("%s, %d, bgra[%d] = %d\n", __FUNCTION__, __LINE__,  i, bgra[i]);
  	sprintf(tmp,"0x%x,",bgra[i]);
  	fwrite(tmp,strlen(tmp),1,f);

 }
 	fwrite(bgra,size,1,f);
 	fclose(f);
 png_destroy_read_struct(&png_ptr, &info_ptr, 0);
 fclose(file);
 return   bgra;
}
② 编译
gcc png_decode.c -l png -L libpng-1.6.34/tmp/lib/ -o png_decode.app
4.成功解码
运行第一次出错

找不到共享库。
导出库路径,具体路径看实际的。
export LD_LIBRARY_PATH=$LD_LIBRARY_PATH:/home/work/ibpng-1.6.34/tmp/lib
再次运行,成功,分辨率信息没有保存,但是后续还是要用到。

解码的文件名为LOGO.png.
图中出现警告 libpng warning: iCCP: known incorrect sRGB profile可无需体会,如果觉得碍眼可以百度解决下,当前不影响我们叠加水印。
生成文件

至于解码出来的数据对不对还的看下节了。
四、叠加水印
叠加水印首先我们将JPEG格式的文件解码成RGB原始数据,再将上面解码出来的PNG图片的RGBA数据取出,然后将两种数据按比例混合。由于JPEG是有损压缩,会产生迭代有损,在重复压缩和解码的过程中会不断丢失信息使图像质量下降。
1、编写代码
因为后面需要移植到嵌入式平台上,为了方便使用,我将PNG的数据保存到H文件中,建立了一个常量数组来保存PNG数据,便于使用。当然这种方法不适合通用,将PNG解码和JPEG编解码结合起来实在点,不过到嵌入式设备了就得连带将PNG和JPEG的库文件都移植进去空间会变大,可以根据情况选取。
①填充PNG数据
void fill_png_info()
{
	watermask_info.width=138;
	watermask_info.height=45;
	watermask_info.depth=4;
	watermask_info.image_size=watermask_info.width * watermask_info.height *watermask_info.depth ;
	watermask_info.bits_per_pixel=watermask_info.depth * 8;
	watermask_info.data=(char *)png_watermark_data;
}
这就是自己写的一个结构体,保存一些后面要用的信息,png_watermark_data这是个const char 类型的数字放的就是PNG解码出来的纯RBGA数据流,后面叠加的时候需要用到。
②叠加水印函数
整体思想就是先按上文的方式解码JPEG文件,再将PNG解码后的数据叠加到JPEG解码数据上,整合后按JPEG格式编码。
int read_jpeg_file(const char *input_filename, const char *output_filename)
{
        struct jpeg_decompress_struct cinfo; //jpeg使用的对象结构体
        struct jpeg_error_mgr jerr;       // jpeg错误处理结构体
        FILE *input_file;
        FILE *output_file;
        JSAMPARRAY buffer;//IJG还定义了JSAMPROW和JSAMPARRAY,分别表示一行JSAMPLE和一个2D的JSAMPLE数组
        int row_width;

        unsigned char *output_buffer;
        unsigned char *tmp = NULL;
        cinfo.err = jpeg_std_error(&jerr); //将错误结构体绑定到jpeg对象上
        if ((input_file = fopen(input_filename, "rb")) == NULL) {
                fprintf(stderr, "can't open %s\n", input_filename);
                return -1;
        }
        jpeg_create_decompress(&cinfo);  //初始化jpeg 对象
        /* Specify data source for decompression */
        jpeg_stdio_src(&cinfo, input_file); //利用标准C中的文件指针传递要打开的jpg文件
        /* Read file header, set default decompression parameters */
        (void) jpeg_read_header(&cinfo, TRUE); //IJG将图像的缺省信息填充到cinfo结构中以便程序使用。
        /* Start decompressor */
        (void) jpeg_start_decompress(&cinfo);
        row_width = cinfo.output_width * cinfo.output_components;//每个像素中的颜色通道数cinfo.output_components(比如灰度为1,全彩色为3)等。
        buffer = (*cinfo.mem->alloc_sarray)
                ((j_common_ptr) &cinfo, JPOOL_IMAGE, row_width, 1);

        output_buffer = (unsigned char *)malloc(row_width * cinfo.output_height);
        memset(output_buffer, 0, row_width * cinfo.output_height);
        tmp = output_buffer;
				/*output_scanline表示当前已经读取的行数,如此即可依次读出图像的所有数据,并填充到缓冲区中,参数1表示的是每次读取的行数。*/
        /* Process data */
        while (cinfo.output_scanline < cinfo.output_height) {
                (void) jpeg_read_scanlines(&cinfo, buffer, 1);

                memcpy(tmp, *buffer, row_width);
                tmp += row_width;
        }
		if(	png_add_watermark(&cinfo, output_buffer,10,10) <0)
		{
			printf("add watermark failed \n");
			return -1;
		}

	jpeg_finish_decompress(&cinfo); //解压缩完毕
	encode_jpeg(&cinfo,output_filename, output_buffer,80);

	jpeg_destroy_decompress(&cinfo);//释放资源
	free(output_buffer);
	/* Close files, if we opened them */
	fclose(input_file);
	return 0;
}
②整合数据函数
PNG格式解码后的RGBA数据当中的A数据包含着该像素点在图像当中的比列,我们根据这个比列进行融合。融合在for循环中,最关键的是要理解像素点数据在数组当中的位置进行偏移融合,JPEG解码的是BGR数据,然PNG数组当中的数据我在解码的时候为了方便就按BRGA的顺序存放,所以就无需进行数据顺序的交换,按实际顺序即可。JPEG解码后的数据是按三个字节一像素偏移,PNG数据是按四字节一像素偏移。
int	png_add_watermark(struct jpeg_decompress_struct *cinfo, unsigned char *output_buffer,int x ,int y)
{
    int rows, cols ,i,j;
    int row_width;
    int step;
    unsigned char *tmp = NULL;
    if( (x+watermask_info.width  )  > cinfo->output_width || (y+watermask_info.height)>cinfo->output_height )
    	return -1;
	row_width = watermask_info.width*watermask_info.depth;
/*rgb - bgr*/
	step = cinfo->output_width * cinfo->output_components;
	//printf(   " output_width =%d,output_components=%d, output_height  =%d \n",cinfo->output_width,cinfo->output_components,cinfo->output_height  );
	//printf("output_buffer = %p  \n",output_buffer);
	tmp = output_buffer + (step) * (y); // 得到当前的偏移行地址
	//char * wm_src_data = dst_data + ( watermask_info.height-1  )* row_width;
	int cnt;
	int num;
	  for(rows = 0 ; rows <watermask_info.height ; rows++ )
	  {
		  for(cols = 0,cnt=0 ; cols <watermask_info.width *(watermask_info.depth ) ; cols+=4 )
		  {
		  		num = watermask_info.data[ cols+3  +  rows* row_width];
		  		//output_buffer[(y*row_width)+rows] = wm_src_data[   ]
				tmp[ cinfo->output_components*x+cnt] = tmp[ cinfo->output_components*x+cnt++]*(100-num)/100  + watermask_info.data[ cols+0  +  rows* row_width] *(num) /100 ;
				tmp[ cinfo->output_components*x+cnt] = tmp[ cinfo->output_components*x+cnt++]*(100-num)/100 + watermask_info.data[ cols+1  +  rows* row_width] *(num) / 100;
				tmp[ cinfo->output_components*x+cnt] = tmp[ cinfo->output_components*x+cnt++]*(100-num)/100  + watermask_info.data[ cols+2  +  rows* row_width] *(num ) / 100;
		  }
		  tmp+=step; //移到下一行
	  }
	//  free(watermask_info.data);
	  return 0;
}
2、编译代码
gcc JpegAddWatermark.c -l jpeg -L jpeg-8c/tmp/lib/ -o AddWm.app
3、运行结果
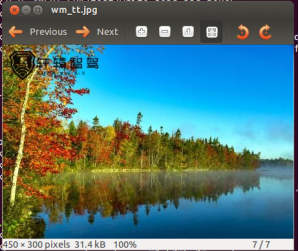
成功的将水印叠加了上去。
结束语
至此本文就编写完成,该项目已经完成快一年半了,很多细节知识都忘记了,当中如果有什么错误还望各位能够在评论区指正,有什么不明白的地方也欢迎在评论区中讨论,能给个赞最好了/wx。