静态代理:
假设现在有一个人(person接口),他的名字叫A(class A implement person),小A 40岁了必须要找对象,但是呢自己比较害羞不好意思开口,这样就需要一个媒婆来帮他找对象(MeiPo 代理类),至此就是静态代理模式,下面我们用带来实现下。
Person:
public interface Person {
	void findLove();
}
A:
public class XiaoA implements Person{
	@Override
	public void findLove() {
        //个人条件
		System.out.println("高富帅");
		System.out.println("有房有车的");
	}
}
媒婆:
public class Meipo2 implements Person {
private XiaoA xiaoA;
public Meipo2(XiaoA xa) {
// TODO Auto-generated constructor stub
this.xiaoA = xa;
}
@Override
public void findLove() {
// TODO Auto-generated method stub
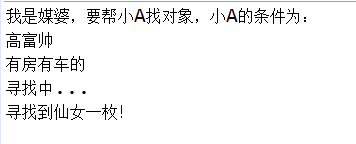
System.out.println("我是媒婆,要帮小A找对象,小A的条件为:");
xiaoA.findLove();
System.out.println("寻找中...");
System.out.println("寻找到仙女一枚!");
}
}Main方法:
public class TestFindLove {
	public static void main(String[] args) {
		Meipo2 meipo2 = new Meipo2(new XiaoA());
		meipo2.findLove();
	}
}
上面的静态代理的基础代码,下面我们考虑一个问题,这时候B也来找媒婆了,说我也要找对象,这时候由于class meipo2代理着A的找对象的任务,无法再代理B,所以我们不得不再创建一个meipo3来代理B,如果有1000个人来就得创建1000个meipo。这时候可能有人说了一个媒婆可以代理多个people啊。但是这样的话,需要修改接口与类,违背了开闭原则。
动态代理:
基于JDK的动态代理:
上面的静态代理是每来一个人就创建一个媒婆代理他,这样的话工作过于繁琐,这时我们为何我开一个媒婆公司呢?将找对象的人交给媒婆公司,让媒婆公司创建媒婆代理他传宗接代的任务!
贴下代码:
增加一个xiaoB:
public class XiaoB implements Person{
	@Override
	public void findLove() {
		System.out.println("矮穷矬");
		System.out.println("屌丝一枚");
	}
}
媒婆 改为 媒婆公司:
public class MeipoCompany implements InvocationHandler {

	private Person target; //被代理对象的引用作为一个成员变量保存下来了

	//获取被代理人的个人资料
	public Object getInstance(Person target) throws Exception{
		this.target = target;
		Class clazz = target.getClass();
		System.out.println("被代理对象的class是:"+clazz);
		return Proxy.newProxyInstance(clazz.getClassLoader(), clazz.getInterfaces(), this);
	}


	@Override
	public Object invoke(Object proxy, Method method, Object[] args) throws Throwable {

		System.out.println("我是媒婆公司:" + "得给你找个异性才行");
		System.out.println("说下你的条件:");
		System.out.println("------------");
		//反射调用方法
		method.invoke(this.target, args);
		System.out.println("------------");
		System.out.println("开始进行海选...");
		System.out.println("找到啦");

		return null;
	}

}
Main方法:
public class TestFindLove {
	public static void main(String[] args) {
		try {
 			Person A = (Person)new MeipoCompany().getInstance(new XiaoA());
 			System.out.println("代理类:"+A.getClass());
 			A.findLove();
 			System.out.println("******************************************************");
 			Person B = (Person)new MeipoCompany().getInstance(new XiaoB());
 			System.out.println("代理类:"+B.getClass());
 			B.findLove();
		} catch (Exception e) {
			e.printStackTrace();
		}
	}
}
打印结果:

这样当小C再来时,只需新建一个小C,然后Person C = (Person)new MeipoCompany().getInstance(new XiaoC());即可代理小C
JDK静态代理是通过直接编码创建的,而JDK动态代理是利用反射机制在运行时创建代理类的。
那么问题来了,jdk是怎么实现动态代理的呢?
首先我们把jdk创建的动态代理类的字节码输出到一个class文件中:(需要引入rt.jar)
byte[] data = ProxyGenerator.generateProxyClass("$Proxy0", new Class[]{Person.class});
			FileOutputStream os = new FileOutputStream("D:/$Proxy0.class");
			os.write(data);
			os.close();
然后反编译一下,反编译后的代码: (这个代码会报错,但是无伤大雅我们只看下其中的逻辑)
public final class Proxy0 extends Proxy
implements Person
{
private static Method m1;
private static Method m3;
private static Method m2;
private static Method m0;

public Proxy0()
  throws
{
  super(paramInvocationHandler);
}

public final boolean equals()
  throws
{
  try
  {
    return ((Boolean)this.h.invoke(this, m1, new Object[] { paramObject })).booleanValue();
  }
  catch (RuntimeException localRuntimeException)
  {
    throw localRuntimeException;
  }
  catch (Throwable localThrowable)
  {
    throw new UndeclaredThrowableException(localThrowable);
  }
}

public final void findLove()
  throws
{
  try
  {
    this.h.invoke(this, m3, null);
    return;
  }
  catch (RuntimeException localRuntimeException)
  {
    throw localRuntimeException;
  }
  catch (Throwable localThrowable)
  {
    throw new UndeclaredThrowableException(localThrowable);
  }
}

public final String toString()
  throws
{
  try
  {
    return ((String)this.h.invoke(this, m2, null));
  }
  catch (RuntimeException localRuntimeException)
  {
    throw localRuntimeException;
  }
  catch (Throwable localThrowable)
  {
    throw new UndeclaredThrowableException(localThrowable);
  }
}

public final int hashCode()
  throws
{
  try
  {
    return ((Integer)this.h.invoke(this, m0, null)).intValue();
  }
  catch (RuntimeException localRuntimeException)
  {
    throw localRuntimeException;
  }
  catch (Throwable localThrowable)
  {
    throw new UndeclaredThrowableException(localThrowable);
  }
}

static
{
  try
  {
    m1 = Class.forName("java.lang.Object").getMethod("equals", new Class[] { Class.forName("java.lang.Object") });
    m3 = Class.forName("com.bzy.proxy.jdk.Person").getMethod("findLove", new Class[0]);
    m2 = Class.forName("java.lang.Object").getMethod("toString", new Class[0]);
    m0 = Class.forName("java.lang.Object").getMethod("hashCode", new Class[0]);
    return;
  }
  catch (NoSuchMethodException localNoSuchMethodException)
  {
    throw new NoSuchMethodError(localNoSuchMethodException.getMessage());
  }
  catch (ClassNotFoundException localClassNotFoundException)
  {
    throw new NoClassDefFoundError(localClassNotFoundException.getMessage());
  }
}
}
上面的proxy0就是JDK生成的代理类。然后我们分析下,他是如何调用到XiaoA的findLove方法的呢
首先调用proxy0的findLove:

然后findLOVE调用了this.h,这个h就是invocationHandler是父类(proxy)中的成员变量
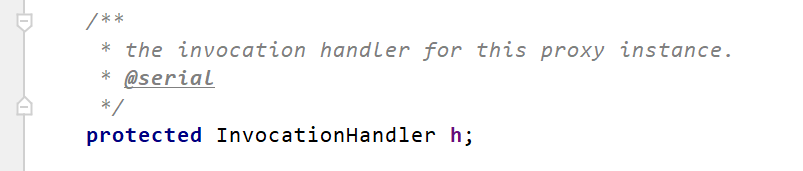
然后调用了h.invoke,那么问题来了,InvocationHandler是一个接口,是在何时实例化接口的呢?即实例化MeipoConpany的呢
我们把目光转向MeipoCompany中的
Proxy.newProxyInstance(clazz.getClassLoader(), clazz.getInterfaces(), this)我们看下newProxyInstance方法: (都在里面解释了)
public static Object newProxyInstance(ClassLoader loader,
                                          Class<?>[] interfaces,
                                          InvocationHandler h)
        throws IllegalArgumentException
    {
		//检查h不为空
        Objects.requireNonNull(h);
		//安全检查
        final Class<?>[] intfs = interfaces.clone();
        final SecurityManager sm = System.getSecurityManager();
        if (sm != null) {
            checkProxyAccess(Reflection.getCallerClass(), loader, intfs);
        }

        /*
         * 动态代理核心,生成新类proxy0,拿到proxy0的class对象
         */
        Class<?> cl = getProxyClass0(loader, intfs);

        /*
         * Invoke its constructor with the designated invocation handler.
         */
        try {
            if (sm != null) {
                checkNewProxyPermission(Reflection.getCallerClass(), cl);
            }
			//反射调用proxy0的构造方法,获取参数为constructorParams的构造方法,
			//其实就是获取参数为InvocationHandler.class的构造方法
            final Constructor<?> cons = cl.getConstructor(constructorParams);
            final InvocationHandler ih = h;
			//cl.getModifiers()获取构造方法修饰符,判断是不是public
            if (!Modifier.isPublic(cl.getModifiers())) {
                AccessController.doPrivileged(new PrivilegedAction<Void>() {
                    public Void run() {
                        cons.setAccessible(true);
                        return null;
                    }
                });
            }
			//返回proxy0的对象,并将InvocationHandler的实现类传入,这里proxy0的构造方法
			//调用了 super(paramInvocationHandler); 也就是调用了父类构造方法将InvocationHandler的实现类传入父类,
			//在父类中通过 this.h = h; 将值赋给了父类中的h,这样就完成了父类中h的实例化

    }
            return cons.newInstance(new Object[]{h});
        } catch (IllegalAccessException|InstantiationException e) {
            throw new InternalError(e.toString(), e);
        } catch (InvocationTargetException e) {
            Throwable t = e.getCause();
            if (t instanceof RuntimeException) {
                throw (RuntimeException) t;
            } else {
                throw new InternalError(t.toString(), t);
            }
        } catch (NoSuchMethodException e) {
            throw new InternalError(e.toString(), e);
        }
    }
总结:
1.调用newProxyInstance方法,然后proxy创建代理对象proxy0,proxy0继承了proxy实现了person接口
2.反射调用proxy0的构造方法,将invocationHandler实现类传入,在proxy0的构造方法中super调用proxy的构造方法,将invocationHandler实现类传入proxy并复制给成员变量。
3.proxy0.findLove时,调用 this.h.invoke(this, m3, null); 调用到父类invocationHandler的实例化对象,再调用到实例化对象的invoke,实现代理