Docker+K8s基础篇(三)
-
kubernetes上的资源
- A:k8s上的常用资源
-
Pod的配置清单
- A:Pod上的清单定义
- B:Pod创建资源的方法
- C:spec下其它字段的介绍
-
Pod的生命周期
- A:Pod的生命周期阶段
- B:容器的两种探测(探针)
- C:容器启动后和终止前钩子
♣一:kubernetes的资源
A:k8s上的常用资源:
1:workload(工作负载型对象):
pod,Replicaset,Deployment,statefulSet,DaemonSet,Job,Cronjob,.....(以及各种各样的pod控制器)deployment
2:服务发现和负载均衡:
Service,Ingress,....
3:配置和存储:
Volume,CSI(K8S上的容器存储接口,用来扩展各种第三方的存储卷)
配置相关:
ConfigMap(配置中心类型的存储对象),Secret(主要功能和ConfigMap相似,但是用于存储敏感数据),.....
外部信息输出给容器:
DownwardAPI,......
4:集群级的资源:(之前的pod资源默认都是在default名称空间里面的),但是有些资源需要在集群级内部进行定义。
Namespace,Node,Role(角色),ClusterRole(集群角色),RoleBinding(角色绑定),ClusteRoleBinding(集群角色绑定)
5:元数据型资源:
HPA,PodTemplate(用于控制器创建pod的模板),LimitRange(定义资源限制)
♣二:Pod的配置清单
A:Pod上的清单定义:
我们前面都使用命令来创建pods,但是这种形式创建pods资源的时候不能人为的定义其内部的配置。


[root@www .kube]# kubectl get pod myapp-5bc569c47d-jh6qk -o yaml  (我们可以通过查看pods资源信息的时候加上-o yaml来查看pods资源的详细信息,而这些详细信息的展示方式也是我们接下来要使用的配置清单来创建pods资源的形式。
apiVersion: v1  api群组的名称和版本
在实际定义中我们会使用group(组名)/version(版本)来定义的,如果没有定义组名,默认是cron(核心组)
kind: Pod   资源类别
metadata:    元数据
  creationTimestamp: "2019-06-23T03:39:45Z"
  generateName: myapp-5bc569c47d-
  labels:
    pod-template-hash: 5bc569c47d
    run: myapp
  name: myapp-5bc569c47d-jh6qk
  namespace: default
  ownerReferences:
  - apiVersion: apps/v1
    blockOwnerDeletion: true
    controller: true
    kind: ReplicaSet
    name: myapp-5bc569c47d
    uid: 8b17b969-9568-11e9-9101-000c291028e5
  resourceVersion: "8087"
  selfLink: /api/v1/namespaces/default/pods/myapp-5bc569c47d-jh6qk
  uid: 8b1c0e97-9568-11e9-9101-000c291028e5
spec:    规格,定义我们要创建的资源需要满足什么规范和特性(这个字段下的内容从定义之初就已经决定了pods资源启动之后的特性)
  containers:
  - image: ikubernetes/myapp:v1
    imagePullPolicy: IfNotPresent
    name: myapp
    resources: {}
    terminationMessagePath: /dev/termination-log
    terminationMessagePolicy: File
    volumeMounts:
    - mountPath: /var/run/secrets/kubernetes.io/serviceaccount
      name: default-token-7bd8r
      readOnly: true
  dnsPolicy: ClusterFirst
  enableServiceLinks: true
  priority: 0
  restartPolicy: Always
  schedulerName: default-scheduler
  securityContext: {}
  serviceAccount: default
  serviceAccountName: default
  terminationGracePeriodSeconds: 30
  tolerations:  容忍度(污点)
  - effect: NoExecute
    key: node.kubernetes.io/not-ready
    operator: Exists
    tolerationSeconds: 300
  - effect: NoExecute
    key: node.kubernetes.io/unreachable
    operator: Exists
    tolerationSeconds: 300
  volumes:
  - name: default-token-7bd8r
    secret:
      defaultMode: 420
      secretName: default-token-7bd8r
status:   这个字段定义了pods资源在当前的状态,上面的spec定义初始状态,status则定义当前状态(只读),如果我们定义的spec状态和后面运行的status当前状态不统一,k8s会自动把当前状态向目标状态转移或靠拢,直到满足用户期望的状态。
  conditions:
  - lastProbeTime: null
    lastTransitionTime: "2019-06-23T03:39:45Z"
    message: '0/3 nodes are available: 3 node(s) had taints that the pod didn''t tolerate.'
    reason: Unschedulable
    status: "False"
    type: PodScheduled
  phase: Pending
  qosClass: BestEffort
[root@www .kube]#
B:Pod创建资源的方法:
不是所有的资源都能接受yaml格式定义的资源,例如apiservice就只能接受JSON格式的资源定义,但是JSON格式在定义起来不如yaml格式的方便,如果使用yaml格式来提供配置清单,apiservice能无损切自动的江yaml格式的清单转换成JSON格式,然后提交直到运行。
配置清单的字段组成:
1:apiVersion(用来定义当前属于哪个组和那个版本,这个直接关系到最终提供使用的是那个版本)
通过命令kubectl api-versions可以查看到当前所有api的版本。
[root@www .kube]# kubectl api-versions
    k8s将api的版本都以组的形式来划分,这样我们后面如果是对版本升级,只需要对组内的版本升级即可,避免全部版本都受到影响。而且分组之后还能在一个组里面定义多个版本,来实现多版本并存。
    admissionregistration.k8s.io/v1beta1
    apiextensions.k8s.io/v1beta1
    apiregistration.k8s.io/v1
    apiregistration.k8s.io/v1beta1
    apps/v1
    apps/v1beta1
    apps/v1beta2
    authentication.k8s.io/v1
    authentication.k8s.io/v1beta1
    authorization.k8s.io/v1
    authorization.k8s.io/v1beta1
    autoscaling/v1
    autoscaling/v2beta1
    autoscaling/v2beta2
    在各组的版本之间还分为了稳定版本(v1),稳定版表示定义好的接口在后续不会再进行变化,万一有变化也是在已有的接口上来增加新的接口。
    非稳定版本(beta),表示定义的接口还会进行变化。
    batch/v1
    batch/v1beta1
    certificates.k8s.io/v1beta1
    coordination.k8s.io/v1
    coordination.k8s.io/v1beta1
    events.k8s.io/v1beta1
    extensions/v1beta1
    networking.k8s.io/v1
    networking.k8s.io/v1beta1
    node.k8s.io/v1beta1
    policy/v1beta1
    rbac.authorization.k8s.io/v1
    rbac.authorization.k8s.io/v1beta1
    scheduling.k8s.io/v1
    scheduling.k8s.io/v1beta1
    storage.k8s.io/v1
    storage.k8s.io/v1beta1
    v1
    [root@www .kube]#
2:kind(资源类别)用来定义创建的对象是属于什么类别,是pod,service,还是deployment等对象,可以按照其固定的语法格式来自定义。
3:metadata(元数据):
提供以下几个字段:
creationTimestamp: "2019-06-24T12:18:48Z"
generateName: myweb-5b59c8b9d-
labels: (对象标签)
pod-template-hash: 5b59c8b9d
run: myweb
name: myweb-5b59c8b9d-gwzz5 (pods对象的名称,同一个类别当中的pod对象名称是唯一的,不能重复)
namespace: default (对象所属的名称空间,同一名称空间内可以重复,这个名称空间也是k8s级别的名称空间,不和容器的名称空间混淆)
ownerReferences:
- apiVersion: apps/v1
blockOwnerDeletion: true
controller: true
kind: ReplicaSet
name: myweb-5b59c8b9d
uid: 37f38f64-967a-11e9-8b4b-000c291028e5
resourceVersion: "943"
selfLink: /api/v1/namespaces/default/pods/myweb-5b59c8b9d-gwzz5
uid: 37f653a6-967a-11e9-8b4b-000c291028e5
annotations(资源注解,这个需要提前定义,默认是没有的)
通过这些标识定义了每个资源引用的path:即/api/group/version/namespaces/名称空间/资源类别/对象名称
4:spec (这个字段最重要,因为spec是用来定义目标状态的‘disired state’,而且资源不通导致spec所嵌套的字段也各不相同,也就因为spec重要且字段不相同,k8s在内部自建了一个spec的说明用于查询)
5:status:(当前状态,’current state‘,这个字段有kubernetes集群来生成和维护,不能自定义,属于一个只读字段)
spec字段的定义说明:
[root@www kubeadm]# kubectl explain pods(通过explain参数加上资源类别就能看到该资源应该怎么定义)
    KIND:     Pod
    VERSION:  v1

    DESCRIPTION:
         Pod is a collection of containers that can run on a host. This resource is
         created by clients and scheduled onto hosts.

    FIELDS:
       apiVersion   <string>
         APIVersion defines the versioned schema of this representation of an
         object. Servers should convert recognized schemas to the latest internal
         value, and may reject unrecognized values. More info:
         https://git.k8s.io/community/contributors/devel/api-conventions.md#resources

       kind <string>
         Kind is a string value representing the REST resource this object
         represents. Servers may infer this from the endpoint the client submits
         requests to. Cannot be updated. In CamelCase. More info:
         https://git.k8s.io/community/contributors/devel/api-conventions.md#types-kinds

       metadata     <Object>  在相应的字段下面只要看到Object就可以知道该字段下面是要嵌套很多二级字段的,但是二级字段我们还是不知道怎么去定义。
         Standard object's metadata. More info:
         https://git.k8s.io/community/contributors/devel/api-conventions.md#metadata

       spec <Object>
         Specification of the desired behavior of the pod. More info:
         https://git.k8s.io/community/contributors/devel/api-conventions.md#spec-and-status

       status       <Object>
         Most recently observed status of the pod. This data may not be up to date.
         Populated by the system. Read-only. More info:
         https://git.k8s.io/community/contributors/devel/api-conventions.md#spec-and-status

    [root@www kubeadm]# kubectl explain pods.metadata 通过资源类别加上带有Object标记的字段,我们就可以看到一级字段下二级字段的内容有那些怎么去定义等
    KIND:     Pod
    VERSION:  v1

    RESOURCE: metadata <Object>

    DESCRIPTION:
         Standard object's metadata. More info:
         https://git.k8s.io/community/contributors/devel/api-conventions.md#metadata

         ObjectMeta is metadata that all persisted resources must have, which
         includes all objects users must create.

    FIELDS:
       annotations  <map[string]string>  二级字段加上map标记代表是映射字段,其字段是有k=v数据组成的json数组
         Annotations is an unstructured key value map stored with a resource that
         may be set by external tools to store and retrieve arbitrary metadata. They
         are not queryable and should be preserved when modifying objects. More
         info: http://kubernetes.io/docs/user-guide/annotations

       clusterName  <string>
         The name of the cluster which the object belongs to. This is used to
         distinguish resources with same name and namespace in different clusters.
         This field is not set anywhere right now and apiserver is going to ignore
         it if set in create or update request.

       creationTimestamp    <string>
         .........
        ownerReferences      <[]Object>  二级字段下面还可以嵌套三级字段,和上面方法一样[root@www kubeadm]# kubectl explain pods.metadata.ownerReferences,通过加上不同级别的字段名称来看下字段下的内容,而且前面的[]号代表对象列表

    (如果字段后面加上了-required-就代表这个字段是必选字段)
    ........
自定义yaml文件:
我们在创建yaml文件的时候可以先把上面5个一级字段写下来,然后慢慢填空来完成:
apiVersion: v1
kind: Pod
metadata:
name: pod-number 而且这个位置的名字好像不支持大写字母
namespace: default
labels: #这个位置可以使用{key:value,key:value.....}kv之间逗号隔开
app: myweb 注意这个位置的名字和下面创建image的时候的名字一致
tier: Not outside
spec:
containers:
- name: myweb
image: ikubernetes/myapp:v1
- name: busybox #如果有多个容器,还可以多定义几个
image: busybox:latest 因为busybox默认是启动的sh命令,我们可以给shell命令传递些参数。
command: (["/bin/sh","-c","sleep 20"] 传递的参数可以使用[]来写,也可以用下面的形式来定义)
- "/bin/sh"
- "-c"
- "echo $(date) >> /usr/share/nginx/html/index.html; sleep 5"
[root@www TestYaml]# kubectl create -f pod-test.yaml 然后使用create参数-f去指定加载的yaml文件名
pod/pod-number created
[root@www TestYaml]# kubectl get pods
NAME         READY   STATUS             RESTARTS   AGE
pod-kk       1/1     Running            0          88s
pod-number   1/2     CrashLoopBackOff   4          5m59s可以看到pod-number已经被创建
我们定义了两个容器,正在运行的有一个,我们可以通过命令来查看通过yaml创建的文件的详细信息
[root@www TestYaml]# kubectl describe pods pod-number  通过describe参数来查看pods的详细信息
Name:               pod-number
Namespace:          default
Priority:           0
PriorityClassName:  <none>
Node:               www.kubernetes.node1.com/192.168.181.140  运行在哪个节点上
Start Time:         Wed, 26 Jun 2019 21:05:36 +0800
Labels:             app=myweb
                    tier=Not-outside
Annotations:        <none>
Status:             Running  可以看到名称叫myweb状态是运行中
IP:                 10.244.1.19
Containers:
  myweb:
    Container ID:   docker://4b213ff75852bf943adc4a4f35dfb41dd881ac10b051bd545ca00f8bdbcb9ab1
    Image:          ikubernetes/myapp:v1
    Image ID:       docker-pullable://ikubernetes/myapp@sha256:9c3dc30b5219788b2b8a4b065f548b922a34479577befb54b03330999d30d513
    Port:           <none>
    Host Port:      <none>
    State:          Running
      Started:      Wed, 26 Jun 2019 21:05:41 +0800
    Ready:          True
    Restart Count:  0
    Environment:    <none>
    Mounts:
      /var/run/secrets/kubernetes.io/serviceaccount from default-token-n5fjx (ro)
  busybox:
    Container ID:  docker://e2b6b439439202e1887b3182b3155bb7e6798460be48c42edafda046ef907e8f
    Image:         busybox:latest
    Image ID:      docker-pullable://busybox@sha256:7a4d4ed96e15d6a3fe8bfedb88e95b153b93e230a96906910d57fc4a13210160
    Port:          <none>
    Host Port:     <none>
    Command:
      /bin/sh
      -c
      echo $(date) >> /usr/share/nginx/html/index.html; sleep 5
    State:          Waiting   因为我们第二个容器创建之后运行的命令是有问题的,所有状态也是显示不正常的
      Reason:       CrashLoopBackOff
    Last State:     Terminated
      Reason:       Completed
      Exit Code:    0
      Started:      Wed, 26 Jun 2019 21:27:15 +0800
      Finished:     Wed, 26 Jun 2019 21:27:20 +0800
    Ready:          False
    Restart Count:  8
    Environment:    <none>
    Mounts:
      /var/run/secrets/kubernetes.io/serviceaccount from default-token-n5fjx (ro)
Conditions:
  Type              Status
  Initialized       True
  Ready             False
  ContainersReady   False
  PodScheduled      True
Volumes:
  default-token-n5fjx:
    Type:        Secret (a volume populated by a Secret)
    SecretName:  default-token-n5fjx
    Optional:    false
QoS Class:       BestEffort
Node-Selectors:  <none>
Tolerations:     node.kubernetes.io/not-ready:NoExecute for 300s
                 node.kubernetes.io/unreachable:NoExecute for 300s
Events:  在这个字段信息下,我们可以看到整个yaml格式创建pods的过程
  Type     Reason     Age                 From                               Message
  ----     ------     ----                ----                               -------
  Normal   Scheduled  26m                 default-scheduler                  Successfully assigned default/pod-number to www.kubernetes.node1.com
  Normal   Created    25m                 kubelet, www.kubernetes.node1.com  Created container myweb
  Normal   Pulled     25m                 kubelet, www.kubernetes.node1.com  Container image "ikubernetes/myapp:v1" already present on machine
  Normal   Started    25m                 kubelet, www.kubernetes.node1.com  Started container myweb
  Warning  Failed     25m                 kubelet, www.kubernetes.node1.com  Failed to pull image "busybox:latest": rpc error: code = Unknown desc = Error response from daemon: Get https://registry-1.docker.io/v2/library/busybox/manifests/latest: Get https://auth.docker.io/token?scope=repository%3Alibrary%2Fbusybox%3Apull&service=registry.docker.io: net/http: TLS handshake timeout
  Warning  Failed     25m (x2 over 25m)   kubelet, www.kubernetes.node1.com  Error: ErrImagePull
  Warning  Failed     25m                 kubelet, www.kubernetes.node1.com  Failed to pull image "busybox:latest": rpc error: code = Unknown desc = Error response from daemon: Get https://registry-1.docker.io/v2/: net/http: TLS handshake timeout
  Warning  Failed     24m (x2 over 25m)   kubelet, www.kubernetes.node1.com  Error: ImagePullBackOff
  Normal   BackOff    24m (x2 over 25m)   kubelet, www.kubernetes.node1.com  Back-off pulling image "busybox:latest"
  Normal   Started    24m (x2 over 24m)   kubelet, www.kubernetes.node1.com  Started container busybox
  Normal   Pulling    23m (x5 over 25m)   kubelet, www.kubernetes.node1.com  Pulling image "busybox:latest"
  Normal   Created    23m (x3 over 24m)   kubelet, www.kubernetes.node1.com  Created container busybox
  Normal   Pulled     15m (x7 over 24m)   kubelet, www.kubernetes.node1.com  Successfully pulled image "busybox:latest"
  Warning  BackOff    54s (x89 over 23m)  kubelet, www.kubernetes.node1.com  Back-off restarting failed container
查看pods日志:
因为我们创建busybox的是状态是有问题的,我们就可以通过命令来查看。
[root@www TestYaml]# kubectl logs pod-number busybox  我们通过logs参数指定查看pods里面容器的日志
/bin/sh: can't create /usr/share/nginx/html/index.html: nonexistent directory  可以看到报错内容,方便我们去查询容器的错误
[root@www TestYaml]# curl 10.244.1.19  因为我们创建的myweb是正常运行,但是没有访问请求,我们自己访问下myweb制造访问请求
Hello MyApp | Version: v1 | <a href="hostname.html">Pod Name</a>
[root@www TestYaml]# kubectl logs pod-number myweb
10.244.0.0 - - [26/Jun/2019:13:41:35 +0000] "GET / HTTP/1.1" 200 65 "-" "curl/7.29.0" "-"   可以看到来自master在什么时间对myweb进行了访问
创建好的容器我们也可以和docker一样通过命令到容器里面去操作。
[root@www TestYaml]# kubectl exec --help  可以使用exec命令来操作
命令行格式
Usage:
  kubectl exec POD [-c CONTAINER] -- COMMAND [args...] [options]
  注意command前面的--是固定格式
[root@www TestYaml]# kubectl exec -it pod-number -c myweb -- /bin/sh
/ #
[root@www TestYaml]# kubectl get pods
NAME         READY   STATUS         RESTARTS   AGE
pod-kk       1/1     Running        0          45m
pod-number   1/2     ErrImagePull   12         49m
基于yaml文件删除pods。
[root@www TestYaml]# kubectl delete -f pod-test.yaml  我们在删除pods资源的时候可以基于yaml文件定义的pods资源来删除,这样我们即使删除了pods,但是yaml文件还存在,想创建随时可以create下就能出来,无需每次都run,避免人为命令行run的时候导致的问题
pod "pod-kk" deleted
[root@www TestYaml]# kubectl get pods    而且在基于yaml文件删除的时候发现删除的pods不在会被自动创建了,也就是说pods不在受控制器管理了,想删除随时可以删除和创建
NAME         READY   STATUS    RESTARTS   AGE
pod-number   1/2     Running   13         50m
我们上面只是写了一个最简单yaml,其实yaml能更好的按照我们的期许或者更加可控的形式来创建pods,yaml形式大大的弥补了pods自定义这个概念,使得最大限度上pods是按照约束和规范来创建的。
kubectl管理资源有三种方式:
1:命令管理法;
2:配置清单管理法(声明式);
配置清单式好处是不言而喻的,可以随时修改和创建,极大的规避了错误的产生。
3:通过其它命令的配置清单管理法。
我们上面创建的pods是没有持久存储功能的,要想完成持久存储,必须脱离k8s集群节点之外的网络存储节点,这种存储节点都是具有持久存储的节点。
C:spec下其它字段的介绍:
我们可以通过explain一层层的从一级字段(例如spec)往下看。
[root@www TestYaml]# kubectl explain pods.spec.containers.imagePullPolicy
KIND:     Pod
VERSION:  v1

FIELD:    imagePullPolicy <string>

DESCRIPTION:
     Image pull policy. One of Always, Never, IfNotPresent. Defaults to Always
     if :latest tag is specified, or IfNotPresent otherwise. Cannot be updated.
     More info:
     https://kubernetes.io/docs/concepts/containers/images#updating-images
imagePullPolicy字段定义了三种镜像获取的方式,而且当对象一旦被创建之后,改字段是不被允许的。
Always:总是去仓库里面拖镜像,而且如果镜像标签是latest,就默认从仓库获取镜像;
Never:总是以使用本地镜像,本地没有也不会去仓库里面拖镜像;
IfNotPresent:当本地没有才去仓库拖镜像,除了latest之外,其它的都遵循IfNotPresent模式。
[root@www TestYaml]# kubectl explain pods.spec.containers.ports
如果是创建的对象后面需要暴露端号出去,可以一次暴露多个端口,而且每个暴露出去的端口还可以自定义名字,最后还指明暴露的端口是什么协议
当然我们还注意的是例如对象是nginx,默认是80端口,及时在此不指定暴露的端口,默认也是暴露服务默认的端口。
KIND:     Pod
VERSION:  v1

RESOURCE: ports <[]Object>

DESCRIPTION:
     List of ports to expose from the container. Exposing a port here gives the
     system additional information about the network connections a container
     uses, but is primarily informational. Not specifying a port here DOES NOT
     prevent that port from being exposed. Any port which is listening on the
     default "0.0.0.0" address inside a container will be accessible from the
     network. Cannot be updated.

     ContainerPort represents a network port in a single container.
那从实际的角度来说指定容器端口即可containerPort
FIELDS:
   containerPort        <integer> -required-
     Number of port to expose on the pod's IP address. This must be a valid port
     number, 0 < x < 65536.

   hostIP       <string>
     What host IP to bind the external port to.

   hostPort     <integer>
     Number of port to expose on the host. If specified, this must be a valid
     port number, 0 < x < 65536. If HostNetwork is specified, this must match
     ContainerPort. Most containers do not need this.

   name <string>
     If specified, this must be an IANA_SVC_NAME and unique within the pod. Each
     named port in a pod must have a unique name. Name for the port that can be
     referred to by services.

   protocol     <string>
     Protocol for port. Must be UDP, TCP, or SCTP. Defaults to "TCP".
     没有指定协议,默认是tcp的协议
 案例:
 spec:
   containers:
   - name: myweb1
     image: ikubernetes/myapp:v2
     ports:
     - name: http
       containerPort: 80   可以一次暴露多个端口
     - name: https
       containerPort: 443
[root@www TestYaml]# kubectl explain pods.spec.containers.args
args指默认向command(命令)传递参数
KIND:     Pod
VERSION:  v1

FIELD:    args <[]string>

DESCRIPTION:
     Arguments to the entrypoint. The docker image's CMD is used if this is not
     provided. Variable references $(VAR_NAME) are expanded using the
     container's environment. If a variable cannot be resolved, the reference in
     the input string will be unchanged. The $(VAR_NAME) syntax can be escaped
     with a double $$, ie: $$(VAR_NAME). Escaped references will never be
     expanded, regardless of whether the variable exists or not. Cannot be
     updated. More info:
     https://kubernetes.io/docs/tasks/inject-data-application/define-command-argument-container/#running-a-command-in-a-shell
[root@www TestYaml]# kubectl explain pods.spec.containers.command
command指向要运行的对象给与默认执行的命令或者程序
KIND:     Pod
VERSION:  v1

FIELD:    command <[]string>

DESCRIPTION:
     Entrypoint array. Not executed within a shell(默认给出的命令是不会运行在shell里面的,如果想运行在sehll里面需要自己指定  ). The docker image's
     ENTRYPOINT is used if this is not provided. Variable references $(VAR_NAME)
     are expanded using the container's environment. If a variable cannot be
     resolved, the reference in the input string will be unchanged. The
     $(VAR_NAME) syntax can be escaped with a double $$, ie: $$(VAR_NAME).
     Escaped references will never be expanded, regardless of whether the
     variable exists or not. Cannot be updated. More info:
     https://kubernetes.io/docs/tasks/inject-data-application/define-command-argument-container/#running-a-command-in-a-shell
在args和command和dockerfile里面的entypoint和cmd是存在一定关系的:
当没有提供args和command的时候就运行镜像里面的entypoint和cmd;
如果只提供了command,没有提供args,那镜像里面的entypoint和cmd都被忽略;
当只定义了args,默认会将args当参数传递给entypoint,这个时候镜像里面的cmd将不再生效;
当提供了args和command两种,镜像里面的entypoint和cmd就将失效了。
标签:
标签是k8s上一个重要的对象声明,标签具有以下特征:
一个对象可以有多个标签,一个标签也可以贴在多个对象上;
标签即可以在被创建的时候定义,也可以在创建之后来增加,修改和删除;
以便于对象被创建之后,方便调度器做匹配度检查,从而达到目标对象。
标签在定义的时候应该考虑到以下几个部分:
1:对象的版本(稳定版,开发版,公测版,内存版)
2:环境标签(测试版,开发版本)
3:对象提供的功能(web服务,代理服务,数据库服务等等)
4:分区标签(用户a,用户b等等)
5:品控标签(月级定时追踪,周级定时追踪等等)
标签的定义需要遵循:
key:字母,数字,_,-,. 字符,且不能超过63个字符;
value;其它和key相同,但是可以为空。
[root@www TestYaml]# kubectl get pods --show-labels  通过参数--show-labels来查看对象标签
NAME     READY   STATUS    RESTARTS   AGE   LABELS
pod-yy   1/1     Running   0          61m   app=myweb1,tier=Not-outside
[root@www TestYaml]# kubectl get pods -L app   加-L参数值过滤查询对象标签的值
NAME     READY   STATUS    RESTARTS   AGE     APP
pod-kk   1/1     Running   1          2m57s   mypod01
pod-yy   1/1     Running   0          66m     myweb1
[root@www TestYaml]# kubectl get pods -l app --show-labels  -l过滤查看指包含app这个标签一类的对象
NAME     READY   STATUS    RESTARTS   AGE    LABELS
pod-kk   1/1     Running   1          5m6s   app=mypod01,tier=Not-outside
pod-yy   1/1     Running   0          68m    app=myweb1,tier=Not-outside
Usage:
  kubectl label [--overwrite] (-f FILENAME | TYPE NAME) KEY_1=VAL_1 ... KEY_N=VAL_N [--resource-version=version]
[options]
[root@www TestYaml]# kubectl label pods pod-kk edition=beta_version
pod/pod-kk labeled
[root@www TestYaml]# kubectl get pods pod-kk --show-labels 可以看到新的标签已经标记完成
NAME     READY   STATUS    RESTARTS   AGE   LABELS
pod-kk   1/1     Running   1          11m   app=mypod01,edition=beta_version,tier=Not-outside
k8s的标签选择器支持两种方式来进行选择性查询:
等值关系的标签选择器:
支持:=,==,!=
[root@www TestYaml]# kubectl get pods -l app=mypod01 --show-labels 等于
NAME     READY   STATUS    RESTARTS   AGE   LABELS
pod-kk   1/1     Running   1          20m   app=mypod01,edition=beta_version,tier=Not-outside
[root@www TestYaml]# kubectl get pods -l app!=mypod01 --show-labels  不等于
NAME     READY   STATUS    RESTARTS   AGE   LABELS
pod-yy   1/1     Running   0          83m   app=myweb1,tier=Not-outside
[root@www TestYaml]# kubectl get pods -l app=mypod01,edition=beta_version --show-labels  同时满足多个条件的
NAME     READY   STATUS    RESTARTS   AGE   LABELS
pod-kk   1/1     Running   1          22m   app=mypod01,edition=beta_version,tier=Not-outside
集合关系的标签选择器:
key in (value1,value2)
key notin (value1,value2)
key和!key
[root@www TestYaml]# kubectl get pods -l "edition in (beta_version)" --show-labels
NAME     READY   STATUS    RESTARTS   AGE   LABELS
pod-kk   1/1     Running   1          37m   app=mypod01,edition=beta_version,tier=Not-outside
[root@www TestYaml]#
在k8s上我们很多资源都需要通过标签和标签选择器来关联其它的资源,例如pod控制器和service,针对这种资源我们通常会使用两个字段来嵌套关联其它资源
1:matchLabesl;直接给定键值
2:matchExpressions;基于给定的表达式来定义使用的选择器
{key:“KEY",operator:"OPERATOR",values:[value1,value2....]}
表示定义的key的values值基于operator来做比较,能满足即表示满足我们的需求,否则就不能满足我们的需求
operator表示操操作符,常用的有:In,Notin,Exists(存在),NotExists(不存在)
使用In,Notin后面的values必须是一个非空列表
Exists,NotExists的valuel必须是一个空列表
k8s上很多资源都可以打标签,例如nodes等。
[root@www TestYaml]# kubectl get nodes --show-labels
NAME                        STATUS   ROLES    AGE    VERSION   LABELS
                                                               beta.kubernetes.io是前缀,这个前缀是dns域名
www.kubernetes.master.com   Ready    master   142m   v1.14.1   beta.kubernetes.io/arch=amd64,beta.kubernetes.io/os=linux,kubernetes.io/arch=amd64,kubernetes.io/hostname=www.kubernetes.master.com,kubernetes.io/os=linux,node-role.kubernetes.io/master=
www.kubernetes.node1.com    Ready    <none>   140m   v1.14.3   beta.kubernetes.io/arch=amd64,beta.kubernetes.io/os=linux,kubernetes.io/arch=amd64,kubernetes.io/hostname=www.kubernetes.node1.com,kubernetes.io/os=linux
www.kubernetes.node2.com    Ready    <none>   140m   v1.14.3   beta.kubernetes.io/arch=amd64,beta.kubernetes.io/os=linux,kubernetes.io/arch=amd64,kubernetes.io/hostname=www.kubernetes.node2.com,kubernetes.io/os=linux
[root@www TestYaml]#
nodeSelector节点选择器,可以选择pod在哪个节点上运行,这样我们可以指定该pod在哪个或者哪类节点上运行,因为我们几点资源不都是一样的,有的可能是虚拟机和云机,有的是ibm或者dell的实体机等,针对这种我们做监控也得有针对性的运行pods
[root@www TestYaml]# kubectl explain pods.spec.nodeSelector
KIND:     Pod
VERSION:  v1

FIELD:    nodeSelector <map[string]string> 注意字段的类型

DESCRIPTION:
     NodeSelector is a selector which must be true for the pod to fit on a node.
     Selector which must match a node's labels for the pod to be scheduled on
     that node. More info:
     https://kubernetes.io/docs/concepts/configuration/assign-pod-node/
spec:
   containers:
   - name: mypod01
     image: ikubernetes/myapp:v2
     ports:
     - name: http
       containerPort: 80
     - name: https
       containerPort: 443
   nodeSelector:   例如我们定义改pods只能运行在带有IBM标签的机器上,当然得事先定义带IMB的标签
       lable: IBM
如果不想这么麻烦,我就想直接指定节点,也可以,字段是nodeName
[root@www TestYaml]# kubectl explain pods.spec.nodeName
KIND:     Pod
VERSION:  v1

FIELD:    nodeName <string>

DESCRIPTION:
     NodeName is a request to schedule this pod onto a specific node. If it is
     non-empty, the scheduler simply schedules this pod onto that node, assuming
     that it fits resource requirements.
annotations:资源注解,这个label不同的是,不能作为标签选择器的挑选机制所存在,只能为对象提供元数据,而且资源描述是没有字符限制的。当创建的大型且重要对象的适合,资源描述尤为重要。
[root@www TestYaml]# cat pod-test.yaml
apiVersion: v1
kind: Pod
metadata:
   name: pod-kk
   namespace: default
   labels:
     app: mypod01
     tier: Not-outside
   annotations:  我们定义了三个资源的描述
     creator: "Tommy"
     create_time: "2019-06-30"
     Contact_information: "[email protected]"
spec:
   containers:
   - name: mypod01
     image: ikubernetes/myapp:v2
     ports:
     - name: http
       containerPort: 80
     - name: https
       containerPort: 443
   nodeSelector:
       lable: IBM
[root@www TestYaml]# kubectl create -f pod-test.yaml
pod/pod-kk created
[root@www TestYaml]# kubectl describe pods pod-kk
Name:               pod-kk
Namespace:          default
Priority:           0
PriorityClassName:  <none>
Node:               <none>
Labels:             app=mypod01
                    tier=Not-outside
Annotations:        Contact_information: baidu@163.com  可以看到Annotations的信息,但是不是安装我们定义的顺序来的,但是无关紧要。
                    create_time: 2019-06-30
                    creator: Tommy
Status:             Pending
IP:
Containers:
  mypod01:
    Image:        ikubernetes/myapp:v2
    Ports:        80/TCP, 443/TCP
    Host Ports:   0/TCP, 0/TCP
    Environment:  <none>
..........
♣三:Pod的生命周期
A:Pod的生命周期阶段:
一个pods的生命周期需要经历一下几个阶段:
1:pod被创建到运行为一个阶段;
2:pods在被创建之后到运行为容器之前有一段的空闲时间,这个时间有可能需要给容器做一些环境的初始化。
3:当pods被运维为容器的最开始,容器本身需要最环境的初始化,例如容器如果是nginx,nginx需要对html路径下的文件按照顺序加载等等,当然容器有开始就有结束,结束的时候对容器产生的数 据进行处理;
4:容器在运行的过程中我们需要对容器做监控,存活性状态检测。
pod的生命周期按照状态来划分可以分为一下几个部分:
1:Pending(挂起),pods为什么会挂起,pods运行的时候是按照yaml文件来运行的,当节点环境不能满足pods运行就会处于挂起,也代表调度尚未完成;
2:Running(运行)
3:Failed(失败)
4:Succeeded(成功)
5:Unknown(未知状态)
等等状态
pods创建的过程:
当用户创建pods的时候,这个请求会传递给apiservice,apisevice接收到请求之后会保存在etcd当中,接下来apiservice会请求scheduler来进行调度,如果调度成功了会将调度的结果保存在etcd的poids资源状态信息当中,
被调度的节点上的kubelet会得到这个保存的状态知道有一个新任务给到自己了,kubelet拿到清单之后并启动运行这个pods,pods创建的状态对由kubelet发送给apiservice保存在etcd当中。
pod生命周期中的重要行为,初始化容器,容器探测。
pod的重启:
[root@www TestYaml]# kubectl explain pods.spec.restartPolicy
restartPolicy用来给重启容器,当探测到容器挂了,restartPolicy会提供三种选项给用户,Always(总是重启),OnFailure(只有正常终止的才重启),Never(从不重启)
KIND:     Pod
VERSION:  v1

FIELD:    restartPolicy <string>

DESCRIPTION:
     Restart policy for all containers within the pod. One of Always, OnFailure,
     Never. Default to Always. More info:
     https://kubernetes.io/docs/concepts/workloads/pods/pod-lifecycle/#restart-policy
pods的重启不是我们常规理解的一旦服务退出就立马重启,周而复始的重启,因为每一次重启都会消耗我们的硬件资源的,如果不能合理处理这种情况,可能我们机器硬件资源就用完了,影响到其他的程序,所以pods的重启是第一次挂了立马重启,
当第二次挂了是延时重启,每一次重启就要在上一次时间上翻倍,直到最大时长300秒,到300秒一会代表pods每一次重启都需要300秒。当pods节点没有挂或者pods没有被删除,就一直会在此节点上重启。
pod的终止:
pod的终止需要遵循平滑终止的策略,主要是为了保证我们的数据不会丢失,当用户或者外在因素终止了pods,pods首先会想其内部的容器发起终止信号,让pods中的容器自然终止,这个终止是有时间限制的,例如10秒,10秒没有终止,就会发起kill信号。
这个宽限的时间默认是30秒,也可以自行定义。
B:容器的两种探测(探针)
liveness probe(存活性探测)和readiness probe(就绪性探测)
容器的探测和我们生活常见的探测一样,在容器里面安装一些传感器或者探针等,来获取一些数据来作为容器是否存活或者就绪的标准,目前k8s上对两种状态的探测方式是一样的。
三种探测(探针)类型:
1:ExecAction
2:TCPSocketAction(tcp套接字探测)
3:HTTPGetAction(如果对象是http服务,我们直接发送http的请求即可达到探测目的)
上述三种针对两种不同的状态又分为了存活性探针或者就绪性探针,还有这个探测是用来探测容器的,不是pods。
[root@www home]# kubectl explain pod.spec.containers.livenessProbe
KIND:     Pod
VERSION:  v1

RESOURCE: livenessProbe <Object>

DESCRIPTION:
     Periodic probe of container liveness. Container will be restarted if the
     probe fails. Cannot be updated. More info:
     https://kubernetes.io/docs/concepts/workloads/pods/pod-lifecycle#container-probes

     Probe describes a health check to be performed against a container to
     determine whether it is alive or ready to receive traffic.

FIELDS:
   exec <Object>  第一种
     One and only one of the following should be specified. Exec specifies the
     action to take.

   failureThreshold     <integer>  指定探测的多少次都是失败的,才认为是失败的
     Minimum consecutive failures for the probe to be considered failed after
     having succeeded. Defaults to 3(默认是3此). Minimum value is 1.(最少是一次)

   httpGet      <Object> 第二种
     HTTPGet specifies the http request to perform.

   initialDelaySeconds  <integer>  在docker容器在启动的时候立即做探测,这个时候可能主程序还没有启动完成,这个时候探测结果有可能是失败造成误伤,在多长时间之后进行探测
     Number of seconds after the container has started before liveness probes  默认是容器一旦启动就立马探测
     are initiated. More info:
     https://kubernetes.io/docs/concepts/workloads/pods/pod-lifecycle#container-probes

   periodSeconds        <integer>  指定探测次数之后间隔多长时间来进行探测
     How often (in seconds) to perform the probe. Default to 10 (默认是10秒探测一次)seconds. Minimum
     value is 1.

   successThreshold     <integer>
     Minimum consecutive successes for the probe to be considered successful
     after having failed. Defaults to 1. Must be 1 for liveness. Minimum value
     is 1.

   tcpSocket    <Object>第三种
     TCPSocket specifies an action involving a TCP port. TCP hooks not yet
     supported

   timeoutSeconds       <integer>  指定探测间隔时间之后超时多长时间
     Number of seconds after which the probe times out. Defaults to 1(默认是1秒) second.
     Minimum value is 1. More info:
     https://kubernetes.io/docs/concepts/workloads/pods/pod-lifecycle#container-probes
     上面三种探针,我们一次创建指需要定义一个足以
[root@www home]# kubectl explain pod.spec.containers.readinessProbe
KIND:     Pod
VERSION:  v1

RESOURCE: readinessProbe <Object>  探测方式和livenessProbe一样的,但是需要分清楚两者之间的属性,程序存活不代表程序就是就绪的

DESCRIPTION:
     Periodic probe of container service readiness. Container will be removed
     from service endpoints if the probe fails. Cannot be updated. More info:
     https://kubernetes.io/docs/concepts/workloads/pods/pod-lifecycle#container-probes

     Probe describes a health check to be performed against a container to
     determine whether it is alive or ready to receive traffic.

FIELDS:
   exec <Object>
     One and only one of the following should be specified. Exec specifies the
     action to take.

   failureThreshold     <integer>
     Minimum consecutive failures for the probe to be considered failed after
     having succeeded. Defaults to 3. Minimum value is 1.

   httpGet      <Object>
     HTTPGet specifies the http request to perform.

   initialDelaySeconds  <integer>
     Number of seconds after the container has started before liveness probes
     are initiated. More info:
     https://kubernetes.io/docs/concepts/workloads/pods/pod-lifecycle#container-probes

   periodSeconds        <integer>
     How often (in seconds) to perform the probe. Default to 10 seconds. Minimum
     value is 1.

   successThreshold     <integer>
     Minimum consecutive successes for the probe to be considered successful
     after having failed. Defaults to 1. Must be 1 for liveness. Minimum value
     is 1.

   tcpSocket    <Object>
     TCPSocket specifies an action involving a TCP port. TCP hooks not yet
     supported

   timeoutSeconds       <integer>
     Number of seconds after which the probe times out. Defaults to 1 second.
     Minimum value is 1. More info:
     https://kubernetes.io/docs/concepts/workloads/pods/pod-lifecycle#container-probes
除了上述两种,k8s还提供了生命周期的探测。
[root@www home]# kubectl explain pod.spec.containers.lifecycle
这个什么周期是用来定义容器启动前和终止后的钩子参数的
KIND:     Pod
VERSION:  v1

RESOURCE: lifecycle <Object>

DESCRIPTION:
     Actions that the management system should take in response to container
     lifecycle events. Cannot be updated.

     Lifecycle describes actions that the management system should take in
     response to container lifecycle events. For the PostStart and PreStop
     lifecycle handlers, management of the container blocks until the action is
     complete, unless the container process fails, in which case the handler is
     aborted.

FIELDS:
   postStart    <Object>
     PostStart is called immediately after a container is created. If the
     handler fails, the container is terminated and restarted according to its
     restart policy. Other management of the container blocks until the hook
     completes. More info:
     https://kubernetes.io/docs/concepts/containers/container-lifecycle-hooks/#container-hooks

   preStop      <Object>
     PreStop is called immediately before a container is terminated due to an
     API request or management event such as liveness probe failure, preemption,
     resource contention, etc. The handler is not called if the container
     crashes or exits. The reason for termination is passed to the handler. The
     Pod's termination grace period countdown begins before the PreStop hooked
     is executed. Regardless of the outcome of the handler, the container will
     eventually terminate within the Pod's termination grace period. Other
     management of the container blocks until the hook completes or until the
     termination grace period is reached. More info:
     https://kubernetes.io/docs/concepts/containers/container-lifecycle-hooks/#container-hooks
exec说明:
[root@www TestYaml]# kubectl explain pod.spec.containers.livenessProbe.exec
KIND:     Pod
VERSION:  v1

RESOURCE: exec <Object>

DESCRIPTION:
     One and only one of the following should be specified. Exec specifies the
     action to take.

     ExecAction describes a "run in container" action.

FIELDS:要想使用exec命令必须是容器里面程序拥有并且能执行的命令才可以
   command      <[]string>
     Command is the command line to execute inside the container, the working
     directory for the command is root ('/') in the container's filesystem. The
     command is simply exec'd, it is not run inside a shell, so traditional
     shell instructions ('|', etc) won't work. To use a shell, you need to
     explicitly call out to that shell. Exit status of 0 is treated as
     live/healthy and non-zero is unhealthy.
[root@www TestYaml]# cat pod-test.yaml
apiVersion: v1
kind: Pod
metadata:
   name: busybox-test
   namespace: default
spec:
   containers:
   - name: busybox-test-pod
     image: busybox:latest
     command: ["bin/sh","-c","touch /home/busybox; sleep 20; mv /home/busybox /tmp/; sleep 1200"] 我们给定命令让对象启动为容器之后执行的命令
     livenessProbe:
       exec:  使用exec加上命令对这个容器运行之后创建的文件进行命令的探测
         command: ["test","-e","/home/busybox"]
       initialDelaySeconds: 3  在容器启动后3秒才开始探测
       periodSeconds: 4 每隔4秒探测一次
[root@www TestYaml]# kubectl create -f pod-test.yaml
pod/busybox-test created
[root@www TestYaml]# kubectl get pods -w
NAME           READY   STATUS    RESTARTS   AGE
busybox-test   1/1     Running   0          46s  可以看到pods开始是running的
pod-kk         0/1     Pending   0          19m
[root@www TestYaml]# kubectl describe pods busybox-test
Name:               busybox-test
Namespace:          default
Priority:           0
PriorityClassName:  <none>
Node:               www.kubernetes.node1.com/192.168.181.140
Start Time:         Mon, 01 Jul 2019 21:01:03 +0800
Labels:             <none>
Annotations:        <none>
Status:             Running   容器状态是running和实际的状态相符
IP:                 10.244.1.22
Containers:
  busybox-test-pod:
    Container ID:  docker://dce312cf24767a597ee177cf65d83686d1cf0a12a638708eb2810e78a18ab0de
    Image:         busybox:latest
    Image ID:      docker-pullable://busybox@sha256:7a4d4ed96e15d6a3fe8bfedb88e95b153b93e230a96906910d57fc4a13210160
    Port:          <none>
    Host Port:     <none>
    Command:
      bin/sh
      -c
      touch /home/busybox; sleep 20; mv /home/busybox /tmp/; sleep 1200
    State:          Waiting
      Reason:       CrashLoopBackOff
    Last State:     Terminated  但是看到最近一次的状态是结束的
      Reason:       Error   原因是错误
      Exit Code:    137    退出的代码是137
      Started:      Mon, 01 Jul 2019 21:19:55 +0800   启动的时间
      Finished:     Mon, 01 Jul 2019 21:20:57 +0800   完成的时间
    Ready:          False
    Restart Count:  9  已经帮忙重启了9次
    Liveness:       exec [test -e /home/busybox] delay=3s timeout=1s period=4s #success=1 #failure=3  可以看到详细的探测过程
    Environment:    <none>
    Mounts:
      /var/run/secrets/kubernetes.io/serviceaccount from default-token-npzp7 (ro)
Conditions:
  Type              Status
  Initialized       True
  Ready             False
  ContainersReady   False
  PodScheduled      True
Volumes:
  default-token-npzp7:
    Type:        Secret (a volume populated by a Secret)
    SecretName:  default-token-npzp7
    Optional:    false
QoS Class:       BestEffort
Node-Selectors:  <none>
Tolerations:     node.kubernetes.io/not-ready:NoExecute for 300s
                 node.kubernetes.io/unreachable:NoExecute for 300s
Events:
  Type     Reason     Age                  From                               Message
  ----     ------     ----                 ----                               -------
  Normal   Scheduled  20m                  default-scheduler                  Successfully assigned default/busybox-test to www.kubernetes.node1.com
  Normal   Pulled     17m (x3 over 20m)    kubelet, www.kubernetes.node1.com  Successfully pulled image "busybox:latest"
  Normal   Created    17m (x3 over 20m)    kubelet, www.kubernetes.node1.com  Created container busybox-test-pod
  Normal   Started    17m (x3 over 20m)    kubelet, www.kubernetes.node1.com  Started container busybox-test-pod
  Warning  Unhealthy  17m (x9 over 19m)    kubelet, www.kubernetes.node1.com  Liveness probe failed:
  Normal   Killing    17m (x3 over 19m)    kubelet, www.kubernetes.node1.com  Container busybox-test-pod failed liveness probe, will be restarted
  Normal   Pulling    9m57s (x8 over 20m)  kubelet, www.kubernetes.node1.com  Pulling image "busybox:latest"
  Warning  BackOff    21s (x36 over 12m)   kubelet, www.kubernetes.node1.com  Back-off restarting failed container
[root@www TestYaml]# kubectl get pods -w
NAME           READY   STATUS         RESTARTS   AGE
busybox-test   0/1     ErrImagePull   9          26m
pod-kk         0/1     Pending        0          44m
busybox-test   1/1     Running        10         26m
可以看到RESTARTS的数字在变化,说明一直在帮忙重启,标记的重启次数。
[root@www TestYaml]# kubectl get pods -w
NAME           READY   STATUS         RESTARTS   AGE
busybox-test   0/1     ErrImagePull   9          26m
pod-kk         0/1     Pending        0          44m
busybox-test   1/1     Running        10         26m
busybox-test   0/1     ErrImagePull   10         27m
busybox-test   0/1     CrashLoopBackOff   10         27m
重启10次之后直接显示容器挂了
[root@www TestYaml]# kubectl explain pod.spec.containers.livenessProbe.tcpSocket
KIND:     Pod
VERSION:  v1

RESOURCE: tcpSocket <Object>

DESCRIPTION:
     TCPSocket specifies an action involving a TCP port. TCP hooks not yet
     supported

     TCPSocketAction describes an action based on opening a socket

FIELDS:
   host <string>  必须要指定主机地址
     Optional: Host name to connect to, defaults to the pod IP.

   port <string> -required-  必须指定从服务的那个端口来进行探测
     Number or name of the port to access on the container. Number must be in
     the range 1 to 65535. Name must be an IANA_SVC_NAME.
httpGet探测
[root@www TestYaml]# kubectl explain pod.spec.containers.livenessProbe.httpGet  如果对象是一个http服务,你们可以直接使用httpGet来探测
KIND:     Pod
VERSION:  v1

RESOURCE: httpGet <Object>

DESCRIPTION:
     HTTPGet specifies the http request to perform.

     HTTPGetAction describes an action based on HTTP Get requests.

FIELDS:
   host <string>
     Host name to connect to, defaults to the pod IP. You probably want to set
     "Host" in httpHeaders instead.

   httpHeaders  <[]Object>
     Custom headers to set in the request. HTTP allows repeated headers.

   path <string>   直接像执行地址和端口的url发起请求,如果返回码是200,301,302都是代表正常,其它代表错误
     Path to access on the HTTP server.

   port <string> -required-
     Name or number of the port to access on the container. Number must be in
     the range 1 to 65535. Name must be an IANA_SVC_NAME.如果定义暴露的端口有指定名称,可以通过命令来访问也行

   scheme       <string>
     Scheme to use for connecting to the host. Defaults to HTTP.
[root@www TestYaml]# cat http-test-pod.yaml
apiVersion: v1
kind: Pod
metadata:
   name: http-test
   namespace: default
spec:
   containers:
   - name: http-test-pod
     image: ikubernetes/myapp:v1
     ports:
     - name: myhttp
       containerPort: 80
     livenessProbe:
       httpGet:
         port: myhttp
         path: /index.html
       initialDelaySeconds: 3
       periodSeconds: 4
[root@www TestYaml]# kubectl get pods
NAME           READY   STATUS             RESTARTS   AGE
busybox-test   0/1     CrashLoopBackOff   13         43m
http-test      1/1     Running            0          12s
pod-kk         0/1     Pending            0          61m
[root@www TestYaml]# kubectl describe pods http-test
Name:               http-test
Namespace:          default
Priority:           0
PriorityClassName:  <none>
Node:               www.kubernetes.node2.com/192.168.181.146
Start Time:         Mon, 01 Jul 2019 21:44:04 +0800
Labels:             <none>
Annotations:        <none>
Status:             Running
IP:                 10.244.2.6
Containers:
  http-test-pod:
    Container ID:   docker://67693dafae6c8b5f84bd344df045dbab0d5600fac67f42bfe00d06f1bfbc8b63
    Image:          ikubernetes/myapp:v1
    Image ID:       docker-pullable://ikubernetes/myapp@sha256:9c3dc30b5219788b2b8a4b065f548b922a34479577befb54b03330999d30d513
    Port:           80/TCP
    Host Port:      0/TCP
    State:          Running
      Started:      Mon, 01 Jul 2019 21:44:09 +0800
    Ready:          True
    Restart Count:  0
    Liveness:       http-get http://:myhttp/index.html delay=3s timeout=1s period=4s #success=1 #failure=3  可以看到整个探测的方式和详细的参数和参数值
                    是通过httpget的形式不断去的访问index.html这个url
    Environment:    <none>
    Mounts:
      /var/run/secrets/kubernetes.io/serviceaccount from default-token-npzp7 (ro)
Conditions:
  Type              Status
  Initialized       True
  Ready             True
  ContainersReady   True
  PodScheduled      True
Volumes:
  default-token-npzp7:
    Type:        Secret (a volume populated by a Secret)
    SecretName:  default-token-npzp7
    Optional:    false
QoS Class:       BestEffort
Node-Selectors:  <none>
Tolerations:     node.kubernetes.io/not-ready:NoExecute for 300s
                 node.kubernetes.io/unreachable:NoExecute for 300s
Events:
  Type    Reason     Age   From                               Message
  ----    ------     ----  ----                               -------
  Normal  Scheduled  81s   default-scheduler                  Successfully assigned default/http-test to www.kubernetes.node2.com
  Normal  Pulled     77s   kubelet, www.kubernetes.node2.com  Container image "ikubernetes/myapp:v1" already present on machine
  Normal  Created    77s   kubelet, www.kubernetes.node2.com  Created container http-test-pod
  Normal  Started    76s   kubelet, www.kubernetes.node2.com  Started container http-test-pod
我们手动进入容器把index.html文件改名字然后在查看
[root@www TestYaml]# kubectl exec -it http-test -- /bin/sh
/ # cd /usr/share/nginx/html/
/usr/share/nginx/html # ls
50x.html    index.html
/usr/share/nginx/html # mv index.html index.html.bak
/usr/share/nginx/html # ls
50x.html        index.html.bak
/usr/share/nginx/html #
[root@www TestYaml]# kubectl describe pods http-test
Name:               http-test
Namespace:          default
Priority:           0
PriorityClassName:  <none>
Node:               www.kubernetes.node2.com/192.168.181.146
Start Time:         Mon, 01 Jul 2019 21:44:04 +0800
Labels:             <none>
Annotations:        <none>
Status:             Running
IP:                 10.244.2.6
Containers:
  http-test-pod:
    Container ID:   docker://850776a64342adae194fa117c6d53ca8baf1a672b33346169de8d687a16fd729
    Image:          ikubernetes/myapp:v1
    Image ID:       docker-pullable://ikubernetes/myapp@sha256:9c3dc30b5219788b2b8a4b065f548b922a34479577befb54b03330999d30d513
    Port:           80/TCP
    Host Port:      0/TCP
    State:          Running
      Started:      Mon, 01 Jul 2019 21:49:41 +0800
    Last State:     Terminated
      Reason:       Completed
      Exit Code:    0
      Started:      Mon, 01 Jul 2019 21:44:09 +0800
      Finished:     Mon, 01 Jul 2019 21:49:40 +0800
    Ready:          True
    Restart Count:  1  可以看到已经在帮忙重启了一次
    Liveness:       http-get http://:myhttp/index.html delay=3s timeout=1s period=4s #success=1 #failure=3
    Environment:    <none>
    Mounts:
      /var/run/secrets/kubernetes.io/serviceaccount from default-token-npzp7 (ro)
Conditions:
  Type              Status
  Initialized       True
  Ready             True
  ContainersReady   True
  PodScheduled      True
Volumes:
  default-token-npzp7:
    Type:        Secret (a volume populated by a Secret)
    SecretName:  default-token-npzp7
    Optional:    false
QoS Class:       BestEffort
Node-Selectors:  <none>
Tolerations:     node.kubernetes.io/not-ready:NoExecute for 300s
                 node.kubernetes.io/unreachable:NoExecute for 300s
Events:
  Type     Reason     Age                  From                               Message
  ----     ------     ----                 ----                               -------
  Normal   Scheduled  6m3s                 default-scheduler                  Successfully assigned default/http-test to www.kubernetes.node2.com
  Warning  Unhealthy  27s (x3 over 35s)    kubelet, www.kubernetes.node2.com  Liveness probe failed: HTTP probe failed with statuscode: 404
  Normal   Killing    27s                  kubelet, www.kubernetes.node2.com  Container http-test-pod failed liveness probe, will be restarted
  Normal   Pulled     26s (x2 over 5m59s)  kubelet, www.kubernetes.node2.com  Container image "ikubernetes/myapp:v1" already present on machine
  Normal   Created    26s (x2 over 5m59s)  kubelet, www.kubernetes.node2.com  Created container http-test-pod
  Normal   Started    26s (x2 over 5m58s)  kubelet, www.kubernetes.node2.com  Started container http-test-pod
[root@www TestYaml]# kubectl exec -it http-test -- /bin/sh
/ # cd /usr/share/nginx/html/
/usr/share/nginx/html # ls
50x.html    index.html
/usr/share/nginx/html #
因为我们创建的容器在重启整个环境会被重置,重置之后index.html文件又因为环境的重置恢复了
[root@www TestYaml]# kubectl exec -it http-test -- /bin/sh
........
 Last State:     Terminated
      Reason:       Completed
      Exit Code:    0
      Started:      Mon, 01 Jul 2019 21:44:09 +0800
      Finished:     Mon, 01 Jul 2019 21:49:40 +0800
    Ready:          True
    Restart Count:  1
    Liveness:       http-get http://:myhttp/index.html delay=3s timeout=1s period=4s #success=1 #failure=3
    Environment:    <none>
[root@www TestYaml]# kubectl get pods
NAME           READY   STATUS             RESTARTS   AGE
busybox-test   0/1     CrashLoopBackOff   15         53m
http-test      1/1     Running            1          10m  可以看到重启的次数为1次
pod-kk         0/1     Pending            0          71m
[root@www TestYaml]# kubectl logs http-test http-test-pod
10.244.2.1 - - [01/Jul/2019:13:49:44 +0000] "GET /index.html HTTP/1.1" 200 65 "-" "kube-probe/1.14" "-"
10.244.2.1 - - [01/Jul/2019:13:49:48 +0000] "GET /index.html HTTP/1.1" 200 65 "-" "kube-probe/1.14" "-"
10.244.2.1 - - [01/Jul/2019:13:49:52 +0000] "GET /index.html HTTP/1.1" 200 65 "-" "kube-probe/1.14" "-"
......
[root@www TestYaml]# kubectl logs http-test http-test-pod | wc -l
110  已经探测了110次了
[root@www TestYaml]# kubectl logs http-test http-test-pod  我们再删除一次index.html,可以看到日志也提示了index.html文件不存在
2019/07/01 13:58:24 [error] 6#6: *131 open() "/usr/share/nginx/html/index.html" failed (2: No such file or directory), client: 10.244.2.1, server: localhost, request: "GET /index.html HTTP/1.1", host: "10.244.2.6:80"
10.244.2.1 - - [01/Jul/2019:13:58:24 +0000] "GET /index.html HTTP/1.1" 404 169 "-" "kube-probe/1.14" "-"
.....
重启之后又立马恢复正常
就绪性探测逻辑和存活性探测类似,其实我们在get pods的时候也能看到容器的大致情况
[root@www TestYaml]# kubectl get pods
NAME READY STATUS RESTARTS AGE
busybox-test 0/1 CrashLoopBackOff 17 61m
http-test 1/1 Running 2 18m
pod-kk 0/1 Pending 0 80m
在READY下面展示的0/1,其中前面的代表几个容器已经就绪的,后面代表这个pods里面有几个容器。但是这个前面的1是容器一启动就代表就绪,但是实际上大多数情况下不代表实际的情况,所以需要去调整这个探测的时间。
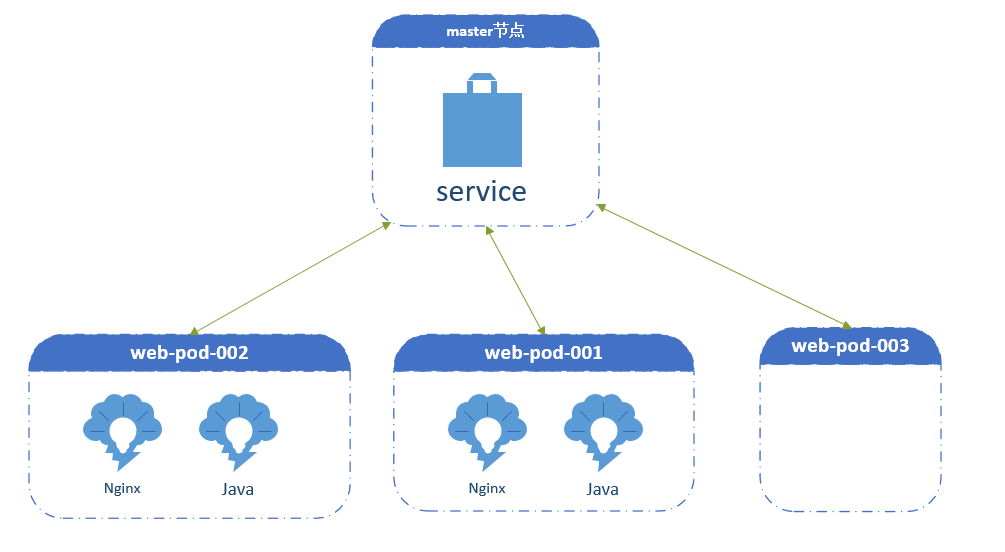
如上图所示,当service在调度的时候只要满足名称为web-pod条件的pod就会被自由调度,这个时候正好起了一个web-pod-003的pods,里面跑的容器和001和002一样,如果我们设置的yaml文件是容器启动就代表就绪,那此时有新用户的请求进来被service
调度到003上,但是因为003上的容器内部的nginx和java都需要做启动前环境检测,nginx加载java文件等操作,这个操作也是会消耗时间,假如消耗时长为5秒,那这5秒之内将会有很多用户的请求将得不到内容,此种也算作生产事故。由此可见我们设定
探测时间也变得尤为重要。
[root@www TestYaml]# cat readiness.http-get.yaml
apiVersion: v1
kind: Pod
metadata:
   name: readiness-http-test
   namespace: default
spec:
   containers:
   - name: readiness-http-test-pod
     image: ikubernetes/myapp:v1
     ports:
     - name: http
       containerPort: 80
     readinessProbe:
       httpGet:
         port: http
         path: /index.html
       initialDelaySeconds: 3
       periodSeconds: 4[root@www TestYaml]# kubectl get pods
NAME                  READY   STATUS    RESTARTS   AGE
readiness-http-test   1/1     Running   0          12s
[root@www TestYaml]# kubectl exec -it readiness-http-test -- /bin/sh
/ # cd /usr/share/nginx/html/
/usr/share/nginx/html # rm -rf index.html  删掉主页文件
/usr/share/nginx/html # ls
50x.html
/usr/share/nginx/html #
[root@www ~]# kubectl get pods -w
NAME                  READY   STATUS    RESTARTS   AGE
readiness-http-test   1/1     Running   0          119s
readiness-http-test   0/1     Running   0          2m38s  可以看到显示未就绪状态了

/usr/share/nginx/html # netstat -anptu | grep 80 而此时我们的nginx还是运行的状态
tcp        0      0 0.0.0.0:80              0.0.0.0:*               LISTEN      1/nginx: master pro
tcp        0      0 10.244.1.23:80          10.244.1.1:37590        TIME_WAIT   -
tcp        0      0 10.244.1.23:80          10.244.1.1:37586        TIME_WAIT   -
/usr/share/nginx/html # touch index.html  我们手动touch一个index文件
/usr/share/nginx/html # ls
50x.html    index.html
/usr/share/nginx/html #

[root@www ~]# kubectl get pods -w
NAME                  READY   STATUS    RESTARTS   AGE
readiness-http-test   1/1     Running   0          119s
readiness-http-test   0/1     Running   0          2m38s
readiness-http-test   1/1     Running   0          6m2s   可以看到又变成就绪的状态了
C:容器启动后和终止前钩子
postStart启动后钩子
preStop终止前钩子
[root@www TestYaml]# kubectl explain pods.spec.containers.lifecycle
KIND:     Pod
VERSION:  v1

RESOURCE: lifecycle <Object>

DESCRIPTION:
     Actions that the management system should take in response to container
     lifecycle events. Cannot be updated.

     Lifecycle describes actions that the management system should take in
     response to container lifecycle events. For the PostStart and PreStop
     lifecycle handlers, management of the container blocks until the action is
     complete, unless the container process fails, in which case the handler is
     aborted.

FIELDS:
   postStart    <Object>  支持启动后
     PostStart is called immediately after a container is created. If the
     handler fails, the container is terminated and restarted according to its
     restart policy. Other management of the container blocks until the hook
     completes. More info:
     https://kubernetes.io/docs/concepts/containers/container-lifecycle-hooks/#container-hooks

   preStop      <Object>终止前
     PreStop is called immediately before a container is terminated due to an
     API request or management event such as liveness probe failure, preemption,
     resource contention, etc. The handler is not called if the container
     crashes or exits. The reason for termination is passed to the handler. The
     Pod's termination grace period countdown begins before the PreStop hooked
     is executed. Regardless of the outcome of the handler, the container will
     eventually terminate within the Pod's termination grace period. Other
     management of the container blocks until the hook completes or until the
     termination grace period is reached. More info:
     https://kubernetes.io/docs/concepts/containers/container-lifecycle-hooks/#container-hooks
[root@www TestYaml]# kubectl explain pods.spec.containers.lifecycle.postStart
KIND:     Pod
VERSION:  v1

RESOURCE: postStart <Object>

DESCRIPTION:
     PostStart is called immediately after a container is created. If the
     handler fails, the container is terminated and restarted according to its
     restart policy. Other management of the container blocks until the hook
     completes. More info:
     https://kubernetes.io/docs/concepts/containers/container-lifecycle-hooks/#container-hooks

     Handler defines a specific action that should be taken

FIELDS:
   exec <Object>
     One and only one of the following should be specified. Exec specifies the
     action to take.

   httpGet      <Object>
     HTTPGet specifies the http request to perform.

   tcpSocket    <Object>
     TCPSocket specifies an action involving a TCP port. TCP hooks not yet
     supported

[root@www TestYaml]#

[root@www TestYaml]# kubectl explain pods.spec.containers.lifecycle.preStop
KIND:     Pod
VERSION:  v1

RESOURCE: preStop <Object>  终止前

DESCRIPTION:
     PreStop is called immediately before a container is terminated due to an
     API request or management event such as liveness probe failure, preemption,
     resource contention, etc. The handler is not called if the container
     crashes or exits. The reason for termination is passed to the handler. The
     Pod's termination grace period countdown begins before the PreStop hooked
     is executed. Regardless of the outcome of the handler, the container will
     eventually terminate within the Pod's termination grace period. Other
     management of the container blocks until the hook completes or until the
     termination grace period is reached. More info:
     https://kubernetes.io/docs/concepts/containers/container-lifecycle-hooks/#container-hooks

     Handler defines a specific action that should be taken

FIELDS:
   exec <Object>  可以看到三种方式和上面的探针一样,其功能也类似
     One and only one of the following should be specified. Exec specifies the
     action to take.

   httpGet      <Object>
     HTTPGet specifies the http request to perform.

   tcpSocket    <Object>
     TCPSocket specifies an action involving a TCP port. TCP hooks not yet
     supported
两者都是容器的两个极端点运行之前需要执行一些命令或者操作之后才能运行和终止容器,如果这些命令和操作执行失败了,容器会终止并重启,这个重启就取决于重启策略。