一、Nginx介绍
nginx是一款由俄罗斯人使用c语言开发得开源的www服务软件,可以运用在linux,unix,windows平台上。其本身是一款静态的www软件,可以直接解析html,js,css,jpg等静态文件,如果要解析例如PHP,JSP,DO这样的动态文件则需要另外安装php,tomcat等软件配合使用。由于使用epoll模型,对1M左右的静态小文件可实现高并发且占用内存比较小。nginx还可以对ip限速,限制服务连接数。
nginx作为www服务还有如下特征:
-
支持基于名字,端口以及IP的多虚拟主机站点
对nginx来说一个server标签段就是一个虚拟主机
基于域名的虚拟主机:通过域名来区分虚拟主机,一般用在外部网站
基于端口的虚拟主机:通过端口来区分虚拟主机,一般用在内部网站 -
支持rewrite模块,支持URL重写以及正则表达式匹配
-
支持基于客户端IP和http基本认证的访问机制
-
支持http响应速率限制
-
支持统一IP地址的并发连接或请求数限制
nginx除了可以用作web服务,还可以实现负载均衡功能和web缓存等功能。
二、安装Nginx
2.1安装依赖包
-
安装PCRE库
pcre全称(perl compatible regular expressions)perl兼容正则表达式。因为http rewrite module 需要PCRE库支持。yum install pcre pcre-devel -y [root@localhost ~]#rpm -qa pcre pcre-devel pcre-7.8-7.el6.x86_64 pcre-devel-7.8-7.el6.x86_64 -
安装openssl库
ssl加密模块需要openssl 库支持yum install openssl-devel -y [root@localhost ~]#rpm -qa openssl-devel openssl openssl-1.0.1e-57.el6.x86_64 openssl-devel-1.0.1e-57.el6.x86_64 -
安装gcc
因为需要make编译源码,需要安装gcc,gcc-c++,glibc(glibc是GNU发布的libc库,即c运行库)yum install -y gcc glibc gcc-c++2.2 安装nginx
这里选择编译安装nginx
mkdir -p /home/wode/tools
cd /home/wode/tools
 wget  http://nginx.org/download/nginx-1.10.3.tar.gz
 tar -xvz -f nginx-1.10.3.tar.gz #解压缩
 groupadd www #添加用户组
 useradd -s /sbin/nologin -M www -g www   #添加虚拟用户www来管理nginx,并让      它属于www用户组
 [root@localhost nginx-1.10.3]#id www #查看一下
 uid=500(www) gid=500(www) groups=500(www)
 ./configure --help #可查看参数,选择自己需要的模块安装
 ./configure --prefix=/home/wode/nginx-1.10.1#安装位置
  --user=www #指定用户
 --group=www #指定用户组
 --with-http_ssl_module#加密模块
  --with-http_stub_status_module#添加连接状态监控模块
  make && make install #编译安装,至此安装结束
  ln -s /home/wode/nginx-1.10.1/ /home/wode/nginx #做一个软连接不用每次打版本号
2.3启动nginx
 #/home/wode/nginx/sbin/nginx -t #检查nginx语法和配置有没有错误
nginx: the configuration file /home/shitan/nginx-1.10.1/conf/nginx.conf syntax is ok#语法正确
  nginx: configuration file /home/shitan/nginx-1.10.1/conf/nginx.conf test is successful#配置正确
 #/home/wode/nginx/sbin/nginx#启动nginx
 ]#ps -ef|grep nginx|grep -v grep#检查启动情况
 root      9000     1  0 11:26 ?        00:00:00 nginx: master process   /home/wode/nginx/sbin/nginx
  www       9001  9000  0 11:26 ?        00:00:00 nginx: worker process
curl 127.0.0.1 查看nginx是否成功启动
2.4 nginx目录结构
- nginx目录结构
用tree看一下nginx目录结构结果如下:
 [root@localhost nginx]#tree
├── client_body_temp
├── conf  #这是nginx的所有配置文件的目录
│   ├── fastcgi.conf#fastcgi相关参数的配置文件
│   ├── fastcgi.conf.default#fastcgi.conf的原始备份
│   ├── fastcgi_params#fastcgi的参数文件
│   ├── fastcgi_params.default
│   ├── koi-utf
│   ├── koi-win
│   ├── mime.types
│   ├── mime.types.default
│   ├── nginx.conf#nginx默认的主配置文件
│   ├── nginx.conf.default
│   ├── scgi_params
	│   ├── scgi_params.default
│   ├── uwsgi_params
│   ├── uwsgi_params.default
│   └── win-utf
├── fastcgi_temp
├── html#这是编译安装nginx的默认站点目录,
│   ├── 50x.html#错误页面优雅代显示文件error_page  502,504
│   └── index.html#默认首页文件
├── logs#nginx默认日志路径,包括错误日志和访问日志
│   ├── access.log#nginx默认的访问日志,tail -f access.log可以实时观察访问状况
│   ├── error.log#nginx的错误日志
│   └── nginx.pid#nginx的pid文件,nginx进程启动后,会把所有进	程	idhao写在此
├── proxy_temp
├── sbin
│   └── nginx
├── scgi_temp
└── uwsgi_temp
-
nginx.conf主配置文件介绍
nginx主配置文件nginx.conf是一个纯文本类型的文件,它位于nginx安装目录的conf目录下,整个配置文件是以区块的形式组织的。一般,每个区块以一个大括号“{}”来表示,区块可以分为几个层次,整个配置文件中Main区位于最高层,在Main区下面可以有Events区,HTTP区等层级,在HTTP区中又包含一个或多个Server区,每个Server区又可以有一个或多个location区。整个nginx配置文件如下[root@localhost conf]#grep -v '#' nginx.conf |grep -v '^$' worker_processes 1;#worker进程数 error_log logs/error.log; pid logs/nginx.pid; #以上是main区 events {#event区块开始 worker_connections 1024;#每个进程的连接数 }#event区块结束 #以上是events区 http { #http区开始,nginx http 核心模块 include mime.types; #nginx支持的媒体类型库 default_type application/octet-stream; sendfile on;#高效文件传输 keepalive_timeout 65;#超时 server {#server标签开始,一个server标签就是一个虚拟主机 listen 80;#监听端口 server_name localhost;#域名 location / { # location区块,请求匹配,所有都到html目录下找 root html; index index.html index.htm;#首页文件 } error_page 500 502 503 504 /50x.html; location = /50x.html { #首先匹配这个loaction,=号优先没有再去找默认的 root html; } } #以上是server标签 }
三、搭建基于域名的虚拟主机
-
调整nginx.conf配置文件
grep -E -v "^$|#" nginx.conf.default >nginx.conf#出掉空行和注释 #cat nginx.conf worker_processes 1; events { worker_connections 1024; } http { include mime.types; default_type application/octet-stream; sendfile on; keepalive_timeout 65; server { listen 80; server_name www.ceishi.com;#域名 location / { root html/www;#域名对应的站点目录 index index.html index.htm; } } server {#增加一个server标签 listen 80; server_name bbs.ceishi.com;#域名 location / { root html/bbs;#域名对应站点目录 index index.html index.htm; } } server { listen 80; server_name blog.ceishi.com; location / { root html/bbs; index index.html index.htm; } } } -
向站点目录写入内容
mkdir -p /home/wode/nginx/html/{www,bbs,blog} #新建站点目录 echo "www.ceshi.com" > /home/wode/nginx/html/www/index.html echo "bbs.ceshi.com" >/home/wode/nginx/html/bbs/index.html echo "blog.ceshi.com" >/home/wode/nginx/html/blog/index.htm #向站点目录写入内容 cat /home/wode/nginx/{www,bbs,blog}/index.html#查看一下写入的内容 www.ceshi.com bbs.ceshi.com blog.ceishi.com -
访问测试
/home/wode/nginx/sbin/nginx -t#检查语法 /home/wode/nginx/sbin/nginx -s reload#重新加载 -
配置本地DNS解析
#vim /etc/hosts 127.0.0.1 localhost localhost.localdomain localhost4 localhost4.localdomain4 ::1 localhost localhost.localdomain localhost6 localhost6.localdomain6 192.168.31.230 www.ceishi.com bbs.ceishi.com blog.ceishi.com -
访问虚拟主机
 curl  blog.ceishi.com
 curl  bbs.ceishi.com
 curl  www.ceishi.com
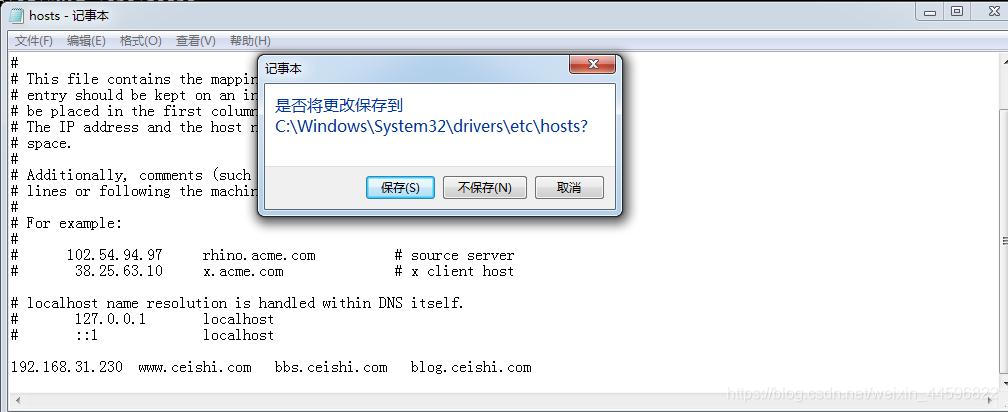
要想在windows上访问,则需要以管理员权限运行记事本
添加192.168.31.230 www.ceishi.com bbs.ceishi.com blog.ceishi.com
浏览器上输入ip
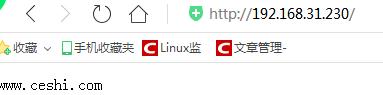
再浏览器上输入ip默认访问第一个server标签
四、搭建基于端口的虚拟主机
基于端口nginx.conf配置如下
  worker_processes  1;
events {
worker_connections  1024;
}
http {
include       mime.types;
default_type  application/octet-stream;
sendfile        on;
keepalive_timeout  65;
server {
    listen       8001;
    server_name  www.ceishi.com;
    location / {
        root   html/www;
        index  index.html index.htm;
    }
}
server {
    listen       8002;
    server_name  bbs.ceishi.com;
    location / {
        root   html/bbs;
        index  index.html index.htm;
    }
}
server {
    listen       8003;
    server_name  blog.ceishi.com;
    location / {
        root   html/bbs;
        index  index.html index.htm;
    }
}

}
访问方法:
 curl  http://www.ceshi.com:8001
 curl  http://bbs.ceshi.com:8002
 curl  http://blog.ceshi.com:8003