第一步:先建一个spring工程
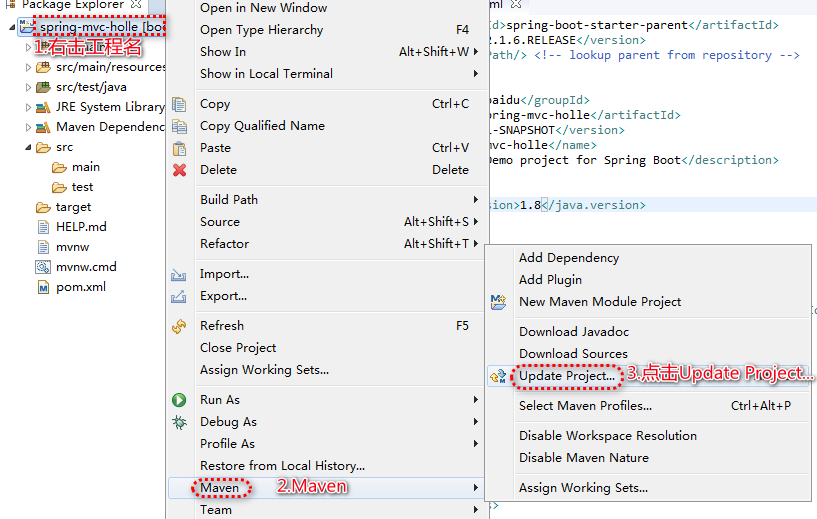
第二步:工程update一下
第三步:建一个控制器类

 1 package com.baidu.demo;
 2
 3 import org.springframework.stereotype.Controller;
 4 import org.springframework.ui.Model;
 5 import org.springframework.web.bind.annotation.GetMapping;
 6 import org.springframework.web.bind.annotation.RequestParam;
 7
 8 @Controller//表示这个类是控制器
 9 public class GreetingController {
10
11     /**@RequestParam用于获取请求参数,相当于servlet的request.getParameter()方法
12       *Model 是模型,用于存储数据,相当于servlet中的setAttribute()和getAttribute()。Model里面可以放POJO
13      */
14
15     @GetMapping("/greeting")//注释@GetMapping表示一个get请求,相当于servlet中的doGet()方法
16     public String greeting(@RequestParam(name="name", required=false, defaultValue="World") String name, Model model) {
17         model.addAttribute("name", name);//addAttribute()方法 ===setAttribute()
18
19       //这里的return相当于servlet中的request.getRequestDispacher().forword()方法,用于跳转页面
20         return "greeting";//greeting 指向于src/main/resources/templates/greeting.html文件,后缀省略不写
21     }
22
23 }
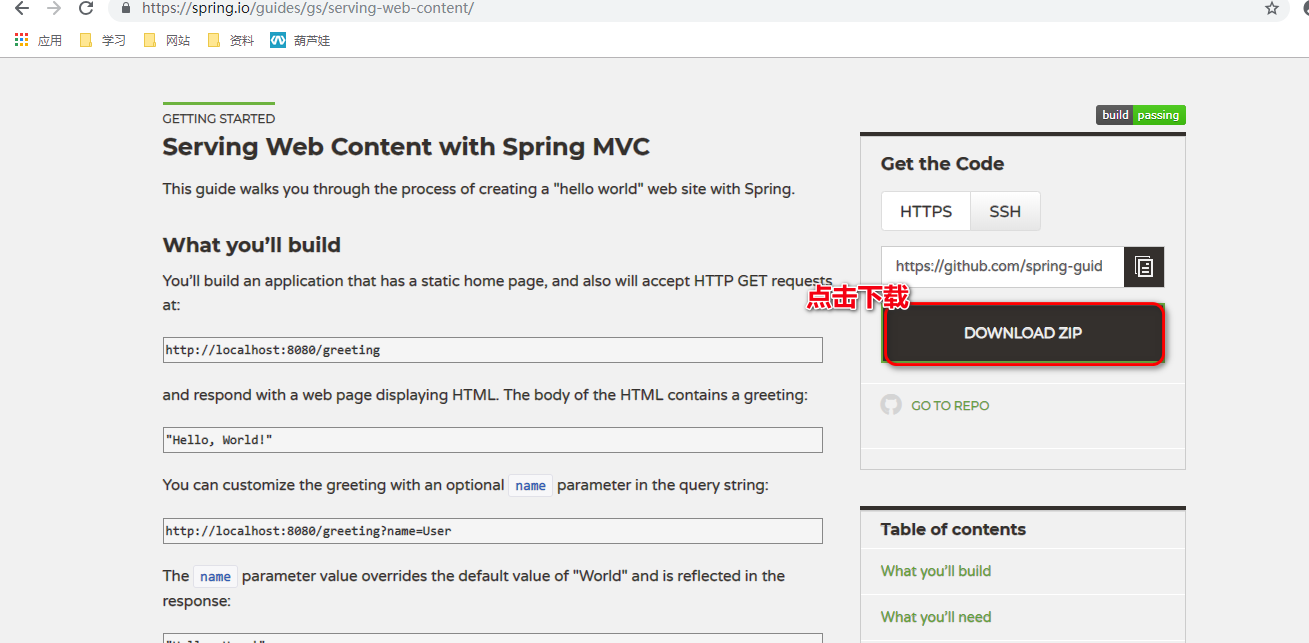
第四步:下载Spring源码
网站https://spring.io/guides/gs/serving-web-content/
第五步:将源码中的static/index.html和templates/greeting.html复制到工程中的main/resources/static/和main/resources/templates/中

 1 <!DOCTYPE HTML>
 2 <html>
 3 <head>
 4     <title>Getting Started: Serving Web Content</title>
 5     <meta http-equiv="Content-Type" content="text/html; charset=UTF-8" />
 6 </head>
 7 <body>
 8        <!-- 跳转到控制器中 -->
 9     <p>Get your greeting <a href="/greeting">here</a></p>
10 </body>
11 </html>
 1 <!DOCTYPE HTML>
 2 <!--引入属性xmlns:th="http://www.thymeleaf.org来启动thymeleaf模板 -->
 3 <html xmlns:th="http://www.thymeleaf.org">
 4 <head>
 5     <title>Getting Started: Serving Web Content</title>
 6     <meta http-equiv="Content-Type" content="text/html; charset=UTF-8" />
 7 </head>
 8
 9
10 <body>
11     <p th:text="'Hello, ' + ${name} + '!'" />
12     <!-- th:前缀thymeleaf模板,相当于jstl标签的前缀 -->
13 </body>
14 </html>
运行
1.先安装:右击工程名、【Run As】、【Maven install】
2.编义完后,再运行:右击工程名、【Run As】、【Spring Boot App】