ansible and cisco (2)
一、ansible playbook二、playbook的使用1) 第一个playbook的使用2) 第二个playbook3) 最后一个playbook三、最后
一、ansible playbook
playbook
playbook 翻译过来就是剧本,什么是剧本?就是编剧写好了所有的情景话语,演员去执行、表达出来。在ansible中,我们就是编剧,而路由器交换机等设备就是演员。所以这个剧本需要我们去写,然后由设备去执行。(讲得不太专业,大家可以自行百度ansible playbook),playbook要以yaml格式编写。
playbook可以做什么
之前的我们的文章演示了单条命令执行,playbook相对于之前的模式更加灵活,我们可以在playbook中加入循环、判断、调用多个模块、执行多个命令等等…所以playbook是(装13)必不可少的。
二、playbook的使用
YAML
YAML跟JSON和XML的区别不大,都有特定的格式。大家可以去看一下YAML的简单用法。一定要注意空格,缩进只能使用空格缩进。
模块
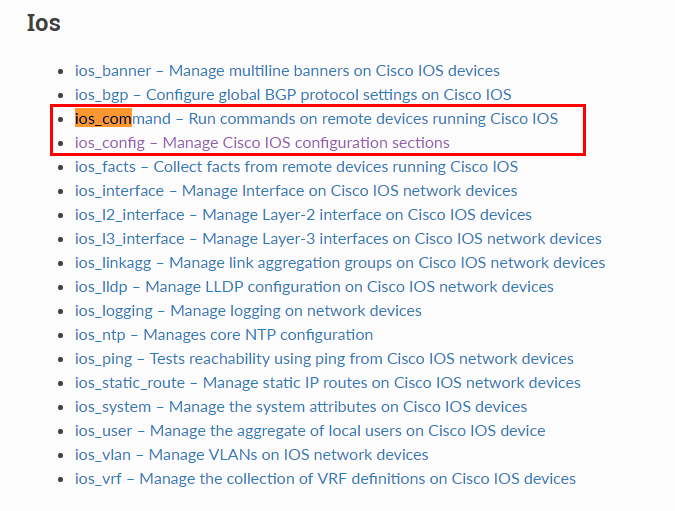
需要查看网络模块可以点击这里查看。我们今天主要使用的是ios_command和ios_config模块,如下图:
点击模块名,可以看到里面的参数和使用的例子,如下图:

ios_command
ios_command 模块,可以在IOS的路由器交换机上面使用,该模块只能在(# )特权模式下使用,而不能在(config# )全局配置模式下使用。
ios_config
ios_config 模块,同上,不过只能在(config# )全局配置模式下使用,而不能在(# )特权模式下使用
1) 第一个playbook的使用
第一个playbook比较简单,以下注释我以编剧的身份来解释:
 1[root@yunwei ~]# cat ywsn_playbook1.yaml
 2---  # yaml以---开头  # 一定要注意以下参数的空格,-和: 后面一定要有空格!!!
 3- name: show clock  # 剧本的名字
 4  hosts: cisco-2    # 表演的演员 -- 执行的主机(在hosts文件中)
 5  gather_facts: false # 检查演员的基本信息 -- 检查主机配置等信息
 6  connection: local # 剧本在谁的手里
 7  tasks:  # 剧情
 8    - name: show clock # 剧情的名字(第1集)
 9      ios_command:    # 使用ios_command模块
10        commands:     # 使用ios_command模块下的commands参数(即命令执行)
11          - show clock # 执行的命令
12      register: print_output # 保存在一个文件中(执行的目录下会多出一个.retry文件)
13    - debug: var=print_output.stdout_lines # 将文件中的内容打印出来
14
15    - name: configure loop interfact # 剧情的名字(第2集)
16      ios_config:  # 使用ios_config模块
17        parents: int loop 0  # 使用 parents参数,表示执行了这个命令之后,才能执行lines
18        lines:  # 使用lines参数,执行多条命令
19          - ip add 1.1.1.1 255.255.255.0
20          - no sh
21      register: print_output
22    - debug: var=print_output
23
24... # yaml以...结尾
执行效果如下(动图比较慢):

2) 第二个playbook
第二个playbook,我将实现免密登录和循环。playbook如下:
 1[root@yunwei ~]# cat ywsn_playbook2.yaml
 2---
 3- name: yunweishaonian ansible and cisco 2
 4  hosts: cisco-1
 5  gather_facts: false
 6  connection: local
 7
 8  vars:  # 定义一个变量
 9    authinfo: # 变量名称
10      username: "cisco"  # 变量值
11      password: "123456" # 变量值
12
13  tasks:
14    - name: config loop interfact
15      ios_config:
16        provider: "{{ authinfo }}"  # 验证,验证时使用前面定义的变量
17        lines:  # 命令
18          - switchport trunk encapsulation dot1q
19          - switchport mode trunk
20        parents: "{{ item }}"  # 父配置 -- 执行这个,再执行上面的lines(子配置)
21      with_items:  # 循环以下变量,循环的值为 item
22        - int Ethernet 1/0
23        - int Ethernet 1/1
24        - int Ethernet 1/2
25    - name: show int trunk
26      ios_command:
27        provider: "{{ authinfo }}"
28        commands:
29          - show int trunk
30      register: print_output
31    - debug: var=print_output.stdout_lines
32
33...
34
35[root@yunwei ~]#
执行结果如下(动图比较慢):

3) 最后一个playbook
最后一个playbook,实现引用外部文件的变量、判断。
外部文件config.yaml内容,里面是字典dict,当循环inter的时候,会有三个key,分别是switch、ip、port
1---
2inter:
3  - {switch: 192.168.108.251, ip: 1.1.1.1, port: loop 1}
4  - {switch: 192.168.108.252, ip: 2.2.2.2, port: loop 2}
5  - {switch: 192.168.108.253, ip: 3.3.3.3, port: loop 3}
6...
hosts 文件
1[root@yunwei ~]# cat /etc/ansible/hosts
2[cisco]
3192.168.108.251
4192.168.108.252
5192.168.108.253
6[root@yunwei ~]#
最终代码:
 1[root@yunwei ~]# cat ywsn_playbook3.yaml
 2---
 3- name: yunweishaonian ansible and cisco 2
 4  hosts: cisco
 5  gather_facts: false
 6  connection: local
 7  vars_files:  # 变量文件,多个变量文件的变量名请不要重复
 8    - config.yaml
 9
10  vars:
11    authinfo:
12      username: "cisco"
13      password: "123456"
14
15  tasks:
16    - name: config int loop
17      ios_config:
18        provider: "{{ authinfo }}"
19        lines:
20          - ip add {{ item.ip }} 255.255.255.0
21          - no sh
22        parents:
23          - interface {{ item.port }}
24      with_items: "{{ inter }}"  # 循环inter 字典,得到switch\ip\port三个key
25      when: (item.switch == inventory_hostname)  # 判断 switch的值是否等于登录的IP,inventory_hostname是一个默认参数,判断之后,执行上parents和lines
26
27    - name: config ospf
28      ios_config:
29        provider: "{{ authinfo }}"
30        lines:
31          - network 0.0.0.0 255.255.255.255 area 0
32        parents:
33          - router ospf 10
34
35    - name: save switch configure  # 保存配置
36      ios_config:
37        provider: "{{ authinfo }}"
38        save_when: modified  # 保存配置的条件是,配置发生变化。
39...
运行效果如下(动图比较慢):

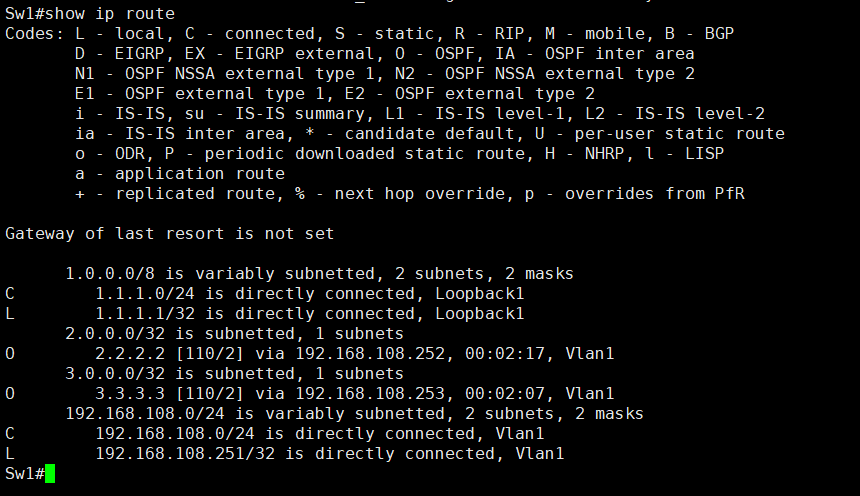
查看swithc1的路由表,如图:
三、最后
ansible and cisco 估计就到这了~
转载于:https://blog.51cto.com/xiaowangzai/2408354