一、什么是Swagger
Swagger 是一个规范和完整的框架,用于生成、描述、调用和可视化 RESTful 风格的 Web 服务。总体目标是使客户端和文件系统作为服务器以同样的速度来更新。文件的方法,参数和模型紧密集成到服务器端的代码,允许API来始终保持同步。
作用:
1. 接口的文档在线自动生成。
2. 功能测试。
二、个人感受
我之前一直是项目运行调试,但是发现这样效率太低,又用了Postman来调试。Postman是谷歌的一个网页调试工具,非常适合JavaWeb调试。但是现在我要介绍另一个更不错的,那就是Swagger工具,这里我是用SpringBoot框架来做的。比较简单的,可以用来学习Swagger来测试前端和后端的运行。就像下面这个图片,Swagger就是中间Restful接口的一种测试框架,可以单元测试前后端的运行状态,提高开发效率。

二、在Maven中添加依赖
版本Swagger太高出现问题,
扫描二维码关注公众号,回复:
6614922 查看本文章

i.s.m.p.AbstractSerializableParameter : Illegal DefaultValue null for parameter type integer
java.lang.NumberFormatException: For input string: “”


at io.swagger.models.parameters.AbstractSerializableParameter.getExample(AbstractSerializableParameter.java:412) ~[swagger-models-1.5.20.jar:1.5.20]


原因:
if (BaseIntegerProperty.TYPE.equals(type)) {
	return Long.valueOf(example);
}

//实体属性类型是Integer,就把example转为Long类型,而example默认为"",导致转换错误。
所以需要降低版本 <artifactId>swagger-models</artifactId>
<!-- https://mvnrepository.com/artifact/io.springfox/springfox-swagger-ui -->
        <dependency>
            <groupId>io.springfox</groupId>
            <artifactId>springfox-swagger-ui</artifactId>
            <version>2.9.2</version>
        </dependency>


        <dependency>
            <groupId>io.springfox</groupId>
            <artifactId>springfox-swagger2</artifactId>
            <version>2.9.2</version>
            <exclusions>
                <exclusion>
                    <groupId>io.swagger</groupId>
                    <artifactId>swagger-models</artifactId>
                </exclusion>
            </exclusions>
        </dependency>

        <dependency>
            <groupId>io.swagger</groupId>
            <artifactId>swagger-models</artifactId>
            <version>1.5.21</version>
        </dependency>
三、创建Swagger2的配置类
/**
 * Swagger2 配置类
 * 在与spring boot 集成时,放在与application.java 同级的目录下
 * 通过@Configuration注解,让spring来加载该配置
 * 再通过@EnableSwagger2注解来启动Swagger2
 */
@Configuration
@EnableSwagger2
public class Swagger2 {


    /**
     * 创建API应用
     * appinfo()增加API相关信息
     * 通过select()函数返回一个ApiSelectorBuilder实例,用来控制那些接口暴露给Swagger来展现
     * 本例采用置顶扫描的包路径来定义指定要建立API的目录
     *
     * @return
     */
    @Bean
    public Docket createRestApi(){
        Docket docket = new Docket(DocumentationType.SWAGGER_2)
                .apiInfo(apiInfo())
                .select()
                .apis(RequestHandlerSelectors.basePackage("com.xzp.springboot.springboot.controller"))
                .paths(PathSelectors.any()).build();

        return docket;
    }


    /**
     * 创建改API的基本信息(这些基本信息会展示在文档页面中)
     * 访问地址: http://项目实际地址/swagger-ui.html
     * @return
     */
    private ApiInfo apiInfo(){
        return new ApiInfoBuilder()
                .title("swagger-api文档")
                .description("swagger文档 by 13")
                .termsOfServiceUrl("http://www.baidu.com")
                .version("1.0")
                .build();
    }
}
四 创建Controller的控制类
public class User implements Serializable {

    private Integer id;
    private String name;
    private String password;

    public Integer getId() {
        return id;
    }

    public void setId(Integer id) {
        this.id = id;
    }

    public String getName() {
        return name;
    }

    public void setName(String name) {
        this.name = name;
    }

    public String getPassword() {
        return password;
    }

    public void setPassword(String password) {
        this.password = password;
    }
}
@RestController
public class TestSwaggerController {
static Map<Integer, User> usersMap = Collections.synchronizedMap(new HashMap<Integer, User>());
// 初始化 usersMap
static {
User user = new User();
user.setId(1);
user.setName("lou1");
user.setPassword("111111");
User user2 = new User();
user2.setId(2);
user2.setName("lou2");
user2.setPassword("222222");
usersMap.put(1, user);
usersMap.put(2, user2);
}
@ApiOperation(value = "获取用户列表" , notes = "查看")
@GetMapping(value = "/users")
public List<User> getUserList(){
List<User> users = new ArrayList<>(usersMap.values());
return users;
}
@ApiOperation(value = "新增加用户" , notes = "根据User对象新增加用户")
@ApiImplicitParam(name = "user" , value = "用户实体" , required = true , dataType = "User")
@PostMapping("/insert")
public String postUser(@RequestBody User user){
usersMap.put(user.getId(),user);
return "新增加成功!";
}
@ApiOperation(value = "获取用户详细信息" , notes = "根据id来获取用户详细信息")
@ApiImplicitParam(name = "id" , value = "用户id" , required = true , dataType = "int")
@GetMapping(value = "/getOne/{id}")
public User getUser(@PathVariable Integer id){
return usersMap.get(id);
}
@ApiOperation(value = "更新用户详细信息", notes = "")
@ApiImplicitParams({
@ApiImplicitParam(name = "id", value = "用户id", required = true, dataType = "int"),
@ApiImplicitParam(name = "user", value = "用户实体user", required = true, dataType = "User")
})
@PutMapping("/users/{id}")
public String putUser(@PathVariable Integer id, @RequestBody User user) {
User tempUser = usersMap.get(id);
tempUser.setName(user.getName());
tempUser.setPassword(user.getPassword());
usersMap.put(id, tempUser);
return "更新成功";
}
@ApiOperation(value = "删除用户", notes = "根据id删除对象")
@ApiImplicitParam(name = "id", value = "用户id", required = true, dataType = "int")
@DeleteMapping("/users/{id}")
public String deleteUser(@PathVariable Integer id) {
usersMap.remove(id);
return "删除成功";
}
}
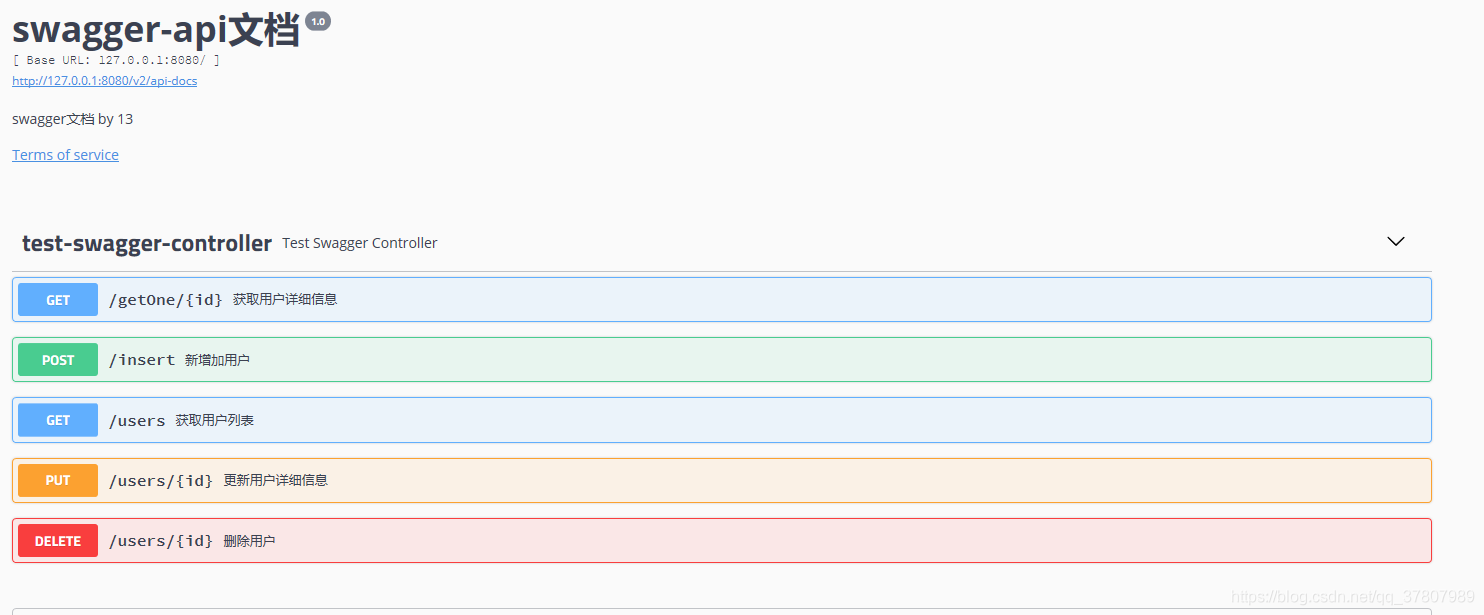
成功:
四、Swagger2 的注解使用
- @Api:用在类上,说明该类的作用。
- @ApiOperation:注解来给API增加方法说明。
- @ApiImplicitParams : 用在方法上包含一组参数说明。
- @ApiImplicitParam:用来注解来给方法入参增加说明。
- @ApiResponses:用于表示一组响应
- @ApiResponse:用在@ApiResponses中,一般用于表达一个错误的响应信息
- * code:数字,例如400
- * message:信息,例如"请求参数没填好"
- * response:抛出异常的类
- @ApiModel:描述一个Model的信息(一般用在请求参数无法使用@ApiImplicitParam注解进行描述的时候)
- * @ApiModelProperty:描述一个model的属性
注意:@ApiImplicitParam的参数说明:
| paramType:指定参数放在哪个地方 | header:请求参数放置于Request Header,使用@RequestHeader获取 query:请求参数放置于请求地址,使用@RequestParam获取 path:(用于restful接口)-->请求参数的获取:@PathVariable body:(不常用) form(不常用) |
| name:参数名 | |
| dataType:参数类型 | |
| required:参数是否必须传 | true | false |
| value:说明参数的意思 | |
| defaultValue:参数的默认值 |
关于文件上传的Swagger2:
/**
 * @author shuke
 * @date 2018/10/16
 */
@Api("ChatInfoController|图片和音频上传控制器类")
@RestController
public class ChatInfoController {

    /**
     * 上传图片接口
     * @param attach 文件对象
     * @param request http请求
     * @return imgSrc:上传后图片文件的路径
     */
    @ApiOperation(value = "上传图片",notes = "文件不能超过20M大小,后缀名为png,jpg,gif")
    @RequestMapping(value = "/uploadImg",method = RequestMethod.POST)
    @ResponseBody
    public String uploadImg(@RequestParam("file") MultipartFile attach,HttpServletRequest request) {
        System.out.println("上传图片");
        return FileUp.upFile(attach, request, Constants.IMAGE, true);
    }

    /**
     * 上传语音接口
     * @param attach 文件对象
     * @param request http请求
     * @return audioSrc:上传后语音文件的路径
     */
    @ApiOperation(value = "上传语音",notes = "文件不能超过20M大小,后缀名为MP3,silk,flv")
    @RequestMapping(value = "/uploadAudio",method = RequestMethod.POST)
    @ResponseBody
    public String uploadAudio( @RequestParam("file") MultipartFile attach,HttpServletRequest request) {
        System.out.println("上传语音");
        return FileUp.upFile(attach, request, Constants.AUDIO, true);
    }

}
添加注解后启动springboot,输入http://localhost:8080/swagger-ui.html即可进入文档页面
