better-scroll,移动端滚动场景需求的插件
例: 做一个上下滚动,左右两边关联(滑动右侧左侧对应的类别显示高亮,点击左侧的类别名称右侧滑动到对应的位置)
如图:
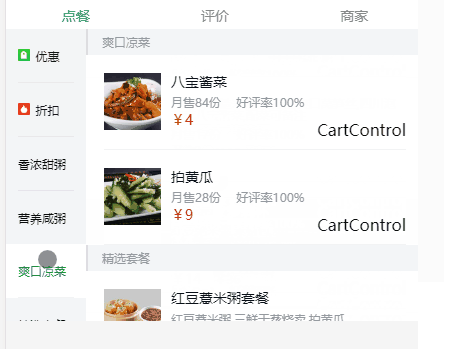
分析:滑动右侧的时候左侧对应的类高亮,高亮显示是通过current类来控制的,当右边滑动到不同个类的时候,同时更新左侧的current的显示。
要做的事情: 1、current来设置当前高亮,2、要实时监听scrollY,3、将右侧每一个类的顶部位置记录下来
根据滑动的位置scrollY,记录的每个类的顶部,来计算当前下标
第一步:下载better-scroll npm install better-scroll -s
在组件中引入这个库 import BScroll from 'better-scroll'
currentIndex: 记录左侧滑块到哪个类
scrollY: 上下滚动的距离
tops:存放右边每一个类的初始位置

第二步:分别创建左右两个滑动列表,注意创建滑动列表时需要后台异步请求完数据之后再创建,用到this.$nextTick(),此处无请求
此处用setTimeout代替延后加载

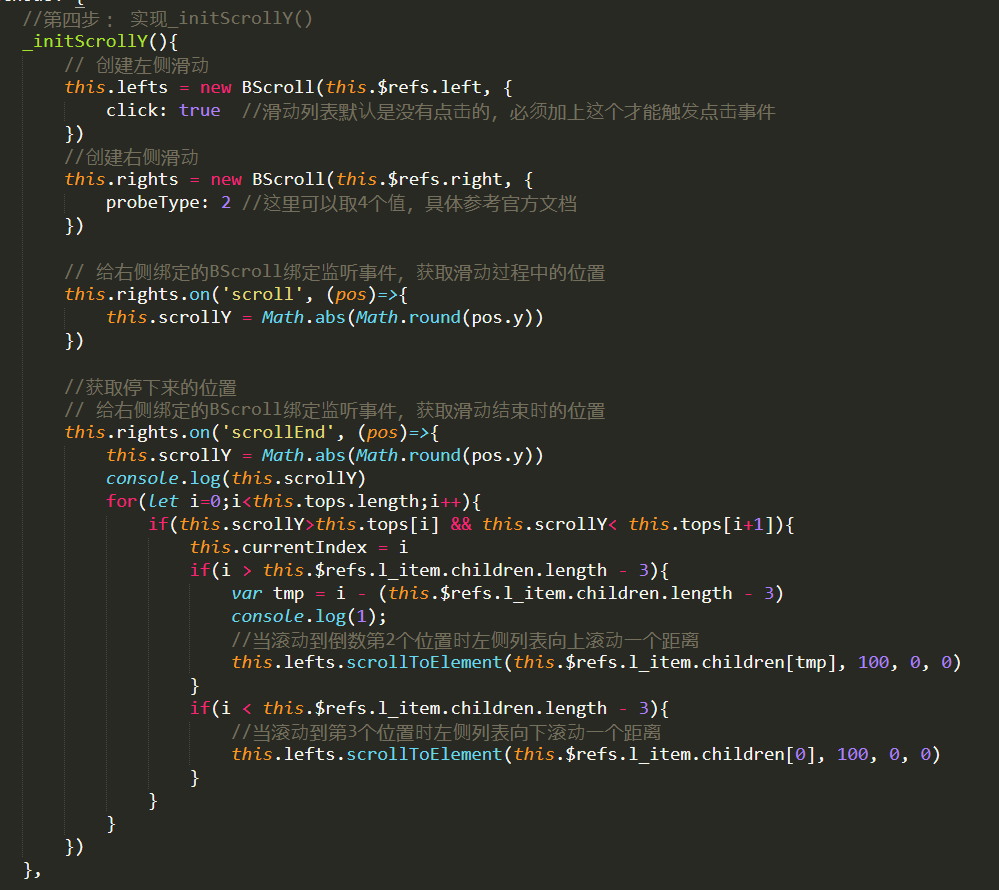
第三步: 将获取当前scrollY的函数,和获取右侧top的函数提取出来,定义在method中
1: 实现_initScrollY()
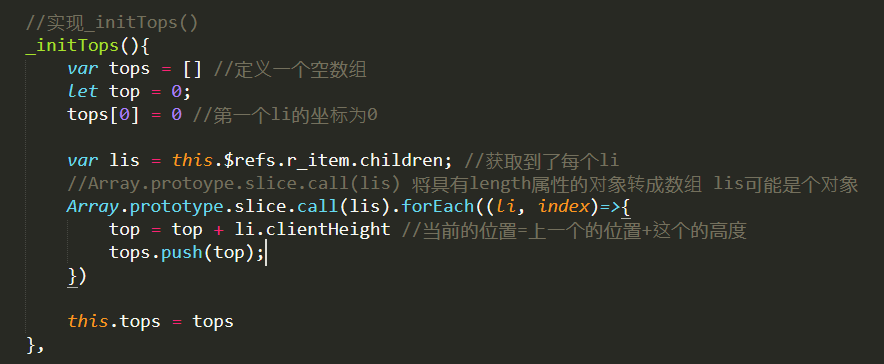
2:实现_initTops()
3:左联右
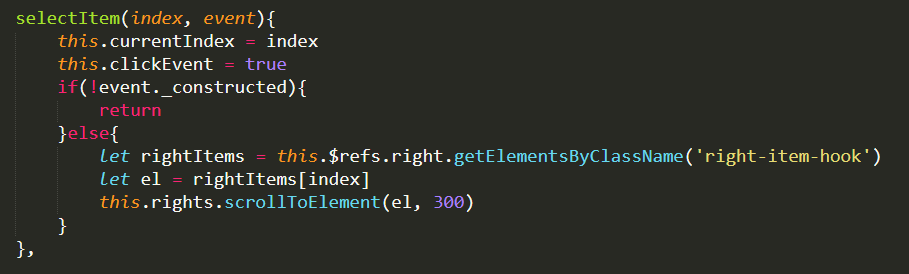
4:右联左

所有代码


<template>
    <div id="linkagelr">
        <div class="head hf">
            head
        </div>
        <div class="content">
            <div class="left" ref="left">
                <ul ref="l_item">
                    <li v-for="(item, index) in left" :class="{current: currentIndex == index}" @click="selectItem(index, $event)">
                        <span class="left-item">{{item}}</span>
                    </li>
                </ul>
            </div>
            <div class="right" ref="right">
                <ul ref="r_item">
                    <li v-for="item in right" class="right-item right-item-hook">
                        <h4>{{item.name}}</h4>
                        <ul>
                            <li v-for="num in item.content">{{item.name+num}}</li>
                        </ul>
                    </li>
                </ul>
            </div>
        </div>
        <div class="foot hf">
            foot
        </div>
    </div>
</template>

<script>
    /*
    * 分析:滑动右侧的时候左侧对应的类高亮,高亮显示是通过current类来控制的,当右边滑动到不同个类的时候,同时更新左侧的current的显示。
    * 要做的事情: 1、current来设置当前高亮,2、要实时监听scrollY,3、将右侧每一个类的顶部位置记录下来
    * 根据滑动的位置scrollY,记录的每个类的顶部,来计算当前下标
    */

    //第一步:下载better-scroll  npm install better-scroll -s
    //在组件中引入这个库
    import BScroll from 'better-scroll'

    export default{
        data(){
            return {
                left: ['mathematics','chinese','english','physic','chemistry','art','music','others'],
                right: [
                    {
                        name: 'mathematics',
                        content: ['1','2','3','4','5','6','7']
                    },
                    {
                        name: 'chinese',
                        content: ['3','4','5','6']
                    },
                    {
                        name: 'english',
                        content: ['1','2','3','4','5','6','7']
                    },
                    {
                        name: 'physic',
                        content: ['4','5','6','7']
                    },
                    {
                        name: 'chemistry',
                        content: ['1','2','3','4','5']
                    },
                    {
                        name: 'art',
                        content: ['4','5','6','7']
                    },
                    {
                        name: 'music',
                        content: ['1','2','3','4','5']
                    },
                    {
                        name: 'others',
                        content: ['1','2','3','4','5','6','7']
                    }
                ],
                currentIndex: 0,
                clickEvent: false,
                scrollY: 0,
                tops: [] //存放每一个类的初始位置
            }
        },
        //第二步:分别创建左右两个滑动列表,注意创建滑动列表时需要后台异步请求完数据之后再创建,用到this.$nextTick(),此处无请求

        //第三步: 将获取当前scrollY的函数,和获取右侧top的函数提取出来,定义在method中

        methods: {
            //第四步: 实现_initScrollY()
            _initScrollY(){
                // 创建左侧滑动
                this.lefts = new BScroll(this.$refs.left, {
                    click: true  //滑动列表默认是没有点击的,必须加上这个才能触发点击事件
                })
                //创建右侧滑动
                this.rights = new BScroll(this.$refs.right, {
                    probeType: 2 //这里可以取4个值,具体参考官方文档
                })

                // 给右侧绑定的BScroll绑定监听事件,获取滑动过程中的位置
                this.rights.on('scroll', (pos)=>{
                    this.scrollY = Math.abs(Math.round(pos.y))
                })

                //获取停下来的位置
                // 给右侧绑定的BScroll绑定监听事件,获取滑动结束时的位置
                this.rights.on('scrollEnd', (pos)=>{
                    this.scrollY = Math.abs(Math.round(pos.y))
                    console.log(this.scrollY)
                    for(let i=0;i<this.tops.length;i++){
                        if(this.scrollY>this.tops[i] && this.scrollY< this.tops[i+1]){
                            this.currentIndex = i
                            if(i > this.$refs.l_item.children.length - 3){
                                var tmp = i - (this.$refs.l_item.children.length - 3)
                                console.log(1);
                                //当滚动到倒数第2个位置时左侧列表向上滚动一个距离
                                this.lefts.scrollToElement(this.$refs.l_item.children[tmp], 100, 0, 0)
                            }
                            if(i < this.$refs.l_item.children.length - 3){
                                //当滚动到第3个位置时左侧列表向下滚动一个距离
                                this.lefts.scrollToElement(this.$refs.l_item.children[0], 100, 0, 0)
                            }
                        }
                    }
                })
            },

            //实现_initTops()
            _initTops(){
                var tops = [] //定义一个空数组
                let top = 0;
                tops[0] = 0 //第一个li的坐标为0

                var lis = this.$refs.r_item.children; //获取到了每个li
                //Array.protoype.slice.call(lis) 将具有length属性的对象转成数组 lis可能是个对象
                Array.prototype.slice.call(lis).forEach((li, index)=>{
                    top = top + li.clientHeight //当前的位置=上一个的位置+这个的高度
                    tops.push(top);
                })

                this.tops = tops
            },

            selectItem(index, event){
                this.currentIndex = index
                this.clickEvent = true
                if(!event._constructed){
                    return
                }else{
                    let rightItems = this.$refs.right.getElementsByClassName('right-item-hook')
                    let el = rightItems[index]
                    this.rights.scrollToElement(el, 300)
                }
            },

            //nowIndex 右联左
            nowIndex(scrollY){
                /*
                    如果滑动的位置在当前这个和下一个之间,返回的是这个的下标
                    如:tops=[0,5,12,18,23]
                        如果scrollY=4  -----返回0
                            scrollY=8  -----返回1
                */
                for(let i=0;i<this.tops.lenght;i++){
                    if(scrollY>this.tops[i] && scrollY< this.tops[i+1]){
                        this.currentIndex = i
                    }
                }

            }
        },
        mounted(){
            setTimeout(()=>{
                //获取scrollY
                this._initScrollY()

                //获取右侧tops
                this._initTops()
            }, 20)
        },
        computed:{
        }
    }
</script>
<style>
    #linkagelr{
        width: 100%;
        height: 100%;
    }
    .hf{
        position: fixed;
        width: 16rem;
        height: 2rem;
        line-height: 2rem;
        font-size: .8rem;
        text-align: center;
        background: #333;
        color: #fff;
    }
    .head{
        top:0;
    }
    .foot{
        bottom:0;
    }
    .content{
        display: flex;
        position: fixed;
        top: 2rem;
        bottom: 2rem;
        width: 16rem;
        overflow:hidden;
        background:#eee;
    }
    .left{
        flex: 0 0 4rem;
        width: 4rem;
        background: #f3f5f7;
    }
    .left li{
        width: 4rem;
        height: 4rem;
        display: flex;
        justify-content: center;
        align-items: center;
        border-bottom: .1rem solid #17a2b8;
        font-size: .6rem;
    }
    .current{
        background: #ff0000;
        color: #fff;
    }
    .right{
        flex: 1;
    }
    .right-item li{
        width: 100%;
        height: 5rem;
        border-bottom: .2rem solid #ffff00;
    }
    .right-item h4{
        font-size: 1rem;
        background: #ffc107;
        padding: .3rem 0;
    }
    .right-item ul>li{
        display: flex;
        justify-content: center;
        align-items: center;
        font-size: .6rem;
    }
</style>
横向滑动与些类似
<template>
    <div class="pic-wrapper" ref='picWrapper'>
        <ul class="pic-list" ref='picList'>
            <li class="pic-item" ref="item" v-for="item in left">
                {{item}}
            </li>
        </ul>
    </div>
</template>

<script>
    import BScroll from 'better-scroll'
    const options = {
        scrollY: true
    }
    options.pullDownRefresh = {
        threshold: 50,
        stop: 20
    }
    export default{
        data(){
            return {
                left: ['mathematics','chinese','english','physic','chemistry','art','music','others']
            }
        },
        methods: {

        },
        mounted(){
            var that = this;
            setTimeout(function(){
                let width = 0;
                for(let i=0; i<that.left.length;i++){
                    width += that.$refs.item[i].getBoundingClientRect().width;
                    console.log(width);
                }
                that.$refs.picList.style.width = width + 'px'
            },20)

            this.$nextTick(() => {
                if(!this.picScroll){
                    this.picScroll = new BScroll(this.$refs.picWrapper,{
                        scrollX: true,
                        eventPassthrough: 'vertical'
                    })
                }else{
                    this.picScroll.refresh();
                }
            })

        }
    }
</script>
<style>
    .pic-wrapper{
        padding-bottom: .5rem;
        width: 16rem;
        overflow: hidden;
        position: fixed;
        top:0;
        left: 0;
    }
    .pic-list{
        font-size: .6rem;
        background:#007bff;
        white-space: nowrap;
        margin:0;
        height: 2rem;
    }
    .pic-item{
        display: inline-block;
        color: #fff;
        /*margin-right: .5rem;*/
        padding: .5rem;
        box-sizing: border-box;
    }
</style>
完结~
注:只为个人学习记录使用
转载于:https://www.cnblogs.com/studycollect/p/10997271.html