puppet自动化配置
课程目标
- 理解
- puppet的概念和应用场景
- puppet基本语法和资源的定义方法
- 掌握
- puppet服务端和客户端的安装配置
一、puppet的介绍
- puppet是什么?
- puppet是一种Linux、Unix、Windows平台的集中配置管理系统,使用自有的puppet描述语言,可管理配置文件、用户、cron任务、软件包、系统服务等
- puppet将自己所管理的系统实体(文件、用户、软件包等)称之为资源
- puppet是开源的可以免费使用的,基于ruby语言开发
- puppet的作用和目的是什么?
- 作用:是实现资源的自动化批量部署配置管理,最常用的是集群服务和配置文件的管理
- 目的:提高运维人员的工作效率,降低了运维人员的工作难度
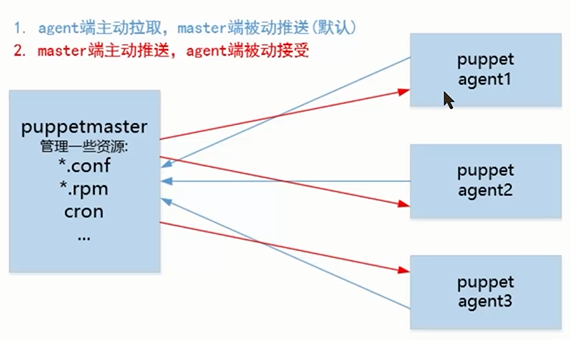
- puppet的工作模式是什么?
- puppet采用C/S的结构模型,服务端/客户端
- 服务端 puppetmaster-->负责配置和配置任务
- 客户端 puppet -->既是一个命令也是一个服务,从puppetmaster端主动拉去数据
- puppet采用C/S的结构模型,服务端/客户端
- puppet的应用场景是什么?
- 用户管理
- 集群配置
- 工作模式:
- 每个puppet客户端每半小时(可以设置)连接一次服务器端,下载最新的配置文件,并且严格安装配置文件来配置客户端
- 配置完成以后,puppet客户端可以反馈给服务器一个消息,如果出错,也会给服务器端反馈一个消息
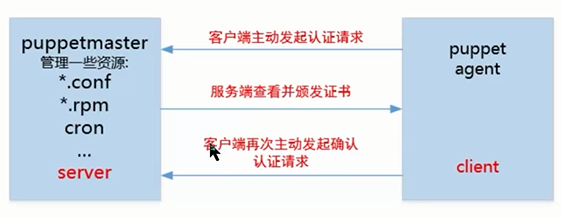
- puppet的agent和master之间的数据传输是通过SSL证书认证完成的,具有服务端身份验证和数据传输加密功能
二、puppet的安装配置
1.环境说明
puppet-master:  192.168.75.136  FQDN:puppet-master.liu.cc
puppet-agent1:  192.168.75.137  FQDN:agent1.liu.cc
puppet-agent2:  192.168.75.138  FQDN:agent2.liu.cc
说明:
建议都在nat模式,保证都能上外网
2.环境准备
2.1配置FQDN(重要)
要修改为非常规范的主机名
 vim /etc/sysconfig/network
 HOSTNAME=puppet-master.liu.cc
 vim /etc/hosts
192.168.75.136  puppet-master.liu.cc
192.168.75.137  agent1.liu.cc
192.168.75.138  agent2.liu.cc
 scp /etc/hosts 192.168.75.137:/etc
 scp /etc/hosts 192.168.75.138:/etc

更改完后重启机器
2.2所有服务器系统时间保证一致(重要)
在puppet-master上搭建一个ntp服务器
vim /etc/ntp.conf
restrict 192.168.75.0 mask 255.255.255.0 nomodify notrap 添加一行
service ntpd restart
在agent1和agent2上:
ntpdate 192.168.75.136

或者用xinetd服务,局域网内同步时间
cd /etc/xinetd.d
vim time-dgram
vim time-stream
修改为yes
service time
{
# This is for quick on or off of the service
        disable         = yes
重启xinetd服务
在agent1和2上:
rdate -s 192.168.75.136

然后agent客户端定义计划任务来向puppet-master同步时间
crontab -e
*/2 * * * * /usr/sbin/ntpdate 192.168.75.136 2> /tmp/date.log  每隔两分钟同步一次时间,错误输出到/tmp/date.log


cp /usr/share/zoneinfo/Asia/Shanghai /etc/localtime(保证时区一致)
2.3关闭防火墙和SELinux
[root@puppet-master ~]# service iptables stop
[root@puppet-master ~]# chkconfig iptables off
[root@puppet-master ~]# getenforce
Disabled
2.4配置yum源
1.备份或删掉本地源
mv demo.repo demo.repo.bak
mv bak/* .
ls
2.下载安装
wget -P /usr/src/ http://yum.puppetlabs.com/puppetlabs-release-el-6.noarch.rpm
cd /usr/src/
ls
rpm -ivh puppetlabs-release-6-10.noarch.rpm
ls /etc/yum.repos.d/
(多了一个)puppetlabs.repo
至此外网源已经安装完成

测试验证:
yum clean all
yum makecache
其他两台也是这样处理
http://yum.puppetlabs.com/el/6/products/x86_64/puppetlabs-release-6-5.noarch.rpm(没找到)
http://yum.puppetlabs.com/el/6Server/products/x86_64/puppetlabs-release-6-10.noarch.rpm(报错 Could not retrieve mirrorlist http://mirrorlist.centos.org/?release=6&arch=x86_64&repo=os error was
14: PYCURL ERROR 7 - "Failed to connect to 2001:4178:5:200::10: Network is unreachable")
http://yum.puppetlabs.com/puppetlabs-release-el-6.noarch.rpm(成功创建)
3.安装puppet的server端
yum -y install puppet-server puppet
service puppetmaster start
netstat -nltp|grep ruby
4.安装puppet的agent端
yum -y install puppet
客户端服务暂时不要启动
service puppet status
5.修改相关配置文件
rpm -ql puppet-server
rpm -ql puppet
/etc/puppet/modules
/etc/puppet/puppet.conf
/etc/rc.d/init.d/puppet
/var/log/puppet
1.修改master端配置文件
[root@puppet-master ~]# vim /etc/puppet/puppet.conf
[master]
certname=puppet-master.liu.cc   //定义签名认证的名称,自己的主机名

[root@puppet-master ~]# /etc/init.d/puppetmaster start
Starting puppetmaster:                                     [  OK  ]
[root@puppet-master ~]# netstat -anltp|grep ruby
tcp        0      0 0.0.0.0:8140                0.0.0.0:*                   LISTEN      2552/ruby
2.修改agent端配置文件
[root@agent2 ~]# vim /etc/puppet/puppet.conf
[agent]
    certname=agent2.liu.cc
    sercer=puppet-master.liu.cc
    runinterval=180     //每隔3分钟拉取一次
6.配置客户端和服务的认证连接
注意:客户端不要开启puppet服务,启动会自动发起认证请求
1.agent端尝试发起注册申请
手动测试:一次性向服务端尝试拉取一次,如果是新装的客户端就是先发起注册申请
# puppet agent -t
[root@agent1 ~]# puppet agent -t    发起认证请求
Info: Creating a new SSL key for agent1.liu.cc
Info: Caching certificate for ca
Info: csr_attributes file loading from /etc/puppet/csr_attributes.yaml
Info: Creating a new SSL certificate request for agent1.liu.cc
Info: Certificate Request fingerprint (SHA256): 04:04:77:AA:38:05:57:54:5A:55:F2:F1:3A:E8:96:04:FF:51:EC:64:28:48:33:8F:E8:5C:E7:E9:FF:8D:39:5E
Info: Caching certificate for ca
Exiting; no certificate found and waitforcert is disabled

[root@puppet-master ~]# puppet cert --list  服务端查看
  "agent1.liu.cc" (SHA256) 04:04:77:AA:38:05:57:54:5A:55:F2:F1:3A:E8:96:04:FF:51:EC:64:28:48:33:8F:E8:5C:E7:E9:FF:8D:39:5E
2.master端查看当前注册申请
[root@puppet-master ~]# puppet cert --list
  "agent1.liu.cc" (SHA256) 04:04:77:AA:38:05:57:54:5A:55:F2:F1:3A:E8:96:04:FF:51:EC:64:28:48:33:8F:E8:5C:E7:E9:FF:8D:39:5E
  "agent2.liu.cc" (SHA256) 76:B9:CE:95:AF:A6:B9:0D:58:FB:E3:30:C1:3C:32:5B:8B:75:60:A4:DB:0B:FE:11:05:DF:96:3A:10:B0:87:8F
3.master端签发认证
[root@puppet-master ~]# puppet cert sign --all
Notice: Signed certificate request for agent1.liu.cc
Notice: Removing file Puppet::SSL::CertificateRequest agent1.liu.cc at '/var/lib/puppet/ssl/ca/requests/agent1.liu.cc.pem'
Notice: Signed certificate request for agent2.liu.cc
Notice: Removing file Puppet::SSL::CertificateRequest agent2.liu.cc at '/var/lib/puppet/ssl/ca/requests/agent2.liu.cc.pem'


[root@agent1 ~]# puppet agent -t
Info: Caching certificate for agent1.liu.cc
Info: Caching certificate_revocation_list for ca
Info: Caching certificate for agent1.liu.cc
Warning: Unable to fetch my node definition, but the agent run will continue:
Warning: undefined method `include?' for nil:NilClass
Info: Retrieving pluginfacts
Info: Retrieving plugin
Info: Caching catalog for agent1.liu.cc
Info: Applying configuration version '1557735427'
Info: Creating state file /var/lib/puppet/state/state.yaml
Notice: Finished catalog run in 0.07 seconds
三、puppet的C/S模式工作原理

四、puppet的基本语法和资源定义
1.资源类型
puppet的操作对象:资源
| 资源类型 | 资源描述 |
|---|---|
| file | 文件或目录 |
| user | 用户 |
| group | 组 |
| service | 服务 |
| cron | 计划任务 |
| exec | 命令 |
| package | 软件包 |
| yumrepo | 软件仓库 |
2.目录说明
ls /etc/puppet/

manifests   清单目录,至少需要包含site.pp文件:site.pp文件里定义了具体的资源
modules     模块目录,以类和模块的方式定义资源
puppet.conf 服务器master端配置文件
3.资源定义格式
type{'title':
    attr1 => value1,
    attr2 => value2,
    ...
    ;
}
attr表示资源的属性,=>符合是给属性赋值
特殊属性:
ensure属性:用来定义资源的目标状态,不同的资源ensure值不同。比如,user资源中ensure可以设置为present表示用户必须存在;设置为absent表示用户不能存在(删除用户)
但是在service资源中,ensure的值往往被设置为stopped或者running。大部分是前者。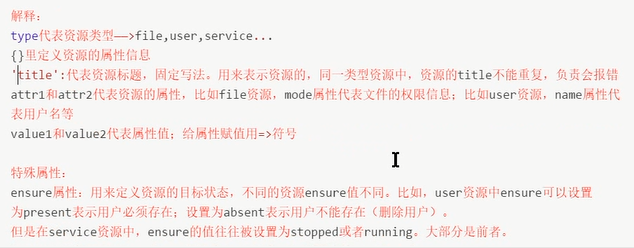
五、应用案例
1.在所有的agent端创建文件
在puppetmaster端创建一个索引文件site.pp
[root@puppet-master manifests]# vim site.pp
node 'default' {        //node ‘xxxx’代表定义一个新的客户端节点(使用FQDN)
file{'aaa':
    path => "/tmp/puppet1.txt",
    content => "Hello puppet agent1";
    }
}

agent1端测试
puppet agent -t
2.在不同的agent上创建不同文件
node 'agent1.liu.cc' {      //node ‘xxxx’代表定义一个新的客户端节点(使用FQDN)
file{"/tmp/puppet1.txt":                    换一种写法,没有path,文件写到标题里的路径里
    content => "Hello puppet agent1";
    }
}

node 'agent2.liu.cc' {      //node ‘xxxx’代表定义一个新的客户端节点(使用FQDN)
file{'aaa':
    path => "/tmp/puppet2.txt",
    content => "Hello puppet agent2";
    }
}
3.在所有的agent上创建oracle和mysql用户
扫描二维码关注公众号,回复:
6471428 查看本文章

node 'default'{
    user {'abc':
      name => oracle,
      ensure => present,
      uid => 666;
    }
    user {'aaa':
      name => mysql,
      ensure => present,
      uid => 777;
    }
}

node 'agent2.liu.cc' {
    user{'mysql':
      ensure => absent;
    }
}
4.在agent端安装vsftpd
1.puppet-master端操作:
1)创建模块目录
mkdir -pv /etc/puppet/modules/vsftpd/{manifests,files}
说明:
manifests目录是vsftpd模块的功能代码目录,该模块有什么功能都会在这里定义
files目录是资源目录,在manifests里定义的代码需要发送一些文件可以放在这里

2)编辑模块核心文件 init.pp

class vsftpd {
    yumrepo {"Server":
    descr => "Server repo",
    baseurl => "file:///media/CentOS_6.5_Final",
    gpgcheck => "0",
    enables => "1";
    }
    package {"vsftpd":
    ensure => installed,
    require => Yumrepo["Server"];       //注意,关联资源时字母要大写
    }
    service {"vsftpd":
    ensure => running
    }
}

3)调用模块
cat /etc/puppet/manifests/site.pp
node default {
    include vsftpd
}

4)检测配置文件语法
puppet parser validate
/etc/puppet/modules/vsftpd/manifests/init.pp
puppet parser validate /etc/puppet/manifests/site.pp

2.agent端测试验证
puppet agent -t

[root@agent1 ~]# puppet agent -t
Info: Retrieving pluginfacts
Info: Retrieving plugin
Info: Caching catalog for agent1.liu.cc
Info: Applying configuration version '1557741614'
Error: Could not start Service[vsftpd]: Execution of '/sbin/service vsftpd start' returned 1: vsftpd: unrecognized service
Error: /Stage[main]/Vsftpd/Service[vsftpd]/ensure: change from stopped to running failed: Could not start Service[vsftpd]: Execution of '/sbin/service vsftpd start' returned 1: vsftpd: unrecognized service
Notice: /Stage[main]/Vsftpd/Yumrepo[Server]/ensure: created
Info: changing mode of /etc/yum.repos.d/Server.repo from 600 to 644
Notice: /Stage[main]/Vsftpd/Package[vsftpd]/ensure: created
Notice: Finished catalog run in 13.60 seconds
You have new mail in /var/spool/mail/root
[root@agent1 ~]# rpm -q vsftpd
vsftpd-2.2.2-24.el6.x86_64

发现两个error,原因是还在装vsftpd,所以不能启动服务
[root@agent1 ~]# puppet agent -t
Info: Retrieving pluginfacts
Info: Retrieving plugin
Info: Caching catalog for agent1.liu.cc
Info: Applying configuration version '1557741614'
Notice: Finished catalog run in 0.25 seconds
You have new mail in /var/spool/mail/root
[root@agent1 ~]# service vsftpd status      现在就能看到已经运行了
vsftpd (pid 11812) is running...