Day 19
2019年5月25日。
这是我学习Java的第十九天。
这一天,我学到了以下的知识。
NIO流
NIO流,是面向缓冲区的,基于通道的IO操作,这个库是在JDK1.4中才引入的。NIO和IO有相同的作用和目的,但实现方式不同,NIO主要用到的是块,所以NIO的效率要比IO高很多
以下,用一个文件复制类copyFile来说明NIO流。copyFile执行三个基本的操作:创建一个Buffer,然后从源文件读取数据到缓冲区,然后再将缓冲区写入目标文件。
详细的NIO流说明,可以参考:https://www.cnblogs.com/zailushang1996/p/8916017.html
public static void copyFile(String src,String dst) throws IOException{
        //声明源文件和目标文件
        FileInputStream fi=new FileInputStream(new File(src));
        FileOutputStream fo=new FileOutputStream(new File(dst));
        //获得传输通道channel
        FileChannel inChannel=fi.getChannel();
        FileChannel outChannel=fo.getChannel();
        //获得容器buffer
        ByteBuffer buffer=ByteBuffer.allocate(1024);
        while(true){
        //判断是否读完文件
        int eof =inChannel.read(buffer);
        if(eof==-1){
        break;
        }
        //重设一下buffer的position=0,limit=position
        buffer.flip();
        //开始写
        outChannel.write(buffer);
        //写完要重置buffer,重设position=0,limit=capacity
        buffer.clear();
        }
        inChannel.close();
        outChannel.close();
        fi.close();
        fo.close();
}
GUI编程
GUI,即Graphical User Interface(图形用户接口编程),是指采用图形方式显示的计算机操作用户界面。
Java中的GUI编程,基本上是运用swing和AWT,在这里主要介绍AWT:
- AWT(Abstract Window Toolkit)包括了很多类和接口,用于Java Application的GUI(Graphics User Interface 图形用户界面)编程
- GUI的各种元素(如:窗口,按钮,文本框等)由Java类来实现
- 使用AWT所涉及的类一般在Java.AWT包及其子包中
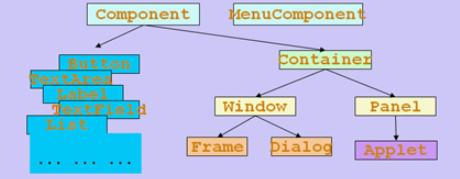
- Container(容器)和Component(组件)是AWT中的两个核心类
Container和Component的关系图,如下所示:
接下来,分别介绍Container和LayoutManager(布局管理器)以及Component来说明GUI编程
-
Container(容器)
Container里面分为Window和Pannel。
Window是可以独立显示出来的,平时我们看到的各种各样的应用程序的窗口都可以称为Window,Window作为一个应用程序窗口独立显示出来。Window本身又可以分为Frame和Dialog,Frame就是我们平时看到的一般的窗口,而Dialog则是那些需要用户进行了某些操作(如点击某个下拉菜单的项)才出现的对话框,这种对话框就是Dialog。
Pannel也可以容纳其它的图形元素,但一般看不见Pannel,Pannel不能作为应用程序的独立窗口显示出来,Pannel要想显示出来就必须得把自己装入到Window里面才能显示出来。- Frame
Frame是Windows的子类,由Frame或其子类创建的对象,为一个窗体
构造方法:public Frame():构造一个最初不可见的 Frame 新实例
public Frame(String title):构造一个新的、最初不可见的、具有指定标题的 Frame 对象
成员方法
public void setBounds(int x, int y, int width, int height):设置窗体位置和大小,x,y是左上角坐标,width和height是宽度和高度
public void setSize(int width, int height):设置窗体的大小
public void setLocation(int x, int y):设置窗体的位置
public void setBackground(Color c):设置背景颜色,参数为Color对象
public void setVisible(boolean b):设置窗体是否可见,默认为不可见
public void setTitle(String title):设置Frame的标题
public String getTitle():获得Frame的标题
public void setResizable(boolean resizable):设置是否可以调整大小
Frame代码实例:
public class MyTest { public static void main(String[] args) { //这里只是在内存里面创建了一个窗口对象 还不能真正显示出来让我们看到 Frame frame = new Frame("JAVA图形界面窗口"); //设置窗体的背景颜色 frame.setBackground(Color.blue); //设置窗体是否可见 //要想看到在内存里面创建出来的窗口对象 //必须调用setVisble()方法 //并且把参数true传入才能看得见窗体 //如果传入的参数是false //那么窗体也是看不见的 frame.setVisible(true); //设置窗体的初始大小 frame.setSize(500,500); //设置窗体出现时的位置,如果不设置则默认在左上角(0,0)位置显示 frame.setLocation(200,200); // 设置窗体能否被改变大小 // 设置为false后表示不能改变窗体的显示大小 // 这里将窗体显示的大小设置为200X200 // 那么窗体的显示只能是这个大小了,不能再使用鼠标拖大或者缩小 frame.setResizable(false); //设置窗体在点击右上角的“X”按钮时可以退出程序 frame.addWindowListener(new WindowAdapter() { @Override public void windowClosing(WindowEvent e) { System.exit(0); } }); }}- Panel
Panel对象可以看成容纳Component的空间,且可以拥有自己的布局管理器,并且拥有从父类继承来的方法
构造方法:public Panel():使用默认的布局管理器创建新面板
public Panel(LayoutManager layout):构造一个新的、最初不可见的、具有指定标题的 Frame 对象
成员方法
public void setBounds(int x, int y, int width, int height):设置面板位置和大小,x,y是左上角坐标,width和height是宽度和高度
public void setSize(int width, int height):设置面板的大小
public void setLocation(int x, int y):设置面板的位置
public void setBackground(Color c):设置背景颜色,参数为Color对象
public void setLayout(LayoutManager mgr):设置面板的布局管理器
Panel代码实例:
- Frame
public class TestPanel {
    public static void main(String[] args) {
        Frame frame = new Frame("JAVA Frame With Panel");
        Panel panel = new Panel(null);
        frame.setLayout(null);

        //这里设置的坐标(300,300)是相对于整个屏幕的
        frame.setBounds(300,300,500,500);

        //设置背景颜色时使用三基色(红,绿,蓝)的比例来调配背景色
        frame.setBackground(new Color(0,0,102));

        //这里设置的坐标(50,50)是相对于Frame窗体的
        panel.setBounds(50,50,400,400);
        panel.setBackground(new Color(204,204,255));

        //把Panel容器装入到Frame容器中,使其能在Frame窗口中显示出来
        frame.add(panel);

        frame.setVisible(true);

        //解决关闭问题
        frame.addWindowListener(new WindowListener() {
            @Override
            public void windowOpened(WindowEvent e) {

            }

            @Override
            public void windowClosing(WindowEvent e) {
                System.exit(0);
            }

            @Override
            public void windowClosed(WindowEvent e) {

            }

            @Override
            public void windowIconified(WindowEvent e) {

            }

            @Override
            public void windowDeiconified(WindowEvent e) {

            }

            @Override
            public void windowActivated(WindowEvent e) {

            }

            @Override
            public void windowDeactivated(WindowEvent e) {

            }
        });
    }
}
-
LayoutManger(布局管理器)
Java中,提供了布局管理器类的对象可以管理,管理Component在Container中的布局,不必直接设置Component位置和大小,且每个Container都有一个布局管理器对象,当容器需要对某个组件进行定位或判断大小尺寸时,就会调用其对应的布局管理器,调用Container的setLayout方法改变其布局管理器对象。-
FlowLayout(流式布局)
FlowLayout是Panel类的默认布局管理器,具有如下特点:- FlowLayout布局管理器对组件进行定位,行内从左到右,一行排满后换行。
- 不改变组件的大小,按组件原有尺寸显示组件,可设置不同的组件间距,行距以及对齐方式。
- 默认的对齐方式是居中。
构造方法:
public FlowLayout():使用默认的居中对齐方式,水平和垂直间距为默认值(5)
public FlowLayout(int align):使用指定的对齐方式,align的值必须为:FlowLayout.LEFT、FlowLayout.RIGHT、FlowLayout.CENTER、FlowLayout.LEADING 或 FlowLayout.TRAILING
public FlowLayout(int align, int hgap, int vgap):使用指定的对齐方式以及水平和垂直间距,align的值必须为:FlowLayout.LEFT、FlowLayout.RIGHT、FlowLayout.CENTER、FlowLayout.LEADING 或 FlowLayout.TRAILING
FlowLayout代码实例:
public class TestFlowLayout { public static void main(String[] args) { Frame frame = new Frame("FlowLayout"); //使用Button类创建按钮 // 按钮类的其中一个构造方法:Button(String label) label为按钮显示的文本 Button button1 = new Button("button1"); Button button2 = new Button("button2"); Button button3 = new Button("button3"); // setLayout方法的定义:public void setLayout(LayoutManager mgr) // 使用流水(Flow)线般的布局 frame.setLayout(new FlowLayout()); // 使用了布局管理器FlowLayout,这里的布局采用默认的水平居中模式 // frame.setLayout(new FlowLayout(FlowLayout.LEFT)); // 这里在布局的时候使用了FlowLayout.LEFT常量,这样就将按钮设置为左对齐 // frame.setLayout(new FlowLayout(FlowLayout.RIGHT)); //这里在布局的时候使用了FlowLayout.RIGHT常量,这样就将按钮设置为右对齐 frame.setSize(200,200); frame.add(button1); // 把创建出来的按钮放置到Frame窗体中 frame.add(button2); // 这里并没有设置按钮的大小与位置 frame.add(button3); // 设置按钮的大小与位置都是由布局管理器来做的 frame.setVisible(true); } }-
BorderLayout(边框布局)
BorderLayout是Frame类的默认布局管理器,具有如下特点:- BorderLayout布局管理器将整个容器划分成:东(EAST)、西(WEST)、南(SOUTH)、北(NORTH)、中(CENTER)五个区域,组件只能添加到指定的区域。
- 如果不指定组件的加入部位,则默认加入到CENTER区。
- 每个区域只能加入一个组件,若加入多个,则先前加入的会被覆盖。
构造方法:
public BorderLayout():构造一个组件之间没有间距的新边框布局
public BorderLayout(int hgap, int vgap):构造一个具有指定组件间距的边框布局
BorderLayout代码实例:
public class TestBorderLayout { public static void main(String[] args) { Frame frame = new Frame("TestBorderLayout"); Button buttonEast = new Button("East"); Button buttonWest = new Button("West"); Button buttonSouth = new Button("South"); Button buttonNorth = new Button("North"); Button buttonCenter = new Button("Center"); //把按钮放置到Frame窗体时按照东西南北中五个方向排列好,推荐使用这种方式去排列窗体元素 //这样容易检查出错误 因为这样写如果写错了编译器会提示出错 frame.add(buttonEast,BorderLayout.EAST); frame.add(buttonWest,BorderLayout.WEST); frame.add(buttonSouth,BorderLayout.SOUTH); frame.add(buttonNorth,BorderLayout.NORTH); frame.add(buttonCenter,BorderLayout.CENTER); //也可以使用这样的方式排列按钮 在把按钮放置到Frame窗体时使用方向定位的字符串指定按钮的放置位置 //这种使用方向定位的字符串指定按钮的放置方式不推荐使用 一旦写错了方向字符串就不好检查出来 //因为即使是写错了仍然可以编译通过 /* frame.add(buttonEast,"EAST"); frame.add(buttonWest,"West"); frame.add(buttonSouth,"South"); frame.add(buttonNorth,"North"); frame.add(buttonCenter,"Center"); */ frame.setSize(200,200); frame.setVisible(true); } }- GridLayout(表格布局)
GridLayout型布局管理器将空间划分成规则的矩形网络,每个单元格区域大小相等。组件被添加到每个单元格中,先从左到右填满一行后换行,再从上到下。
构造方法:public GridLayout():创建具有默认值的表格布局,即每个组件占据一行一列
public GridLayout(int rows, int cols):创建具有指定行数和列数的表格布局
GridLayout代码实例:
public class TestGridLayout { public static void main(String[] args) { Frame frame = new Frame("TestGridLayout"); Button btn1 = new Button("btn1"); Button btn2 = new Button("btn2"); Button btn3 = new Button("btn3"); Button btn4 = new Button("btn4"); Button btn5 = new Button("btn5"); Button btn6 = new Button("bnt6"); // 把布局划分成3行2列的表格布局形式 frame.setLayout(new GridLayout(3,2)); frame.add(btn1); frame.add(btn2); frame.add(btn3); frame.add(btn4); frame.add(btn5); frame.add(btn6); // Frame.pack()是JAVA语言的一个函数 // 这个函数的作用就是根据窗口里面的布局及组件的preferredSize来确定frame的最佳大小。 frame.pack(); frame.setVisible(true); } }- 布局嵌套
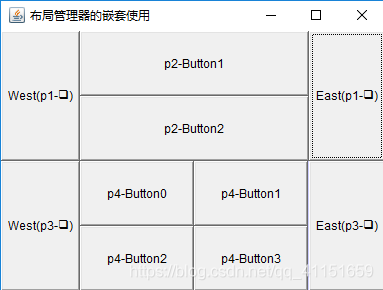
这几种布局管理器可以设置在Frame里面,也可以设置在Panel里面,而Panel本身也可以加入到Frame里面,因此通过Frame与Panel的嵌套就可以实现比较复杂的布局。
代码如下:
public class TestTenButtons {
public static void main(String[] args) {
    //这里主要是对显示窗体进行设置
    Frame frame = new Frame("布局管理器的嵌套使用");

    //把整个窗体分成2行1列的表格布局
    frame.setLayout(new GridLayout(2,1));

    frame.setLocation(300,400);
    frame.setSize(400,300);
    frame.setVisible(true);
    frame.setBackground(new Color(204,204,255));

    //这里主要是对Panel进行布局的设置
    Panel p1 = new Panel(new BorderLayout());
    //p2使用2行1列的表格布局
    Panel p2 = new Panel(new GridLayout(2,1));
    Panel p3 = new Panel(new BorderLayout());
    //p4使用2行2列的表格布局
    Panel p4 = new Panel(new GridLayout(2,2));

    //这里主要是把按钮元素加入到Panel里面
    p1.add(new Button("East(p1-东)"),BorderLayout.EAST);
    p1.add(new Button("West(p1-西)"),BorderLayout.WEST);

    p2.add(new Button("p2-Button1"));
    p2.add(new Button("p2-Button2"));

    //p1里面嵌套p2,把p2里面的按钮作为p的中间部分装入到p1里面
    //把p2作为元素加入到p1里面
    p1.add(p2,BorderLayout.CENTER);

    p3.add(new Button("East(p3-东)"),BorderLayout.EAST);
    p3.add(new Button("West(p3-西)"),BorderLayout.WEST);

    for(int i=0;i<4;i++){
        p4.add(new Button("p4-Button"+i));
    }

    //p3里面嵌套p4,把p4里面的按钮作为p的中间部分装入到p3里面
    p3.add(p4,BorderLayout.CENTER);

    //把Panel装入Frame里面,以便于在Frame窗体中显示出来
    frame.add(p1);
    frame.add(p3);
	}
}
效果如下:
-
-
Component(组件)
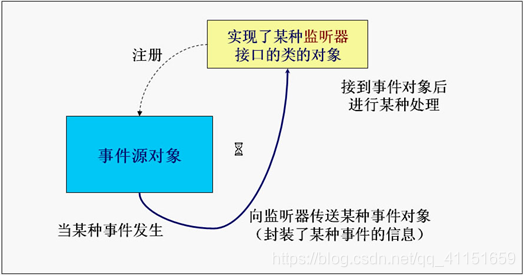
Component,即可以实现各种功能的特殊组件。- Button(按钮)
这里主要介绍按钮监听器的使用方法
原理图如下:
代码示例如下:
public class TestActionEvent { public static void main(String[] args) { Frame frame = new Frame("TestActionEvent"); Button button = new Button("Press Me"); // 创建一个监听对象 MyActionListener listener = new MyActionListener(); // 把监听加入到按钮里面,监听按钮的动作, // 当按钮触发打击事件时,就会返回一个监听对象e // 然后就会自动执行actionPerformed方法 button.addActionListener(listener); frame.add(button, BorderLayout.CENTER); frame.pack(); addWindowClosingEvent(frame); frame.setVisible(true); } //点击窗体上的关闭按钮关闭窗体 private static void addWindowClosingEvent(Frame frame){ frame.addWindowListener(new WindowAdapter() { @Override public void windowClosing(WindowEvent e) { System.exit(0); } }); } } // 自定义Monitor(监听)类实现事件监听接口ActionListener // 一个类要想成为监听类,那么必须实现ActionListener接口 class MyActionListener implements ActionListener{ //重写ActionListener接口里面的actionPerformed(ActionEvent e)方法 @Override public void actionPerformed(ActionEvent e) { System.out.println("A Button has been Pressed"); } }- TextField(文本编辑框)
这里主要介绍文本监听器的使用方法
原理图如下:
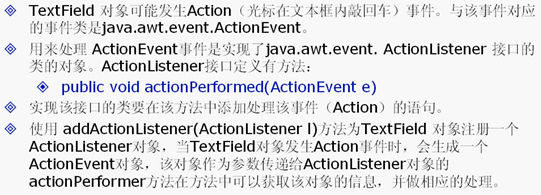
代码示例如下:
public class TestTextField { public static void main(String[] args) { new MyFrameTextField(); } } class MyFrameTextField extends Frame{ MyFrameTextField(){ TextField textField = new TextField(); add(textField); textField.addActionListener(new MyMonitor2()); //这个setEchoChar()方法是设置文本框输入时显示的字符,这里设置为*, //这样输入任何内容就都以*显示出来,不过打印出来时依然可以看到输入的内容 textField.setEchoChar('*'); setVisible(true); pack(); } } class MyMonitor2 implements ActionListener{ //接口里面的所有方法都是public(公共的) //所以从API文档复制void actionPerformed(ActionEvent e)时 要在void前面加上public @Override public void actionPerformed(ActionEvent e) { //事件的相关信息都封装在了对象e里面,通过对象e的相关方法就可以获取事件的相关信息 //getSource()方法是拿到事件源,注意:拿到这个事件源的时候 //是把它当作TextField的父类来对待 //getSource()方法的定义是:“public Object getSource()”返回值是一个Object对象 //所以要强制转换成TextField类型的对象 //在一个类里面想访问另外一个类的事件源对象可以通过getSource()方法 TextField textField = (TextField) e.getSource(); // textField.getText()是取得文本框里面的内容 System.out.println(textField.getText()); // 把文本框里面的内容清空 textField.setText(""); } }- paint(绘图方法)
每个Component都有一个paint(Graphics g)用于实现绘图目的,每次重画该Component时都自动调用paint方法
代码示例如下:
- Button(按钮)
public class TestPaint {
    public static void main(String[] args) {
        new MyPaint().launchFrame();
        //在main()方法里面并没有显示调用paint(Graphics g)方法
        //可是当创建出Frame窗体后却可以看到Frame窗体上画出了圆和矩形
        //这是因为paint()方法是一个比较特殊的方法
        //在创建Frame窗体时会自动隐式调用
        //当我们把Frame窗体最小化又再次打开时
        //又会再次调用paint()方法重新把圆和矩形在Frame窗体上画出来
        //即每次需要重画Frame窗体的时候就会自动调用paint()方法
    }
}

class MyPaint extends Frame{
    public void launchFrame(){
        setBounds(200,200,640,480);
        setVisible(true);
    }

    public void paint(Graphics g){
        //paint(Graphics g)方法有一个Graphics类型的参数g
        //我们可以把这个g当作是一个画家,这个画家手里拿着一只画笔
        //我们通过设置画笔的颜色与形状来画出我们想要的各种各样的图像

        /*设置画笔的颜色*/
        g.setColor(Color.red);
        g.fillOval(100,100,100,100);/*画一个实心椭圆*/
        g.setColor(Color.green);
        g.fillRect(150,200,200,200);/*画一个实心矩形*/

        //这下面的两行代码是为了写程序的良好编程习惯而写的
        //前面设置了画笔的颜色,现在就应该把画笔的初始颜色恢复过来
        //就相当于是画家用完画笔之后把画笔上的颜色清理掉一样
        Color c = g.getColor();
        g.setColor(c);

        System.out.println("gogoogo");

    }

}