1.首先我們创建一个web的maven项目,如果不会请参考这个地方 如何创建web项目
2.我们在pom.xml中添加依赖的包
<dependency>
			<groupId>org.apache.axis2</groupId>
			<artifactId>axis2</artifactId>
			<version>1.6.2</version>
			<type>pom</type>
			<scope>compile</scope>
		</dependency>
		<dependency>
			<groupId>org.apache.axis2</groupId>
			<artifactId>axis2-adb</artifactId>
			<version>1.6.2</version>
			<type>jar</type>
			<scope>compile</scope>
		</dependency>
		<dependency>
			<groupId>org.apache.axis2</groupId>
			<artifactId>axis2-kernel</artifactId>
			<version>1.6.2</version>
			<type>jar</type>
			<scope>compile</scope>
			<exclusions>
				<exclusion>
					<groupId>javax.ws.rs</groupId>
					<artifactId>jsr311-api</artifactId>
				</exclusion>
			</exclusions>
		</dependency>
		<dependency>
			<groupId>org.apache.axis2</groupId>
			<artifactId>axis2-transport-local</artifactId>
			<version>1.6.2</version>
		</dependency>
		<dependency>
			<groupId>org.apache.axis2</groupId>
			<artifactId>axis2-transport-http</artifactId>
			<version>1.6.2</version>
		</dependency>
3.修改web.xml,添加如下:
 <servlet>
<servlet-name>AxisServlet</servlet-name>
<servlet-class>org.apache.axis2.transport.http.AxisServlet</servlet-class>
<load-on-startup>5</load-on-startup>
</servlet>
<servlet-mapping>
<servlet-name>AxisServlet</servlet-name>
<url-pattern>/services/*</url-pattern>
</servlet-mapping>
4 创建一个services.xml
<?xml version="1.0" encoding="UTF-8" ?>
<serviceGroup>
<service name="hello" scope="application">
    <description>
        helloworld
    </description>
    <!--  这里指定为你写的接口实现类的全路径-->
    <parameter name="ServiceClass">com.test.axis2.service.impl.HelloServiceImpl</parameter>
<operation name="test">
<messageReceiver class="org.apache.axis2.rpc.receivers.RPCMessageReceiver" />
</operation>
</service>
</serviceGroup>
5.创键接口以及实现类
public interface HelloService {
	String  hello(String name,String msg);
}
实现类
public class HelloServiceImpl implements HelloService {

	@Override
	public String hello(String name, String msg) {
		System.out.println("name:="+name+"msg="+msg);

		return "name:="+name+"msg="+msg;
	}


}
6.发布项目服务器上,发现没有报错,因为我使用的是jetty ,使用其他的发布服务方式一样的

7.访问我们的
http://localhost:8080/webservice/services/hello?wsdl 可以看到

到此 服务发布成功。
搭建时候容易出现的问题:
1.有的我们在创建成功之后访问地址会发现报下面这种错:

这是因为我们的services.xml路径不对 正确的路径是:
在 WEB-INF 路径下创建 /services/自定义文件夹名/META-INF/services.xml 配置文件。自定义文件夹名你叫啥都无所谓,但是必须是这种结构,一旦这个路径不对 就会报上面的错误。
还有其它疑问可以在询问我。
二:调用的话我使用的soapUI来调用的,非常方便
1.打开这个软件:

针对这次调用 :项目名称为:webservice
wsdl路经为:http://localhost:8080/webservice/services/hello?wsdl
填写完毕以后点击ok,可以看到:

在这里输入参数之后点击左上角的绿色三角运行

我们可以看到:
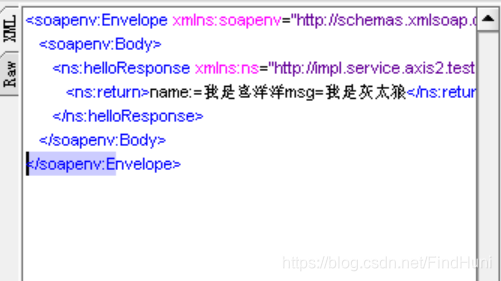
ok
我们还可以写一个main方法来调用代码如下:
package com.csq.study.test;

import javax.xml.namespace.QName;

import org.apache.axis2.AxisFault;
import org.apache.axis2.addressing.EndpointReference;
import org.apache.axis2.client.Options;
import org.apache.axis2.rpc.client.RPCServiceClient;

public class TestWebService {
	public static void main(String[] args) {
		RPCServiceClient serviceClient = null;
		try {
			serviceClient = new RPCServiceClient();
		} catch (Exception e1) {

			e1.printStackTrace();
		}
		Options options = serviceClient.getOptions();
		EndpointReference targetEPR = new EndpointReference("http://localhost:8080/webservice/services/hello");
		options.setTo(targetEPR);
		Object[] requestParam = new Object[] { "我是喜洋洋", "我是灰太狼" };
		Class[] responseParam = new Class[] { String.class, String.class };
		QName requestMethod = new QName("http://impl.service.axis2.test.com", //这里使用wsdl地址下xml的 xmlns:ns
				"hello");// 方法名
		String result = null;

		try {
			result = (String) serviceClient.invokeBlocking(requestMethod, requestParam, responseParam)[0];

			System.out.println(result);
		} catch (AxisFault e) {

			e.printStackTrace();
		}
	}
}
运行main方法可以在服务器的控制台看到如下图所示:

也可以在main方法的打印台看到:

ok 完成。。。。。。。。。。
转载请注明出处:https://blog.csdn.net/FindHuni/article/details/84656923