介绍:ActiveMQ是一个开源兼容Java Message Service (JMS) 1.1面向消息的中件间. 来自Apache Software Foundation. ActiveMQ提供松耦合的应用程序架构.
那么为什么要用消息ActiveMQ?下面来看两组图:
一、异步处理:
串行方式:将注册信息写入数据库成功后,发送注册邮件,再发送注册短信。以上三个任务全部完成后,返回给客户端。

并行方式:将注册信息写入数据库成功后,发送注册邮件同时发送注册短信。以上三个任务全部完成后,返回给客户端。与串行的差别是,并行的方式可以提高处理的时间。

假设三个业务节点每个使用50毫秒钟,不考虑网络等其他开销,则串行方式的时间是150毫秒,并行的时间可能是100毫秒。
因为CPU在单位时间内处理的请求数是一定的,假设CPU1秒内吞吐量是100次。
则串行方式1秒内CPU可处理的请求量是7次(1000/150)。并行方式处理的请求量是10次(1000/100)。
小结:如以上案例描述,传统的方式系统的性能(并发量,吞吐量,响应时间)会有瓶颈。如何解决这个问题呢?
消息队列方式:将注册信息写入数据库成功后,将消息发送给消息队列直接返回结果了,这时候发送邮件和短信服务去异步读取队列的信息处理。写入消息队列的速度是非常快的

二、应用解耦:
场景说明:用户下单后,订单系统需要通知库存系统。传统的做法是,订单系统调用库存系统的接口。如下图:

传统模式的缺点:
1)、假如库存系统无法访问,则订单减库存将失败,从而导致订单失败;
2)、订单系统与库存系统耦合;
如何解决以上问题呢?引入应用消息队列后的方案,如下图:
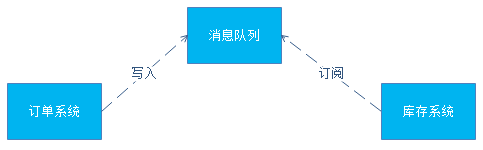
1:订单系统:用户下单后,订单系统完成持久化处理,将消息写入消息队列,返回用户订单下单成功,请等待物流配送。
2:库存系统:订阅下单的消息,采用拉/推的方式,获取下单信息,库存系统根据下单信息,进行库存操作。
3:假如:在下单时库存系统不能正常使用。也不影响正常下单,
因为下单后,订单系统写入消息队列就不再关心其他的后续操作了。实现订单系统与库存系统的应用解耦。
三、流量削锋:
流量削锋也是消息队列中的常用场景,一般在秒杀或团抢活动中使用广泛。
应用场景:秒杀活动,一般会因为流量过大,导致流量暴增,应用容易挂掉。为解决这个问题,一般需要在应用前端加入消息队列。
可以控制活动的人数.
可以缓解短时间内高流量压垮应用;如下图:

用户的请求,服务器接收后,首先写入消息队列。假如消息队列长度超过最大数量,则直接抛弃用户请求或跳转到错误页面;
秒杀业务根据消息队列中的请求信息,再做后续处理。
四、消息通讯:
消息通讯是指,消息队列一般都内置了高效的通信机制,因此也可以用在纯的消息通讯。比如实现点对点消息队列,或者聊天室等。
点对点通讯:

客户端A和客户端B使用同一队列,进行消息通讯。
聊天室通讯:

客户端A,客户端B,客户端N订阅同一主题,进行消息发布和接收。实现类似聊天室效果。
以上实际是消息队列的两种消息模式,点对点或发布订阅模式。
下面是介绍springboot实现activeMQ代码:
第一步:在pom文件中添加依赖的架包
<dependency>
   <groupId>org.springframework.boot</groupId>
   <artifactId>spring-boot-starter-activemq</artifactId>
</dependency>
<dependency>
   <groupId>org.springframework.boot</groupId>
   <artifactId>spring-boot-starter-web</artifactId>
</dependency>
<dependency>
   <groupId>org.apache.activemq</groupId>
   <artifactId>activemq-pool</artifactId>
</dependency>
第二步:application.yml文件配置
spring:
  activemq:
    password: admin
    user: admin
    broker-url: tcp://192.168.0.115:61616
一、ActiveMQ点对点之消息配置
@Configuration
@EnableJms
public class ActiveMQConfig {
    /**
     * @Author: 凉白开不加冰
     * @Date:   2018/10/24 11:59
     * @Description: 点对点
    **/
    @Bean
    public Queue queue(){
        return new ActiveMQQueue("study.msg.queue");
    }
}
点对点之消息订阅
@Component
public class MessageConsumerService {
    @JmsListener(destination = "study.msg.queue")
    public void receiveMessage(String text) {
        System.out.println("queue1 -> " + text);
    }
}
点对点之发布消息
@Service("messageProducerQueueService")
public class MessageProducerQueueServiceImpl implements IMessageProducerService{

    @Autowired
    private JmsMessagingTemplate messagingTemplate;

    @Override
    public void sendMessageQueue(String msg,Queue queue) {
        messagingTemplate.convertAndSend(queue,msg);
    }
}
二、ActiveMQ发布订阅之消息配置
@Configuration
@EnableJms
public class ActiveMQConfig {
    /**
     * @Author: 凉白开不加冰
     * @Date:   2018/10/24 11:59
     * @Description:发布订阅
    **/
    @Bean
    public Topic topic(){
        return new ActiveMQTopic("study.msg.topic");
    }
    /**
     * JmsListener注解默认只接收queue消息,如果要接收topic消息,需要设置containerFactory
     */
    @Bean
    public JmsListenerContainerFactory<?> topicListenerContainer(ConnectionFactory activeMQConnectionFactory) {
        DefaultJmsListenerContainerFactory topicListenerContainer = new DefaultJmsListenerContainerFactory();
        topicListenerContainer.setPubSubDomain(true);
        topicListenerContainer.setConnectionFactory(activeMQConnectionFactory);
        return topicListenerContainer;
    }
}
发布订阅之消息订阅
@Component
public class MessageConsumerService {
    @JmsListener(destination = "study.msg.topic", containerFactory = "topicListenerContainer")
    public void receiveMessageTopic(String text) {
         System.out.println("topic -> " + text);
    }
}
发布订阅之消息发布
@Service("messageProducerTopicService")
public class MessageProducerTopicServiceImpl implements IMessageProducerService{

    @Autowired
    private JmsMessagingTemplate messagingTemplate;

    @Override
    public void sendMessage(String msg,Topic topic) {
        messagingTemplate.convertAndSend(topic,msg);
    }
}
三、发布订阅消息之消息持久配置
@Configuration
@EnableJms
public class ActiveMQConfig {

    @Bean
    public Topic topic(){
        return new ActiveMQTopic("study.msg.topic");
    }

    @Autowired
    private ActiveMQConnectionFactory connectionFactory;

    //订阅持久化,必须有factory.setSubscriptionDurable(true); 和   factory.setClientId("id1");
    @Bean(name = "topicListenerFactory")
    public DefaultJmsListenerContainerFactory topicListenerFactory(){
        DefaultJmsListenerContainerFactory factory = new DefaultJmsListenerContainerFactory();
        factory.setConnectionFactory(connectionFactory);
        factory.setPubSubDomain(true);
        factory.setSubscriptionDurable(true);
        factory.setClientId("id1");
        return factory;
    }
}
发布订阅之消息订阅持久
@Component
public class MessageConsumerService {

    @JmsListener(destination = "study.msg.topic", containerFactory = "topicListenerFactory",id = "id1")
    public void receiveMessageTopic(String text) {
        System.out.println("topic -> " + text);
    }

}
发布订阅之消息发布
@Service("messageProducerTopicService")
public class MessageProducerTopicServiceImpl implements IMessageProducerService{

    @Autowired
    private JmsMessagingTemplate messagingTemplate;

    @Override
    public void sendMessage(String msg,Topic topic) {
        messagingTemplate.convertAndSend(topic,msg);
    }
}