讲师_@王晓春
本章内容
- ▼用户与组
- ▼文件权限
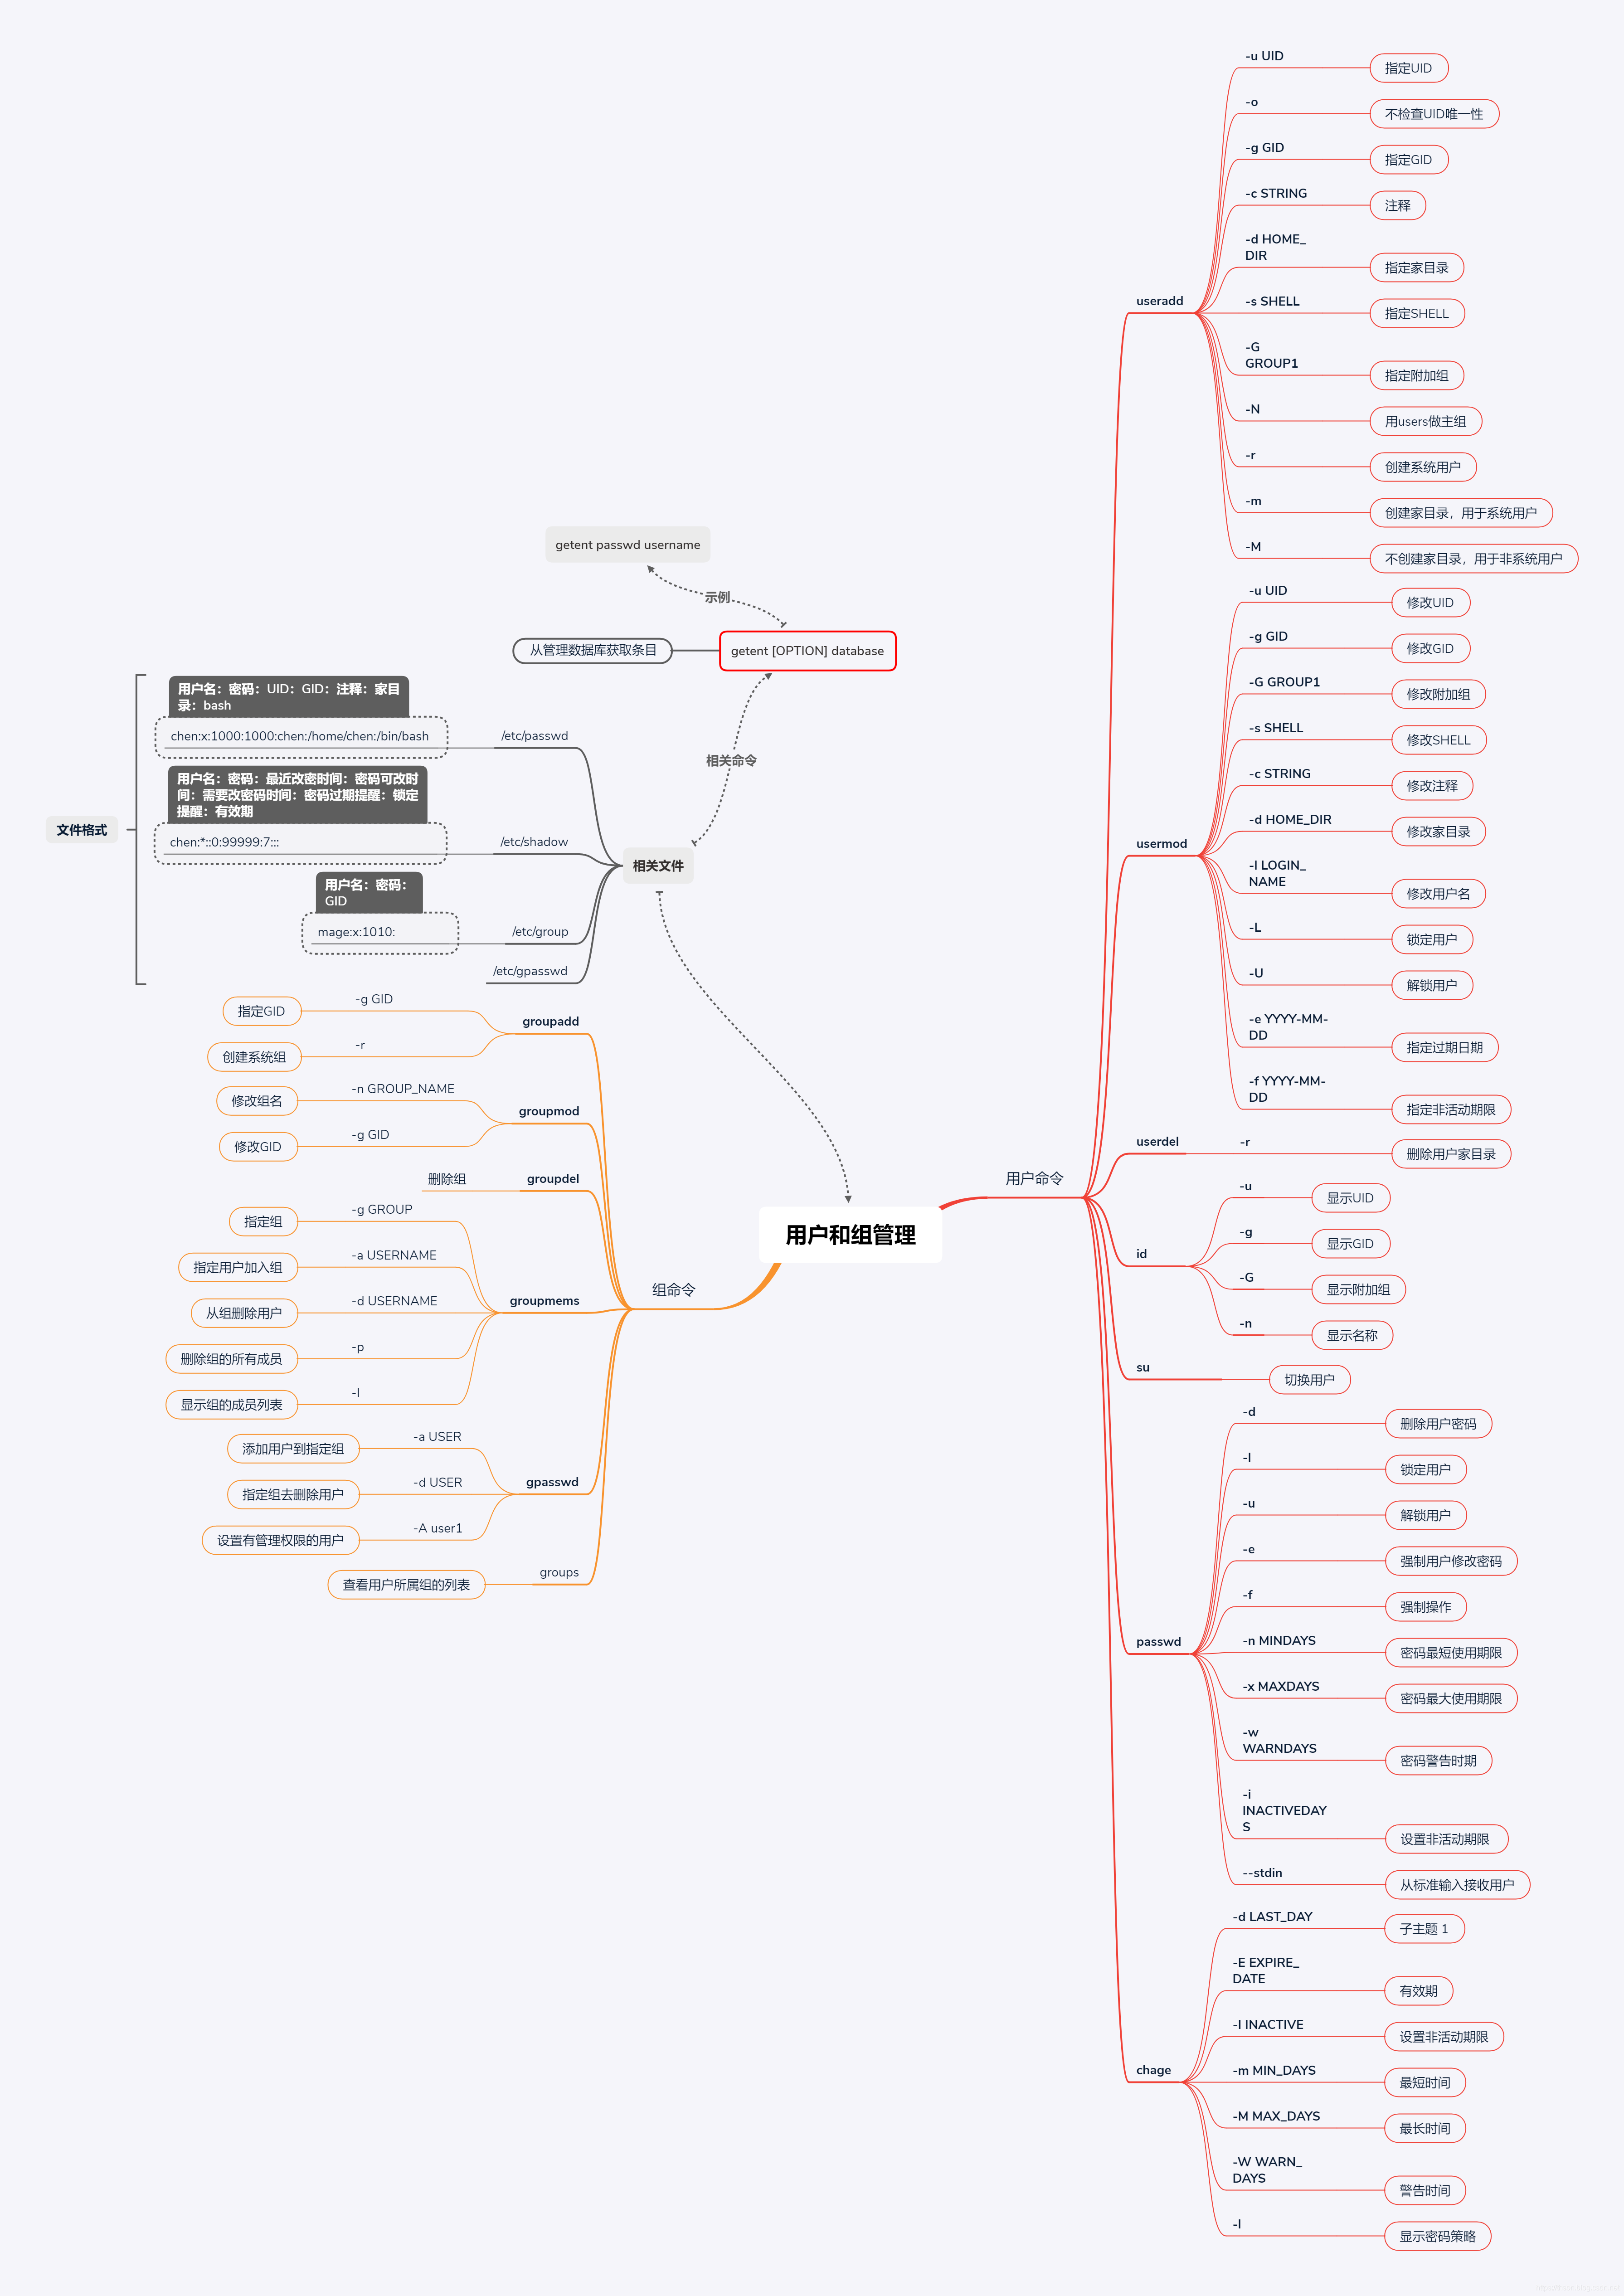
- ▷用户管理命令
- ●新建用户的相关文件和命令
- useradd`用户创建`
- usermod [OPTION] USERNAME“用户属性修改”
- userdel [OPTION]... USERNAME“删除用户”
- id [OPTION]... [USER] “查看用户相关的ID信息”
- su [options...] [-] [user [args...]] “切换用户或以其他用户身份执行命令”
- passwd [OPTIONS] UserName “设置密码”
- 修改用户密码策略
- 用户相关的其它命令
- ●组的相关命令
- ▼文件权限
- 练习
- 练习答案
▼用户与组
-
资源分派:
Authentication:认证
Authorization:授权
Accouting|Audition:审计 -
用户user
- Linux用户:Username/UID
- 管理员:root, 0
- 普通用户:1-60000 自动分配
- 系统用户:1-499, 1-999 (CentOS7)
对守护进程获取资源进行权限分配 - 登录用户:500+, 1000+(CentOS7)
交互式登录
- 系统用户:1-499, 1-999 (CentOS7)
-
组group
- Linux组:Groupname/GID
- 管理员组:root, 0
- 普通组:
- 系统组:1-499, 1-999(CENTOS7)
- 普通组:500+, 1000+(CENTOS7)
-
Linux安全上下文
- 运行中的程序:进程 (process)
- 以进程发起者的身份运行:
- root: /bin/cat
- mage: /bin/cat
- 进程所能够访问资源的权限取决于进程的运行者的身份
-
Linux组的类别
- 用户的主要组(primary group)
- 用户必须属于一个且
只有一个主组 - 组名同用户名,且仅包含一个用户,私有组
- 用户必须属于一个且
- 用户的附加组(supplementary group)
- 一个用户
可以属于零个或多个附加组
- 一个用户
- 用户的主要组(primary group)
▷用户和组的配置文件
- 主要配置文件:
/etc/passwd:用户及其属性信息(名称、UID、主组ID等)
/etc/group:组及其属性信息
/etc/shadow:用户密码及其相关属性
/etc/gshadow:组密码及其相关属性
passwd文件格式
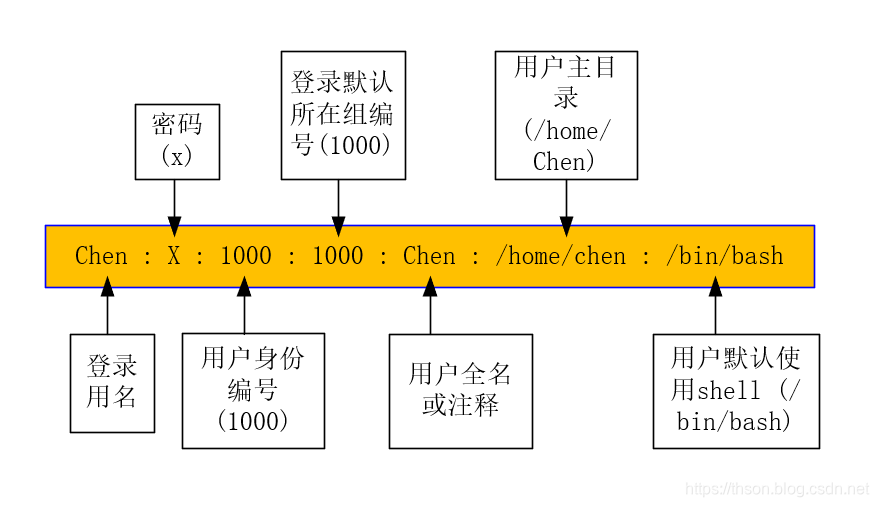
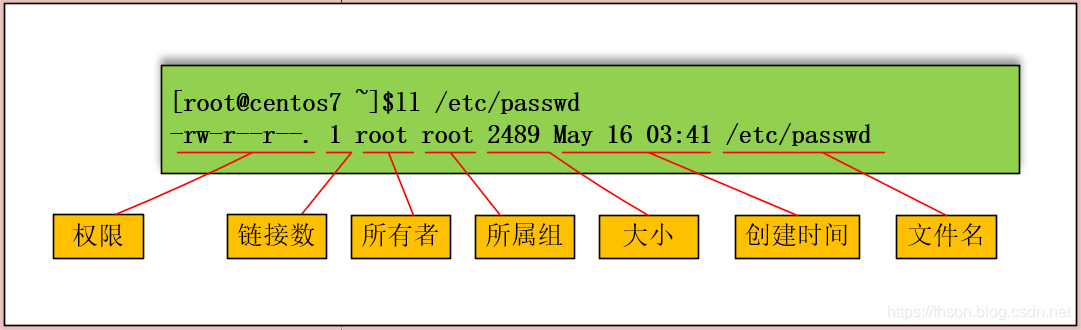
[root@centos7 ~]$cat /etc/passwd
chen:x:1000:1000:chen:/home/chen:/bin/bash
- login name:登录用名(wang)
- passwd:密码 (x)
- UID:用户身份编号 (1000)
- GID:登录默认所在组编号 (1000)
- GECOS:用户全名或注释
- home directory:用户主目录 (/home/wang)
- shell:用户默认使用shell (/bin/bash)
- 还可以使用命令
vipw相当于vi /etc/passwd
shadow文件格式
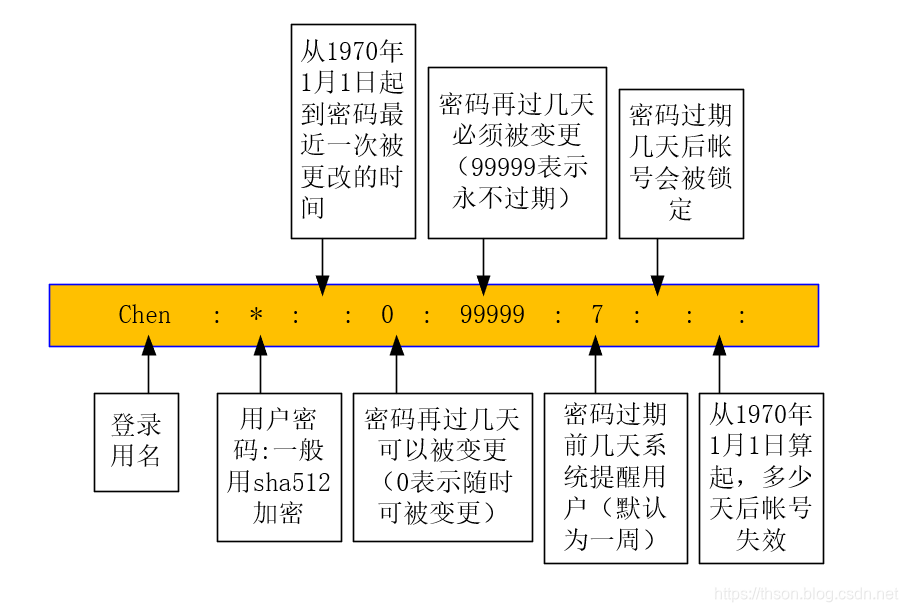
[root@centos7 ~]$cat /etc/shadow
chen:*::0:99999:7:::
- 登录用名
- 用户密码:一般用sha512加密
- 从1970年1月1日起到密码最近一次被更改的时间
- 密码再过几天可以被变更(0表示随时可被变更)
- 密码再过几天必须被变更(99999表示永不过期)
- 密码过期前几天系统提醒用户(默认为一周)
- 密码过期几天后帐号会被锁定
- 从1970年1月1日算起,多少天后帐号失效
- 还可以使用命令
vipw -s相当于vi /etc/shadow
group文件格式
- 群组名称:就是群组名称
- 群组密码:通常不需要设定,密码是被记录在
/etc/gshadow。设置组密码可以让普通用户加入组(只要知道密码即可) - GID:就是群组的 ID
- 以当前组为附加组的用户列表(分隔符为逗号)
vigr相当于vi /etc/group
gshdow文件格式
- 群组名称:就是群的名称
- 群组密码:
- 组管理员列表:组管理员的列表,更改组密码和成员
- 以当前组为附加组的用户列表:多个用户间用逗号分隔
vigr -s相当于vi /etc/gshadow
密码加密
- 单向加密:哈希算法,原文不同,密文必不同
md5: message digest, 128bits
sha1: secure hash algorithm, 160bits
sha224: 224bits
sha256: 256bits
sha384: 384bits
sha512: 512bits - 更改加密算法:
authconfig --passalgo=sha256 --update - 生成随机口令:
openssl rand -base64 9
mkpasswd(需要expect包:yum install expect)
[root@centos7 data]$mkpasswd
H1an6Clu;
[root@centos7 data]$openssl rand -base64 8
mImNcw4VCjg=
- 密码的复杂性策略
1.足够长
2.使用数字、大写字母、小写字母及特殊字符中至少3种
3.使用随机密码
4.定期更换,不要使用最近曾经使用过的密码
密码期限
| [OPTION] | 意义 |
|---|---|
-M |
最大时间 max days |
-m |
最小时间 min days |
-W |
警告时间 warn days |
-I |
非活跃时间 inactive days |
▼文件权限
pwck和grpck
- 用户管理命令
1.useradd
2.usermod
3.userdel
4.id
5.su
6.passwd
7.chage - 组帐号维护命令
1.groupadd
2.groupmod
3.groupdel
4.gpasswd
5.groupmems
6.groups
▷用户管理命令
●新建用户的相关文件和命令
- 相关文件
/etc/default/useradd
/etc/skel/*
/etc/login.defs newuserspasswd格式文件 批量创建用户chpasswd批量修改用户口令
useradd用户创建
useradd [OPTION] USERNAME
| [OPTION] | 意义 |
|---|---|
-u |
UID |
-o |
配合-u 选项,不检查UID的唯一性 |
-g GID |
指明用户所属基本组,可为组名,也可以GID |
-c "COMMENT“ |
用户的注释信息 |
-d HOME_DIR |
以指定的路径(不存在)为家目录 |
-s SHELL |
指明用户的默认shell程序,可用列表在/etc/shells文件中 |
-G GROUP1[,GROUP2,...] |
为用户指明附加组,组须事先存在 |
-N |
不创建私用组做主组,使用users组做主组 |
-r |
创建系统用户 CentOS 6: ID<500,CentOS 7: ID<1000 |
-m |
创建家目录,用于系统用户 |
-M |
不创建家目录,用于非系统用户 |
`创建用户ID为1888,组ID为100,描述为“The tesxt user",家目录指定在/home/textdir,指定shell为nologin`
[root@centos7 ~]$useradd -u 1888 -g 100 -c "The text user" -d /home/textdir -s /bin/nologin/ test_user

[root@centos7 ~]$cat /etc/passwd | grep test
test_user:x:1888:100:The text user:/home/textdir:/bin/nologin/
- 默认值设定:
/etc/default/useradd
useradd -D显示默认设置
useradd –D [OPTION]更改默认设置
[OPTION]与上述相同
[root@centos7 ~]$useradd -D
GROUP=100
HOME=/home
INACTIVE=-1
EXPIRE=
SHELL=/bin/bash
SKEL=/etc/skel
CREATE_MAIL_SPOOL=yes

[root@centos7 ~]$useradd -D -s /bin/nologin
[root@centos7 ~]$useradd -D
GROUP=100
HOME=/home
INACTIVE=-1
EXPIRE=
SHELL=/bin/nologin
SKEL=/etc/skel
CREATE_MAIL_SPOOL=yes

[root@centos7 ~]$useradd -D -b /root
[root@centos7 ~]$useradd -D
GROUP=100
HOME=/root
INACTIVE=-1
EXPIRE=
SHELL=/bin/bash
SKEL=/etc/skel
CREATE_MAIL_SPOOL=yes
usermod [OPTION] USERNAME“用户属性修改”
| [OPTION] | 意义 |
|---|---|
-u UID |
新UID |
-g GID |
新主组 |
-G GROUP1[,GROUP2,...[,GROUPN]]] |
新附加组,原来的附加组将会被覆盖;若保留原有,则要同时使用-a选项(追加) |
-s SHELL |
新的默认SHELL |
-c 'COMMENT' |
新的注释信息 |
-d HOME |
新家目录不会自动创建;若要创建新家目录并移动原家数据,同时使用-m选项 |
-l login_name |
新的名字 |
-L |
lock指定用户,在/etc/shadow 密码栏的增加 ! |
-U |
unlock指定用户,将 /etc/shadow 密码栏的 ! 拿掉 |
-e YYYY-MM-DD |
指明用户账号过期日期 |
-f INACTIVE |
设定非活动期限 |
userdel [OPTION]… USERNAME“删除用户”
| [OPTION] | 意义 |
|---|---|
-r |
删除用户家目录 |
id [OPTION]… [USER] “查看用户相关的ID信息”
| [OPTION] | 意义 |
|---|---|
-u |
显示UID |
-g |
显示GID |
-G |
显示用户所属的组的ID |
-n |
显示名称,需配合ugG使用 |
[root@centos7 data]$id -u chen
1000
[root@centos7 data]$id -g chen
1000
[root@centos7 ~]$id -nu 0
root
[root@centos7 ~]$id -nu 1000
chen
su [options…] [-] [user [args…]] “切换用户或以其他用户身份执行命令”
- 切换用户的方式:
- su UserName:非登录式切换,即不会读取目标用户的配置文件,不改变当前工作目录
- su - UserName:登录式切换,会读取目标用户的配置文件,切换至家目录,完全切换
- root su至其他用户无须密码;非root用户切换时需要密码
换个身份执行命令:
su [-] UserName -c 'COMMAND'
su -l UserName 相当于 su - UserName
passwd [OPTIONS] UserName “设置密码”
passwd [OPTIONS] UserName: 修改指定用户的密码
| 常用选项 | 意义 |
|---|---|
-d |
删除指定用户密码 |
-l |
锁定指定用户 |
-u |
解锁指定用户 |
-e |
强制用户下次登录修改密码 |
-f |
强制操作 |
-n mindays |
指定最短使用期限 |
-x maxdays |
最大使用期限 |
-w warndays |
提前多少天开始警告 |
-i inactivedays |
非活动期限 |
--stdin |
从标准输入接收用户密码 |
`示例:echo "PASSWORD" | passwd --stdin USERNAME`
[root@centos7 data]$echo "pw123" | passwd --stdin wang
Changing password for user wang.
passwd: all authentication tokens updated successfully.
passwd -e wang示例

修改用户密码策略
chage [OPTION]… LOGIN
| [OPTION] | 意义 |
|---|---|
-d |
LAST_DAY |
-E |
–expiredate EXPIRE_DATE |
-I |
–inactive INACTIVE |
-m |
–mindays MIN_DAYS |
-M |
–maxdays MAX_DAYS |
-W |
–warndays WARN_DAYS |
-l |
显示密码策略 |
`示例:`
chage -d 0 tom 	#下一次登录强制重设密码.相当于`passwd -e tom
chage -m 0 –M 42 –W 14 –I 7 tom
chage -E 2016-09-10 tom
用户相关的其它命令
- chfn 指定个人信息
- chsh 指定shell
- finger
●组的相关命令
groupadd [OPTION]… group_name “创建组”
| [OPTION] | 意义 |
|---|---|
| -g GID | 指明GID号;[GID_MIN, GID_MAX] |
| -r | 创建系统组 |
[root@centos7 f_dir]$groupadd -g 8888 class
[root@centos7 f_dir]$cat /etc/group
...
class:x:8888:
groupmod [OPTION]… group “修改组”
| [OPTION] | 意义 |
|---|---|
| -n group_name | 新名字 |
| -g GID | 新的GID |
[root@centos7 f_dir]$cat /etc/group
...
class:x:8888:
[root@centos7 f_dir]$groupmod -g 6666 class
[root@centos7 f_dir]$cat /etc/group
...
class:x:6666:
groupdel [OPTION] GROUP “删除组”
groupdel GROUP
[root@centos7 f_dir]$groupdel class
[root@centos7 f_dir]$cat /etc/group
...
wang:x:1002:
gpasswd [OPTION] GROUP “更改组密码”
| [OPTION] | 意义 |
|---|---|
| -a user | 将user添加至指定组中 |
| -d user | 从指定组中移除用户user |
| -A user1,user2,… | 设置有管理权限的用户列表 |
[root@centos7 f_dir]$gpasswd -a wang class
Adding user wang to group class
[root@centos7 f_dir]$id wang
uid=1002(wang) gid=1002(wang) groups=1002(wang),8888(class)
- newgrp命令:临时切换主组
如果用户本不属于此组,则需要组密码
groupmems [options] [action] 更改和查看组成员
| [OPTION] | 意义 |
|---|---|
| -g | –group groupname 更改为指定组 (只有root) |
| [Actions] | 意义 |
| - | - |
| -a | –add username 指定用户加入组 |
| -d | –delete username 从组中删除用户 |
| -p | –purge 从组中清除所有成员 |
| -l | –list 显示组成员列表 |
[root@centos7 ~]$groupmems -g webs -l
nginx  varnish
[root@centos7 ~]$groupmems -g webs -d nginx
[root@centos7 ~]$groupmems -g webs -l
varnish
groups [OPTION].[USERNAME]… 查看用户所属组列表
[root@centos7 f_dir]$groups wang
wang : wang
getent
- 总结:
▼文件权限
- 文件属性
▷文件权限
- 文件的权限主要针对三类对象进行定义
- owner 属主, u
- group 属组, g
- other 其他, o
- 每个文件针对每类访问者都定义了三种权限
对文件来说:
| 简写 | 全写 | 意义 |
|---|---|---|
| r | Readable | 可使用文件查看类工具获取其内容 |
| w | Writable | 可修改其内容 |
| x | eXcutable | 可以把此文件提请内核启动为一个进程 |
对目录来说
| 简写 | 全写 | 意义 |
|---|---|---|
| r | Readable | 可以使用ls查看此目录中文件列表 |
| w | Writable | 可在此目录中创建文件,也可删除此目录中的文件(文件能不能删除,由目录决定) |
| x | eXcutable | 可以使用ls -l查看此目录中文件元数据(须配合r),可以cd进入此。可以访问已知文件名的文件内容。 |
| X | 只给目录x权限,不给文件x权限 |
- 文件权限表
| 权限项 | 读 | 写 | 执行 | 读 | 写 | 执行 | 读 | 写 | 执行 |
|---|---|---|---|---|---|---|---|---|---|
| 字符法 | r | w | x | r | w | x | r | w | x |
| 数字法 | 4 | 2 | 1 | 4 | 2 | 1 | 4 | 2 | 1 |
| 权限分配 | 文件所有者 | 文件所属组 | 其它用户 | ||||||
| 示例1 | rw- | -wx | r-x | ||||||
| 4+2= 6 | 2+1= 3 | 4+1= 5 | |||||||
▷文件属性操作
chown “设置文件的所有者”
chown [OPTION]... [OWNER][:[GROUP]] FILE...
| [OPTION] | 意义 |
|---|---|
| -R | 递归 |
--reference=RFILE |
引用RFILE的文件权限 |
#":"可以用"."代替
[root@centos7 data]$chown wang.chen f1
[root@centos7 data]$ll
total 76
-rw-r--r--. 1 wang chen  2814 May 16 00:12 f1

#chown [OPTION]... --reference=RFILE FILE...
[root@centos7 data]$chown --reference=f1 vim.txt
[root@centos7 data]$ll
total 76
-rw-r--r--. 1 wang chen  2814 May 16 00:12 f1
-rw-r--r--. 1 wang chen 68974 May 15 23:39 vim.txt
chgrp “设置文件的属组信息”
- chgrp [OPTION]… GROUP FILE…
| [OPTION] | 意义 |
|---|---|
| -R | 递归 |
--reference=RFILE |
引用RFILE的文件权限 |
chmod “修改文件权限”
chmod [OPTION]... MODE[,MODE]... FILE...
| [OPTION] | 意义 |
|---|---|
-R |
递归修改权限 |
--reference=RFILE |
引用RFILE的文件权限 |
- 修改一类用户的所有权限
u=g=o=ug=a=u=g=
[root@centos7 data]$chmod u=rwx /data
- 修改一类用户某位或某些位权限
u+u-g+g-o+o-a+a-
[root@centos7 data]$chmod u+x /data

#参考RFILE文件的权限,将FILE的修改为同RFILE
[root@centos7 link_dir]$chmod 777 f1
[root@centos7 link_dir]$ll
total 0
-rwxrwxrwx. 1 root root 0 May 16 04:27 f1
-rw-r--r--. 1 root root 0 May 16 04:27 f2
[root@centos7 link_dir]$chmod --reference=f1 f2
[root@centos7 link_dir]$ll
total 0
-rwxrwxrwx. 1 root root 0 May 16 04:27 f1
-rwxrwxrwx. 1 root root 0 May 16 04:27 f2

#示例
#设置用户增加“写、执行”权限;组删除“读”权限;其它人权限为“读执行”
chmod u+wx,g-r,o=rx file
#设置目录testdir以及目录下的文件,组有“读写执行(只对目录有执行)”
chmod -R g+rwX /testdir
▷新建文件和目录的默认权限(umask)
umask值 可以用来保留在创建文件权限
- 新建文件的默认权限:
666-umask,如果所得结果某位存在执行(奇数)权限,则将其权限+1 - 新建目录的默认权限:
777-umask - 非特权用户umask是
002 - root的umask 是
022
示例:
#模式方式显示
[root@centos7 ~]$umask -S
u=rwx,g=rx,o=rx
#输出可被调用
[root@centos7 /data]$umask -p
umask 0022
[root@centos7 ~]$umask
0022

#设置umask
umask 002
umask u=rw,g=r,o=
-
全局设置:
/etc/bashrc用户设置:~/.bashrc -
默认权限计算方法:
777-umask
出于安全考虑,文件需要去除x权限,目录不变。
即文件结果的奇数位时需-1。
示例:
| 序号 | umask | 目录 | 文件 |
|---|---|---|---|
| 1 | 002 | 777-002=775 |
777-002 = 775-001 = 774 |
| 2 | 122 | 777-132=645 |
777-132 = 655-011 = 644 |
| 3 | 444 | 777-444=333 |
777-444 = 333-111 = 222 |
▷Linux文件系统上的特殊权限(SUID, SGID, Sticky)
(1) 任何一个可执行程序文件能不能启动为进程,取决发起者对程序文件是否拥有执行权限
(2) 启动为进程之后,其进程的属主为发起者,进程的属组为发起者所属的组
(3) 进程访问文件时的权限,取决于进程的发起者
(a) 进程的发起者,同文件的属主:则应用文件属主权限
(b) 进程的发起者,属于文件属组;则应用文件属组权限
© 应用文件“其它”权限
1.SUID “可执行文件上的权限”
- 任何一个可执行程序文件能不能启动为进程:取决发起者对程序文件是否拥有执行权限
- 启动为进程之后,其进程的属主为原程序文件的属主
- SUID只对二进制可执行程序有效
- SUID设置在目录上无意义
- 权限设定:
chmod u+s FILE...
chmod u-s FILE...
2. SGID “可执行文件上的权限”
- 任何一个可执行程序文件能不能启动为进程:取决发起者对程序文件是否拥有执行权限
- 启动为进程之后,其进程的属组为原程序文件的属组
- 权限设定:
chmod g+s FILE...
chmod g-s FILE...
- 目录上的SGID权限
- 默认情况下,用户创建文件时,其属组为此用户所属的主组
- 一旦某目录被设定了SGID,则对此目录有写权限的用户在此目录中创建的文件所属的组为此目录的属组
- 通常用于创建一个协作目录
- 权限设定:
chmod g+s DIR...
chmod g-s DIR...
[wang@centos7 test_dir]$ touch f1
[root@centos7 test_dir]$ll
total 0
-rw-rw-r--. 1 wang wang 0 May 16 05:01 f1

[root@centos7 test_dir]$chmod g+s /data/test_dir

[wang@centos7 test_dir]$ touch f2
[wang@centos7 test_dir]$ ll
total 0
-rw-rw-r--. 1 wang wang 0 May 16 05:01 f1
-rw-rw-r--. 1 wang root 0 May 16 05:01 f2
[wang@centos7 test_dir]$
3. Sticky 位
- 具有写权限的目录通常用户可以删除该目录中的任何文件,无论该文件的权限或拥有权
- 在目录设置Sticky 位,只有文件的所有者或root可以删除该文件
- sticky 设置在文件上无意义
- 权限设定:
chmod o+t DIR...
chmod o-t DIR...
[root@centos7 test_dir]$chmod o+t .
[root@centos7 test_dir]$su wang
[wang@centos7 test_dir]$ touch f1

#用户nginx无法删除wang用户的文件
[nginx@centos7 test_dir]$ rm -f f1
rm: cannot remove ‘f1’: Operation not permitted
- 数字法
| SUID | SGID | STICKY | 合计 |
|---|---|---|---|
| 4 | 2 | 1 | 7 |
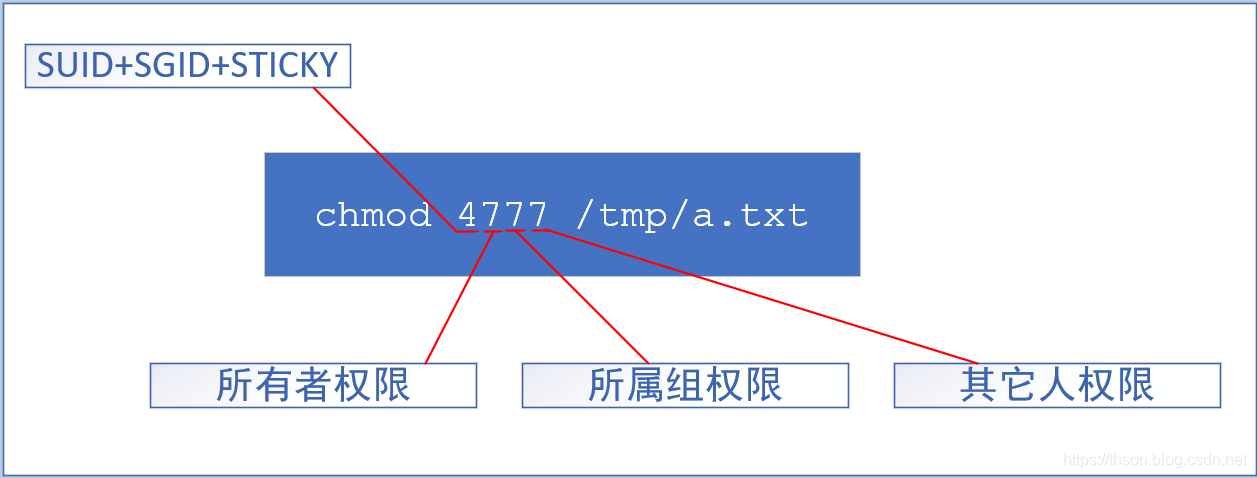
- 权限位映射
- SUID: user,占据属主的执行权限位
s:属主拥有x权限
S:属主没有x权限 - SGID: group,占据属组的执行权限位
s: group拥有x权限
S:group没有x权限 - Sticky: other,占据other的执行权限位
t:other拥有x权限
T:other没有x权限
- SUID: user,占据属主的执行权限位
chattr “设定文件特定属性”
chattr +i不能删除,改名,更改
chattr +a 只能追加内容
lsattr 显示特定属性
[root@centos7 test_dir]$chattr +i f1
[root@centos7 test_dir]$lsattr
---------------- ./f3
----i----------- ./f1

[root@centos7 test_dir]$su wang
[wang@centos7 test_dir]$ mv f1 f111
mv: cannot move ‘f1’ to ‘f111’: Operation not permitted
[wang@centos7 test_dir]$
▷访问控制列表ACL
- ACL:Access Control List,实现灵活的权限管理
- 除了文件的所有者,所属组和其它人,可以对更多的用户设置权限
- CentOS7 默认创建的xfs和ext4文件系统具有ACL功能
- CentOS7 之前版本,默认手工创建的ext4文件系统无ACL功能,需手动增加,方法如下:
tune2fs –o acl /dev/sdb1
mount –o acl /dev/sdb1 /mnt/test - ACL生效顺序:所有者,自定义用户,自定义组,其他人
- 所属组的权限变成mask的权限
- 所有权限不能超mask权限(除了user所有者的权限)
示例:
getfacl file |directory#获取文件的ACL
[wang@centos7 test_dir]$ getfacl f1
# file: f1
# owner: wang
# group: root
user::rw-
group::rw-
other::r--
setfacl [OPTION] FILE “设置文件ACL”
| [OPTION] | 意义 |
|---|---|
-m |
更改文件的访问控制列表 |
-M |
从文件读取访问控制列表条目更改 |
-x |
根据文件中访问控制列表移除条目 |
-X |
从文件读取访问控制列表条目并删除 |
-b |
删除所有扩展的acl规则,基本的acl规则(所有者,群组,其他)将被保留。 |
-k |
删除缺省的acl规则。如果没有缺省规则,将不提示。 |
-n |
不要重新计算有效权限。setfacl默认会重新计算ACL mask,除非mask被明确的制定。 |
--mask |
重新计算有效权限,即使ACL mask被明确指定。 |
-d |
目录设定默认的acl规则。 |
--restore=file |
从文件恢复备份的acl规则(这些文件可由getfacl -R产生)。通过这种机制可以恢复整个目录树的acl规则。此参数不能和除–test以外的任何参数一同执行。 |
--test |
测试模式,不会改变任何文件的acl规则,操作后的acl规格将被列出。 |
-R |
递归的对所有文件及目录进行操作。 |
-L |
跟踪符号链接,默认情况下只跟踪符号链接文件,跳过符号链接目录。 |
-P |
跳过所有符号链接,包括符号链接文件。 |
--version |
输出setfacl的版本号并退出。 |
--help |
输出帮助信息。 |
-- |
标识命令行参数结束,其后的所有参数都将被认为是文件名 |
- |
如果文件名是-,则setfacl将从标准输入读取文件名。 |
一些示例
setfacl -m u:wang:rwx file#给文件wang用户设置rwx
[root@centos7 test_dir]$setfacl -m u:wang:rwx f11
[root@centos7 test_dir]$getfacl f11
# file: f11
# owner: root
# group: root
user::rw-
user:wang:rwx
group::r--
mask::rwx
other::r--
setfacl -Rm g:sales:rwX directory#设置目录下所有的文件有给组sales有rwX权限setfacl -M file.acl file#从文件读取访问控制列表条目更改setfacl -m g:sales:rw file#设置该目录下的文件有给组sales有rw权限
[root@centos7 test_dir]$setfacl -m g:webs:rwx f1
[root@centos7 test_dir]$getfacl f1
# file: f1
# owner: root
# group: root
user::rw-
group::r--
group:webs:rwx
mask::rwx
other::r--
setfacl -m d:u:wang:rx directory#d表示默认,只能给目录使用
[root@centos7 test_dir]$setfacl -m d:u:wang:rwx .
[root@centos7 test_dir]$getfacl .
# file: .
# owner: root
# group: root
user::rwx
group::rwx
other::rwx
default:user::rwx
default:user:wang:rwx
default:group::rwx
default:mask::rwx
default:other::rwx
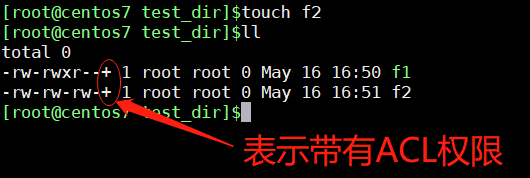
setfacl -x u:wang file#根据文件中访问控制列表移除条目
[root@centos7 test_dir]$setfacl -m u:wang:rwx f1
[root@centos7 test_dir]$ll
total 0
-rw-rwxr--+ 1 root root 0 May 16 16:50 f1
-rw-rw-rw-+ 1 root root 0 May 16 16:51 f2
-rw-rw-rw-. 1 wang wang 0 May 16 16:52 f3
[root@centos7 test_dir]$getfacl f1
# file: f1
# owner: root
# group: root
user::rw-
user:wang:rwx
group::r--
group:webs:rwx
mask::rwx
other::r--

[root@centos7 test_dir]$setfacl -x u:wang f1
[root@centos7 test_dir]$getfacl f1
# file: f1
# owner: root
# group: root
user::rw-
group::r--
group:webs:rwx
mask::rwx
other::r-
-
setfacl -X file.acl directory#从文件读取访问控制列表条目并删除 -
setfacl -b /bin/bash#清楚所有的acl规则
[root@centos7 test_dir]$getfacl f11
# file: f11
# owner: root
# group: root
user::rw-
user:wang:rwx
group::r--
mask::rwx
other::r--

[root@centos7 test_dir]$setfacl -b f11
[root@centos7 test_dir]$getfacl f11
# file: f11
# owner: root
# group: root
user::rw-
group::r--
other::r--
-
ACL文件上的group权限是mask 值(自定义用户,自定义组,拥有组的最大权限),而非传统的组权限
-
getfacl 可看到特殊权限:flags
-
通过ACL赋予目录默认x权限,目录内文件也不会继承x权限
-
base ACL#不能删除 -
setfacl -k dir# 删除默认ACL权限 -
setfacl –b file#清除所有ACL权限 -
getfacl file1 | setfacl --set-file=- file2#复制file1的acl权限给file2 -
mask只影响除所有者和other的之外的人和组的最大权限
-
Mask需要与用户的权限进行逻辑与运算后,才能变成有限的权限(Effective Permission)
用户或组的设置必须存在于mask权限设定范围内才会生效
setfacl -m mask::rx file -
–set选项会把原有的ACL项都删除,用新的替代,需要注意的是一定要包含UGO的设置,不能象-m一样只是添加ACL就可以
示例:
setfacl --set u::rw,u:wang:rw,g::r,o::- file1 -
备份和恢复ACL
主要的文件操作命令cp和mv都支持ACL,只是cp命令需要加上-p 参数。但是tar等常见的备份工具是不会保留目录和文件的ACL信息
备份:getfacl -R /tmp/dir1 > acl.txt
删除:setfacl -R -b /tmp/dir1
恢复:setfacl -R --set-file=acl.txt /tmp/dir1
	#方式2:setfacl --restore acl.txt
查看:getfacl -R /tmp/dir1
- 总结

练习
- 创建用户gentoo,附加组为bin和root,默认shell为/bin/csh,注释信息为"Gentoo Distribution"
- 创建下面的用户、组和组成员关系
名字为webs 的组
用户nginx,使用webs 作为附加组
用户varnish,使用webs 作为附加组
用户mysql,不可交互登录系统,且不是webs 的成员,nginx,varnish,mysql密码都是magedu - 当用户docker对/testdir 目录无执行权限时,意味着无法做哪些操作?
- 当用户mongodb对/testdir 目录无读权限时,意味着无法做哪些操作?
- 当用户redis 对/testdir 目录无写权限时,该目录下的只读文件file1是否可修改和删除?
- 当用户zabbix对/testdir 目录有写和执行权限时,该目录下的只读文件file1是否可修改和删除?
- 复制/etc/fstab文件到/var/tmp下,设置文件所有者为tomcat读写权限,所属组为apps组有读写权限,其他人无权限
- 误删除了用户git的家目录,请重建并恢复该用户家目录及相应的权限属性
- 在/testdir/dir里创建的新文件自动属于webs组,组apps的成员如:tomcat能对这些新文件有读写权限,组dbs的成员如:mysql只能对新文件有读权限,其它用户(不属于webs,apps,dbs)不能访问这个文件夹
- 备份/testdir/dir里所有文件的ACL权限到/root/acl.txt中,清除/testdir/dir中所有ACL权限,最后还原ACL权限
练习答案
- 创建用户gentoo,附加组为bin和root,默认shell为/bin/csh,注释信息为"Gentoo Distribution"
[root@centos7 ~]$useradd -G bin,root -s /bin/csh -c "Gentoo Distribution" gentoo

`检验`
[root@centos7 ~]$cat /etc/passwd |grep gentoo
gentoo:x:1001:1001:Gentoo Distribution:/home/gentoo:/bin/csh
[root@centos7 ~]$id gentoo
uid=1001(gentoo) gid=1001(gentoo) groups=1001(gentoo),0(root),1(bin)
[root@centos7 ~]$
- 创建下面的用户、组和组成员关系
名字为webs 的组
用户nginx,使用webs 作为附加组
用户varnish,使用webs 作为附加组
用户mysql,不可交互登录系统,且不是webs 的成员,nginx,varnish,mysql密码都是magedu
[root@centos7 ~]$groupadd webs
[root@centos7 ~]$useradd -G webs nginx
[root@centos7 ~]$useradd -G webs varnish
[root@centos7 ~]$useradd -s /bin/nologin mysql

[root@centos7 ~]$
- 当用户docker对/testdir 目录无执行权限时,意味着无法做哪些操作?
无法进入目录
- 当用户mongodb对/testdir 目录无读权限时,意味着无法做哪些操作?
无法获取目录下的文件
- 当用户redis 对/testdir 目录无写权限时,该目录下的只读文件file1是否可修改和删除?
不能
- 当用户zabbix对/testdir 目录有写和执行权限时,该目录下的只读文件file1是否可修改和删除?
不能
- 复制/etc/fstab文件到/var/tmp下,设置文件所有者为tomcat读写权限,所属组为apps组有读写权限,其他人无权限
[root@centos7 ]$cp /etc/fstab /var/tmp/
[root@centos7 ]$ll
total 4
-rw-r--r--. 1 root root 595 May 16 20:37 fstab
[root@centos7 ]$chown tomcat fstab
[root@centos7 ]$chgrp apps fstab
[root@centos7 ]$chmod u=rw,g=rw,o= fstab
[root@centos7 ]$ll fstab
-rw-rw----. 1 tomcat apps 595 May 16 20:37 fstab
- 误删除了用户git的家目录,请重建并恢复该用户家目录及相应的权限属性
[root@centos7 test_dir]$cp -r /etc/skel /home/git
cp: omitting directory ‘/etc/skel’
[root@centos7 test_dir]$chmod u=rwx,g=,o= /home/git
[root@centos7 test_dir]$chown git /home/git
chown: invalid user: ‘git’
[root@centos7 test_dir]$chgrp git /hoem/git
chgrp: invalid group: ‘git’
- 在/testdir/dir里创建的新文件自动属于webs组,组apps的成员如:tomcat能对这些新文件有读写权限,组dbs的成员如:mysql只能对新文件有读权限,其它用户(不属于webs,apps,dbs)不能访问这个文件夹
[root@centos7 data]$useradd tomcat
[root@centos7 data]$useradd mysql
[root@centos7 data]$groupadd webs
[root@centos7 data]$groupadd dbs
[root@centos7 data]$groupadd apps
[root@centos7 data]$usermod -G webs tomcat
[root@centos7 data]$usermod -G dbs mysql
[root@centos7 data]$mkdir dir
[root@centos7 data]$chgrp webs dir
[root@centos7 data]$chmod g+ws dir
[root@centos7 data]$ll
drwxrwsr-x. 2 root webs 6 May 16 22:30 dir
[root@centos7 data]$setfacl -m g:apps:rwx dir
[root@centos7 data]$setfacl -m g:dbs:r-- dir
[root@centos7 data]$setfacl -m o::--- dir
[root@centos7 data]$setfacl -m d:g:apps:rwx dir
[root@centos7 data]$setfacl -m d:g:webs:rwx dir
[root@centos7 data]$setfacl -m d:g:dbs:r dir
[root@centos7 data]$chmod o= dir
[root@centos7 data]$ll
drwxrws---+ 2 root webs 6 May 16 22:30 dir
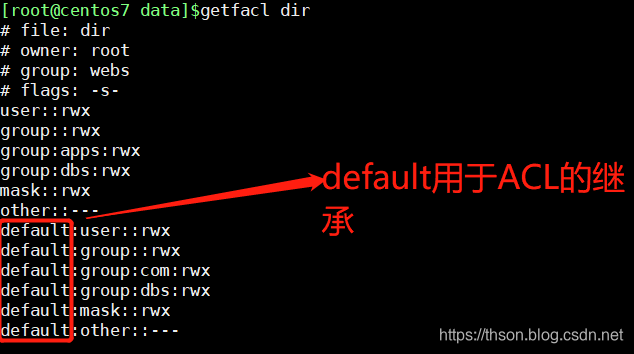
[root@centos7 data]$getfacl dir
#file: dir
#owner: root
#group: webs
#flags: -s-
user::rwx
group::rwx
group:apps:rwx
group:dbs:r--
mask::rwx
other::---
default:user::rwx
default:group::rwx
default:group:webs:rwx
default:group:apps:rwx
default:group:dbs:r--
default:mask::rwx
default:other::---
- 备份/testdir/dir里所有文件的ACL权限到/root/acl.txt中,清除/testdir/dir中所有ACL权限,最后还原ACL权限
#查看并匹配
getfacl -R /testdir/dir >dir.acl
#删除ACL
setfacl -R -b /testdir/dir
#恢复ACL
setfacl -R --set-file=dir.acl /testdir/dir
#查看恢复的ACL
getfacl -R /testdir/dir