1. 序言
当某个应用程序希望想用户发出一些提示信息,而该应用程序又不在前台运行时,就可以借助通知来实现。发出一条通知,手机最上方的状态栏中会显示一个通知的图标,下拉状态栏后可以看到通知的详细内容。通知栏和抽屉式通知栏均是由系统控制,用户可以随时查看。
通知的用法比较灵活,既可以在服务中创建,又可以在广播里创建。
Notification的类型主要有以下几种:
-
状态栏和抽屉式通知栏
发出通知后,通知先以图标的形式显示在状态栏中
 之后用户在状态栏向下滑动打开抽屉式通知栏,并在其中查看更多详情及对通知执行操作。

-
提醒式通知
从 Android 5.0 开始,通知可以短暂地显示在浮动窗口中,称之为提醒式通知。这种行为通常适用于用户应立即知晓的重要通知,而且仅在设备未锁定时才显示。

提醒式通知会在应用发出通知后立即出现,稍后便会消失,但仍照常显示在抽屉式通知栏中。 -
锁定屏幕
从 Android 5.0 开始,通知可以显示在锁定屏幕上。
您可以程序化地设置您的应用在安全锁定屏幕上所发布通知的详情可见等级,甚至可以设置通知是否显示在锁定屏幕上

-
应用图标标志
在所支持的设备(搭载 Android 8.0(API 级别 26)及更高版本)启动器中,应用图标通过在相应的应用启动器图标上显示彩色“标志”(又称“通知圆点”)来表示有新通知。
用户可以长按应用图标以查看该应用的通知。然后,用户可以关闭通知或者在长按菜单中对通知执行操作(类似于抽屉式通知栏)

通知的常见用途: -
显示接收的短消息,及时消息等信息(如QQ,微信、新浪、短信等)
-
显示客户端的推送消息,如广告,优惠,版本更新。常见的第三方SDK有:JPush、个推、信鸽、阿里云推送等
-
显示正在进行的事物,如后台运行的程序,如音乐播放,下载进度等。
2. Notification基本使用
这里涉及到的Notification相关使用都是在Android8.0(api 26)之前的,关于Notification在Android8.0 之后的适配后续详细讲述

通知栏主要涉及到两个类:Notification 和 NotificationManager
Notification为通知信息类,里面对应了通知栏的各个属性NotificationManager:是状态栏通知的管理类,负责发通知,清除通知等操作。
2.1 创建通知
通知的设计由系统模板决定,您的应用只需要定义模板中各个部分的内容即可。通知的部分详情仅在展开后视图中显示。

- 小图标:必须提供,通过
setSmallIcon()进行设置。 - 应用名称:由系统提供。
- 时间戳:由系统提供,但您可以通过
setWhen()将其替换掉或者通过setShowWhen(false)将其隐藏。 - 大图标:可选内容(通常仅用于联系人照片,请勿将其用于应用图标),通过
setLargeIcon()进行设置。 - 标题:可选内容,通过
setContentTitle()进行设置。 - 文本:可选内容,通过
setContentText()进行设置。
Notification创建前必须要添加的属性:
- 小图标,通过
setSmallcom()设置 - 标题,通过
setContentTitle()设置 - 内容,通过
setContentText()设置
通知栏的创建主要涉及到Notification.Builder、Notification 和 NotificationManager,其中Notification.Builder作用是使用建造者模式构建Notification对象
基本使用步骤如下:
-
创建
NotificationManager
首先需要一个NotificationManager来对通知进行管理,可以调用Context的getSystemService()获取到。该方法接收一个字符串参数用于确定获取系统的哪个服务。 -
创建通知栏的Builder构造类:
Notification.Builder,使用的是建造者模式,创建Notification对象,这里可以在终极build()之前连缀任意多的设置方法来创建一个丰富的Notification对象。
public class MainActivity extends AppCompatActivity {

    private TextView mSendNotifi;

    @Override
    protected void onCreate(Bundle savedInstanceState) {
        super.onCreate(savedInstanceState);
        setContentView(R.layout.activity_main);
        mSendNotifi = (TextView) findViewById(R.id.send_notifi);
        mSendNotifi.setOnClickListener(new View.OnClickListener() {
            @Override
            public void onClick(View v) {
                sendNotification();
            }
        });

    }

    private void sendNotification() {
        int id = 1;
        Drawable drawable = ContextCompat.getDrawable(this, R.drawable.btn_audio_next_normal);
        Bitmap bitmap = ((BitmapDrawable) drawable).getBitmap();

		/* 创建通知栏的Builder构造类 */
        Notification.Builder mBuilder = new Notification.Builder(this);
        //设置小图标
        mBuilder.setSmallIcon(R.drawable.ic_launcher_background);
        //设置大图标
        mBuilder.setLargeIcon(bitmap);
        //设置标题
        mBuilder.setContentTitle("这是标题");
        //设置通知正文
        mBuilder.setContentText("这是正文,当前ID是:" + id);
        //设置摘要
        mBuilder.setSubText("这是摘要");
        //设置是否点击消息后自动clean
        mBuilder.setAutoCancel(true);
        //显示指定文本
        mBuilder.setContentInfo("Info");
        //与setContentInfo类似,但如果设置了setContentInfo则无效果
        //用于当显示了多个相同ID的Notification时,显示消息总数
        mBuilder.setNumber(2);
        //通知在状态栏显示时的文本
        mBuilder.setTicker("在状态栏上显示的文本");
        //设置优先级
        mBuilder.setPriority(Notification.PRIORITY_MAX);
        //自定义消息时间,以毫秒为单位,当前设置为比系统时间少一小时
        mBuilder.setWhen(System.currentTimeMillis() - 3600000);
        //设置为一个正在进行的通知,此时用户无法清除通知
        mBuilder.setOngoing(true);
        //设置消息的提醒方式,震动提醒:DEFAULT_VIBRATE     声音提醒:NotificationCompat.DEFAULT_SOUND
        //三色灯提醒NotificationCompat.DEFAULT_LIGHTS     以上三种方式一起:DEFAULT_ALL
        mBuilder.setDefaults(NotificationCompat.DEFAULT_SOUND);
        //设置震动方式,延迟零秒,震动一秒,延迟一秒、震动一秒
        mBuilder.setVibrate(new long[]{0, 1000, 1000, 1000});
		// 创建NotificationManager
        NotificationManager mNotificationManager = (NotificationManager) getSystemService(Context.NOTIFICATION_SERVICE);
        //发送通知
        mNotificationManager.notify(id++, mBuilder.build());
    }
}
NotificationManager的notify()可以向系统发送通知
Notification.Builder中有设置通知的大小图标的两种方法,如果两者同时存在,则smallIcon显示在通知的右下角,largeIcon显示在左侧;如果只设置smallIcon,其显示在左侧。
2.2 定义Action操作
设置一个Action,这样就可以直接跳转到App的某个Activity、启动一个Service或者发送一个Broadcast。否则,Notification仅仅只能起到通知的效果,不能与用户交互。
//创建intent
Intent resultIntent = new Intent(this, SecondActivity.class);
resultIntent.addFlags(Intent.FLAG_ACTIVITY_NEW_TASK);           //添加为栈顶Activity
resultIntent.putExtra("what",5);
PendingIntent resultPendingIntent = PendingIntent.getActivity(this,5,resultIntent,PendingIntent.FLAG_UPDATE_CURRENT);
......
//发送pendingIntent
mBuilder.setContentIntent(resultPendingIntent);
可以发现,创建一个具有Action的Notification多创建了Intent、PendingIntent和setContentIntent()这几步
关于PendingIntent的理解可以查看Android基础——PendingIntent
2.3 Notification更新、取消
更新通知很简单,只需要再次发送相同 ID 的通知即可,如果之前的通知还未被取消,则会直接更新该通知相关的属性。如果之前的通知已经被取消,则会重新创建一个新通知。 更新通知跟发送通知使用相同的方式。
取消通知有5种方式:
- 点击通知栏的清除按钮,会清除所有可清除的通知
- 设置了
setAutoCancel()或FLAG_AUTO_CANCEL通知,点击该通知会清除它 - 通过NotificationManager调用
cancel(int id)方法清除指定ID的通知 - 通过NotificationManager调用
cancel(String tag, int id)清除指定TAG和ID的通知 - 通过NotificationManager调用
cancelAll()清除所有该应用之前发送的通知
备注:
如果你是通过NotificationManager.notify(String tag, int id, Notification notify)方法创建的通知,那么只能通过
NotificationManager.cancel(String tag, int id)
方法才能清除对应的通知,调用NotificationManager.cancel(int id)无效。
插一句:
notification.flags |= Notification.FLAG_NO_CLEAR;
Notification的标志添加方法如上, flags可以通过 |=运算叠加效果。
2.4 自定义Notification布局
通知的框架允许你去自定义通知的布局。通过RemoteViews对象来定义通知的外观。自定义通知布局与常规通知相似,但是它是基于定义在XML文件的RemoteViews对象来操作的。
定义通知的可用高度是取决于通知视图的。正常的视图布局高度限制在64dp,可展开视图的布局高度限制在256dp
关于自定义通知栏的基本步骤如下:
- 创建一个单独的XML文件,用来定义通知的布局。(notification_mobile_play.xml)
<?xml version="1.0" encoding="utf-8"?>
<LinearLayout
    xmlns:android="http://schemas.android.com/apk/res/android"
    android:orientation="horizontal"
    android:layout_width="match_parent"
    android:id="@+id/ll_root"
    android:layout_height="65dp"
    android:gravity="center_vertical">


    <ImageView
        android:layout_width="wrap_content"
        android:layout_height="wrap_content"
        android:src="@drawable/ic_notification_music_logo"
        android:layout_marginLeft="12dp"/>

    <LinearLayout
        android:layout_width="0dp"
        android:layout_height="wrap_content"
        android:layout_marginLeft="10dp"
        android:layout_weight="1"
        android:orientation="vertical">

        <TextView
            android:layout_width="wrap_content"
            android:layout_height="wrap_content"
            android:text="标题"
            android:id="@+id/tv_title" />

        <TextView
            android:layout_width="wrap_content"
            android:layout_height="wrap_content"
            android:layout_marginTop="5dp"
            android:text="艺术家"
            android:id="@+id/tv_artist" />
    </LinearLayout>

    <Button
        android:layout_width="32dp"
        android:layout_height="32dp"
        android:background="@drawable/btn_audio_pre_normal"
        android:id="@+id/btn_pre" />

    <Button
        android:layout_width="32dp"
        android:layout_height="32dp"
        android:background="@drawable/btn_audio_play_normal"
        android:id="@+id/btn_start" />

    <Button
        android:layout_width="32dp"
        android:layout_height="32dp"
        android:layout_marginRight="12dp"
        android:background="@drawable/btn_audio_next_normal"
        android:id="@+id/btn_next" />

</LinearLayout>
- 在应用里面,使用RemoteViews对象的方法来给你的通知设置文本和图标,通过调用
setContent()把你的RemoteViews对象放到NotificationCompat.Builder里面。避免使用背景图像,因为你的文本可能会变得不太好阅读。
public class MainActivity extends AppCompatActivity {

    private TextView mSendNotifi;
    private TextView mCancelNotifi;

    @Override
    protected void onCreate(Bundle savedInstanceState) {
        super.onCreate(savedInstanceState);
        setContentView(R.layout.activity_main);
        mSendNotifi = (TextView) findViewById(R.id.send_notifi);
        mCancelNotifi = (TextView) findViewById(R.id.cancel_notifi);
        mSendNotifi.setOnClickListener(new View.OnClickListener() {
            @Override
            public void onClick(View v) {
                sendNotification();
            }
        });
        mCancelNotifi.setOnClickListener(new View.OnClickListener() {
            @Override
            public void onClick(View v) {
                NotificationManager mNotificationManager = (NotificationManager) getSystemService(Context.NOTIFICATION_SERVICE);
                mNotificationManager.cancel(1);
            }
        });

    }

    private void sendNotification() {
        int id = 1;
        Drawable drawable = ContextCompat.getDrawable(this, R.drawable.btn_audio_next_normal);
        Bitmap bitmap = ((BitmapDrawable) drawable).getBitmap();

        Notification.Builder mBuilder = new Notification.Builder(this);

        mBuilder.setContent(getRemoteViews())
               .setSmallIcon(R.drawable.ic_launcher_background);

        NotificationManager mNotificationManager = (NotificationManager) getSystemService(Context.NOTIFICATION_SERVICE);
        mNotificationManager.notify(id++, mBuilder.build());
    }

    private RemoteViews getRemoteViews() {
        RemoteViews remoteViews = new RemoteViews(getPackageName(), R.layout.notification_mobile_play);
        // 设置 点击通知栏的上一首按钮时要执行的意图
        remoteViews.setOnClickPendingIntent(R.id.btn_pre, getActivityPendingIntent(11));
        // 设置 点击通知栏的下一首按钮时要执行的意图
        remoteViews.setOnClickPendingIntent(R.id.btn_next, getActivityPendingIntent(12));
        // 设置 点击通知栏的播放暂停按钮时要执行的意图
        remoteViews.setOnClickPendingIntent(R.id.btn_start, getActivityPendingIntent(13));
        // 设置 点击通知栏的根容器时要执行的意图
        remoteViews.setOnClickPendingIntent(R.id.ll_root, getActivityPendingIntent(14));
        remoteViews.setTextViewText(R.id.tv_title, "标题");     // 设置通知栏上标题
        remoteViews.setTextViewText(R.id.tv_artist, "艺术家");   // 设置通知栏上艺术家
        return remoteViews;
    }


    /** 获取一个Activity类型的PendingIntent对象 */
    private PendingIntent getActivityPendingIntent(int what) {
        Intent intent = new Intent(this, SecondActivity.class);
        intent.addFlags(Intent.FLAG_ACTIVITY_NEW_TASK);           //添加为栈顶Activity
        intent.putExtra("what", what);
        PendingIntent pendingIntent = PendingIntent.getActivity(this, what, intent, PendingIntent.FLAG_UPDATE_CURRENT);
        return pendingIntent;
    }
}
备注:
RemoteViews.setInt(id、methodName、value):这个方法用来调用子View中需要一个Int型参数的方法,如为TextView设置背景颜色等。- 默认的Notification只能通过
setContentIntent设置整体点击事件,但是RemoteViews可以设置不同地方的不同点击事件。 RemoteViews只支持4种布局- FrameLayout
- LinearLayout
- RelativeLayout
- GridLayout
这些布局下面只支持几种视图控件: - AnalogClock
- Button
- Chronometer
- ImageButton
- ProgressBar
- TextView
- ViewFlipper
- ListView
- GridView
- StackView
- AdapterViewFlipper
- 前述的代码中运用了
setContent()方法,这里会存在一个问题,通过该方法获得的Notification是定高的。如果View的高度比默认高度要高的话,就会有一部分显示不出来。默认情况下通知高度一般是64dp,对于(API >=24)可以直接使用setCustomContentView()和setBigCustomContentView()处理,对于低版本情况的处理情况如下:
if(android.os.Build.VERSION.SDK_INT >= 16) {
            notification = builder.build();
            notification.bigContentView = remoteViews;
}
notification.contentView = remoteViews;
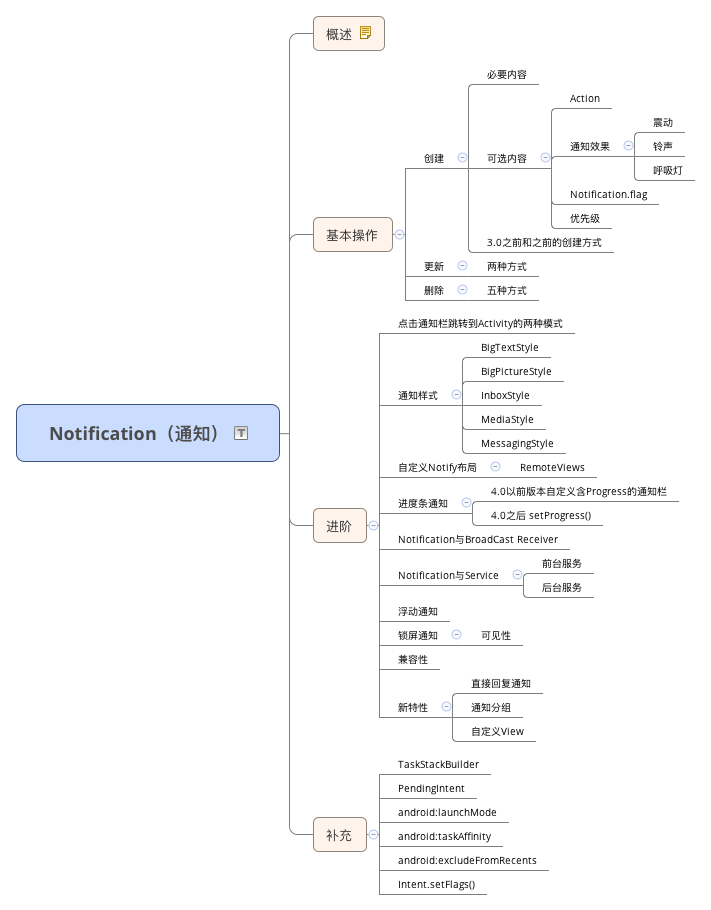
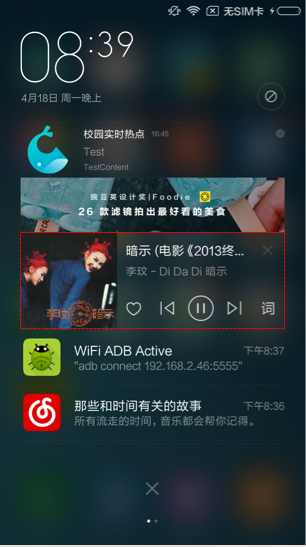
通知是可以展开收起的,同样是网易云音乐的通知,图一比图二要大一些。其实图一展示的是网易云音乐通知的展开状态,使用两个手指上滑就可以缩起,也就是图二
bigContentView是在sdk16时引入的,所以需要判断一下。如果小于sdk16则只能定高了。
bigContentView的最大高度是256dp
背景色
不同Rom的通知背景色是不同的,所以在UI上需要注意。
主要有两种方法:
-
固定背景色:
设定一个固定的背景色,文字和icon颜色都可以固定
缺点如上图所示,某些Rom的Notification会有一个左右Padding,如果固定背景色会很难看。 -
透明背景色
另一种方法是让背景透明,通过特殊方式拿到通知栏字体颜色和字体大小
思路是:通过Notification.Builder生成一条空的Notification,但不调用notify()方法,然后通过这条Notification想办法获取里面的布局元素,通过遍历,就能拿到对应的字体和颜色了。
关于这部分的研究,待更新。。。。。。。