翻译:Siqi ([email protected] )
在本系列的第一篇教程dojox.mobile入门 中,我们已经详细介绍了Dojo Toolkit中dojox.mobile包的基本概念和用法。在本系列接下来的教程中,我们将着手创建我们自己的强大dojox.mobile web应用程序TweetView。本篇教程将帮助你熟悉什么是TweetView,我们想用它来干什么,然后我们将开始构建这个移动应用程序的 HTML和CSS布局。
版本:1.6
难度:中级
系列:TweetView
什么是TweetView?
TweetView是我们将要使用dojox.mobile和一些我们自己定制的Dojo资源创建的应用程序。TweetView不仅仅是一个简单的dojox.mobile习作,它将是一个功能齐全并且真正有用的web应用程序。我们制作TweetView的目标有:
- 利用dojox.mobile提供的widgets来创建一个跨平台、优雅的移动应用程序。
- 为web应用程序添加我们自己的元素、控件以及我们想要的功能。
- 使用JSONP 来从Twitter获取多个账户的微博。
- 使用Dojo data store API 来储存微博。
- 使用低耦合、高性能的代码。
!创建应用程序前花店时间好好计划一下是非常重要的
和创建所有基于Dojo的应用程序一样,一个共有的目标是保持代码的灵活、可扩展性,同时别忘了合理添加注释。
TweetView设计
我们将依照下面的模型来创建TweetView。本系列中接下来几篇教程将逐一介绍每个模型中视图的实现。

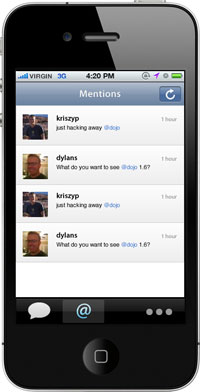
!你也许已经注意到这些模型只展示了iOS主题。我们的教程将专注于实现iOS主题。Android主题的图片和元素样只要根据iOS的资源依样画葫芦就可以了。由于dojox.mobile既提供Android主题又提供iOS主题,一旦我们的应用程序完成了,我们将很容易的创建Android的样式资源。
讲解上面所有模型的实现已经超出了本教程的范围,所以我们将先专注于创建该应用程序的全局HTML/CSS结构,也就是说你所看到的顶部标题栏和底部的控制区域。
TweetView HTML结构
第一篇教程提供了一个mobile web应用程序坚实的模板、所需的主题样式表以及一些SCRIPT标签。
- <!DOCTYPE HTML PUBLIC "-//W3C//DTD HTML 4.01//EN" "http://www.w3.org/TR/html4/strict.dtd">
- <html>
- <head>
- <meta name="viewport" content="width=device-width,initial-scale=1,maximum-scale=1,minimum-scale=1,user-scalable=no"/>
- <meta name="apple-mobile-web-app-capable" content="yes" />
- <title>TweetView</title>
- <link href="http://ajax.googleapis.com/ajax/libs/dojo/1.6/dojox/mobile/themes/iphone/iphone.css" mce_href="http://ajax.googleapis.com/ajax/libs/dojo/1.6/dojox/mobile/themes/iphone/iphone.css" rel="stylesheet" />
- <mce:script type="text/javascript"><!--
- djConfig = {
- isDebug: true,
- baseUrl: './',
- modulePaths: {
- tweetview: 'js/tweetview'
- },
- parseOnLoad: true
- };
- // --></mce:script>
- <mce:script type="text/javascript" src="http://ajax.googleapis.com/ajax/libs/dojo/1.6/dojo/dojo.xd.js.uncompressed.js" mce_src="http://ajax.googleapis.com/ajax/libs/dojo/1.6/dojo/dojo.xd.js.uncompressed.js"></mce:script>
- <mce:script type="text/javascript"><!--
- // 使用轻量级的mobile parser
- dojo.require("dojox.mobile.parser");
- // 导入 Dojo mobile
- dojo.require("dojox.mobile");
- // 如果客户端不是基于Webkit内核的话道出compat包
- dojo.requireIf(!dojo.isWebKit,"dojox.mobile.compat");
- // --></mce:script>
- </head>
- <body>
- <!-- 这里将放我们的应用程序代码 -->
- </body>
- </html>
有了基本的应用程序模板,我们接下来将考虑怎么把三个视图整合进来(Tweets,Mentions,和Setting),还有每个视图中底部的导航条。我们先来处理视图:
- <!-- tweets 视图 -->
- <div id="tweets" dojoType="dojox.mobile.ScrollableView" selected="true">
- <h1 dojoType="dojox.mobile.Heading">
- <!-- 刷新按钮 -->
- <div dojoType="dojox.mobile.ToolBarButton" class="mblDomButton tweetviewRefresh" style="float:right;" mce_style="float:right;" icon="images/refresh.png"></div>
- Tweets
- </h1>
- <ul dojoType="dojox.mobile.RoundRectList">
- <li dojoType="dojox.mobile.ListItem">
- Tweet item here
- </li>
- </ul>
- </div>
- <!-- mentions视图 -->
- <div id="mentions" dojoType="dojox.mobile.ScrollableView">
- <h1 dojoType="dojox.mobile.Heading">
- <!-- the refresh button -->
- <div dojoType="dojox.mobile.ToolBarButton" class="mblDomButton tweetviewRefresh" style="float:right;" mce_style="float:right;" icon="images/refresh.png"></div>
- Mentions
- </h1>
- <ul dojoType="dojox.mobile.RoundRectList">
- <li dojoType="dojox.mobile.ListItem">
- Mention tweet item here
- </li>
- </ul>
- </div>
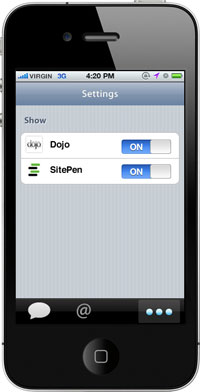
- <!-- settings视图 -->
- <div id="settings" dojoType="dojox.mobile.ScrollableView">
- <h1 dojoType="dojox.mobile.Heading">Settings</h1>
- <h2 dojoType="dojox.mobile.RoundRectCategory">Show</h2>
- <ul dojoType="dojox.mobile.RoundRectList">
- <li dojoType="dojox.mobile.ListItem">
- Setting item here
- </li>
- </ul>
- </div>
!注意,我们在每一个视图里放了一个示例列表。每个视图中最终内容的实现将在将来的教程中介绍。
我们没有使用dojox.mobile基本的视图类View,而是选择了ScrollableView。 ScrollableView顶部有一个固定的标题栏,在底部有一个固定的控制条。ScrollableView的中间内容可以被滚动。我们还是用了ToolBarButton来实现一个刷新按钮。注意, mblDomButton CSS 类只是dojox.mobile提供的诸多按钮样式 之一。现在这个刷新按钮还没有实现任何功能——我们先简单的把它放在这里。最后,我们给这个按钮实例添加了名为tweetviewRefresh的CSS类。这个CSS类的内容是:
- <mce:style><!--
- /* vertically center the image */
- .tweetviewRefresh img {
- margin-top:6px;
- }
- --></mce:style><style mce_bogus="1">/* vertically center the image */
- .tweetviewRefresh img {
- margin-top:6px;
- }</style>
这个刷新按钮现在在标题栏中垂直居中。
安置好这三个视图之后,我们可以开始使用dojox.mobile.TabBar来创建底部的菜单栏,它包含三个dojox.mobile.TabBarButton:
- <!-- 底部的TabBar -->
- <ul dojoType="dojox.mobile.TabBar" iconBase="images/iconStrip.png" style="margin-top:-49px;" mce_style="margin-top:-49px;">
- <!-- iconPos的四个参数为: top left width height -->
- <li dojoType="dojox.mobile.TabBarButton" iconPos1="0,0,29,30" iconPos2="29,0,29,30" selected="true" moveTo="tweets">Tweets</li>
- <li dojoType="dojox.mobile.TabBarButton" iconPos1="0,29,29,30" iconPos2="29,29,29,30" moveTo="mentions">Mentions</li>
- <li dojoType="dojox.mobile.TabBarButton" iconPos1="0,58,29,30" iconPos2="29,58,29,30" moveTo="settings">Settings</li>
- </ul>
控制按钮的图片切片的大小为29×30,普通状态的图片在顶层,激活状态的图片在其之下。点击每个控制按钮将切换到其对应的视图。
!dojox.mobile.TabBar和dojox.mobile.TabBarButton是Dojo1.6中的新控件。dojox.mobile.TabBar有两种类型:tabBar和segementControl。你可以在这里 看到他们的区别。同时请注意本例中的TabBar添加了样式 margin-top:-49px,这使得TabBar可以一直显示在当前页面上。
现在我们需要的都准备好了,让我们回顾一下代码细节:
- 每一个视图的ID属性对应着每一个TabBarButton的moveTo属性。
- 如果我们不想为TabBarButton状态图片使用图片切片(sprite)的话,我们可以通过设置TabBarButton的icon1和icon2属性来设置所使用图片的路径。由于我们在例子中使用了图片切片(sprited image), 可以通过设置TabBar的iconBase属性来设置图片路径,每一个TabBarButton使用iconPos1和iconPos2属性来提供所使用的切片(sprite)的位置。
- iconPos1和iconPos2的参数格式为:top, left, width, height。
- ScrollableView将标题栏和控制栏分别固定在应用程序的顶端和底部。
同时请注意,我们使用的三个widget并不是dojox.mobile内核自带的:TabBar, TabBarButton和ScrollableView。你可只需要添加下列require语句就可以为你的页面添加所需的资源。
- // 使用轻量的mobile parser
- dojo.require("dojox.mobile.parser");
- // 导入 dojox.mobile
- dojo.require("dojox.mobile");
- // 导入额外的 dojox.mobile widgets
- dojo.require("dojox.mobile.ScrollableView");
- dojo.require("dojox.mobile.TabBar"); // TabBarButton 在这里被导入
- // 如果客户端不是Webkit内核的话导入compat包。
- dojo.requireIf(!dojo.isWebKit,"dojox.mobile.compat");
!这两个额外的资源非常小并且不需要额外的样式表。所以我们的应用程序还是很“苗条”的。
现在我们的应用程序的布局已经完成了!你可以看下TweetView大致长什么样!
TweetView已经成形!
创建TweetView的基本布局非常简单:添加一些ScrollingView widgets 和 TabBar。需要指出的是,TweetView应用程序的每一个部件都是dojox.mobile提供的:标题栏,工具栏,按钮...这些都已经为你准备好了。
让我们期待本系列的下一篇教程!下一篇教程中我们将介绍如何创建Tweets和Mentions视图中的具体内容!