原理是操作led 与 CPU 相连管脚的GPIO,具体操作哪个GPIO,需要查看原理图。将对应GPIO配置为输出模式,并设置GPIO的对应位为低电平即可点亮led,相反,设置对应位为高电平则熄灭led
以韦东山的JZ2440为例,原理图:

可以看出3个led分别对应GPF4,GPF5,GPF6设置为输出状态,查看芯片手册:
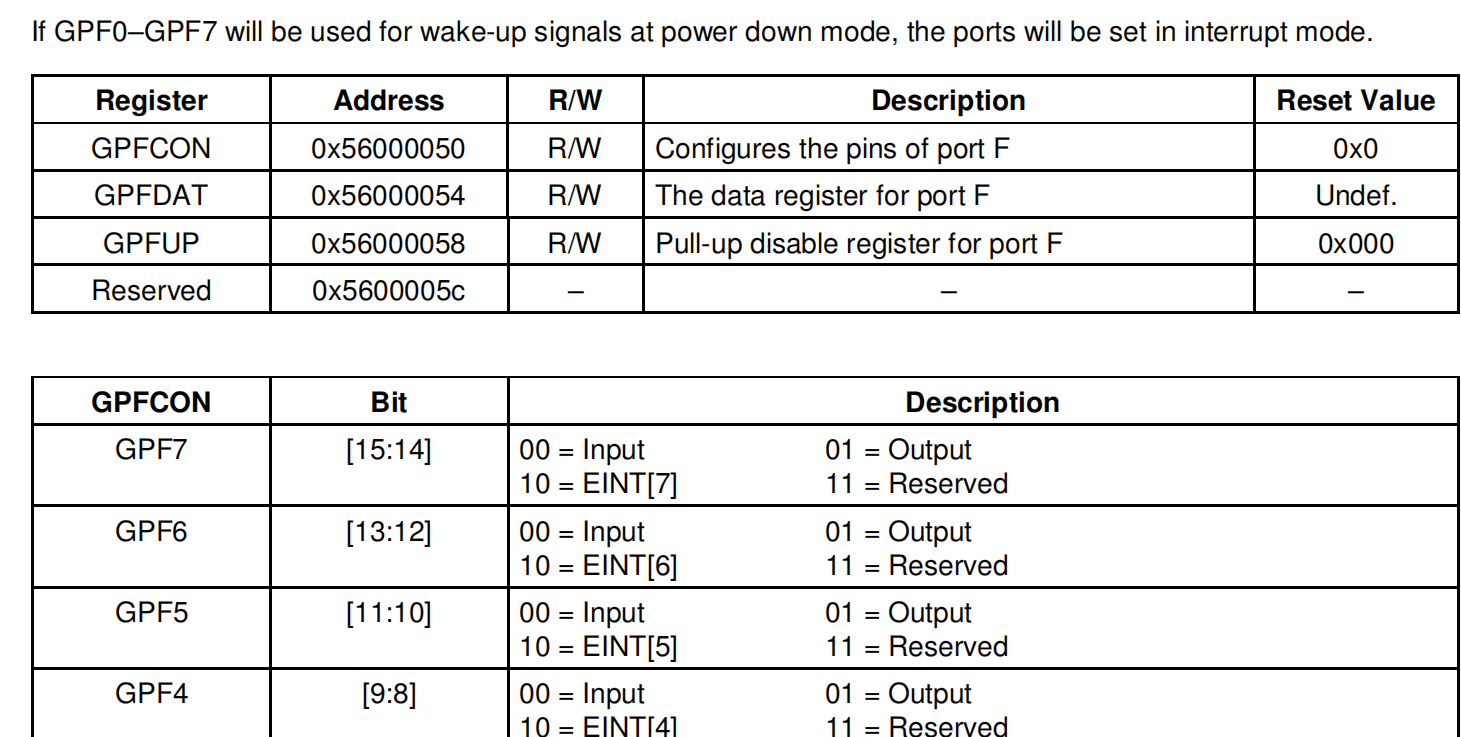
得知GPFCON寄存器地址为 0x56000050,GPFDAT寄存器地址为 0x56000054,GPF4,GP5,GPF6 的对应配置分别为8-9,10-12,12-13位,需要将这连续的6位设置为010101 即可配置设置GPF4-6为输出模式,然后控制 GPFDAT 4-6 位,0点亮,1熄灭。
代码如下,汇编:
 1 .global _start
 2
 3 _start:
 4     // 关闭看门狗
 5     ldr r0, =0x53000000
 6     ldr r1, =0
 7     str r1, [r0]
 8   //初始化栈
 9     mov sp,#4096

10     bl main
c代码:
  1 #define GPFCON  (*(volatile unsigned int *) 0x56000050)
  2 #define GPFDAT  (*(volatile unsigned int *) 0x56000054)
  3
  4
  5 void delay()
  6 {
  7     volatile int d = 100000;
  8     while(d--);
  9 }
 10
 11 void led_all_off()
 12 {
 13     GPFDAT |= (7 << 4);
 14 }
 15
 16 void led_all_on()
 17 {
 18
 19     GPFDAT &= ~(7 << 4);
 20 }
 21
 22
 23 void led_light_one(int index)
 24 {
 25     GPFDAT &= ~(1 << (4 + index));
 26 }
 27
 28 void led_off_one(int index)
 29 {
 30     GPFDAT |= (1 << (4 + index));
 31 }
 32
 33 void config_gpio()
 34 {
 35     //清0
 36     GPFCON    &= ~ ((3 << 8) | (3 << 10)    | (3 << 12));
 37     //设置1
 38     GPFCON    |= ((1 << 8) | (1    << 10)    | (1 << 12));
 39 }
 40
 41 void horse_left()
 42 {
 43     int i;
 44     for(i =0; i < 3;i ++)
 45     {
 46         led_light_one(i);
 47         delay();
 48         led_off_one(i);
 49
 50     }
 51 }
 52
 53 void horse_right()
 54 {
 55     int i;
 56     for(i =3; i >= 0;i --)
 57     {
 58         led_light_one(i);
 59         delay();
 60         led_off_one(i);
 61     }
 62 }
 63
 64 void horse_race()
 65 {
 66     int i;
 67     for(i =0 ; i < 3;i ++)
 68     {
 69         horse_left();
 70         horse_right();
 71     }
 72 }
 73
 74
 75 void twinkle()
 76 {
 77     int i;
 78     led_all_off();
 79     for(i =0 ; i < 3;i ++)
 80     {
 81         led_all_on();
 82         delay();
 83         led_all_off();
 84         delay();
 85     }
 86 }
 87
 88 void one_by_one_on()
 89 {
 90     int i;
 91     for(i =0; i < 3;i ++)
 92     {
 93         led_light_one(i);
 94         delay();
 95     }
 96 }
 97
 98 void one_by_one_off()
 99 {
100     int i;
101     for(i =3; i >= 0;i --)
102     {
103         led_off_one(i);
104         delay();
105     }
106 }
107 void one_by_one()
108 {
109     int i;
110     led_all_off();
111     for(i =0 ; i < 3;i ++)
112     {
113         one_by_one_on();
114         one_by_one_off();
115     }
116 }
117
118 int main()
119 {
120     config_gpio();
121     while(1)
122     {
123         twinkle();
124         horse_race();
125         one_by_one();
126     }
127
128     return 0;
129 }
Makefile
all:
	arm-linux-gcc -O3 -c -o led.o led.S
	arm-linux-gcc -O3 -c -o main.o main.c
	arm-linux-ld -Ttext 0 led.o main.o -o led.elf
	arm-linux-objcopy -O binary -S led.elf led.bin

clean:
	rm led.o led.ef led.bin -rf
此代码实现了3个led同时闪烁,流水灯。