One by one,一步步开始使用Redis吧(一)
最近有需求需要使用redis,之前也是随便用用,从来也没有归纳总结,今天想睡觉,但是又睡不着,外面阳光不错,气温回升了,2019年6月1日,成都的夏天来了又走,走了又来,这次应该是真的来了。
Redis安装
Redis 是一款依据BSD开源协议发行的高性能Key-Value存储系统(cache and store)。它通常被称为数据结构服务器,因为值(value)可以是 字符串(String), 哈希(Map), 列表(list), 集合(sets) , 有序集合(sorted sets)和位图(bitmaps)等类型。
平台-windwos
打开 Redis 官网,我们发现 Redis 官方并不支持 Windows 平台,但 Microsoft Open Tech Group 却改变了这一情况,ps:微软已经关闭了Microsoft Open Tech Group了,不在依靠Open Tech Group,因为微软更好了开源了,收购了github,也预祝微软在开源的道路上越走越扎实。
下载
- 1.下载地址:https://github.com/MicrosoftArchive/redis/releases
- 2.Assets:选择3.2.100.msi或者3.2.100.zip
- 3.运行服务端:cd 到redis的目录下,redis-server.exe redis.windows.conf
- 4.运行客户端:保持上面的redis服务端不关闭,redis-cli.exe -h 127.0.0.1 -p 6379
- 5.测试命令: set name Randy(SET) get name(GET)
- 6.安装windows服务-开机自启:cd到redis的目录下,redis-server --service-install redis.windows.conf
- 7.此时已经安装了服务,4-5步,测试就没问题了
平台-linux
linux下,版本就迭代很多个版本,本人书写时,已经是5.0.5的Stable版本
- $ wget http://download.redis.io/releases/redis-5.0.5.tar.gz
- $ tar xzf redis-5.0.5.tar.gz
- $ cd redis-5.0.5
- $ make
- 上面的命令安装后,redis就在CentOS下的根目录下root下,
- $:cd root
$:ls -all
[root@VM_16_7_centos ~]# ls -all
dr-xr-x---. 10 root root 4096 6Ղ 1 14:47 .
dr-xr-xr-x. 19 root root 4096 6Ղ 1 14:50 ..
drwxr-xr-x 3 root root 4096 11Ղ 13 2018 .aspnet
-rw------- 1 root root 27109 6Ղ 1 14:50 .bash_history
-rw-r--r--. 1 root root 18 12Ղ 29 2013 .bash_logout
-rw-r--r--. 1 root root 176 12Ղ 29 2013 .bash_profile
-rw-r--r--. 1 root root 176 12Ղ 29 2013 .bashrc
drwxr-xr-x 4 root root 4096 1Ղ 31 16:22 .cache
drwxr-xr-x 3 root root 4096 8Ղ 13 2018 .config
-rw-r--r--. 1 root root 100 12Ղ 29 2013 .cshrc
-rw-r--r-- 1 root root 1402 11Ղ 14 2018 c:\temp\internal-nlog.txt
drwxr-xr-x 4 root root 4096 11Ղ 14 2018 .dotnet
-rw-r--r-- 1 root root 15080 10Ղ 3 2017 epel-release-latest-7.noarch.rpm
-rw------- 1 root root 498 11Ղ 13 2018 .mysql_history
-rw-r--r-- 1 root root 4680 11Ղ 12 2018 nginx.rpm
drwxr-xr-x 2 root root 4096 9Ղ 14 2018 .pip
drwxr----- 3 root root 4096 11Ղ 12 2018 .pki
-rw-r--r-- 1 root root 73 9Ղ 14 2018 .pydistutils.cfg
drwxrwxr-x 6 root root 4096 5Ղ 16 00:07 redis-5.0.5
-rw-r--r-- 1 root root 1975750 5Ղ 16 00:26 redis-5.0.5.tar.gz
drwx------ 2 root root 4096 8Ղ 13 2018 .ssh
-rw-r--r--. 1 root root 129 12Ղ 29 2013 .tcshrc
-rw------- 1 root root 5579 1Ղ 31 16:05 .viminfo- $ cd redis-5.0.5
- $ make
在redis-5.0.5/src下未发现 ./redis-server文件,只找到几个.c后辍的文件
网上查找原因:
Redis是C实现的,需要gcc来进行编译,原因可能是未安装gcc,
使用命令安装gcc:yum install gcc
然后重新解压redis编译成功!--你可能就成功了,那么可以恭喜你了
++但是本人还是失败了++
zmalloc.h:50:31: error: jemalloc/jemalloc.h: No such file or directory
zmalloc.h:55:2: error: #error "Newer version of jemalloc required"
make[1]: *** [adlist.o] Error 1
make[1]: Leaving directory `/data0/src/redis-2.6.2/src'
make: *** [all] Error 2- 原因是jemalloc重载了Linux下的ANSI C的malloc和free函数。解决办法:make时添加参数。
make MALLOC=libc
make之后,会出现一句提示
Hint: To run 'make test' is a good idea ;)
但是不测试,通常是可以使用的。若我们运行make test ,会有如下提示
[devnote@devnote src]$ make test
You need tcl 8.5 or newer in order to run the Redis test
make: ***[test] Error_1
解决办法是用yum安装tcl8.5(或去tcl的官方网站http://www.tcl.tk/下载8.5版本,并参考官网介绍进行安装)
yum install tcl启动服务端
- cd到redis目录:——$:cd redis-5.0.5
- 运行服务端——:$:src/redis-server

启动客户端
- hold住服务端,不要关闭
- cd到redis目录:——$:cd redis-5.0.5
- 运行客户端——:$:src/redis-cli
- 测试: 127.0.0.1:6379>set name RandyField
127.0.0.1:6379>get name"RandyField"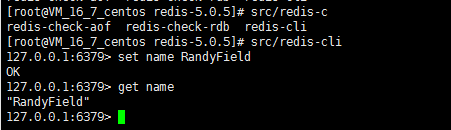
参考链接:
- https://redis.io/download
- https://blog.csdn.net/tv002/article/details/87882347
- https://blog.csdn.net/qq_40273898/article/details/79427477
- https://blog.csdn.net/lgh1117/article/details/48270085