[技术博客]简单好用的星级评价和图片裁剪插件
在前端的编写中,往往需要使用到某些功能,但这些功能自己来写又过于复杂,因此使用插件是一个非常简单又实用的选择,这里就推荐两个JS插件,一个是用于星级评价,另一个用于图片的裁剪。
星级评价插件——jquery.raty.js
简介
看到它的名字就知道,这个插件是基于JQuery的一个JS插件,因此自然采用JQuery的方式来使用这个函数,他的功能,就是用于星级评价。这个插件就能直接显示评分,同时也支持点击来进行打分,非常的简单。
插件的使用
首先引入JS,里面的css事实上不引入也不存在问题。
在需要显示评分的地方创建一个元素<div id="id" ></div>,对这个元素直接调用raty()函数即可。下面是其raty()函数所有的功能。
$("#id").raty({
    cancel:      false                                          // Creates a cancel button to cancel the rating.
    cancelClass: 'raty-cancel'                                  // Name of cancel's class.
    cancelHint:  'Cancel this rating!'                          // The cancel's button hint.
    cancelOff:   'cancel-off.png'                               // Icon used on active cancel.
    cancelOn:    'cancel-on.png'                                // Icon used inactive cancel.
    cancelPlace: 'left'                                         // Cancel's button position.
    click:       undefined                                      // Callback executed on rating click.
    half:        false                                          // Enables half star selection.
    halfShow:    true                                           // Enables half star display.
    hints:       ['bad', 'poor', 'regular', 'good', 'gorgeous'] // Hints used on each star.
    iconRange:   undefined                                      // Object list with position and icon on and off to do a mixed icons.
    mouseout:    undefined                                      // Callback executed on mouseout.
    mouseover:   undefined                                      // Callback executed on mouseover.
    noRatedMsg:  'Not rated yet!'                               // Hint for no rated elements when it's readOnly.
    number:      5                                              // Number of stars that will be presented.
    numberMax:   20                                             // Max of star the option number can creates.
    path:        undefined                                      // A global locate where the icon will be looked.
    precision:   false                                          // Enables the selection of a precision score.
    readOnly:    false                                          // Turns the rating read-only.
    round:       { down: .25, full: .6, up: .76 }               // Included values attributes to do the score round math.
    score:       undefined                                      // Initial rating.
    scoreName:   'score'                                        // Name of the hidden field that holds the score value.
    single:      false                                          // Enables just a single star selection.
    space:       true                                           // Puts space between the icons.
    starHalf:    'star-half.png'                                // The name of the half star image.
    starOff:     'star-off.png'                                 // Name of the star image off.
    starOn:      'star-on.png'                                  // Name of the star image on.
    target:      undefined                                      // Element selector where the score will be displayed.
    targetForma: '{score}'                                      // Template to interpolate the score in.
    targetKeep:  false                                          // If the last rating value will be keeped after mouseout.
    targetScore: undefined                                      // Element selector where the score will be filled, instead of creating a new hidden field (scoreName option).
    targetText:  ''                                             // Default text setted on target.
    targetType:  'hint'                                         // Option to choose if target will receive hint o 'score' type.
    starType:    'img'                                          // Element used to represent a star.
});
事实上,我们所用到的功能往往很少,而如果多次调用的话,可以对它再进行一定程度的封装,可以如下所示:
function rank(number, size, id){
    $("#id").raty({
        score:number,                           //评分数目
        starOn:"./resource/star-on.png",        //满星的图片的地址
        starOff:"./resource/star-off.png",      //空星的图片的地址
        starHalf:"./resource/star-half.png",    //半星的图片的地址
        readOnly:true,                          //只读
        halfShow:true,                          //显示半星
        size:size,                              //评分大小
    })
}比较重要的一点就是只读属性,为true时这个星级评价是无法被更改的,为false时就可以靠点击来选择分数,进行打分的操作。
获取到评分的数目也是很简单,使用$("#id").raty("getScore")就会返回评分的数字。
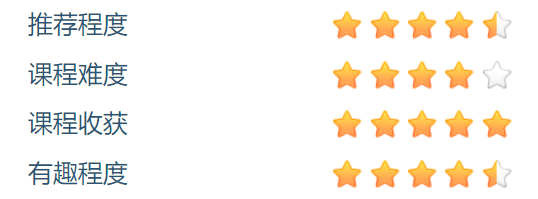
其最终效果:
图片裁剪插件——cropper.js
在处理用户的个人信息时,头像这一块比较让人头大,头像最好是要1:1的图片,显示起来才美观,可是不能保障用户上传的头像的比例就是1:1,因此就不得不对上传的头像进行裁剪。
简介
这个插件可以提供对图片的裁剪以及预览,可以设定好裁剪的比例等属性,还能够显示出预览图,用起来还是比较简单的。
插件的使用
这个插件虽然是国人所写,但是其文档确是英文,同时也并不是很好读懂,在这篇博客中有较好的介绍。最终在使用时也是采用的别人博客里所介绍的方法来使用,主要来源于这篇博客。其作者比较好的介绍了使用cropper.js进行裁剪的方法,同时也是采用了Bootstrap的模态框(Modal)来实现裁剪和显示。
插件的使用主要就是对参数options的处理以及处理裁剪的对象。裁剪的设置就是通过在options中添加众多参数,来调整裁剪的效果。具体的全部的参数和方法可以见博客,这里只介绍几个重要的。
- aspectRatio—裁剪框的宽高比:1、16/9、4/3等等。
- viewMode—cropper裁剪时视图模式:用于控制裁剪框的范围,这个值可以设定为0-3;
- preview—预览图的class名:我们要为预览图添加class,并将其加到参数中,就可以看到预览图了。
获取裁剪的对象时,直接采用$('#image').cropper(‘method'[,para])就可以获取或者设置裁剪的图片。比如在上传图片时,就需要采用
$('#photo').cropper('getCroppedCanvas', {
        width: 300,
        height: 300
    })
来获取到最终裁剪的结果。
在此先附上经过适当修改后的代码:
HTML:
<button type="button" class="btn btn-default mybtn float-md-none ml-0 ml-md-5" data-toggle="modal" data-target="#changeModal" id="show_modal">上传头像</button>

<div class="modal fade" id="changeModal" tabindex="-1" role="dialog" aria-hidden="true">
        <div class="modal-dialog modal-lg">
            <div class="modal-content" >
                <div class="modal-header">
                    <!--模态框的头部-->
                    <h4 class="modal-title float-md-none">
                        <i class="fa fa-pencil"></i>更换头像
                    </h4>
                    <button type="button" class="close" data-dismiss="modal" aria-hidden="true" id="close_modal">×</button>
                </div>
                <div class="modal-body">
                    <!-- 模态框的中部,用于裁剪并显示预览 预览图和裁剪图都是默认隐藏的-->
                    <p class="tip-info text-center">
                        未选择图片
                    </p>
                    <!--裁剪图片的地方-->
                    <div class="img-container" style="display: none">
                        <img src="" alt="" id="photo">
                    </div>
                    <!--图片预览的地方-->
                    <div class="img-preview-box" style="display: none">
                        <hr>
                        <span>预览:</span>
                        <div id="testid" class="img-preview img-preview-md" style="width: 100px;height: 100px;">
                        </div>
                    </div>
                </div>
                <div class="modal-footer">
                    <!-- 模态框的底部,用于选择图片等-->
                    <div class="container">
                        <label class="btn mybtn col-md-3" for="photoInput">
                            <input type="file" class="sr-only" id="photoInput" accept="image/*">
                                <span>打开图片</span>
                        </label>
                        <button class="btn mybtn disabled col-md-2 offset-md-4 mb-2" disabled="true" onclick="sendPhoto();">提交</button>
                        <button class="btn mybtn col-md-2 mb-2" aria-hidden="true" data-dismiss="modal">取消</button>
                    </div>
                </div>
            </div>
        </div>
    </div>
JS:
$(function(){
        initCropperInModal($('#photo'),$('#photoInput'),$('#changeModal'));
    });
//进行模态框的初始化
var initCropperInModal = function(img, input, modal){
        var $image = img;
        var $inputImage = input;
        var $modal = modal;
        var options = {
            aspectRatio: 1, // 纵横比,头像采用1:1
            viewMode: 2, //cropper的视图模式
            preview: '.img-preview' // 预览图的class名
        };
        // 模态框隐藏后需要保存的数据对象
        var saveData = {};
        var URL = window.URL || window.webkitURL;
        var blobURL;
        $modal.on('shown.bs.modal', function () {
            // 重新创建
            $image.cropper( $.extend(options, {
                ready: function () {
                    // 当剪切界面就绪后,恢复数据
                    if(saveData.canvasData){
                        $image.cropper('setCanvasData', saveData.canvasData);
                        $image.cropper('setCropBoxData', saveData.cropBoxData);
                    }
                }
            }));
        }).on('hidden.bs.modal', function () {
            // 保存相关数据
            saveData.cropBoxData = $image.cropper('getCropBoxData');
            saveData.canvasData = $image.cropper('getCanvasData');
            // 销毁并将图片保存在img标签
            $image.cropper('destroy').attr('src',blobURL);
        });
        if (URL) {
            //检测用户上传了图片,将图片显示到裁剪框中,然后处理相关的内容,如预览图和提示语句
            $inputImage.change(function() {
                var files = this.files;
                var file;
                if (!$image.data('cropper')) {
                    return;
                }
                if (files && files.length) {
                    file = files[0];
                    //验证文件是否为图片文件
                    if (/^image\/\w+$/.test(file.type)) {

                        if(blobURL) {
                            URL.revokeObjectURL(blobURL);
                        }
                        blobURL = URL.createObjectURL(file);
                        // 重置cropper,将图像替换
                        $image.cropper('reset').cropper('replace', blobURL);
                        // 选择文件后,显示和隐藏相关内容
                        //bootstrap4取消了.hidden,因此采用JQ的show()和hide()来实现,等同于css中的display属性
                        $('.img-container').show();
                        $('.img-preview-box').show();
                        $('#changeModal .disabled').removeAttr('disabled').removeClass('disabled');
                        $('#changeModal .tip-info').hide();

                    } else {
                        window.alert('请选择一个图像文件!');
                    }
                }
            });
        } else {
            //没有上传头像时是无法提交的
            $inputImage.prop('disabled', true).addClass('disabled');
        }
    }
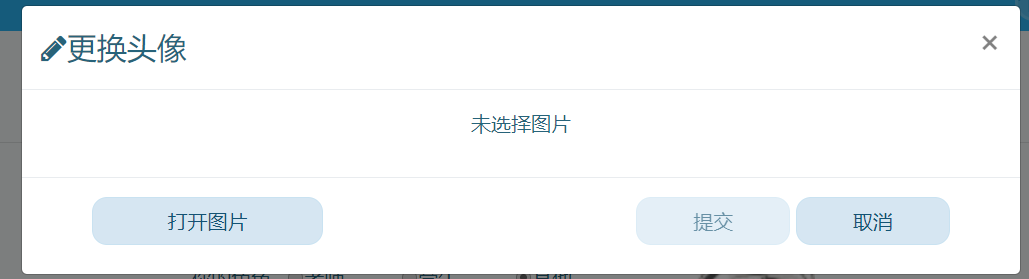
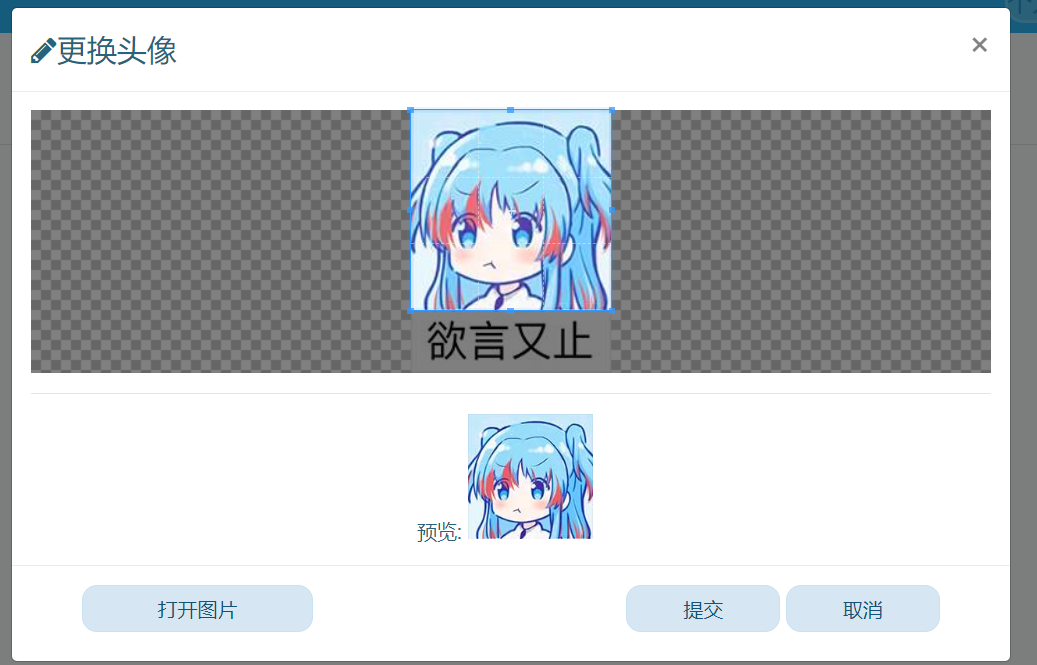
这样,就能够在弹窗中实现预览图的加载,并对图片进行裁剪了,最终的效果图:
上传前:
上传并调整了裁剪范围后:
裁剪完后往往需要上传,这个时候就又需要对裁剪后的图片进行一定的操作。
var sendPhoto = function(){
    //获取到图片的内容,采用toBlob()生成Blob对象,再将Blob对象添加到formData对象中去,最终实现上传,也可以采用toDataURL()来获取BASE64对象,如果服务器支持BASE64的话
    var photo = $('#photo').cropper('getCroppedCanvas', {
        width: 300,
        height: 300
    }).toBlob(function (blob) {
        formData=new FormData();
        formData.append('smfile',blob);
        $.ajax({
            type:"POST",
            url:url,
            data:formData,
            cache: false,
            contentType: false,
            processData: false,
            success: function (data) {
                //do something
            },
            error: function (data) {
                //do something
            }
        });
    });
}
遇到的问题
- 最后上传时,getCropperedCanvas里的长宽就是最终生成的图片长宽,不能太低,过低会导致裁剪出来的图片严重失真,尽管在预览图中看着并不模糊。早期为了简单快捷采用了100x100,导致最后头像非常模糊,低分辨的图片裁剪后尚可,高分辨率图片惨不忍睹。如果支持的话,还是调高一点,300x300的大小还算比较合适。
- 浏览器适配问题,部分浏览器可能不支持toBlob()方法,点名Edge浏览器,其余浏览器暂时不清楚,其解决办法是再引入一个JS,定义toBlob()方法就可以了,这里我采用的是canvas-to-blob,其余部分均不作改动,就能在Edge里进行图片的上传了。