防火墙
预习内容
10.12 firewalld和netfilter
10.13 netfilter5表5链介绍
10.14 iptables语法
10.15 iptables filter表案例
10.16/10.17/10.18 iptables nat表应用
扩展(selinux了解即可)
selinux教程 http://os.51cto.com/art/201209/355490.htm
selinux pdf电子书 http://pan.baidu.com/s/1jGGdExK
iptables应用在一个网段 http://www.aminglinux.com/bbs/thread-177-1-1.html
sant,dnat,masquerade http://www.aminglinux.com/bbs/thread-7255-1-1.html
iptables限制syn速率 http://www.aminglinux.com/bbs/thread-985-1-1.html http://jamyy.us.to/blog/2006/03/206.html
1. 防火墙iptables和firewalld
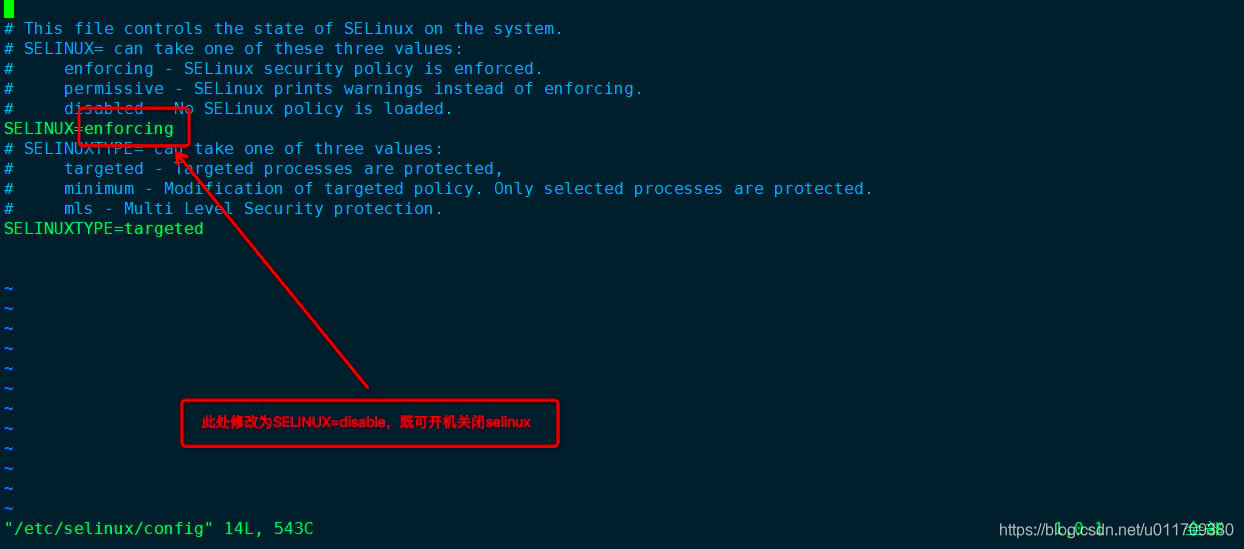
在说防火墙之前,我们需要提到selinux,SELinux 主要作用就是最大限度地减小系统中服务进程可访问的资源,centos7默认selinux是开启状态,需要关闭它。如果是临时关闭,可以使用setenforce 0,如果要永久关闭就需要修改selinux的配置文件/etc/selinux/config,如下图:
centos 6 包含之前的版本上的防火墙是iptables,而centos7上的防火墙是firewalld。平常所说的iptables其实并不是防火墙,它只不过是一个工具罢了,但是这两者都可以使用iptables工具。
在使用iptables工具前,需要进行以下几步操作:
- systemctl disable firewalld
- systemctl stop firewalld.service
- yum install -y iptables-services
- systemctl enable iptables.service
- systemctl start iptables.service
## 关闭firewalld开机启动 ##
[root@linux-01 ~]# systemctl  disable  firewalld
Removed symlink /etc/systemd/system/multi-user.target.wants/firewalld.service.
Removed symlink /etc/systemd/system/dbus-org.fedoraproject.FirewallD1.service.

## 停止firewalld运行 ##
[root@linux-01 ~]# systemctl stop  firewalld.service

## 安装iptables-services 工具 ##
[root@linux-01 ~]# yum install -y iptables-services
已加载插件:fastestmirror
Repository base is listed more than once in the configuration
Repository updates is listed more than once in the configuration
Repository extras is listed more than once in the configuration
Repository centosplus is listed more than once in the configuration
Loading mirror speeds from cached hostfile
epel/x86_64/metalink                                                                                | 4.9 kB  00:00:00
 * base: mirrors.cn99.com
 * epel: mirrors.tuna.tsinghua.edu.cn
 * extras: mirrors.163.com
 * updates: mirrors.163.com
base                                                                                                | 3.6 kB  00:00:00
epel                                                                                                | 4.7 kB  00:00:00
extras                                                                                              | 3.4 kB  00:00:00
updates                                                                                             | 3.4 kB  00:00:00
(1/2): epel/x86_64/updateinfo                                                                       | 986 kB  00:00:01
(2/2): epel/x86_64/primary_db                                                                       | 6.7 MB  00:00:01
正在解决依赖关系
--> 正在检查事务
---> 软件包 iptables-services.x86_64.0.1.4.21-28.el7 将被 安装
--> 解决依赖关系完成

依赖关系解决

===========================================================================================================================
 Package                             架构                     版本                            源                      大小
===========================================================================================================================
正在安装:
 iptables-services                   x86_64                   1.4.21-28.el7                   base                    52 k

事务概要
===========================================================================================================================
安装  1 软件包

总下载量:52 k
安装大小:26 k
Downloading packages:
iptables-services-1.4.21-28.el7.x86_64.rpm                                                          |  52 kB  00:00:01
Running transaction check
Running transaction test
Transaction test succeeded
Running transaction
  正在安装    : iptables-services-1.4.21-28.el7.x86_64                                                                 1/1
  验证中      : iptables-services-1.4.21-28.el7.x86_64                                                                 1/1

已安装:
  iptables-services.x86_64 0:1.4.21-28.el7

完毕!

## 开机启动iptables ##
[root@linux-01 ~]# systemctl  enable iptables.service
Created symlink from /etc/systemd/system/basic.target.wants/iptables.service to /usr/lib/systemd/system/iptables.service.

## 启动iptables服务 ##
[root@linux-01 ~]# systemctl  start  iptables.service
2. netfilter5表5链介绍
| netfilter的5个表 | 作用 |
|---|---|
| filter | 表主要用于过滤包,是系统预设的表,该表内建3个链:INPUT、OUTPUT以及FORWARD。INPUT链作用于进入本机的包,OUTPUT链作用于本机送出的包,FORWARD链作用于那些跟本机无关的包。 |
| nat | 表主要用于网络地址转换,同样也有3个链,PREROUTING链的作用是在包刚刚到达防火墙时改变它的目的地址,OUTPUT链的作用是改变本地产生的包的目的地址,POSTROUTING链的作用是在包即将离开防火墙时改变其源地址。 |
| mangle | 表主要用于给数据包做标记,然后根据标记去操作相应的包。 |
| raw | 表可以实现不追踪数据包做标记,默认系统的数据包都会被追踪,但追踪势必消耗一定的资源,所以可以用raw表来指定某些端口的包不被追踪。 |
| security | 表在Centos6里是没有的,它用于强制访问控制(MAC)的网络规则。 |
| netfilter的5个链 | 作用 |
|---|---|
| PREROUTING | 数据包进入路由表之前 |
| INPUT | 通过路由表后目的地为本机 |
| FORWARD | 通过路由表后,目的地不为本机 |
| OUTPUT | 由本机产生,向外转发 |
| POSTROUTING | 发送到网卡接口之前 |
3. iptables 命令与用法
3.1 选项含义
| 选项 | 含义 |
|---|---|
| -F | 清空iptables规则 |
| -I | 插入iptables规则在前 |
| -A | 插入iptables规则在后 |
| -D | 删除iptables规则 |
| -Z | 计数器清零 |
| -t | 指定表,如果不指定,默认表是filter表 |
| -s | source,表示指定源IP(可以是一个IP段) |
| -p | 指定协议,可以是tcp、udp或者icmp |
| -d | 表示指定目的IP(可以是一个IP段) |
| -j | 后面跟动作,其中ACCEPT表示允许包,DROP表示丢掉包,REJECT表示拒绝包 |
| -i | 表示指定网卡 |
| –dport | 跟-p一起使用,表示指定目标端口 |
| –sport | 跟=p一起使用,表示指定源端口 |
| –line-number | 显示规则的行号 |
3.2 iptables的用法
1.查看iptables默认规则配置文件 cat /etc/sysconfig/iptables
[root@linux-01 ~]# cat /etc/sysconfig/iptables
# sample configuration for iptables service
# you can edit this manually or use system-config-firewall
# please do not ask us to add additional ports/services to this default configuration
*filter
:INPUT ACCEPT [0:0]
:FORWARD ACCEPT [0:0]
:OUTPUT ACCEPT [0:0]
-A INPUT -m state --state RELATED,ESTABLISHED -j ACCEPT
-A INPUT -p icmp -j ACCEPT
-A INPUT -i lo -j ACCEPT
-A INPUT -p tcp -m state --state NEW -m tcp --dport 22 -j ACCEPT
-A INPUT -j REJECT --reject-with icmp-host-prohibited
-A FORWARD -j REJECT --reject-with icmp-host-prohibited
COMMIT
[root@linux-01 ~]#
2.查看iptables默认规则:iptables -nvL
[root@local6 ~]# iptables -nvL
Chain INPUT (policy ACCEPT 123M packets, 36G bytes)
 pkts bytes target     prot opt in     out     source               destination

Chain FORWARD (policy ACCEPT 123M packets, 75G bytes)
 pkts bytes target     prot opt in     out     source               destination

Chain OUTPUT (policy ACCEPT 122M packets, 155G bytes)
 pkts bytes target     prot opt in     out     source               destination
[root@local6 ~]#
3.保存iptables规则(当前规则,保存到配置文件)
[root@local6 ~]# service iptables save
4.清空iptables规则:
[root@local6 ~]# iptables -F
5.重启iptables规则
[root@local6 ~]# service iptables restart
6.查看指定表的规则
[root@linux-01 ~]# iptables -t nat -nvL
Chain PREROUTING (policy ACCEPT 0 packets, 0 bytes)
 pkts bytes target     prot opt in     out     source               destination

Chain INPUT (policy ACCEPT 0 packets, 0 bytes)
 pkts bytes target     prot opt in     out     source               destination

Chain OUTPUT (policy ACCEPT 0 packets, 0 bytes)
 pkts bytes target     prot opt in     out     source               destination

Chain POSTROUTING (policy ACCEPT 0 packets, 0 bytes)
 pkts bytes target     prot opt in     out     source               destination
[root@linux-01 ~]#
7.清空表的计数器
[root@linux-01 ~]# iptables -nvL
Chain INPUT (policy ACCEPT 0 packets, 0 bytes)
 pkts bytes target     prot opt in     out     source               destination
   61  4520 ACCEPT     all  --  *      *       0.0.0.0/0            0.0.0.0/0            state RELATED,ESTABLISHED
    0     0 ACCEPT     icmp --  *      *       0.0.0.0/0            0.0.0.0/0
    0     0 ACCEPT     all  --  lo     *       0.0.0.0/0            0.0.0.0/0
    0     0 ACCEPT     tcp  --  *      *       0.0.0.0/0            0.0.0.0/0            state NEW tcp dpt:22
    2   557 REJECT     all  --  *      *       0.0.0.0/0            0.0.0.0/0            reject-with icmp-host-prohibited

Chain FORWARD (policy ACCEPT 0 packets, 0 bytes)
 pkts bytes target     prot opt in     out     source               destination
    0     0 REJECT     all  --  *      *       0.0.0.0/0            0.0.0.0/0            reject-with icmp-host-prohibited

Chain OUTPUT (policy ACCEPT 44 packets, 4612 bytes)
 pkts bytes target     prot opt in     out     source               destination

[root@linux-01 ~]# iptables -Z   //计数器归零

[root@linux-01 ~]# iptables -nvL
Chain INPUT (policy ACCEPT 0 packets, 0 bytes)
 pkts bytes target     prot opt in     out     source               destination
    6   428 ACCEPT     all  --  *      *       0.0.0.0/0            0.0.0.0/0            state RELATED,ESTABLISHED
    0     0 ACCEPT     icmp --  *      *       0.0.0.0/0            0.0.0.0/0
    0     0 ACCEPT     all  --  lo     *       0.0.0.0/0            0.0.0.0/0
    0     0 ACCEPT     tcp  --  *      *       0.0.0.0/0            0.0.0.0/0            state NEW tcp dpt:22
    0     0 REJECT     all  --  *      *       0.0.0.0/0            0.0.0.0/0            reject-with icmp-host-prohibited

Chain FORWARD (policy ACCEPT 0 packets, 0 bytes)
 pkts bytes target     prot opt in     out     source               destination
    0     0 REJECT     all  --  *      *       0.0.0.0/0            0.0.0.0/0            reject-with icmp-host-prohibited

Chain OUTPUT (policy ACCEPT 4 packets, 432 bytes)
 pkts bytes target     prot opt in     out     source               destination
[root@linux-01 ~]#
8.插入一条规则
[root@linux-01 ~]# iptables -A INPUT  -s 192.168.141.150 -p tcp  --sport 1234 -d 192.168.141.128 --dport 8008 -j DROP
[root@linux-01 ~]# iptables -nvL
Chain INPUT (policy ACCEPT 0 packets, 0 bytes)
 pkts bytes target     prot opt in     out     source               destination
  544 44492 ACCEPT     all  --  *      *       0.0.0.0/0            0.0.0.0/0            state RELATED,ESTABLISHED
    0     0 ACCEPT     icmp --  *      *       0.0.0.0/0            0.0.0.0/0
    0     0 ACCEPT     all  --  lo     *       0.0.0.0/0            0.0.0.0/0
    0     0 ACCEPT     tcp  --  *      *       0.0.0.0/0            0.0.0.0/0            state NEW tcp dpt:22
    4  1312 REJECT     all  --  *      *       0.0.0.0/0            0.0.0.0/0            reject-with icmp-host-prohibited
    0     0 DROP       tcp  --  *      *       192.168.141.150      192.168.141.128      tcp spt:1234 dpt:8008

Chain FORWARD (policy ACCEPT 0 packets, 0 bytes)
 pkts bytes target     prot opt in     out     source               destination
    0     0 REJECT     all  --  *      *       0.0.0.0/0            0.0.0.0/0            reject-with icmp-host-prohibited

Chain OUTPUT (policy ACCEPT 24 packets, 2232 bytes)
 pkts bytes target     prot opt in     out     source               destination
[root@linux-01 ~]#
9.删除一条规则
[root@linux-01 ~]# iptables -nvL --line-numbers
Chain INPUT (policy ACCEPT 0 packets, 0 bytes)
num pkts bytes target prot opt in out source destination
1 628 50624 ACCEPT all -- * * 0.0.0.0/0 0.0.0.0/0 state RELATED,ESTABLISHED
2 0 0 ACCEPT icmp -- * * 0.0.0.0/0 0.0.0.0/0
3 0 0 ACCEPT all -- lo * 0.0.0.0/0 0.0.0.0/0
4 0 0 ACCEPT tcp -- * * 0.0.0.0/0 0.0.0.0/0 state NEW tcp dpt:22
5 5 1640 REJECT all -- * * 0.0.0.0/0 0.0.0.0/0 reject-with icmp-host-prohibited
6 0 0 DROP tcp -- * * 192.168.141.150 192.168.141.128 tcp spt:1234 dpt:8008
Chain FORWARD (policy ACCEPT 0 packets, 0 bytes)
num pkts bytes target prot opt in out source destination
1 0 0 REJECT all -- * * 0.0.0.0/0 0.0.0.0/0 reject-with icmp-host-prohibited
Chain OUTPUT (policy ACCEPT 80 packets, 8672 bytes)
num pkts bytes target prot opt in out source destination
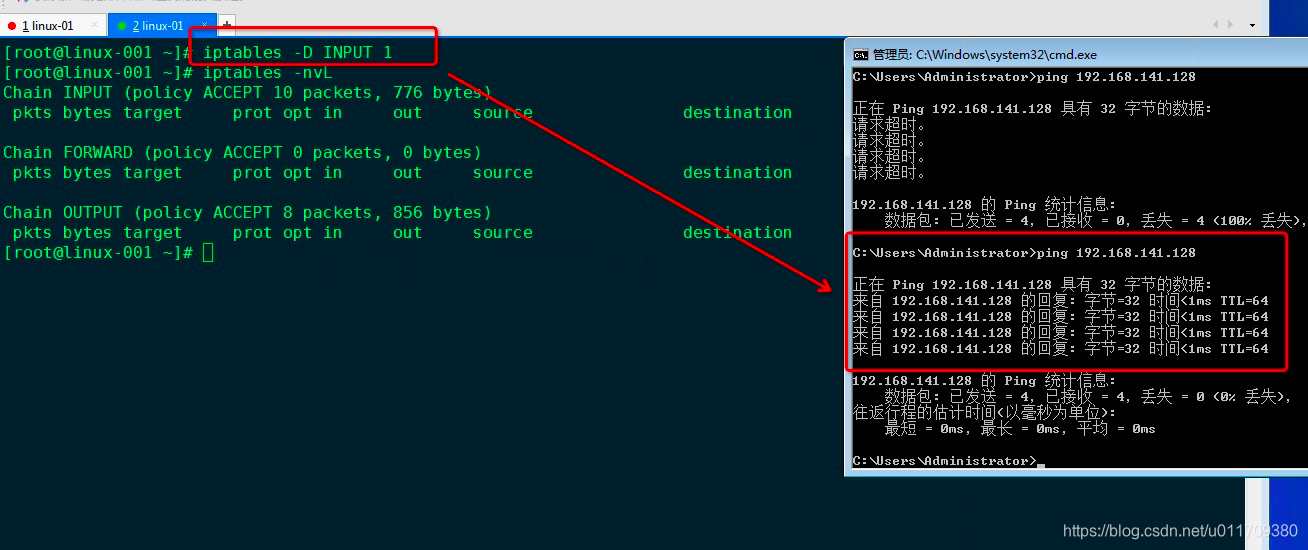
[root@linux-01 ~]# iptables -D INPUT 5 // 删除规则
[root@linux-01 ~]# iptables -nvL
Chain INPUT (policy ACCEPT 0 packets, 0 bytes)
pkts bytes target prot opt in out source destination
716 57192 ACCEPT all -- * * 0.0.0.0/0 0.0.0.0/0 state RELATED,ESTABLISHED
0 0 ACCEPT icmp -- * * 0.0.0.0/0 0.0.0.0/0
0 0 ACCEPT all -- lo * 0.0.0.0/0 0.0.0.0/0
0 0 ACCEPT tcp -- * * 0.0.0.0/0 0.0.0.0/0 state NEW tcp dpt:22
0 0 DROP tcp -- * * 192.168.141.150 192.168.141.128 tcp spt:1234 dpt:8008
Chain FORWARD (policy ACCEPT 0 packets, 0 bytes)
pkts bytes target prot opt in out source destination
0 0 REJECT all -- * * 0.0.0.0/0 0.0.0.0/0 reject-with icmp-host-prohibited
Chain OUTPUT (policy ACCEPT 20 packets, 2056 bytes)
pkts bytes target prot opt in out source destination
[root@linux-01 ~]#
10.设定默认策略,为指定链设置默认策略,格式如下:
#设置fllter表input链的默认规则为丢弃

[root@linux-01 ~]# iptables -t fllter -P INPUT DROP
- iptables规则

3. iptables filter表小案例
## 设置只有192.168.141.0/24这网段的ip地址可以连接这台机器的22端口,其他地址的80和21端口是 ##
[root@linux-001 ~]# vim iptables.sh
#! /bin/bash
ipt="/usr/sbin/iptables"
$ipt -F
$ipt -P INPUT DROP
$ipt -P OUTPUT ACCEPT
$ipt -P FORWARD ACCEPT
$ipt -A INPUT -m state --state RELATED,ESTABLISHED -j ACCEPT
$ipt -A INPUT -s 192.168.141.0/24 -p tcp --dport 22 -j ACCEPT
$ipt -A INPUT -p tcp --dport 80 -j ACCEPT
$ipt -A INPUT -p tcp --dport 21 -j ACCEPT

[root@linux-001 ~]# iptables -nvL
Chain INPUT (policy DROP 0 packets, 0 bytes)
 pkts bytes target     prot opt in     out     source               destination
   29  2060 ACCEPT     all  --  *      *       0.0.0.0/0            0.0.0.0/0            state RELATED,ESTABLISHED
    0     0 ACCEPT     tcp  --  *      *       192.168.141.0/24     0.0.0.0/0            tcp dpt:22
    0     0 ACCEPT     tcp  --  *      *       0.0.0.0/0            0.0.0.0/0            tcp dpt:80
    0     0 ACCEPT     tcp  --  *      *       0.0.0.0/0            0.0.0.0/0            tcp dpt:21

Chain FORWARD (policy ACCEPT 0 packets, 0 bytes)
 pkts bytes target     prot opt in     out     source               destination

Chain OUTPUT (policy ACCEPT 20 packets, 1980 bytes)
 pkts bytes target     prot opt in     out     source               destination
[root@linux-001 ~]#

 ## icmp示例,设置其他其他机器无法ping通  ##
 [root@linux-001 ~]# iptables -I INPUT -p icmp --icmp-type 8 -j DROP
[root@linux-001 ~]# iptables -nvL
Chain INPUT (policy ACCEPT 9 packets, 684 bytes)
 pkts bytes target     prot opt in     out     source               destination
    0     0 DROP       icmp --  *      *       0.0.0.0/0            0.0.0.0/0            icmptype 8

Chain FORWARD (policy ACCEPT 0 packets, 0 bytes)
 pkts bytes target     prot opt in     out     source               destination

Chain OUTPUT (policy ACCEPT 6 packets, 760 bytes)
 pkts bytes target     prot opt in     out     source               destination
[root@linux-001 ~]#

4. iptables nat表应用
nat表应用案例:
A机器两块网卡ens33(192.168.141.128)、ens37(192.168.100.1),ens33可以上外网,ens37仅仅是内部网络,B机器只有ens37(192.168.100.100),和A机器ens37可以通信互联。
4.1 需求:可以让B机器连接外网
解决方法:
1.我们那虚拟机来做实验,机器A需要两块网卡ens33(192.168.141.128)、ens37(192.168.100.1),机器B是一块网卡ens37(192.168.100.100),那我们把之前设置好的虚拟机,两个都增加一块网卡, 机器B把原有的网卡给停止掉,使其开机不启动。
2.两台机器启动后,我们需要重新配置添加网卡的IP地址,A为192.168.100.1,B为192.168.100.100,设置网关为192.168.100.1。
3. A机器上打开路由转发 echo “1”>/proc/sys/net/ipv4/ip_forward
4. A上执行 iptables -t nat -A POSTROUTING -s 192.168.100.0/24 -o ens33 -j MASQUERADE
步骤1:


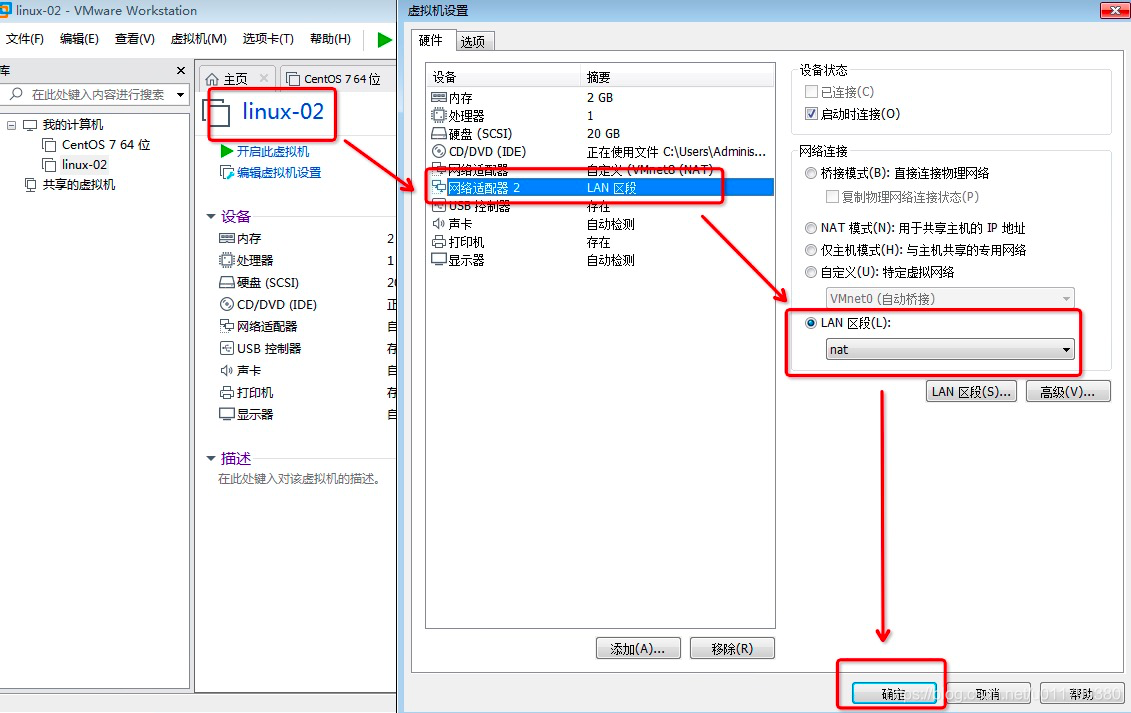

步骤二:
## 机器A可以远程登录,设置ip地址 ##
[root@linux-001 ~]# ifconfig
ens33: flags=4163<UP,BROADCAST,RUNNING,MULTICAST>  mtu 1500
        inet 192.168.141.128  netmask 255.255.255.0  broadcast 192.168.141.255
        inet6 fe80::8db4:d867:92de:d2d1  prefixlen 64  scopeid 0x20<link>
        ether 00:0c:29:6d:81:cc  txqueuelen 1000  (Ethernet)
        RX packets 39  bytes 5433 (5.3 KiB)
        RX errors 0  dropped 0  overruns 0  frame 0
        TX packets 55  bytes 7209 (7.0 KiB)
        TX errors 0  dropped 0 overruns 0  carrier 0  collisions 0

ens33:0: flags=4163<UP,BROADCAST,RUNNING,MULTICAST>  mtu 1500
        inet 192.168.141.122  netmask 255.255.255.0  broadcast 192.168.141.255
        ether 00:0c:29:6d:81:cc  txqueuelen 1000  (Ethernet)

ens37: flags=4163<UP,BROADCAST,RUNNING,MULTICAST>  mtu 1500
        inet6 fe80::2ee7:f618:cdee:fad6  prefixlen 64  scopeid 0x20<link>
        ether 00:0c:29:6d:81:d6  txqueuelen 1000  (Ethernet)
        RX packets 7  bytes 2394 (2.3 KiB)
        RX errors 0  dropped 0  overruns 0  frame 0
        TX packets 29  bytes 4478 (4.3 KiB)
        TX errors 0  dropped 0 overruns 0  carrier 0  collisions 0

lo: flags=73<UP,LOOPBACK,RUNNING>  mtu 65536
        inet 127.0.0.1  netmask 255.0.0.0
        inet6 ::1  prefixlen 128  scopeid 0x10<host>
        loop  txqueuelen 1000  (Local Loopback)
        RX packets 0  bytes 0 (0.0 B)
        RX errors 0  dropped 0  overruns 0  frame 0
        TX packets 0  bytes 0 (0.0 B)
        TX errors 0  dropped 0 overruns 0  carrier 0  collisions 0

[root@linux-001 ~]# cd /etc/sysconfig/network-scripts/
[root@linux-001 network-scripts]# ls
ifcfg-ens33    ifdown-ippp    ifdown-sit       ifup-bnep  ifup-plusb   ifup-TeamPort
ifcfg-ens33:0  ifdown-ipv6    ifdown-Team      ifup-eth   ifup-post    ifup-tunnel
ifcfg-lo       ifdown-isdn    ifdown-TeamPort  ifup-ippp  ifup-ppp     ifup-wireless
ifdown         ifdown-post    ifdown-tunnel    ifup-ipv6  ifup-routes  init.ipv6-global
ifdown-bnep    ifdown-ppp     ifup             ifup-isdn  ifup-sit     network-functions
ifdown-eth     ifdown-routes  ifup-aliases     ifup-plip  ifup-Team    network-functions-ipv6
[root@linux-001 network-scripts]# cp ifcfg-ens33  ifcfg-ens37
[root@linux-001 network-scripts]#  uuidgen   ens37  //获取ens37的uuid
f2651078-2dd6-47ca-9d22-194c71129072
[root@linux-001 network-scripts]# vim ifcfg-ens37
TYPE=Ethernet
PROXY_METHOD=none
BROWSER_ONLY=no
BOOTPROTO=static
DEFROUTE=yes
IPV4_FAILURE_FATAL=no
IPV6INIT=yes
IPV6_AUTOCONF=yes
IPV6_DEFROUTE=yes
IPV6_FAILURE_FATAL=no
IPV6_ADDR_GEN_MODE=stable-privacy
NAME=ens37
UUID=f2651078-2dd6-47ca-9d22-194c71129072
DEVICE=ens37
ONBOOT=yes
IPADDR=192.168.100.1
NETMASK=255.255.255.0

[root@linux-001 ~]# ifdown ens37 && ifup ens37
成功断开设备 'ens37'。
连接已成功激活(D-Bus 活动路径:/org/freedesktop/NetworkManager/ActiveConnection/4)
[root@linux-001 ~]# ifconfig
ens33: flags=4163<UP,BROADCAST,RUNNING,MULTICAST>  mtu 1500
        inet 192.168.141.128  netmask 255.255.255.0  broadcast 192.168.141.255
        inet6 fe80::20c:29ff:fe6d:81cc  prefixlen 64  scopeid 0x20<link>
        ether 00:0c:29:6d:81:cc  txqueuelen 1000  (Ethernet)
        RX packets 521  bytes 49218 (48.0 KiB)
        RX errors 0  dropped 0  overruns 0  frame 0
        TX packets 373  bytes 53642 (52.3 KiB)
        TX errors 0  dropped 0 overruns 0  carrier 0  collisions 0

ens37: flags=4163<UP,BROADCAST,RUNNING,MULTICAST>  mtu 1500
        inet 192.168.100.1  netmask 255.255.255.0  broadcast 192.168.100.255
        inet6 fe80::1bd9:6a99:3db1:3ce6  prefixlen 64  scopeid 0x20<link>
        ether 00:0c:29:6d:81:d6  txqueuelen 1000  (Ethernet)
        RX packets 0  bytes 0 (0.0 B)
        RX errors 0  dropped 0  overruns 0  frame 0
        TX packets 29  bytes 2290 (2.2 KiB)
        TX errors 0  dropped 0 overruns 0  carrier 0  collisions 0

lo: flags=73<UP,LOOPBACK,RUNNING>  mtu 65536
        inet 127.0.0.1  netmask 255.0.0.0
        inet6 ::1  prefixlen 128  scopeid 0x10<host>
        loop  txqueuelen 1000  (Local Loopback)
        RX packets 0  bytes 0 (0.0 B)
        RX errors 0  dropped 0  overruns 0  frame 0
        TX packets 0  bytes 0 (0.0 B)
        TX errors 0  dropped 0 overruns 0  carrier 0  collisions 0
## 机器B不可以远程登录,我们可以设置好B机器的ens37的ip地址,再把ens33给断开 ##
[root@linux-02 ~]# cd /etc/sysconfig/network-scripts/
[root@linux-02 network-scripts]# ls
ifcfg-ens33 ifdown-ippp ifdown-sit ifup-bnep ifup-plusb ifup-TeamPort
ifcfg-ens33:0 ifdown-ipv6 ifdown-Team ifup-eth ifup-post ifup-tunnel
ifcfg-lo ifdown-isdn ifdown-TeamPort ifup-ippp ifup-ppp ifup-wireless
ifdown ifdown-post ifdown-tunnel ifup-ipv6 ifup-routes init.ipv6-global
ifdown-bnep ifdown-ppp ifup ifup-isdn ifup-sit network-functions
ifdown-eth ifdown-routes ifup-aliases ifup-plip ifup-Team network-functions-ipv6
[root@linux-02 network-scripts]# cp ifcfg-ens33 ifcfg-ens37
[root@linux-02 ~]# uuidgen ens37
40150849-ce69-46a7-ba52-e90c17019453
[root@linux-02 ~]# vim ifcfg-ens37
TYPE=Ethernet
PROXY_METHOD=none
BROWSER_ONLY=no
BOOTPROTO=static
DEFROUTE=yes
IPV4_FAILURE_FATAL=no
IPV6INIT=yes
IPV6_AUTOCONF=yes
IPV6_DEFROUTE=yes
IPV6_FAILURE_FATAL=no
IPV6_ADDR_GEN_MODE=stable-privacy
NAME=ens37
DEVICE=ens37
UUID=40150849-ce69-46a7-ba52-e90c17019453
ONBOOT=yes
IPADDR=192.168.100.100
NETMASK=255.255.255.0
GATEWAY=192.168.100.1
[root@linux-02 network-scripts]# ifdown ens37 && ifup ens37
成功断开设备 'ens37'。
连接已成功激活(D-Bus 活动路径:/org/freedesktop/NetworkManager/ActiveConnection/6)
[root@linux-02 network-scripts]# ifconfig // 之后可以物理断开网卡ens33
ens33: flags=4163<UP,BROADCAST,RUNNING,MULTICAST> mtu 1500
inet 192.168.141.129 netmask 255.255.255.0 broadcast 192.168.141.255
inet6 fe80::86ff:d912:c144:4503 prefixlen 64 scopeid 0x20<link>
ether 00:50:56:3a:cd:af txqueuelen 1000 (Ethernet)
RX packets 698 bytes 65240 (63.7 KiB)
RX errors 0 dropped 0 overruns 0 frame 0
TX packets 471 bytes 74272 (72.5 KiB)
TX errors 0 dropped 0 overruns 0 carrier 0 collisions 0
ens37: flags=4163<UP,BROADCAST,RUNNING,MULTICAST> mtu 1500
inet 192.168.100.100 netmask 255.255.255.0 broadcast 192.168.100.255
inet6 fe80::e3af:26e5:ac7b:b1f prefixlen 64 scopeid 0x20<link>
ether 00:0c:29:83:29:48 txqueuelen 1000 (Ethernet)
RX packets 13 bytes 932 (932.0 B)
RX errors 0 dropped 0 overruns 0 frame 0
TX packets 47 bytes 3678 (3.5 KiB)
TX errors 0 dropped 0 overruns 0 carrier 0 collisions 0
lo: flags=73<UP,LOOPBACK,RUNNING> mtu 65536
inet 127.0.0.1 netmask 255.0.0.0
inet6 ::1 prefixlen 128 scopeid 0x10<host>
loop txqueuelen 1000 (Local Loopback)
RX packets 12 bytes 1152 (1.1 KiB)
RX errors 0 dropped 0 overruns 0 frame 0
TX packets 12 bytes 1152 (1.1 KiB)
TX errors 0 dropped 0 overruns 0 carrier 0 collisions 0
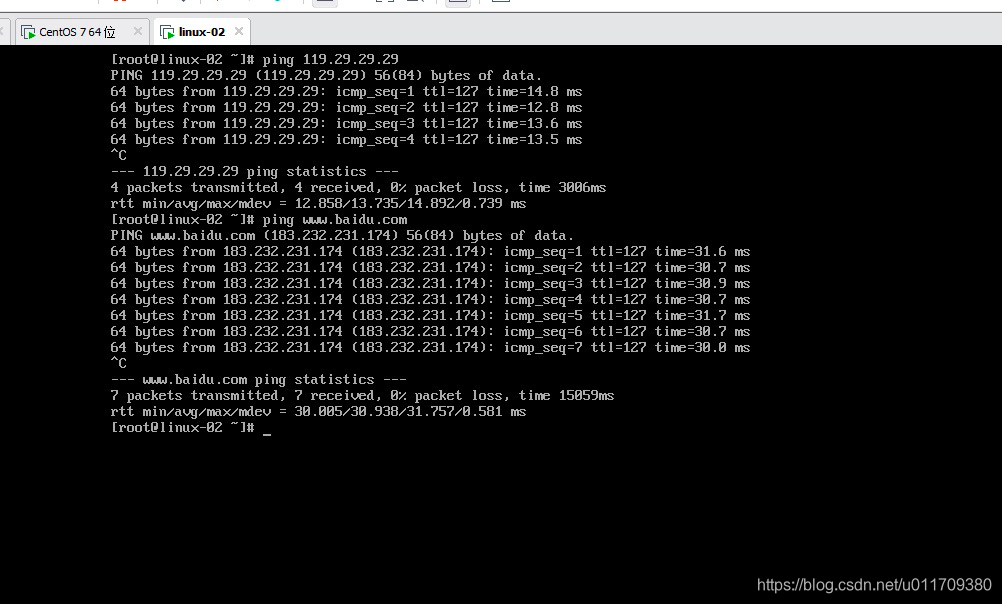
[root@linux-02 ~]# ping 192.168.100.1
PING 192.168.100.1 (192.168.100.1) 56(84) bytes of data.
64 bytes from 192.168.100.1: icmp_seq=1 ttl=64 time=2.48 ms
64 bytes from 192.168.100.1: icmp_seq=2 ttl=64 time=0.645 ms
64 bytes from 192.168.100.1: icmp_seq=3 ttl=64 time=0.639 ms
64 bytes from 192.168.100.1: icmp_seq=4 ttl=64 time=0.642 ms
64 bytes from 192.168.100.1: icmp_seq=5 ttl=64 time=0.589 ms
64 bytes from 192.168.100.1: icmp_seq=6 ttl=64 time=0.707 ms
^C
--- 192.168.100.1 ping statistics ---
6 packets transmitted, 6 received, 0% packet loss, time 5007ms
rtt min/avg/max/mdev = 0.589/0.951/2.488/0.688 ms
[root@linux-02 ~]#
步骤3:
A机器上打开路由转发 echo “1”>/proc/sys/net/ipv4/ip_forward
Linux系统缺省并没有打开IP转发功能,要确认IP转发功能的状态,可以查看/proc文件系统,使用下面命令: cat /proc/sys/net/ipv4/ip_forward
如果上述文件中的值为0,说明禁止进行IP转发;如果是1,则说明IP转发功能已经打开。
要想打开IP转发功能,可以直接修改上述文件: echo 1 > /proc/sys/net/ipv4/ip_forward
把文件的内容由0修改为1。禁用IP转发则把1改为0。
上面的命令并没有保存对IP转发配置的更改,下次系统启动时仍会使用原来的值,要想永久修改IP转发,需要修改/etc/sysctl.conf文件,修 改下面一行的值: net.ipv4.ip_forward = 1 修改后可以重启系统来使修改生效,也可以执行下面的命令来使修改生效: sysctl -p /etc/sysctl.conf 进行了上面的配置后,IP转发功能就永久使能了。

步骤4:
A上执行 iptables -t nat -A POSTROUTING -s 192.168.100.0/24 -o ens33 -j MASQUERADE
## 在机器A上执行上面的命令 ##
[root@linux-001 ~]# iptables -F
[root@linux-001 ~]# iptables -t nat -A POSTROUTING -s 192.168.100.0/24 -o ens33 -j MASQUERADE
[root@linux-001 ~]# iptables -t nat -nvL
Chain PREROUTING (policy ACCEPT 1 packets, 328 bytes)
 pkts bytes target     prot opt in     out     source               destination

Chain INPUT (policy ACCEPT 0 packets, 0 bytes)
 pkts bytes target     prot opt in     out     source               destination

Chain OUTPUT (policy ACCEPT 0 packets, 0 bytes)
 pkts bytes target     prot opt in     out     source               destination

Chain POSTROUTING (policy ACCEPT 0 packets, 0 bytes)
 pkts bytes target     prot opt in     out     source               destination
    0     0 MASQUERADE  all  --  *      ens33   192.168.100.0/24     0.0.0.0/0
[root@linux-001 ~]#
## 在机器B上添加dns ##
[root@linux-02 ~]#  vim /etc/resolv.conf
nameserver  114.29.29.29
4.2 端口映射
需求:A机器是windows,B和C机器是centos7;A机器和B机器可以通信,B机器和C机器可以通信,A和C暂时不可以通信。让C机器只能和A通信,让C机器可以直接连通B机器的22端口。
解决办法:
1.B 机器打开路由转发,echo “1”>/ proc/sys/net/ipv4/ip_forward , 同时需要把iptables规则清除。
2.B 机器上执行 iptables -t nat -A PREROUTING -d 192.168.141.128 -p tcp --dport 1122 -j DNAT --to 192.168.100.100:22
3. B上执行iptables -t nat -A POSTROUTING -s 192.168.100.100 -j SNAT --to 192.168.141.128
4. C 上设置网关为192.168.100.1
步骤1:
[root@linux-001 ~]# iptables -t nat -D  POSTROUTING -s 192.168.100.0/24 -o ens33 -j MASQUERADE
[root@linux-001 ~]# iptables -nvL
Chain INPUT (policy ACCEPT 896 packets, 107K bytes)
 pkts bytes target     prot opt in     out     source               destination

Chain FORWARD (policy ACCEPT 32 packets, 2746 bytes)
 pkts bytes target     prot opt in     out     source               destination

Chain OUTPUT (policy ACCEPT 592 packets, 55276 bytes)
 pkts bytes target     prot opt in     out     source               destination
[root@linux-001 ~]# iptables -t nat -nvL
Chain PREROUTING (policy ACCEPT 0 packets, 0 bytes)
 pkts bytes target     prot opt in     out     source               destination

Chain INPUT (policy ACCEPT 0 packets, 0 bytes)
 pkts bytes target     prot opt in     out     source               destination

Chain OUTPUT (policy ACCEPT 0 packets, 0 bytes)
 pkts bytes target     prot opt in     out     source               destination

Chain POSTROUTING (policy ACCEPT 0 packets, 0 bytes)
 pkts bytes target     prot opt in     out     source               destination
[root@linux-001 ~]#  echo "1">/ proc/sys/net/ipv4/ip_forward
步骤2:
[root@linux-001 ~]# iptables -t nat -A PREROUTING -d 192.168.141.128 -p tcp --dport 1122 -j DNAT --to 192.168.100.100:22
[root@linux-001 ~]# iptables -t nat  -nvL
Chain PREROUTING (policy ACCEPT 0 packets, 0 bytes)
 pkts bytes target     prot opt in     out     source               destination
    0     0 DNAT       tcp  --  *      *       0.0.0.0/0            192.168.141.128      tcp dpt:1122 to:192.168.100.100:22

Chain INPUT (policy ACCEPT 0 packets, 0 bytes)
 pkts bytes target     prot opt in     out     source               destination

Chain OUTPUT (policy ACCEPT 0 packets, 0 bytes)
 pkts bytes target     prot opt in     out     source               destination

Chain POSTROUTING (policy ACCEPT 0 packets, 0 bytes)
 pkts bytes target     prot opt in     out     source               destination
[root@linux-001 ~]#
步骤3:
[root@linux-001 ~]# iptables -t nat -A POSTROUTING -s 192.168.100.100 -j SNAT --to 192.168.133.130
[root@linux-001 ~]# iptables -t nat  -nvL
Chain PREROUTING (policy ACCEPT 0 packets, 0 bytes)
 pkts bytes target     prot opt in     out     source               destination
    0     0 DNAT       tcp  --  *      *       0.0.0.0/0            192.168.133.130      tcp dpt:1122 to:192.168.100.100:22

Chain INPUT (policy ACCEPT 0 packets, 0 bytes)
 pkts bytes target     prot opt in     out     source               destination

Chain OUTPUT (policy ACCEPT 0 packets, 0 bytes)
 pkts bytes target     prot opt in     out     source               destination

Chain POSTROUTING (policy ACCEPT 0 packets, 0 bytes)
 pkts bytes target     prot opt in     out     source               destination
    0     0 SNAT       all  --  *      *       192.168.100.100      0.0.0.0/0            to:192.168.133.130
[root@linux-001 ~]#
步骤4:
[root@linux-02 ~]# route add default gw 192.168.100.1
我们使用A机器的windows xshell去链接B机器的ip地址,端口1122。
[C:\~]$ ssh 192.168.141.128 1122

Connecting to 192.168.141.128:1122...
Connection established.
To escape to local shell, press 'Ctrl+Alt+]'.

WARNING! The remote SSH server rejected X11 forwarding request.
Last login: Tue Apr 16 18:50:47 2019
[root@linux-02 ~]# ifconfig
ens33: flags=4099<UP,BROADCAST,MULTICAST>  mtu 1500
        ether 00:50:56:3a:cd:af  txqueuelen 1000  (Ethernet)
        RX packets 0  bytes 0 (0.0 B)
        RX errors 0  dropped 0  overruns 0  frame 0
        TX packets 0  bytes 0 (0.0 B)
        TX errors 0  dropped 0 overruns 0  carrier 0  collisions 0

ens37: flags=4163<UP,BROADCAST,RUNNING,MULTICAST>  mtu 1500
        inet 192.168.100.100  netmask 255.255.255.0  broadcast 192.168.100.255
        inet6 fe80::e3af:26e5:ac7b:b1f  prefixlen 64  scopeid 0x20<link>
        ether 00:0c:29:83:29:48  txqueuelen 1000  (Ethernet)
        RX packets 135  bytes 14397 (14.0 KiB)
        RX errors 0  dropped 0  overruns 0  frame 0
        TX packets 174  bytes 17477 (17.0 KiB)
        TX errors 0  dropped 0 overruns 0  carrier 0  collisions 0

lo: flags=73<UP,LOOPBACK,RUNNING>  mtu 65536
        inet 127.0.0.1  netmask 255.0.0.0
        inet6 ::1  prefixlen 128  scopeid 0x10<host>
        loop  txqueuelen 1000  (Local Loopback)
        RX packets 13  bytes 1264 (1.2 KiB)
        RX errors 0  dropped 0  overruns 0  frame 0
        TX packets 13  bytes 1264 (1.2 KiB)
        TX errors 0  dropped 0 overruns 0  carrier 0  collisions 0

[root@linux-02 ~]#
课后总结
1.纠正前面课中关于防火墙的一些错误认识
纠正前面问题,netfilter表是基于内核的,它是用来抓包的,包里面包含来源IP、端口以及目的ip和端口,内核它是自带iptables的命令。在centos7以下版本的时候,我们所说的防火墙是指iptables,它是一个服务,iptables服务是用来管理加载、调用iptables命令设置好的规则。在centos7版本,这个防火墙不叫iptable了,它叫firewalld,它比iptables更加丰富,同样也可以管理iptables命令设置好的规则。如下图:

2. iptables中的5链

如上图,我们知道数据包中是包含来源ip、端口,目的ip、端口等信息,在经过内核处理后,首先进入prerouting链,进入这个链出来之后会进行一个判断,如果是过桥(相当于中转),那会进入forward链,通过postrouting链出去,如果是要进入ipput链,会经过本机数据处理后,通过output链,在通过postrouting出去。
3.针对网段进行设置
iptables -I INPUT -m iprange --src-range 61.4.176.0-61.4.191.255 -j DROP
192.168.1.0/24
iptables -I INPUT -p tcp --dport 80 -s 192.168.1.0/24 -j ACCEPT
-m 后面跟模块名字,iprange是一个模块名字,用来支持一个网段
–src-range 指定来源的ip范围
–dst-range 指定目标ip范围
4. iptables中DNAT、SNAT和MASQUERADE的理解
DNAT(Destination Network Address Translation,目的地址转换) 通常被叫做目的映谢。而SNAT(Source Network Address Translation,源地址转换)通常被叫做源映谢。
这是我们在设置Linux网关或者防火墙时经常要用来的两种方式。以前对这两个都解释得不太清楚,现在我在这里解释一下。首先,我们要了解一下IP包的结构,如下图所示:

在任何一个IP数据包中,都会有Source IP Address与Destination IP Address这两个字段,数据包所经过的路由器也是根据这两个字段是判定数据包是由什么地方发过来的,它要将数据包发到什么地方去。而iptables的DNAT与SNAT就是根据这个原理,对Source IP Address与Destination IP Address进行修改。然后,我们再看看数据包在iptables中要经过的链(chain):

图中正菱形的区域是对数据包进行判定转发的地方。在这里,系统会根据IP数据包中的destination ip address中的IP地址对数据包进行分发。如果destination ip adress是本机地址,数据将会被转交给INPUT链。如果不是本机地址,则交给FORWARD链检测。
这也就是说,我们要做的DNAT要在进入这个菱形转发区域之前,也就是在PREROUTING链中做,比如我们要把访问202.103.96.112的访问转发到192.168.0.112上:
iptables -t nat -A PREROUTING -d 202.103.96.112 -j DNAT --to-destination 192.168.0.112
这个转换过程当中,其实就是将已经达到这台Linux网关(防火墙)上的数据包上的destination ip address从202.103.96.112修改为192.168.0.112然后交给系统路由进行转发。
而SNAT自然是要在数据包流出这台机器之前的最后一个链也就是POSTROUTING链来进行操作
iptables -t nat -A POSTROUTING -s 192.168.0.0/24 -j SNAT --to-source 58.20.51.66
这个语句就是告诉系统把即将要流出本机的数据的source ip address修改成为58.20.51.66。这样,数据包在达到目的机器以后,目的机器会将包返回到58.20.51.66也就是本机。如果不做这个操作,那么你的数据包在传递的过程中,reply的包肯定会丢失。
假如当前系统用的是ADSL/3G/4G动态拨号方式,那么每次拨号,出口IP都会改变,SNAT就会有局限性。
iptables -t nat -A POSTROUTING -s 192.168.0.0/24 -o eth0 -j MASQUERADE
重点在那个『 MASQUERADE 』!这个设定值就是『IP伪装成为封包出去(-o)的那块装置上的IP』!不管现在eth0的出口获得了怎样的动态ip,MASQUERADE会自动读取eth0现在的ip地址然后做SNAT出去,这样就实现了很好的动态SNAT地址转换。
5. iptables的四种状态
在iptables上一共有四种状态,分别被称为NEW、ESTABLISHED、INVALID、RELATED
- NEW:NEW说明这个包是我们看到的第一个包。意思就是,这是conntrack模块看到的某个连接的第一个包,它即将被匹配了。比如,我们看到一个SYN 包,是我们所留意的连接的第一个包,就要匹配它。
- ESTABLISHED: ESTABLISHED已经注意到两个方向上的数据传输,而且会继续匹配这个连接的包。处于ESTABLISHED状态的连接是非常容易理解的。只要发送并接到应答,连接就是ESTABLISHED的了。一个连接要从NEW变为ESTABLISHED,只需要接到应答包即可,不管这个包是发往防火墙的,还是要由防火墙转发的。ICMP的错误和重定向等信息包也被看作是ESTABLISHED,只要它们是我们所发出的信息的应答。
- RELATED: RELATED是个比较麻烦的状态。当一个连接和某个已处于ESTABLISHED状态的连接有关系时,就被认为是RELATED的了。换句话说,一个连接要想是RELATED的,首先要有一个ESTABLISHED的连接。这个ESTABLISHED连接再产生一个主连接之外的连接,这个新的连接就是 RELATED的了,当然前提是conntrack模块要能理解RELATED。ftp是个很好的例子,FTP-data 连接就是和FTP-control有关联的,如果没有在iptables的策略中配置RELATED状态,FTP-data的连接是无法正确建立的,还有其他的例子,比如,通过IRC的DCC连接。有了这个状态,ICMP应答、FTP传输、DCC等才能穿过防火墙正常工作。注意,大部分还有一些UDP协议都依赖这个机制。这些协议是很复杂的,它们把连接信息放在数据包里,并且要求这些信息能被正确理解。
- INVALID:INVALID说明数据包不能被识别属于哪个连接或没有任何状态。有几个原因可以产生这种情况,比如,内存溢出,收到不知属于哪个连接的ICMP错误信息。一般地,我们DROP这个状态的任何东西,因为防火墙认为这是不安全的东西。
6.限速
http://ask.apelearn.com/question/985
http://jamyy.us.to/blog/2006/03/206.html
iptables -N syn-flood
iptables -A syn-flood -m limit --limit 5/s --limit-burst 500 -j RETURN
iptables -A syn-flood -j DROP
iptables -I INPUT -j syn-flood