第9章 线程常用操作方法
本章目标:
- 了解设置和取得线程名称
- 了解线程的强制运行
- 了解线程的休眠
- 了解线程的礼让
- 了解线程的中断操作
在多线程中所有的操作方法实际上都是从Thread类开始的,所有的操作基本上都在Thread类之中。
一、线程名称
在Thread类之中,可以通过getName()方法取得线程的名称,通过 setName()方法设置线程的名称。
线程的名称一般在启动线程前设置,但也允许为已经运行的线程设置名称。允许两个Thread对象有相同的名字,但为了清晰,应尽量避免这种情况的发生。
另外,如果程序并没有为线程指定名称,则系统会自动地为线程分配一个名称。
package com.java.线程常用操作方法;

public class ThreadNameDemo {
    public static void main(String[] args){
        MyThread mt = new MyThread();    //实例化Runnable子类对象
        new Thread(mt).start();    //系统自动设置线程名称
        new Thread(mt,"线程-A").start();    //手工设置线程名称
        new Thread(mt,"线程-B").start();    //手工设置线程名称
        new Thread(mt).start();    //系统自动设置线程名称
        new Thread(mt).start();    //系统自动设置线程名称
    }
}

/**
 * 实现Runnable接口
 * @author Creator
 *
 */
class MyThread implements Runnable{

    /**
     * 覆写run方法
     */
    public void run(){
        for(int i = 0; i < 3; i++)
            /*
             * 取得当前线程的名字
             */
            System.out.println(Thread.currentThread().getName()
                    +"运行, i = " + i);
    }
}
程序运行效果:
Thread-0运行, i = 0
Thread-0运行, i = 1
Thread-0运行, i = 2
线程-A运行, i = 0
线程-A运行, i = 1
线程-A运行, i = 2
线程-B运行, i = 0
Thread-1运行, i = 0
Thread-1运行, i = 1
Thread-1运行, i = 2
线程-B运行, i = 1
线程-B运行, i = 2
Thread-2运行, i = 0
Thread-2运行, i = 1
Thread-2运行, i = 2
从执行效果来看,指定的名称会自动出现,如果没有指定会发现线程使用自动编号的方式完成,按照Thread-0,Thread-1….依次编号。实际上在类中存在一个static属性,用于记录编号。
二、取得当前线程
程序可以通过currentThread()方法取得当前正在运行的线程对象。
package com.java.线程常用操作方法;

public class CurrentThreadDemo {
    public static void main(String[] args){
        MyThread02 mt = new MyThread02();    //实例化Runnable子类对象
        new Thread(mt,"线程").start();    //启动线程
        mt.run();      //直接调用run()方法
    }
}

/**
 * 实现Runnable接口
 * @author Creator
 *
 */
class MyThread02 implements Runnable{

    /**
     * 覆写run方法
     */
    public void run(){
        for(int i = 0; i < 3; i++)
            /*
             * 取得当前线程的名字
             */
            System.out.println(Thread.currentThread().getName()
                    +"运行, i = " + i);
    }
}
运行效果:
main运行, i = 0
main运行, i = 1
main运行, i = 2
线程运行, i = 0
线程运行, i = 1
线程运行, i = 2
此时发现,程序中由主方法直接通过线程对象调用里面的run()方法,所以输出的结果中包含了一个“main”,此线程就是由“mt.run()”产生的。因为调用此语句是由主方法完成的,也就是说实际上主方法本身也是一个线程——主线程。
问题,既然主方法都是以线程的形式出现的,那么JAVA运行时到底启动了多少个线程?
回答:至少启动了2个线程。
- 从之前学习的知识来看,每当Java程序执行的时候,实际上都会启动一个JVM,每一个JVM实际上就是在操作系统中启动了一个进程。Java中本身具备了垃圾收集机制,所以Java运行时至少启动2个线程:主线程,GC(垃圾回收)。
三、判断线程是否启动
package com.java.线程常用操作方法;

public class ThreadAliveDemo {
    public static void main(String[] args){
        MyThreadAlive mt = new MyThreadAlive();    //实例化Runnable子类对象
        Thread t = new Thread(mt,"线程");    //实例化Thread对象
        System.out.println("线程开始执行之前 --> " + t.isAlive());//判断是否启动
        t.start();  //启动线程
        System.out.println("线程开始执行之后 --> " + t.isAlive());//判断是否启动
        for(int i =0 ; i < 3; i++){
            System.out.println("main运行 --> " + i);
        }
        System.out.println("代码执行之后--> " + t.isAlive());//判断是否启动
    }
}

/**
 * 实现Runnable接口
 * @author Creator
 *
 */
class MyThreadAlive implements Runnable{

    /**
     * 覆写run方法
     */
    public void run(){
        for(int i = 0; i < 3; i++)
            /*
             * 取得当前线程的名字
             */
            System.out.println(Thread.currentThread().getName()
                    +"运行, i = " + i);
    }
}
运行效果:
线程开始执行之前 --> false
线程开始执行之后 --> true
main运行 --> 0
main运行 --> 1
main运行 --> 2
代码执行之后--> true
线程运行, i = 0
线程运行, i = 1
线程运行, i = 2
四、线程的强制运行
在线程操作中,可以使用join()方法让一个线程强制运行,线程强制运行期间,其他线程无法运行,必须等待此线程完成之后才可以继续运行。
package com.java.线程常用操作方法;

public class ThreadJoinDemo {
    public static void main(String[] args){
        MyThreadJoin mt = new MyThreadJoin();    //实例化Runnable子类对象
        Thread t = new Thread(mt,"线程");    //实例化Thread对象
        t.start();  //启动线程
        for(int i =0 ; i < 50; i++){
            if(i > 10)
                try {
                    t.join();//线程强制运行
                } catch (InterruptedException e) {
                    // TODO Auto-generated catch block
                    e.printStackTrace();
                }
            System.out.println("Main线程运行 --> " + i);
        }
    }
}

/**
 * 实现Runnable接口
 * @author Creator
 *
 */
class MyThreadJoin implements Runnable{

    /**
     * 覆写run方法
     */
    public void run(){
        for(int i = 0; i < 50; i++)
            /*
             * 取得当前线程的名字
             */
            System.out.println(Thread.currentThread().getName()
                    +"运行, i = " + i);
    }
}
运行效果:
Main线程运行 --> 0
Main线程运行 --> 1
Main线程运行 --> 2
Main线程运行 --> 3
Main线程运行 --> 4
Main线程运行 --> 5
Main线程运行 --> 6
Main线程运行 --> 7
Main线程运行 --> 8
Main线程运行 --> 9
Main线程运行 --> 10
线程运行, i = 0
线程运行, i = 1
线程运行, i = 2
线程运行, i = 3
线程运行, i = 4
线程运行, i = 5
线程运行, i = 6
线程运行, i = 7
线程运行, i = 8
线程运行, i = 9
线程运行, i = 10
线程运行, i = 11
线程运行, i = 12
线程运行, i = 13
线程运行, i = 14
线程运行, i = 15
线程运行, i = 16
线程运行, i = 17
线程运行, i = 18
线程运行, i = 19
线程运行, i = 20
线程运行, i = 21
线程运行, i = 22
线程运行, i = 23
线程运行, i = 24
线程运行, i = 25
线程运行, i = 26
线程运行, i = 27
线程运行, i = 28
线程运行, i = 29
线程运行, i = 30
线程运行, i = 31
线程运行, i = 32
线程运行, i = 33
线程运行, i = 34
线程运行, i = 35
线程运行, i = 36
线程运行, i = 37
线程运行, i = 38
线程运行, i = 39
线程运行, i = 40
线程运行, i = 41
线程运行, i = 42
线程运行, i = 43
线程运行, i = 44
线程运行, i = 45
线程运行, i = 46
线程运行, i = 47
线程运行, i = 48
线程运行, i = 49
Main线程运行 --> 11
Main线程运行 --> 12
Main线程运行 --> 13
Main线程运行 --> 14
Main线程运行 --> 15
Main线程运行 --> 16
Main线程运行 --> 17
Main线程运行 --> 18
Main线程运行 --> 19
Main线程运行 --> 20
Main线程运行 --> 21
Main线程运行 --> 22
Main线程运行 --> 23
Main线程运行 --> 24
Main线程运行 --> 25
Main线程运行 --> 26
Main线程运行 --> 27
Main线程运行 --> 28
Main线程运行 --> 29
Main线程运行 --> 30
Main线程运行 --> 31
Main线程运行 --> 32
Main线程运行 --> 33
Main线程运行 --> 34
Main线程运行 --> 35
Main线程运行 --> 36
Main线程运行 --> 37
Main线程运行 --> 38
Main线程运行 --> 39
Main线程运行 --> 40
Main线程运行 --> 41
Main线程运行 --> 42
Main线程运行 --> 43
Main线程运行 --> 44
Main线程运行 --> 45
Main线程运行 --> 46
Main线程运行 --> 47
Main线程运行 --> 48
Main线程运行 --> 49
五、线程的休眠
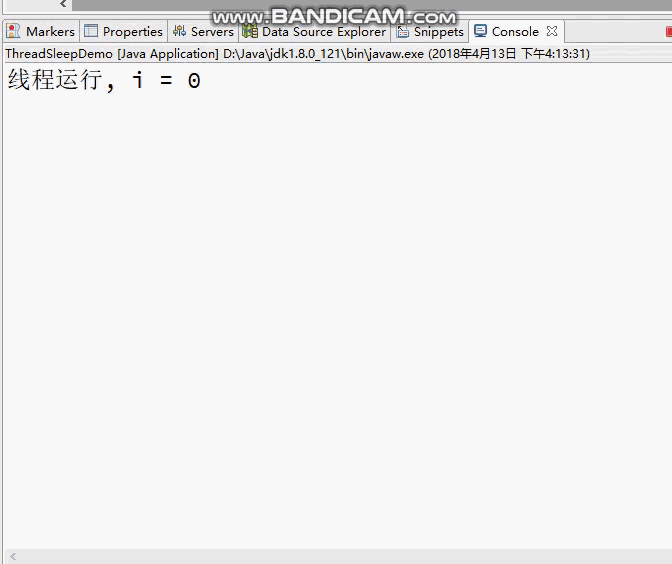
使用休眠可以让线程暂停执行。直接使用Thread.sleep()方法。
package com.java.线程常用操作方法;

public class ThreadSleepDemo {
    public static void main(String[] args){
        MyThreadSleep mt = new MyThreadSleep();    //实例化Runnable子类对象
        Thread t = new Thread(mt,"线程");    //实例化Thread对象
        t.start();  //启动线程
    }
}

/**
 * 实现Runnable接口
 * @author Creator
 *
 */
class MyThreadSleep implements Runnable{

    /**
     * 覆写run方法
     */
    public void run(){
        for(int i = 0; i < 50; i++){
            try {
                Thread.sleep(500);
            } catch (InterruptedException e) {
                // TODO Auto-generated catch block
                e.printStackTrace();
            }
            /*
             * 取得当前线程的名字
             */
            System.out.println(Thread.currentThread().getName()
                    +"运行, i = " + i);
        }
    }
}
运行效果:
六、线程的中断
一个线程可以被另外一个线程中断其操作的状态,使用interrupt()方法完成。
package com.java.线程常用操作方法;

public class ThreadInterruptDemo {
    public static void main(String[] args){
        MyThreadSInterrupt mt = new MyThreadSInterrupt();    //实例化Runnable子类对象
        Thread t = new Thread(mt,"线程");    //实例化Thread对象
        t.start();  //启动线程
        try {
            Thread.sleep(2000); //线程休眠2s
        } catch (InterruptedException e) {
        }

        t.interrupt(); //中断线程执行
    }
}

/**
 * 实现Runnable接口
 * @author Creator
 *
 */
class MyThreadSInterrupt implements Runnable{

    /**
     * 覆写run方法
     */
    public void run(){
        System.out.println("1、进入run()方法");
        try {
            Thread.sleep(10000); //线程休眠10s
            System.out.println("2、已经完成了休眠");
        } catch (InterruptedException e) {
            System.out.println("3、休眠被终止");
            return;  //返回调用处
        }
        System.out.println("4、 run()方法正常结束");
    }
}
运行效果:
1、进入run()方法
3、休眠被终止
七、后台线程
在Java中,只要一个程序没有执行完(一个线程在运行),则整个Java的进程不会消失。所以,此时可以设置一个后台线程,这样即使Java进程结束了,此后台线程依然会继续执行。直接使用setDaemon()方法。
package com.java.线程常用操作方法;

public class ThreadDaemonDemo {
    public static void main(String[] args){
        MyThreadSDaemon mt = new MyThreadSDaemon();    //实例化Runnable子类对象
        Thread t = new Thread(mt,"线程");    //实例化Thread对象
        t.setDaemon(true); //此线程在后台运行
        t.start();  //启动线程
    }
}

/**
 * 实现Runnable接口
 * @author Creator
 *
 */
class MyThreadSDaemon implements Runnable{

    /**
     * 覆写run方法
     */
    public void run(){
        while(true){
            System.out.println(Thread.currentThread().getName());
        }
    }
}
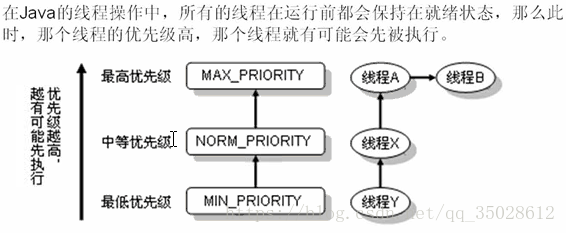
八、线程的优先级
package com.java.线程常用操作方法;

public class ThreadPriorityDemo {
    public static void main(String[] args){
        Thread t1 = new Thread(new MyThreadPriority(),"线程A"); //实例化线程对象
        Thread t2 = new Thread(new MyThreadPriority(),"线程B"); //实例化线程对象
        Thread t3 = new Thread(new MyThreadPriority(),"线程C"); //实例化线程对象
        t1.setPriority(Thread.MIN_PRIORITY);  //优先级最低
        t2.setPriority(Thread.MAX_PRIORITY);  //优先级最高
        t3.setPriority(Thread.NORM_PRIORITY); //普通优先级
        t1.start();  //启动线程
        t2.start();  //启动线程
        t3.start();  //启动线程
    }
}

/**
 * 实现Runnable接口
 * @author Creator
 *
 */
class MyThreadPriority implements Runnable{

    /**
     * 覆写run方法
     */
    public void run(){
        for(int i = 0; i < 5; i++){
            try {
                Thread.sleep(500);
            } catch (InterruptedException e) {
                // TODO Auto-generated catch block
                e.printStackTrace();
            }
            /*
             * 取得当前线程的名字
             */
            System.out.println(Thread.currentThread().getName()
                    +"运行, i = " + i);
        }
    }
}
运行效果:
线程B运行, i = 0
线程A运行, i = 0
线程C运行, i = 0
线程B运行, i = 1
线程C运行, i = 1
线程A运行, i = 1
线程B运行, i = 2
线程C运行, i = 2
线程A运行, i = 2
线程B运行, i = 3
线程C运行, i = 3
线程A运行, i = 3
线程B运行, i = 4
线程C运行, i = 4
线程A运行, i = 4