什么是脚本?
脚本简单地说就是一条条的文字命令(一些指令的堆积),这些文字命令是可以看到的(如可以用记事本打开查看、编辑)。
常见的脚本: JavaScript(JS,前端),VBScript, ASP,JSP,PHP(后端),SQL(数据库操作语言),Perl,Shell,python,Ruby,JavaFX, Lua等。
为什么要学习和使用shell?
Shell属于内置的脚本
程序开发的效率非常高,依赖于功能强大的命令可以迅速地完成开发任务(批处理)
语法简单,代码写起来比较轻松,简单易学
1.1 Shell 简介
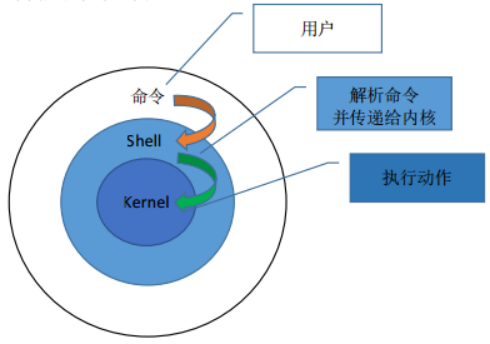
Shell 是一个 C 语言编写的脚本语言,它是用户与 Linux 的桥梁,用户输入命令交给 Shell 处理, Shell 将相应的操作传递给内核(Kernel),内核把处理的结果输出给用户。
下面是流程示意图:
Shell 既然是工作在 Linux 内核之上,那我们也有必要了解下 Linux 相关知识。 Linux 是一套免费试用和自由传播的类 Unix 操作系统,是一个基于 POSIX 和 UNIX 的多用户、多任 务、支持多线程和多 CPU 的操作系统。
1.2 Shell 分类
1.2.1 图形界面 Shell(GUI Shell)
GUI 为 Unix 或者类 Unix 操作系统构造一个功能完善、操作简单以及界面友好的桌面环境。主流桌 面环境有 KDE,Gnome 等。
1.2.2 命令行界面 Shell(CLI Shell)
CLI 是在用户提示符下键入可执行指令的界面,用户通过键盘输入指令,完成一系列操作。 在 Linux 系统上主流的 CLI 实现是 Bash,是许多 Linux 发行版默认的 Shell。还有许多 Unix 上 Shell,例如 tcsh、csh、ash、bsh、ksh 等。
1.3 查看shell
Shell 是一个程序,一般都是放在/bin或者/user/bin目录下,当前 Linux 系统可用的 Shell 都记录在/etc/shells文件中。/etc/shells是一个纯文本文件,你可以在图形界面下打开它,也可以使用 cat 命令查看它。
通过 cat 命令来查看当前 Linux 系统的可用 Shell:
$ cat /etc/shells
/bin/sh
/bin/bash
/sbin/nologin
/usr/bin/sh
/usr/bin/bash
/usr/sbin/nologin
/bin/tcsh
/bin/csh
在现代的 Linux 上,sh 已经被 bash 代替,/bin/sh往往是指向/bin/bash的符号链接。
如果你希望查看当前 Linux 的默认 Shell,那么可以输出 SHELL 环境变量:
echo $SHELL
/bin/bash
输出结果表明默认的 Shell 是 bash。
SHELL是 Linux 系统中的环境变量,它指明了当前使用的 Shell 程序的位置,也就是使用的哪个 Shell。
1.4 第一个 Shell 脚本
主要讲解在大多 Linux 发行版下默认 Bash Shell。Linux 系统是 RedHat 下的 CentOS 操作系 统,完全免费。与其商业版 RHEL(Red Hat Enterprise Linux)出自同样的源代码,不同的是 CentOS 并不包含封闭源代码软件和售后支持。
用 vim 打开 test.sh,编写:
 # vim test.sh
 #!/bin/bash
 echo "Hello world!"
第一行指定解释器,第二行打印 Hello world!
写好后,开始执行,执行 Shell 脚本有三种方法:
方法 1:直接用 bash 解释器执行
# bash test.sh
Hello world!
当前终端会新生成一个子 bash 去执行脚本。
方法 2:添加可执行权限
# ls -lh test.sh
test.sh -rw-r--r--. 1 root root 32 Aug 18 01:07 test.sh
# chmod +x test.sh
# ./test.sh
-bash: ./test.sh: Permission denied
# chmod +x test.sh
# ./test.sh
Hello world!
这种方式默认根据脚本第一行指定的解释器处理,如果没写以当前默认 Shell 解释器执行。
注意,这里在运行时一定要写成 ./test.sh(绝对路径亦可),而不是 test.sh,运行其它二进制的程序也一样,直接写 test.sh,Linux 系统会去 PATH(环境变量) 里寻找有没有叫 test.sh 的,而只有 /bin, /sbin, /usr/bin,/usr/sbin 等在 PATH 里,你的当前目录通常不在 PATH 里,所以写成 test.sh 是会找不到命令的,要用 ./test.sh 告诉系统说,就在当前目录找。
方法 3:source 命令执行,以当前默认 Shell 解释器执行
# source test.sh
Hello world!
source filename 与 bash filename 及./filename执行脚本的区别:
当shell脚本具有可执行权限时,用bash filename与./filename执行脚本是没有区别得。./filename是因为当前目录没有在PATH中,所以”.”是用来表示当前目录的。
source filename:这个命令其实只是简单地读取脚本里面的语句依次在当前shell里面执行,没有建立新的子shell。那么脚本里面所有新建、改变变量的语句都会保存在当前shell里面。
bash filename 重新建立一个子shell,在子shell中执行脚本里面的语句,该子shell继承父shell的环境变量,但子shell新建的、改变的变量不会被带回父shell
(即:子shell新建变量,在父shell中不会生效)
我们可以使用命令pstree查看我们当前所处的位置
需要下载
[root@lee~]# yum search pstree
Loaded plugins: fastestmirror
Loading mirror speeds from cached hostfile
==================================================== Matched: pstree ====================================================
psmisc.x86_64 : Utilities for managing processes on your system
texlive-pst-tree.noarch : Trees, using pstricks
[root@lee ~]# yum install psmisc -y
使用pstree

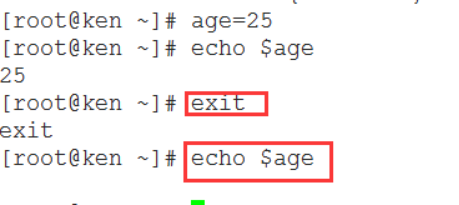
我们再次执行bash,就会进入到另外一个子shell中

这个时候我们在这个子shell中定义一个变量,发现可以正确打印出来
[root@ken ~]# age=25
[root@ken ~]# echo $age
25
现在我们退出当前的shell,即进入了当前子shell中的父shell中,再次打印我们刚才定义的变量
可以发现现在已经无法获取到我们刚才定义的变量值
子shell继承父shell的环境变量:
我们把环境变量定义到profile的一个子文件中,并使用source执行该文件并生效
打开一个子shell,定义在父shell中的环境变量依然有效
反之,这种操作在子shell中操作,父shell也不能继承
[root@ken ~]# cat /etc/profile.d/ken.sh
export name=ken
[root@ken ~]# source /etc/profile.d/ken.sh
[root@ken ~]# echo $name
ken
[root@ken ~]# bash
[root@ken ~]# echo $name
ken
1.5 shell编程几个常用命令
grep命令详解:过滤来自一个文件或标准输入匹配模式内容。
除了 grep 外,还有 egrep。egrep 是 grep 的扩展,相当于 grep -E。
Usage: grep [OPTION]... PATTERN [FILE]...
grep常用选项详解
| 选项 |
描述 |
| -E,--extended-regexp |
模式是扩展正则表达式(ERE) |
| -i,--ignore-case |
忽略大小写 |
| -n,--line-number |
打印行号 |
| -o,--only-matching |
只打印匹配的内容 |
| -c,--count |
只打印每个文件匹配的行数 |
| -B,--before-context=NUM |
打印匹配的前几行 |
| -A,--after-context=NUM |
打印匹配的后几行 |
| -C,--context=NUM |
打印匹配的前后几行 |
| --color[=WHEN], |
匹配的字体颜色 |
| -v,--invert-match |
打印不匹配的行 |
[root@ken ~]# echo "this is ken THIS IS KEN" | grep -i 'ken'
this is ken THIS IS KEN
[root@ken ~]# echo "this is ken THIS IS KEN" | grep  'ken'
this is ken THIS IS KEN


2. -n,打印行号

[root@ken ~]# grep -n 'root' /etc/passwd
1:root:x:0:0:root:/root:/bin/bash
10:operator:x:11:0:operator:/root:/sbin/nologin


 3. -o,只打印匹配的内容

[root@ken ~]# echo "this is ken THIS IS KEN" | grep -o 'ken'
ken
[root@ken ~]# echo "this is ken THIS IS KEN" | grep  'ken'
this is ken THIS IS KEN


4. -c,打印文件匹配的行数

[root@ken ~]# grep  -c 'root' /etc/passwd
2
[root@ken ~]# grep  'root' /etc/passwd
root:x:0:0:root:/root:/bin/bash
operator:x:11:0:operator:/root:/sbin/nologin


5. -B,打印匹配的前几行

[root@ken ~]# grep -B 3 'root' /etc/passwd
root:x:0:0:root:/root:/bin/bash
--
shutdown:x:6:0:shutdown:/sbin:/sbin/shutdown
halt:x:7:0:halt:/sbin:/sbin/halt
mail:x:8:12:mail:/var/spool/mail:/sbin/nologin
operator:x:11:0:operator:/root:/sbin/nologin

6.-A,打印匹配的后几行

[root@ken ~]# grep -A 3 'root' /etc/passwd
root:x:0:0:root:/root:/bin/bash
bin:x:1:1:bin:/bin:/sbin/nologin
daemon:x:2:2:daemon:/sbin:/sbin/nologin
adm:x:3:4:adm:/var/adm:/sbin/nologin
--
operator:x:11:0:operator:/root:/sbin/nologin
games:x:12:100:games:/usr/games:/sbin/nologin
ftp:x:14:50:FTP User:/var/ftp:/sbin/nologin
nobody:x:99:99:Nobody:/:/sbin/nologin

7.-C,打印匹配的前后几行

[root@ken ~]# grep -C 3 'root' /etc/passwd
root:x:0:0:root:/root:/bin/bash
bin:x:1:1:bin:/bin:/sbin/nologin
daemon:x:2:2:daemon:/sbin:/sbin/nologin
adm:x:3:4:adm:/var/adm:/sbin/nologin
--
shutdown:x:6:0:shutdown:/sbin:/sbin/shutdown
halt:x:7:0:halt:/sbin:/sbin/halt
mail:x:8:12:mail:/var/spool/mail:/sbin/nologin
operator:x:11:0:operator:/root:/sbin/nologin
games:x:12:100:games:/usr/games:/sbin/nologin
ftp:x:14:50:FTP User:/var/ftp:/sbin/nologin
nobody:x:99:99:Nobody:/:/sbin/nologin


8. --color,在centos7中已经默认为 grep --color,在centos6中需要加上--color才会显示颜色

[root@ken ~]# alias grep
alias grep='grep --color=auto'

9. -v, 打印不匹配的行

[root@ken ~]# echo -e "hi\nthis is ken\nncie to meet you\nbye " | grep -v 'ken'
hi
ncie to meet you
bye
一、cut命令
语法
cut [-bn] [file]
cut [-c] [file]
cut [-df] [file]
使用说明:
cut 命令从文件的每一行剪切字节、字符和字段并将这些字节、字符和字段写至标准输出。
如果不指定 File 参数,cut 命令将读取标准输入。必须指定 -b、-c 或 -f 标志之一。
常用参数:
-c :以字符为单位进行分割。
-d :自定义分隔符。
-f :与-d一起使用,指定显示哪个区域。
常用实例演示1: -c:以字符为单位进行分隔
[root@ken ~]# echo "this is ken" | cut -c  4
s
[root@ken ~]# echo "this is ken" | cut -c 5

[root@ken ~]# echo "this is ken" | cut -c 2
h
  [root@ken ~]# echo "this is ken" | cut -c 1-5
  this

常用实例演示2:-d,-f:自定义分隔符并进行指定显示

1.从标准输入读取
[root@ken ~]# echo 'this is ken' | cut -d' ' -f3
ken
  [root@ken ~]# echo "name:ken age:25 gender:male" | cut -d ' ' -f2
  age:25

2.从文件中读取
[root@ken ~]# echo "this is ken">test
[root@ken ~]#  cut -d' ' -f3 test
ken
二、sort命令
Linux sort命令用于将文本文件内容加以排序。
sort可针对文本文件的内容,以行为单位来排序。
语法:
sort [-bcdfimMnr][-o<输出文件>][-t<分隔字符>][+<起始栏位>-<结束栏位>][--help][--verison][文件]
常用参数说明:
-k:根据切割后的那一段进行排序
-n 依照数值的大小排序(默认是根据字符进行排序)。
-r 以相反的顺序来排序。
-t<分隔字符> 指定排序时所用的栏位分隔字符。
-u:去除重复的行(只要那个指定的字段重复,就认定是重复的行)
实例一:默认排序
在使用sort命令以默认的式对文件的行进行排序,使用的命令如下:
[root@ken ~]# cat test
6 this is ken
2 this is ken
5 this is ken
6 this is ken
1 this is ken
8 this is ken
[root@ken ~]# sort test
1 this is ken
2 this is ken
5 this is ken
6 this is ken
6 this is ken
8 this is ken
sort 命令将以默认的方式将文本文件的第一列以ASCII 码的次序排列,并将结果输出到标准输出。
实例二:取出排名前三
[root@ken ~]# sort -r test | head -3
8 this is ken
6 this is ken
6 this is ken
实例三:对文件中的内容按照e分割第二部分进行排序
复制代码
[root@ken ~]# sort -t 'e' -k 2 test
6 this:is:ke1
5 this:is:ke2
6 this:is:ke3
2 this:is:ke4
1 this:is:ke6
8 this:is:ke7
[root@ken ~]# sort -t 'e' -k 2 -r test
8 this:is:ke7
1 this:is:ke6
2 this:is:ke4
6 this:is:ke3
5 this:is:ke2
6 this:is:ke1
实例四:去除重复的行
[root@ken ~]# sort test
1 this:is:ke6
2 this:is:ke4
2 this:is:ke4
2 this:is:ke4
2 this:is:ke4
5 this:is:ke2
6 this:is:ke1
6 this:is:ke3
8 this:is:ke7
[root@ken ~]# sort -u test
1 this:is:ke6
2 this:is:ke4
5 this:is:ke2
6 this:is:ke1
6 this:is:ke3
8 this:is:ke7
三、uniq命令
作用:
去除重复的行(相邻且相同,认定为重复)
选项:
-c:在行首用数字表示该行出现了多少次
-u:仅仅显示那些没有出现重复过的行
实例一:统计行数

[root@ken ~]# uniq -c test
      1 6 this:is:ke3
      4 2 this:is:ke4
      1 5 this:is:ke2
      1 6 this:is:ke1
      1 1 this:is:ke6
      1 8 this:is:ke7


实例二:将文件中相同的行去重

[root@ken ~]# sort test | uniq
1 this:is:ke6
2 this:is:ke4
5 this:is:ke2
6 this:is:ke1
6 this:is:ke3
8 this:is:ke7
四、seq命令
作用:
生成一个数组序列
格式:
seq [start [step]] stop
实例:
[root@ken ~]# seq 5       #终止位5
1
2
3
4
5
[root@ken ~]# seq 2 5     #起始位2,终止位5
2
3
4
5
[root@ken ~]# seq 2 2 10  #起始位2,步长为2,终止位10
2
4
6
8
10
五、tr命令
作用:
Linux tr 命令用于转换或删除文件中的字符。
tr 指令从标准输入设备读取数据,经过字符串转译后,将结果输出到标准输出设备。
a-z 任意小写
A-Z 任意大写
0-9 任意数字
[root@ken ~]# echo "this is ken" | tr a-z A-Z
THIS IS KEN
[root@ken ~]# echo "THIS IS KEN" | tr A-Z a-z
this is ken


实例二:删除特定字符串
s这个字符串都会被删掉
[root@ken ~]# cat test
6 this:is:ke3
2 this:is:ke4
2 this:is:ke4
2 this:is:ke4
2 this:is:ke4
5 this:is:ke2
6 this:is:ke1
1 this:is:ke6
8 this:is:ke7
[root@ken ~]# cat test | tr -d 's'
6 thi:i:ke3
2 thi:i:ke4
2 thi:i:ke4
2 thi:i:ke4
2 thi:i:ke4
5 thi:i:ke2
6 thi:i:ke1
1 thi:i:ke6
8 thi:i:ke7