部署环境准备
kubernetes集群准备
192.168.3.115 k8s-master
192.168.3.114 k8s-node1
192.168.3.113 k8s-node2
在集群中至少有三个节点可用,满足ceph高可用要求,这里已配置master节点使其支持运行pod。
添加新磁盘
所有节点添加1块50GB的新磁盘:/dev/sdb,作为OSD盘,提供存储空间,添加完成后扫描磁盘,确保主机能够正常识别到:
#扫描 SCSI总线并添加 SCSI 设备
for host in
host/scan; done
#重新扫描 SCSI 总线
for scsi_device in
scsi_device/device/rescan; done
#查看已添加的磁盘,能够看到sdb说明添加成功
lsblk
部署Rook Operator
git clone https://github.com/rook/rook.git
cd rook/cluster/examples/kubernetes/ceph/
执行yaml文件部署rook系统组件:
[centos@k8s-master ceph]$ kubectl apply -f operator.yaml
namespace/rook-ceph-system created
customresourcedefinition.apiextensions.k8s.io/cephclusters.ceph.rook.io created
customresourcedefinition.apiextensions.k8s.io/cephfilesystems.ceph.rook.io created
customresourcedefinition.apiextensions.k8s.io/cephobjectstores.ceph.rook.io created
customresourcedefinition.apiextensions.k8s.io/cephobjectstoreusers.ceph.rook.io created
customresourcedefinition.apiextensions.k8s.io/cephblockpools.ceph.rook.io created
customresourcedefinition.apiextensions.k8s.io/volumes.rook.io created
clusterrole.rbac.authorization.k8s.io/rook-ceph-cluster-mgmt created
role.rbac.authorization.k8s.io/rook-ceph-system created
clusterrole.rbac.authorization.k8s.io/rook-ceph-global created
clusterrole.rbac.authorization.k8s.io/rook-ceph-mgr-cluster created
serviceaccount/rook-ceph-system created
rolebinding.rbac.authorization.k8s.io/rook-ceph-system created
clusterrolebinding.rbac.authorization.k8s.io/rook-ceph-global created
deployment.apps/rook-ceph-operator created
[centos@k8s-master ~]$
部署rook-ceph-operator过程中,会触发以DaemonSet的方式在集群部署Agent和Discoverpods。
operator会在集群内的每个主机创建两个pod:rook-discover,rook-ceph-agent:
[centos@k8s-master ~]$ kubectl get pod -n rook-ceph-system -o wide
NAME READY STATUS RESTARTS AGE IP NODE NOMINATED NODE READINESS GATES
rook-ceph-agent-49w7t 1/1 Running 0 7m48s 192.168.3.113 k8s-node1
rook-ceph-agent-dpxkq 1/1 Running 0 111s 192.168.3.114 k8s-node2
rook-ceph-agent-wb6r8 1/1 Running 0 7m48s 192.168.3.115 k8s-master
rook-ceph-operator-85d64cfb99-2c78k 1/1 Running 0 9m3s 10.244.1.2 k8s-node1
rook-discover-597sk 1/1 Running 0 7m48s 10.244.0.4 k8s-master
rook-discover-7h89z 1/1 Running 0 111s 10.244.2.2 k8s-node2
rook-discover-hjdjt 1/1 Running 0 7m48s 10.244.1.3 k8s-node1
[centos@k8s-master ~]$
创建rook Cluster
当检查到Rook operator, agent, and discover pods已经是running状态后,就可以部署roo cluster了。执行yaml文件结果:
[centos@k8s-master ceph]$ kubectl apply -f cluster.yaml
namespace/rook-ceph created
serviceaccount/rook-ceph-osd created
serviceaccount/rook-ceph-mgr created
role.rbac.authorization.k8s.io/rook-ceph-osd created
role.rbac.authorization.k8s.io/rook-ceph-mgr-system created
role.rbac.authorization.k8s.io/rook-ceph-mgr created
rolebinding.rbac.authorization.k8s.io/rook-ceph-cluster-mgmt created
rolebinding.rbac.authorization.k8s.io/rook-ceph-osd created
rolebinding.rbac.authorization.k8s.io/rook-ceph-mgr created
rolebinding.rbac.authorization.k8s.io/rook-ceph-mgr-system created
rolebinding.rbac.authorization.k8s.io/rook-ceph-mgr-cluster created
cephcluster.ceph.rook.io/rook-ceph created
[centos@k8s-master ~]$
Ceph集群部署成功后,可以查看到的pods如下,其中osd数量取决于你的节点数量:
[centos@k8s-master ~]$ kubectl get pod -n rook-ceph -o wide
NAME READY STATUS RESTARTS AGE IP NODE NOMINATED NODE READINESS GATES
rook-ceph-mgr-a-8649f78d9b-hlg7t 1/1 Running 0 3h30m 10.244.2.6 k8s-node2
rook-ceph-mon-a-7c7df4b5bb-984x8 1/1 Running 0 3h31m 10.244.0.5 k8s-master
rook-ceph-mon-b-7b9bc8b6c4-8trmz 1/1 Running 0 3h31m 10.244.1.4 k8s-node1
rook-ceph-mon-c-54b5fb5955-5dgr7 1/1 Running 0 3h30m 10.244.2.5 k8s-node2
rook-ceph-osd-0-b9bb5df49-gt4vs 1/1 Running 0 3h29m 10.244.0.7 k8s-master
rook-ceph-osd-1-9c6dbf797-2dg8p 1/1 Running 0 3h29m 10.244.2.8 k8s-node2
rook-ceph-osd-2-867ddc447d-xkh7k 1/1 Running 0 3h29m 10.244.1.6 k8s-node1
rook-ceph-osd-prepare-k8s-master-m8tvr 0/2 Completed 0 3h29m 10.244.0.6 k8s-master
rook-ceph-osd-prepare-k8s-node1-jf7qz 0/2 Completed 1 3h29m 10.244.1.5 k8s-node1
rook-ceph-osd-prepare-k8s-node2-tcqdl 0/2 Completed 0 3h29m 10.244.2.7 k8s-node2
[centos@k8s-master ~]$
可以看出部署的Ceph集群有:
1.Ceph Monitors:默认启动三个ceph-mon,可以在cluster.yaml里配置
2.Ceph Mgr:默认启动一个,可以在cluster.yaml里配置
3.Ceph OSDs:根据cluster.yaml里的配置启动,默认在所有的可用节点上启动
上述Ceph组件对应kubernetes的kind是deployment:
[centos@k8s-master ~]$ kubectl -n rook-ceph get deployment
NAME READY UP-TO-DATE AVAILABLE AGE
rook-ceph-mgr-a 1/1 1 1 5h34m
rook-ceph-mon-a 1/1 1 1 5h36m
rook-ceph-mon-b 1/1 1 1 5h35m
rook-ceph-mon-c 1/1 1 1 5h35m
rook-ceph-osd-0 1/1 1 1 5h34m
rook-ceph-osd-1 1/1 1 1 5h34m
rook-ceph-osd-2 1/1 1 1 5h34m
[centos@k8s-master ~]$
配置ceph dashboard
在cluster.yaml文件中默认已经启用了ceph dashboard,查看dashboard的service:
[centos@k8s-master ~]$ kubectl get service -n rook-ceph
NAME TYPE CLUSTER-IP EXTERNAL-IP PORT(S) AGE
rook-ceph-mgr ClusterIP 10.107.77.188 9283/TCP 3h33m
rook-ceph-mgr-dashboard ClusterIP 10.96.135.98 8443/TCP 3h33m
rook-ceph-mon-a ClusterIP 10.105.153.93 6790/TCP 3h35m
rook-ceph-mon-b ClusterIP 10.105.107.254 6790/TCP 3h34m
rook-ceph-mon-c ClusterIP 10.104.1.238 6790/TCP 3h34m
[centos@k8s-master ~]$
rook-ceph-mgr-dashboard监听的端口是8443,创建nodeport类型的service以便集群外部访问。
kubectl apply -f rook/cluster/examples/kubernetes/ceph/dashboard-external-https.yaml
查看一下nodeport暴露的端口,这里是32483端口:
[centos@k8s-master ~]$ kubectl get service -n rook-ceph | grep dashboard
rook-ceph-mgr-dashboard ClusterIP 10.96.135.98 8443/TCP 3h37m
rook-ceph-mgr-dashboard-external-https NodePort 10.97.181.103 8443:32483/TCP 3h29m
[centos@k8s-master ~]$
获取Dashboard的登陆账号和密码
[centos@k8s-master ~]$ MGR_POD=kubectl get pod -n rook-ceph | grep mgr | awk '{print $1}'
[centos@k8s-master ~]$ kubectl -n rook-ceph logs
找到username和password字段,我这里是admin,8v2AbqHDj6
打开浏览器输入任意一个Node的IP+nodeport端口,这里使用master节点 ip访问:
https://192.168.92.56:32483


部署Ceph toolbox
默认启动的Ceph集群,是开启Ceph认证的,这样你登陆Ceph组件所在的Pod里,是没法去获取集群状态,以及执行CLI命令,这时需要部署Ceph toolbox,命令如下:
[centos@k8s-master ~]$ cd rook/cluster/examples/kubernetes/ceph/
[centos@k8s-master ceph]$ kubectl create -f toolbox.yaml
部署成功后,pod如下:
[centos@k8s-master ceph]$ kubectl -n rook-ceph get pods -o wide | grep ceph-tools
rook-ceph-tools-76c7d559b6-8w7bk 1/1 Running 0 11s 192.168.92.58 k8s-node2
[centos@k8s-master ceph]$
然后可以登陆该pod后,执行Ceph CLI命令:
[centos@k8s-master ceph]$ kubectl -n rook-ceph exec -it rook-ceph-tools-76c7d559b6-8w7bk bash
bash: warning: setlocale: LC_CTYPE: cannot change locale (en_US.UTF-8): No such file or directory
bash: warning: setlocale: LC_COLLATE: cannot change locale (en_US.UTF-8): No such file or directory
bash: warning: setlocale: LC_MESSAGES: cannot change locale (en_US.UTF-8): No such file or directory
bash: warning: setlocale: LC_NUMERIC: cannot change locale (en_US.UTF-8): No such file or directory
bash: warning: setlocale: LC_TIME: cannot change locale (en_US.UTF-8): No such file or directory
[root@k8s-node2 /]#
查看ceph集群状态
[root@k8s-node2 /]# ceph status
cluster:
id: abddff95-5fa0-47dc-a001-7fb291a42bc6
health: HEALTH_OK
services:
mon: 3 daemons, quorum c,b,a
mgr: a(active)
osd: 3 osds: 3 up, 3 in
data:
pools: 1 pools, 100 pgs
objects: 0 objects, 0 B
usage: 12 GiB used, 129 GiB / 141 GiB avail
pgs: 100 active+clean
[root@k8s-node2 /]#
查看ceph配置文件
[root@k8s-node2 /]# cd /etc/ceph/
[root@k8s-node2 ceph]# ll
total 12
-rw-r–r-- 1 root root 121 Jan 3 11:28 ceph.conf
-rw-r–r-- 1 root root 62 Jan 3 11:28 keyring
-rw-r–r-- 1 root root 92 Sep 24 18:15 rbdmap
[root@k8s-node2 ceph]# cat ceph.conf
[global]
mon_host = 10.104.1.238:6790,10.105.153.93:6790,10.105.107.254:6790
[client.admin]
keyring = /etc/ceph/keyring
[root@k8s-node2 ceph]# cat keyring
[client.admin]
key = AQBjoC1cXKJ7KBAA3ZnhWyxvyGa8+fnLFK7ykw==
[root@k8s-node2 ceph]# cat rbdmap
RbdDevice Parameters
#poolname/imagename id=client,keyring=/etc/ceph/ceph.client.keyring
[root@k8s-node2 ceph]#
rook提供RBD服务
创建pool和StorageClass
[centos@k8s-master ~]$ vim rook/cluster/examples/kubernetes/ceph/storageclass.yaml
apiVersion: ceph.rook.io/v1
kind: CephBlockPool
metadata:
name: replicapool
namespace: rook-ceph
spec:
replicated:
size: 1
apiVersion: storage.k8s.io/v1
kind: StorageClass
metadata:
name: rook-ceph-block
provisioner: ceph.rook.io/block
parameters:
blockPool: replicapool
Specify the namespace of the rook cluster from which to create volumes.
If not specified, it will use rook as the default namespace of the cluster.
This is also the namespace where the cluster will be
clusterNamespace: rook-ceph
Specify the filesystem type of the volume. If not specified, it will use ext4.
fstype: xfs
(Optional) Specify an existing Ceph user that will be used for mounting storage with this StorageClass.
#mountUser: user1
(Optional) Specify an existing Kubernetes secret name containing just one key holding the Ceph user secret.
The secret must exist in each namespace(s) where the storage will be consumed.
#mountSecret: ceph-user1-secret
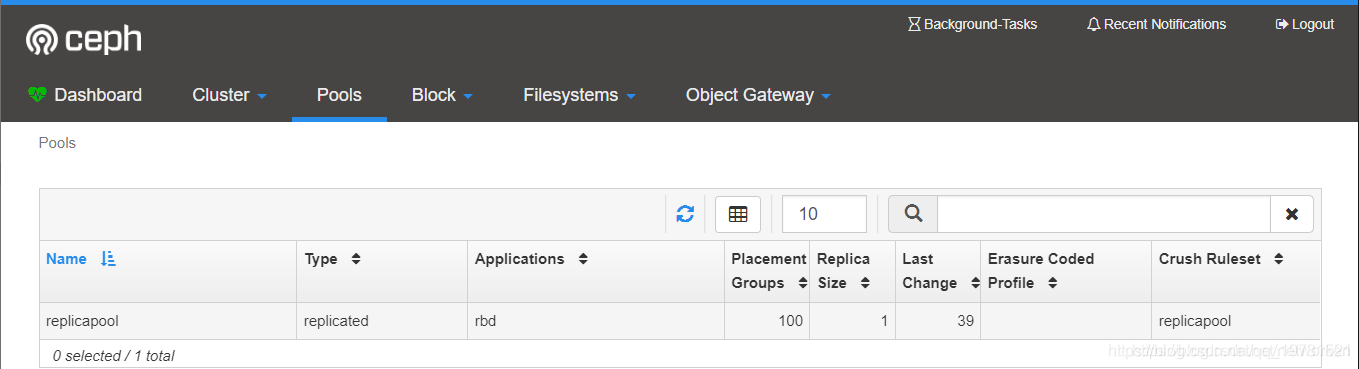
配置文件中包含了一个名为replicapool的存储池,和名为rook-ceph-block的storageClass。
运行yaml文件
[centos@k8s-master ceph]$ kubectl create -f storageclass.yaml
查看创建的storageclass:
[centos@k8s-master ~]$ kubectl get storageclass
NAME PROVISIONER AGE
rook-ceph-block ceph.rook.io/block 171m
[centos@k8s-master ~]$
登录ceph dashboard查看创建的存储池:
本文原自:https://blog.csdn.net/networken/article/details/85772418