spring MVC常用注解介绍
| 注解 | 描述 |
|---|---|
| @Controller |
负责注册一个bean 到spring 上下文中 |
| @Scope |
设置bean的作用域,基本作用域(singleton、prototype),Web 作用域(reqeust、session、globalsession),自定义作用域 |
| @RequestMapping | 注解为控制器指定可以处理哪些 URL 请求 |
| @Resource @Autowired |
用于自动装配(注入)Bean到类中 |
| @RequestParam |
在处理方法入参处使用 @RequestParam 可以把请求参 数传递给请求方法 |
| @PathVariable |
将URL上的部分路径按占位符绑定到入参 |
| @ModelAttribute |
可以修饰方法、参数、返回值。会在@RequestMapping方法之前调用被修饰的方法;为属性(参数)绑定模型对象。 |
| @SessionAttributes @SessionAttribute |
|
| @RequestAttribute | |
| @ResponseBody |
该注解用于将Controller的方法返回的对象,通过适当的HttpMessageConverter转换为指定格式后,写入到Response对象的body数据区,通常用来返回JSON数据或者是XML数据。 需要注意的呢,在使用此注解之后不会再走试图处理器,而是直接将数据写入到输入流中,他的效果等同于通过response对象输出指定格式的数据。 |
| @RequestBody | 该注解用于读取Request请求的body部分数据,使用系统默认配置的HttpMessageConverter进行解析,然后把相应的数据绑定到要返回的对象上 ,再把HttpMessageConverter返回的对象数据绑定到 controller中方法的参数上 |
| @ExceptionHandler | 注解到方法上,出现异常时会执行该方法 |
| @ControllerAdvice | 使一个Contoller成为全局的异常处理类,类中用@ExceptionHandler方法注解的方法可以处理所有Controller发生的异常 |
注解的使用
一、@Controller
使用位置:类
在SpringMVC 中,控制器Controller 负责处理由DispatcherServlet 分发的请求,它把用户请求的数据经过业务处理层处理之后封装成一个Model ,然后再把该Model 返回给对应的View 进行展示。在SpringMVC 中提供了一个非常简便的定义Controller 的方法,你无需继承特定的类或实现特定的接口,只需使用@Controller 标记一个类是Controller ,然后使用@RequestMapping 和@RequestParam 等一些注解用以定义URL 请求和Controller 方法之间的映射,这样的Controller 就能被外界访问到。此外Controller 不会直接依赖于HttpServletRequest 和HttpServletResponse 等HttpServlet 对象,它们可以通过Controller 的方法参数灵活的获取到。
@Controller 用于标记在一个类上,使用它标记的类就是一个SpringMVC Controller 对象。分发处理器将会扫描使用了该注解的类的方法,并检测该方法是否使用了@RequestMapping 注解。@Controller 只是定义了一个控制器类,而使用@RequestMapping 注解的方法才是真正处理请求的处理器。单单使用@Controller 标记在一个类上还不能真正意义上的说它就是SpringMVC 的一个控制器类,因为这个时候Spring 还不认识它。那么要如何做Spring 才能认识它呢?这个时候就需要我们把这个控制器类交给Spring 来管理。有两种方式:
(1)在SpringMVC 的配置文件中定义MyController 的bean 对象。
(2)在SpringMVC 的配置文件中告诉Spring 该到哪里去找标记为@Controller 的Controller 控制器
<!--方式一-->
<bean class="com.host.app.web.controller.MyController"/>
<!--方式二-->
< context:component-scan base-package = "com.host.app.web" />//路径写到controller的上一层(扫描包详解见下面浅析)
二、@RequestMapping
使用位置:类、方法
RequestMapping是一个用来处理请求地址映射的注解
@Controller
@RequestMapping ( "/test" )//在类上修饰,提供理论初步的请求映射信息,相对于WEB的根目录。请求的父路径"/test"
//@RequestMapping ( path="/test" )//与上面效果相同,直接用双引号写url默认为path
//@RequestMapping ( value="/test" )//在servlet环境下value是path的别名,与上面效果相同
public class MyController {

    /**
    *在方法上修饰,提供进一步的细分映射信息,相对于类定义处的url
    *若类处未定义映射请求,则方法处标记的url相对于WEB的根目录
    */
    @RequestMapping ( "/showView" )//调用这个方法的请求路径为"/test/showView"
    public ModelAndView showView() {

       return new ModelAndView();
    }

    @RequestMapping(path = "/showAll", method = RequestMethod.GET)
    public void showAllStudent(){
        System.out.println("StudentController.showAllStudent()");

    }
}
用于类上,表示类中的所有响应请求的方法都是以该地址作为父路径。
RequestMapping注解有八个属性。
| 属性 | 描述 |
|---|---|
| path | 请求的URL,直接用双引号写url默认为path(该属性仅在servlet环境中使用) 在类型级使用时,所有方法级映射都继承这个主映射,从而为特定的处理程序方法缩小其范围。 |
| value | 指定请求的实际地址,指定的地址可以是URI Template 模式(该属性可以在servle和portlet环境中使用) 在类型级使用时,所有方法级映射都继承这个主映射,从而为特定的处理程序方法缩小其范围。 在Servlet环境中,这是path()的别名。例如,@RequestMapping("/foo")等价于@RequestMapping(path="/foo")。 |
| method | 指定请求的method类型, GET、POST、PUT、DELETE等,不写默认可以处理四种中的任意类型 |
| name | 为这个映射分配一个名称 |
| consumes | 指定处理请求的提交内容类型(Content-Type),例如application/json, text/html |
| produces | 指定返回的内容类型,仅当request请求头中的(Accept)类型中包含该指定类型才返回 |
| params | 指定request中必须包含某些参数值时,才让该方法处理 |
| headers | 指定request中必须包含某些指定的header值,才能让该方法处理请求 |
注意:实际操作中容易遇到的问题
1)找不到对应的请求方法
原因:由提示我们可以很清楚的看到是没有POST的请求方法,因为在方法上明文设定了RequestMethod为GET或者POST,而发过来的请求并非是我们所设定的。找到了对应的请求的路径但是没有匹配到对应的RequestMethod类型。
解决方案:
- 把方法上明文设定的“method = RequestMethod.GET”这个去掉,就可以同时处理GET和POST请求
- 再添加一个相同请求路径的方法,并且明文设定对应的RequestMethod类型

2)一次请求登录失败后返回登录页再次登录出现路径重复而拼接出错误的路径
原因:这是由于自动以相对路径而发起的请求,开发中经常会存在一个请求方法中发起另一个请求从而实现请求间的跳转,或请求跳往页面后页面发起请求(如下面代码),这样容易引起在相对路径请求中,请求路径重复嵌套的问题。
解决方案:将相对路径设定为以根目录起始的绝对路径,在jsp请求的时候添加${pageContext.request.contextPath}/,每次都从根路径发起请求,从而避免请求混乱错误拼接的情况。


<%--添加${pageContext.request.contextPath}从根目录开始发起请求--%>
<form action="${pageContext.request.contextPath}/user/login" method="post">
    <table border="1">
        <tr>
            <td>userame:</td>
            <td><input name="username" type="text"></td>
        </tr>
        <tr>
            <td>password:</td>
            <td><input name="password" type="password"></td>
        </tr>
        <tr>
            <td colspan="2">
                <button type="submit">submit</button>
                <button type="reset">reset</button>
            </td>
        </tr>
    </table>
</form>
@Controller
@RequestMapping(path = "/user")
public class StudentController {
@Resource(name = "studentServiceImpl")
private StudentService studentService;
@RequestMapping(path = "/login", method = RequestMethod.POST)
public String login(HttpServletRequest request){
String username=request.getParameter("username");
String password=request.getParameter("password");
if(null==studentService.getStudent(username,password)){
System.out.println("登录失败");
return "/index";//此问题执行这里
}else{
System.out.println("登录成功");
return "forward:/user/showAll";
}
}
@RequestMapping(path = "/showAll",method = RequestMethod.POST)
public ModelAndView showAllStudent(){
......
return mav;
}
}三、@Resource and @Autowired
1、@Autowired注解 / @Qualifier注解(不推荐使用,建议使用@Resource)
(1)@Autowired
- 可以对成员变量、方法和构造函数进行标注,来完成自动装配的工作。
- @Autowired是根据类型进行自动装配的。
- 如果Spring上下文中存在不止一个UserDao类型的bean时,就会抛出BeanCreationException异常
- 如果Spring上下文中不存在UserDao类型的bean,也会抛出BeanCreationException异常
- @Autowired的标注位置不同,它们都会在Spring在初始化这个bean时,自动装配这个属性。要使@Autowired能够工作,还需要在配置文件中加入以下
<bean class="org.springframework.beans.factory.annotation.AutowiredAnnotationBeanPostProcessor" /> (2)@Qualifier
我们可以使用@Qualifier配合@Autowired来解决上面的问题
1. 可能存在多个UserDao实例

@Autowired
@Qualifier("userServiceImpl")
public IUserService userService;

or

@Autowired
public void setUserDao(@Qualifier("userDao") UserDao userDao) {
    this.userDao = userDao;
}

这样,Spring会找到id为userServiceImpl和userDao的bean进行装配
===========================================================

2.可能不存在UserDao实例

@Autowired(required = false)
public IUserService userService;
2、@Resource
- JSR-250标准注解,推荐使用它来代替Spring专有的@Autowired注解。@Resource的作用相当于@Autowired,只不过@Autowired按byType自动注入,而@Resource默认按byName自动注入罢了。
- @Resource有两个属性是比较重要的,分别是name和type,Spring将 @Resource注解的name属性解析为bean的名字,而type属性则解析为bean的类型。所以如果使用name属性,则使用byName的自动注入策略,而使用type属性时则使用byType自动注入策略。如果既不指定name也不指定type属性,这时将通过反射机制使用byName自动注入策略。要使@Autowired能够工作,还需要在配置文件中加入以下:
<bean class="org.springframework.context.annotation.CommonAnnotationBeanPostProcessor" />@Resource(name = "studentServiceImpl")
private StudentService studentService;@Resource装配顺序:
- 如果同时指定了name和type,则从Spring上下文中找到唯一匹配的bean进行装配,找不到则抛出异常
- 如果指定了name,则从上下文中查找名称(id)匹配的bean进行装配,找不到则抛出异常
- 如果指定了type,则从上下文中找到类型匹配的唯一bean进行装配,找不到或者找到多个,都会抛出异常
- 如果既没有指定name,又没有指定type,则自动按照byName方式进行装配(见2);如果没有匹配,则回退为一个原始类型(UserDao)进行匹配,如果匹配则自动装配;
四、@RequestParam
使用位置:方法参数
在处理方法入参处使用 @RequestParam 可以把请求参 数传递给请求方法
java code
@RequestMapping(path = "user/login", method = RequestMethod.POST)
    public void login(@RequestParam("username")String name,@RequestParam("password")String password){
        System.out.println("username="+name);
        System.out.println("password="+password);
    }
jsp code
//建议加上${pageContext.request.contextPath},每次从根目录发起请求,从而避免请求路径重复叠加
<form action="${pageContext.request.contextPath}/user/login" method="post">
    <table border="1">
        <tr>
            <td>userame:</td>
            <td><input name="username" type="text"></td>
        </tr>
        <tr>
            <td>password:</td>
            <td><input name="password" type="password"></td>
        </tr>
        <tr>
            <td colspan="2">
                <button type="submit">submit</button>
                <button type="reset">reset</button>
            </td>
        </tr>
    </table>
</form>
五、@PathVariable
使用位置:方法参数
将URL上的部分路径按占位符绑定到入参
java code
@RequestMapping(path = "user/delete/{userId}")
    public void delete(@PathVariable("userId") String userId){
        System.out.println("userid="+userId);
    }
jsp code
<table>
    <thead>展示所及学生</thead>
    <tbody>
      <tr>
        <td>学号</td>
        <td>姓名</td>
        <td>年龄</td>
        <td>性别</td>
        <td>操作</td>
      </tr>
      <c:forEach var="s" items="${studentList}">
      <tr>
        <td>${s.id}</td>
        <td>${s.name}</td>
        <td>${s.age}</td>
        <td>${s.sex}</td>
        <td>
          <button onclick="">修改</button>
          <button onclick="window.location.href='${pageContext.request.contextPath}/user/delete/${s.id}'">删除</button>
        </td>
      </tr>
      </c:forEach>
    </tbody>
  </table>
六、@ResponseBody
使用位置:方法
这个注释可以放在方法上,并指示返回类型应该直接写到HTTP响应体(而不是放在模型中,或者解释为视图名)
注意:一般在异步获取数据时使用,在使用@RequestMapping后,返回值通常解析为跳转路径, 加上@Responsebody后返回结果不会被解析为跳转路径,而是直接写入HTTP response body中
@ReqestMapping("/something")
@ResponseBody
public String helloWorld() {
    return "Hello World";
}
上面的示例将导致文本Hello World被写入HTTP响应流
比如异步获取json数据,加上@Responsebody后,会直接返回json数据。
这是我的一个例子(由于没玩过ajax,所以简单的写一下)
jsp code
<h5 id="responseBodyValue"></h5>
<script>
    function testAjax(){
        alert("start Ajax action");
        $.ajax({
            url:'${pageContext.request.contextPath}/user/ajaxRequestFunction',//请求的地址
            type: 'POST',   // 请求方式
            success: function(data){//data是返回的参数(响应)
                alert("success:"+data);
                $("#responseBodyValue").html(data);//jequey 使用ID选择器,更改标签内容
            },
            error: function () {
                alert("fail");
//            console.log('Send Request Fail..'); // 请求失败时的回调函数
            }
        });
        alert("end Ajax action");
    }
</script>
<button onclick="testAjax()">Ajax send request to controller</button>
Java code
    @RequestMapping("/user/ajaxRequestFunction")
    @ResponseBody//只有写了ResponseBody才能将return的数据返回给JSP页面
    public String ajaxRequestFunction(){
        System.out.println("now in ajaxRequest Function ");
        return "result testButton action";
    }
注意:
- 这个例子中只有写了@ResponseBody才能将return的数据返回给JSP页面,走success的方法,方法中的data是Java方法返回的数据result testButton action;
- 不写@ResponseBody,jsp的AJAX会走error
七、@RequestBody
使用位置:方法参数
1、将JSON数据请求到方法参数
jsp code
<h5 id="responseBodyValue"></h5>
<script>
    function testAjax(){
        alert("start Ajax action");
        $.ajax({
            url:'${pageContext.request.contextPath}/user/ajaxRequestFunction',//请求的地址
            type: 'POST',   // 请求方式
            data:'{"username":"123"}',
            contentType: "application/json;charset=UTF-8",
//            contentType: "application/json",
//            dataType:'text',//请求数据的类型
            success: function(data){//data是返回的参数(响应)
                alert("success:"+data);
                $("#responseBodyValue").html(data);//jequey 使用IDd选择器,更改标签内容
            },
            error: function () {
                alert("fail");
//            console.log('Send Request Fail..'); // 请求失败时的回调函数
            }
        });
        alert("end Ajax action");
    }
</script>
<button onclick="testAjax()">Ajax send request to controller</button>
java code
@RequestMapping("/user/ajaxRequestFunction")
    @ResponseBody
    public String ajaxRequestFunction(@RequestBody String username ){
        System.out.println("now in ajaxRequest Function ");
        System.out.println("username="+username);
        return "ressult testButton action";
} 
2、将json数据请求自动绑定到pojo参数
需要添加jackson-databind jar包
<dependency>
    <groupId>com.fasterxml.jackson.core</groupId>
    <artifactId>jackson-databind</artifactId>
    <version>2.8.8.1</version>
</dependency>
使用post协议提交时,请检查Content type类型
$.ajax({
    type: "POST",
    contentType: "application/json;charset=UTF-8",
    url: "/reg",
    data: JSON.stringify(data.field),
    dataType: 'json',
    success: function(result) {
        if(result.code == 0) {
            layer.msg('注册成功!');
        } else {
            layer.msg(result.msg);
        }
    }
});
请检查上方contentType类型,如果想用springmvc @RequestBody注解做提交json字符串自动绑定到pojo入参时,类型需要是"application/json;charset=UTF-8",否则会抛"not supported"异常。
@RequestMapping(value = "/reg", method = RequestMethod.POST)
    @ResponseBody
    public ResponseVo reg(@RequestBody user u) throws Exception {
       //其他crud逻辑
}注意:遇到org.springframework.web.HttpMediaTypeNotSupportedException: Content type 'application/json;charset=UTF-8' not supported或其他Content type不支持处理时请按下列方式排查
- 使用post协议提交时,请检查Content type类型
- 缺少jackson-databind jar包
八、@ModelAttribute
使用位置:方法、参数、返回值

1、@ModelAttribute注释在方法上
在调用目标处理方法前,会在@RequestMapping方法之前调用,优先调用所有在方法级上标注了@ModelAttribute 的方法,返回值会被添加到Model中,默认key为返回值类型的首字符小写
注意:
- @ModelAttribute(value="")注释返回具体类的方法。value属性,来指定model属性的名称。model属性对象就是方法的返回值。它无须要特定的参数
- 如果不设定value,默认名称为返回类型对象,首字母小写
/**
*设定model属性的名字,model属性对象就是方法的返回值
*相当于在request中封装了key="student1",value=student.Object
*/
@ModelAttribute("student1")
    public Student beforModelAttributMethod(){
        System.out.println("beforModelAttributMethod");
        Student student = new Student();
        student.setName("aaa");
        student.setPwd("bbb");
        return student;
    }
    @RequestMapping("/testModelAttributMethod")
    public void testModelAttributMethod(Map<String, Object> map){
        System.out.println("testModelAttributMethod");
        Student student=(Student)map.get("student1");//获取key(model属性名)对应的value
        System.out.println(student.getName()+"~~~~~"+student.getPwd());
    }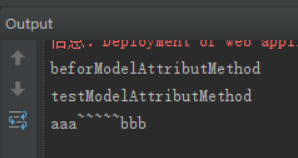
当我们发出/user/testModelAttributMethod这个请求时,SpringMvc 在执行该请求前会优先调用所有(没有发现执行顺序)在方法级上标注了@ModelAttribute 的方法,然后将该模型参数放入testModelAttributMethod()函数的Map参数中。因此对于一个controller映射多个URL的用法来说,要谨慎使用。
@ModelAttribute和@RequestMapping同时注释一个方法
@Controller
 public class HelloWorldController {
     @RequestMapping(value = "/helloWorld.do")
     @ModelAttribute("attributeName")
     public String helloWorld() {
          return "hi";
       }
   }
这时这个方法的返回值并不是表示一个视图名称,而是model属性的值,视图名称由RequestToViewNameTranslator根据请求"/helloWorld.do"转换为逻辑视图helloWorld
2、@ModelAttribute注释方法的参数
(1)从model中获取数据
- 相当于在入参时就将指定的key的value对象赋值给方法参数,对比上面的例子,代码中省去了从Map里面拿值的步骤
- 默认情况下@ModelAttribute注解不带注解参数,那么会使用参数User user中的user作为key,然后从Model取出该key的value然后传入给user
- 如果@ModelAttribute注解用注解参数指定了key,则使用指定的key从Model中取出该key对应的value然后传入给pet
- SpringMVC 会把 key 和 POJO 类型的对象保存到 implicitModel 中, 进而会保存到 request 中.
- 若 implicitModel 中不存在 key 对应的对象, 则检查当前的 Handler 是否使用 @SessionAttributes 注解修饰,
若使用了该注解, 且 @SessionAttributes 注解的 value 属性值中包含了 key, 则会从 HttpSession 中来获取 key 所
对应的 value 值, 若存在则直接传入到目标方法的入参中. 若不存在则将抛出异常. - 若 Handler 没有标识 @SessionAttributes 注解或 @SessionAttributes 注解的 value 值中不包含 key, 则
会通过反射来创建 POJO 类型的参数, 传入为目标方法的参数(如果查不到,就通过反射来创建一个新的对象赋值给参数)
@Controller
 public class HelloWorldController {
     @ModelAttribute("user")
     public User addAccount() {
         return new User("jz","123");
      }

    //直接将key(user)的value赋值给方法参数,省去从Map中拿的代码
     @RequestMapping(value = "/helloWorld")
     public String helloWorld(@ModelAttribute("user") User user) {
            user.setUserName("jizhou");
            return "helloWorld";
         }
   }
注意:在这个例子里,@ModelAttribute("user") User user注释方法参数,参数user的值来源于addAccount()方法中的model属性。此时如果方法体没有标注@SessionAttributes("user"),那么scope为request,如果标注了,那么scope为session
(2)从Form表单或URL参数中获取(实际上,不做此注释也能拿到user对象)
@Controller
 public class HelloWorldController {
     @RequestMapping(value = "/helloWorld")
     public String helloWorld(@ModelAttribute User user) {
         return "helloWorld";
      }
 }
它的作用是将该绑定的命令对象以“user”为名称添加到模型对象中供视图页面展示使用。我们此时可以在视图页面使用${user.username}来获取绑定的命令对象的属性
3、@ModelAttribute注释方法的返回值
放在方法的返回值之前,添加方法返回值到模型对象中,用于视图页面展示时使用
@Controller
 public class HelloWorldController {
     @RequestMapping(value = "/helloWorld")
     public @@ModelAttribute("user2") User helloWorld(@ModelAttribute User user) {
         return new User();
      }
 }
可以看到返回值类型是对象类型,而且通过 @ModelAttribute("user2") 注解,此时会添加返回值到模型数据( 名字为user2 ) 中供视图展示使用
此例子中@ModelAttribute注解的返回值会覆盖 @RequestMapping注解方法中的@ModelAttribute注解的同名命令对象
九、@SessionAttributes 和 @SessionAttribuite
1、@SessionAttributes
使用位置:只能使用在类定义上
若希望在多个请求之间共用某个模型属性数据,则可以在控制器类上标注一个 @SessionAttributes, Spring MVC将在模型中对应的属性暂存到 HttpSession 中。
通过@SessionAttributes注解设置的参数有3类用法:
- 在视图中通过request.getAttribute或session.getAttribute获取
- 在后面请求返回的视图中通过session.getAttribute或者从model中获取
- 自动将参数设置到后面请求所对应处理器的Model类型参数或者有@ModelAttribute注释的参数里面。
将一个参数设置到SessionAttributes中需要满足两个条件:
- 在@SessionAttributes注解中设置了参数的名字或者类型
- 在处理器中将参数设置到了model中。
@SessionAttributes 除了可以通过属性名指定需要放到会话中的属性外,还可以通过模型属性的对象类型指定哪些模型属性需要放到会话中
@SessionAttributes(types=User.class) //会将隐含模型中所有类型为 User.class 的属性添加到会话中。
@SessionAttributes(value={"user1", "user2"})
@SessionAttributes(types={User.class, Dept.class})
@SessionAttributes(value={"user1", "user2"},types={Dept.class})
在下面这个例子中,SpringMVC会把数据模型中的user1对象放入session中,所以我们在doHello4()中可以在session中取到user1对象。
@Controller
@RequestMapping("hello")
@SessionAttributes(value = {"user1"})
public class HelloAction {

 @RequestMapping(value = "hello4", method = {RequestMethod.GET, RequestMethod.POST})
    public String doHello4(Map<String, Object> map, HttpSession session) {

        System.out.println(map.get("user1"));
        System.out.println("session:" + session.getAttribute("user1"));

        return "success";
    }
@ModelAttribute("user1")
    public User getUser() {
        User user = new User();
        user.setId(1L);
        user.setName("jjjj");
        user.setPassword("iiiii");
        return user;

    }
注意一下这种情况:
这种情况表明了ModelAndView里的符合@SessionAttributes(value = {"user1", "msg"})这里面定义的value值,那么这个属性也会被放入到Session对象里。并且同时证明如果在一个方法里带有Map参数,SpringMVC不仅会把标有@ModelAttribute注解的属性放入Map中,也会把@SessionAttributes(value = {"user1", "msg"})中的属性放入Map中。
注意如果通过session.setAttribute("xxx", "kkkk");这种方法放入到session中的属性的不会被放入到map中的。
但是当我们在@SessionAttributes(value = {"user1", "msg", "xxx"})这里添加上“xxx”这个值,再执行代码可以看到map中取出"xxx"的值。
@Controller
@RequestMapping("hello")
@SessionAttributes(value = {"user1", "msg"})
public class HelloAction {

    //我们请求的是这个方法
    @RequestMapping(value = "hello7")
    public ModelAndView doHello6( @ModelAttribute("user1") User user, ModelAndView modelAndView, HttpSession session) {

        //这里我们使用的是HttpSession对象存值,而不是通过springmvc设置,所以不会被存入Map
        session.setAttribute("xxx", "kkkk");

        //这里的msg符合@SessionAttributes的格式标准所以可以被设置到SessionAttributes上放入Map中
        modelAndView.addObject("msg", user.getId() + ":" + user.getName() + ":" + user.getPassword() + ":" + user.getCars());
        System.out.println(user + ":hello7");

        modelAndView.setViewName("redirect:/hello/hello4.do");
        return modelAndView;
    }

   @RequestMapping(value = "hello4", method = {RequestMethod.GET, RequestMethod.POST})
    public String doHello4(Map<String, Object> map, HttpSession session) {

        //user1和msg都在SessionAttributes中添加了,所以会自动被放入Map中,使用两种方式都可以获取到
        System.out.println(map.get("user1"));
        System.out.println("session:" + session.getAttribute("user1"));
        System.out.println(map.get("msg"));
        System.out.println("session:" + session.getAttribute("msg"));

        //有于"xxx"没有被spring放入Map,所以这里会是null
        System.out.println("map:" + map.get("xxx"));
        //只能通过HttpSession对象才能获取到
        System.out.println("session:" + session.getAttribute("xxx"));

        return "success";
    }


 @ModelAttribute("user1")
    public User getUser() {
        User user = new User();
        user.setId(1L);
        user.setName("jjjj");
        user.setPassword("mmmmm");
        return user;

    }
}
清除@SessionAttributes中的参数
用户后可以调用SessionStatus.setComplete来清除,这个方法只是清除SessionAttribute里的参数,而不会应用Session中的参数。
示例如下:注解@SessionAttribute中设置book、description和types={Double},这样值会被放到@SessionAttributes中,但Redirect跳转时就可以重新获得这些数据了,接下来操作sessionStatus.setComplete(),则会清除掉所有的数据,这样再次跳转时就无法获取数据了
@Controller
@RequestMapping("/book")
@SessionAttributes(value ={"book","description"},types={Double.class})
public class RedirectController {
    @RequestMapping("/index")
    public String index(Model model){
		model.addAttribute("book", "金刚经");
		model.addAttribute("description","不擦擦擦擦擦擦擦车");
		model.addAttribute("price", new Double("1000.00"));
		//跳转之前将数据保存到book、description和price中,因为注解@SessionAttribute中有这几个参数
		return "redirect:get.action";
	}


    @RequestMapping("/get")
    public String get(@ModelAttribute ("book") String book,ModelMap model, SessionStatus sessionStatus){

		//可以获得book、description和price的参数System.out.println(model.get("book")+";"+model.get("description")+";"+model.get("price"));
		sessionStatus.setComplete();
		return "redirect:complete.action";
	}

	@RequestMapping("/complete")
	public String complete(ModelMap modelMap){

		//已经被清除,无法获取book的值
		System.out.println(modelMap.get("book"));
		modelMap.addAttribute("book", "妹纸");
		return "sessionAttribute";
	}
}
2、@SessionAttribute
使用@SessionAttribute来访问预先存在的全局会话属性
如果你需要访问预先存在的、以全局方式管理的会话属性的话,比如在控制器之外(比如通过过滤器)可能或不可能存在在一个方法参数上使用注解@SessionAttribute
  /**
     * 在处理请求 /helloWorld/jump 的时候,会在会话中添加一个 sessionStr 属性。
     * <p/>
     * 这里可以通过@SessionAttribute 获取到
     */
    @RequestMapping("/sesAttr")
    public String handleSessionAttr(@SessionAttribute(value = "sessionStr") String sessionStr, Model model){
        System.out.println("--> sessionStr : " + sessionStr);
        model.addAttribute("sth", sessionStr);
        return "/examples/targets/test1";
}
为了使用这些需要添加或移除会话属性的情况,考虑注入org.springframework.web.context.request.WebRequest或javax.servlet.http.HttpSession到一个控制器方法中。