一、概述
Elasticsearch,基于lucene,隐藏复杂性,提供简单易用的restful api接口、java api接口(还有其他语言的api接口)。
Elasticsearch是一个实时分布式搜索和分析引擎。它用于全文搜索、结构化搜索、分析。
全文检索:将非结构化数据中的一部分信息提取出来,重新组织,使其变得有一定结构,然后对此有一定结构的数据进行搜索,从而达到搜索相对较快的目的。
结构化检索:我想搜索商品分类为电子商品都有哪些,select * from products where category_id=‘电子’
数据分析:电商网站,最近一周电子类商品销量排名前10的商家有哪些;新闻网站,最近1个月访问量排名前3的新闻版块是哪些等等。
使用场景:
1)维基百科,类似百度百科,全文检索,高亮,搜索推荐。
2)The Guardian(国外新闻网站),类似搜狐新闻,用户行为日志(点击,浏览,收藏,评论)+ 社交网络数据(对某某新闻的相关看法),数据分析。
3)Stack Overflow(国外的程序异常讨论论坛),IT问题,程序的报错,提交上去,有人会跟你讨论和回答
4)GitHub(开源代码管理),搜索上千亿行代码。
5)国内:站内搜索(电商,招聘,门户,等等),IT系统搜索(OA,CRM,ERP,等等),数据分析(ES热门的一个使用场景)
核心概念:
Index(索引-数据库)
Type(类型-表)
Document(文档-行)
Field(字段-列)
mapping(映射-约束)
ES是如何存取数据的,又是如何检索数据的呢?
1)存放数据时:
类型分为索引区和数据区。
a、索引对象(blog):存储数据的表结构 ,任何搜索数据,存放在索引对象上 。
b、映射(mapping):数据如何存放到索引对象上,需要有一个映射配置, 包括:数据类型、是否存储、是否分词等。
c、文档(document):一条数据记录,存在索引对象上
d、文档类型(type):一个索引对象,存放多种类型数据,数据用文档类型进行标识
2)搜索
由于不是由记录来确定属性值,而是由属性值来确定记录的位置,因而称为倒排索引(inverted index),ES就是利用倒排索引,先搜索索引区域,查找到对应的docID,通过docID去数据区域查找数据。
二、安装配置
1、下载:
https://www.elastic.co/cn/products/elasticsearch
官网:快速入门,开箱即用,底层需要进行大量操作,例如分片、副本、集群发现,但是您无需考虑这些操作即可开始使用。由于 Elasticsearch 定义了合理的默认值,并且无需前期的模式定义,因此能够让您在开始时一切从简,并随着您的发展进一步微调。
推荐下载图形化插件:
elasticsearch-head-master.zip
2、Elasticsearch提供了各个操纵系统下的安装版本,并且提供了Docker安装的方式。
2.1 Docker
拉取镜像:
docker pull docker.elastic.co/elasticsearch/elasticsearch:6.6.1
启动:
docker run -p 9200:9200 -p 9300:9300 -e "discovery.type=single-node" docker.elastic.co/elasticsearch/elasticsearch:6.6.1
例如我的启动:
docker run -e ES_JAVA_OPTS="-Xms256m -Xmx256m" -d -p 9200:9200 -p 9300:9300 --name ES01 5acf0e8da90b
2.2 安装Elasticsearch(单节点Linux环境)
最好安装图形界面化插件:elasticsearch-head-master.zip,因为这是node.js编写的,所以需要Nodejs的环境(node-v6.9.2-linux-x64.tar.gz)
1)解压elasticsearch-5.2.2.tar.gz到/opt/module目录下
[xxx@hadoop102 software]$ tar -zxvf elasticsearch-5.2.2.tar.gz -C /opt/module/
2)在/opt/module/elasticsearch-5.2.2路径下创建data和logs文件夹
[xxx@hadoop102 elasticsearch-5.2.2]$ mkdir data
[xxx@hadoop102 elasticsearch-5.2.2]$ mkdir logs
3)修改配置文件/opt/module/elasticsearch-5.2.2/config/elasticsearch.yml
[xxx@hadoop102 config]$ pwd
/opt/module/elasticsearch-5.2.2/config
[xxx@hadoop102 config]$ vi elasticsearch.yml
# ---------------------------------- Cluster -----------------------------------
# 只要和其他服务器上的名字相同,就默认为集群,java操作时也会用此名字
cluster.name: my-application
# ------------------------------------ Node ------------------------------------
node.name: node-102
# ----------------------------------- Paths ------------------------------------
path.data: /opt/module/elasticsearch-5.2.2/data
path.logs: /opt/module/elasticsearch-5.2.2/logs
# ----------------------------------- Memory -----------------------------------
# 这两个必须要设置,否则启动报错
bootstrap.memory_lock: false
bootstrap.system_call_filter: false
# ---------------------------------- Network -----------------------------------
network.host: 192.168.1.102
# --------------------------------- Discovery ----------------------------------
discovery.zen.ping.unicast.hosts: ["hadoop102"]
(1)cluster.name
如果要配置集群需要两个节点上的elasticsearch配置的cluster.name相同,都启动可以自动组成集群,这里如果不改cluster.name则默认是cluster.name=my-application,
(2)nodename随意取但是集群内的各节点不能相同
(3)修改后的每行前面不能有空格,修改后的“:”后面必须有一个空格
4)配置linux系统环境(参考:http://blog.csdn.net/satiling/article/details/59697916)
(1)切换到root用户,编辑limits.conf 添加类似如下内容
[root@hadoop102 elasticsearch-5.2.2]# vi /etc/security/limits.conf
添加如下内容:
- soft nofile 65536
- hard nofile 131072
- soft nproc 2048
- hard nproc 4096
(2)切换到root用户,进入limits.d目录下修改配置文件。
[root@hadoop102 elasticsearch-5.2.2]# vi /etc/security/limits.d/90-nproc.conf
修改如下内容: - soft nproc 1024
#修改为 - soft nproc 2048
(3)切换到root用户修改配置sysctl.conf
[root@hadoop102 elasticsearch-5.2.2]# vi /etc/sysctl.conf
添加下面配置:
vm.max_map_count=655360
并执行命令:
[root@hadoop102 elasticsearch-5.2.2]# sysctl -p
然后,重新启动elasticsearch,即可启动成功。
2.3 Elasticsearch head插件安装(许多坑,需要注意的点很多)
1)下载插件
https://github.com/mobz/elasticsearch-head
elasticsearch-head-master.zip
2)nodejs官网下载安装包
https://nodejs.org/dist/
node-v6.9.2-linux-x64.tar.xz
3)将elasticsearch-head-master.zip和node-v6.9.2-linux-x64.tar.xz都导入到linux的/opt/software目录。
4)安装nodejs
[xxx@hadoop102 software]$ tar -zxvf node-v6.9.2-linux-x64.tar.gz -C /opt/module/
5)配置nodejs环境变量
[root@hadoop102 software]# vi /etc/profile
export NODE_HOME=/opt/module/node-v6.9.2-linux-x64
export PATH=
NODE_HOME/bin
[root@hadoop102 software]# source /etc/profile
6)查看node和npm版本
[root@hadoop102 software]# node -v
v6.9.2
[root@hadoop102 software]# npm -v
3.10.9
7)解压head插件到/opt/module目录下
[xxx@hadoop102 software]$ unzip elasticsearch-head-master.zip -d /opt/module/
8)查看当前head插件目录下有无node_modules/grunt目录:
没有:执行命令创建:
[xxx@hadoop102 elasticsearch-head-master]$ npm install grunt --save
9)安装head插件:
[xxx@hadoop102 elasticsearch-head-master]$ npm install -g cnpm --registry=https://registry.npm.taobao.org
10)安装grunt:
[xxx@hadoop102 elasticsearch-head-master]$ npm install -g grunt-cli
11)编辑Gruntfile.js
[xxx@hadoop102 elasticsearch-head-master]$ vim Gruntfile.js
文件93行添加hostname:‘0.0.0.0’
options: {
hostname:‘0.0.0.0’,
port: 9100,
base: ‘.’,
keepalive: true
}
12)检查head根目录下是否存在base文件夹
没有:将 _site下的base文件夹及其内容复制到head根目录下
[xxx@hadoop102 elasticsearch-head-master]$ mkdir base
[xxx@hadoop102 _site]$ cp base/* …/base/
13)启动grunt server:
[xxx@hadoop102 elasticsearch-head-master]$ grunt server -d
Running “connect:server” (connect) task
[D] Task source: /opt/module/elasticsearch-head-master/node_modules/grunt-contrib-connect/tasks/connect.js
Waiting forever…
Started connect web server on http://localhost:9100
如果提示grunt的模块没有安装:
Local Npm module “grunt-contrib-clean” not found. Is it installed?
Local Npm module “grunt-contrib-concat” not found. Is it installed?
Local Npm module “grunt-contrib-watch” not found. Is it installed?
Local Npm module “grunt-contrib-connect” not found. Is it installed?
Local Npm module “grunt-contrib-copy” not found. Is it installed?
Local Npm module “grunt-contrib-jasmine” not found. Is it installed?
Warning: Task “connect:server” not found. Use –force to continue.
执行以下命令:
npm install grunt-contrib-clean -registry=https://registry.npm.taobao.org
npm install grunt-contrib-concat -registry=https://registry.npm.taobao.org
npm install grunt-contrib-watch -registry=https://registry.npm.taobao.org
npm install grunt-contrib-connect -registry=https://registry.npm.taobao.org
npm install grunt-contrib-copy -registry=https://registry.npm.taobao.org
npm install grunt-contrib-jasmine -registry=https://registry.npm.taobao.org
最后一个模块可能安装不成功,但是不影响使用。
14)浏览器访问head插件:
http://ES-01:9100
15)启动集群插件后发现集群未连接
在/opt/module/elasticsearch-5.2.2/config路径下修改配置文件elasticsearch.yml,在文件末尾增加
[XXX@hadoop102 config]$ pwd
/opt/module/elasticsearch-5.2.2/config
[XXX@hadoop102 config]$ vi elasticsearch.yml
http.cors.enabled: true
http.cors.allow-origin: “*”
再重新启动elasticsearch。
16)关闭插件服务
ctrl+c
[XXX@hadoop102 elasticsearch-head-master]$ netstat -lntp | grep 9100
tcp 0 0 192.168.1.102:9100 0.0.0.0:* LISTEN 6070/grunt
三、Java API调用
Elasticsearch的Java客户端非常强大;它可以建立一个嵌入式实例并在必要时运行管理任务。
运行一个Java应用程序和Elasticsearch时,有两种操作模式可供使用。该应用程序可在Elasticsearch集群中扮演更加主动或更加被动的角色。在更加主动的情况下(称为Node Client),应用程序实例将从集群接收请求,确定哪个节点应处理该请求,就像正常节点所做的一样。(应用程序甚至可以托管索引和处理请求。)另一种模式称为Transport Client,它将所有请求都转发到另一个Elasticsearch节点,由后者来确定最终目标。
3.1 API基本操作(Eclipse)
新建Maven工程:
<dependencies>
		<dependency>
			<groupId>junit</groupId>
			<artifactId>junit</artifactId>
			<version>3.8.1</version>
			<scope>test</scope>
		</dependency>
		<dependency>
			<groupId>org.elasticsearch</groupId>
			<artifactId>elasticsearch</artifactId>
			<version>5.2.2</version>
		</dependency>

		<dependency>
			<groupId>org.elasticsearch.client</groupId>
			<artifactId>transport</artifactId>
			<version>5.2.2</version>
		</dependency>

		<dependency>
			<groupId>org.apache.logging.log4j</groupId>
			<artifactId>log4j-core</artifactId>
			<version>2.9.0</version>
		</dependency>
	</dependencies>
一定要注意导入的版本与实际连接的ElasticSearch是否匹配,否则会报错!
3.2 获取Transport Client
ElasticSearch服务默认端口9300。Web管理平台端口9200
获取连接客户端:
private TransportClient client;
	@Before
	public void getClient() throws Exception {

		// 1 设置连接的集群名称
		Settings settings = Settings.builder().put("cluster.name", "my-application").build();

		// 2 连接集群
		client = new PreBuiltTransportClient(settings);
		client.addTransportAddress(new InetSocketTransportAddress(InetAddress.getByName("ES01"), 9300));

		// 3 打印集群名称
		System.out.println(client.toString());
	}
3.3 操作索引
创建索引:
	@Test
	public void createIndex_blog(){
		// 1 创建索引
		client.admin().indices().prepareCreate("news").get();

		// 2 关闭连接
		client.close();
	}
删除索引:
	@Test
	public void deleteIndex(){
		// 1 删除索引
		client.admin().indices().prepareDelete("blog2").get();

		// 2 关闭连接
		client.close();
	}
3.4 新建文档:有三种常用的方式——Json String 、Map方式、ES构建器。
注意:当直接在ElasticSearch建立文档对象时,如果索引不存在的,默认会自动创建,映射采用默认方式。
Json String方式:
	@Test
	public void createIndexByJson() throws UnknownHostException {

		// 1 文档数据准备
		String json = "{" + "\"id\":\"1\"," + "\"title\":\"你好!\","
				+ "\"content\":\"进入ES的世界了!\"" + "}";

		// 2 创建文档
		IndexResponse indexResponse = client.prepareIndex("blog", "article", "1").setSource(json).execute().actionGet();

		// 3 打印返回的结果
		System.out.println("index:" + indexResponse.getIndex());
		System.out.println("type:" + indexResponse.getType());
		System.out.println("id:" + indexResponse.getId());
		System.out.println("version:" + indexResponse.getVersion());
		System.out.println("result:" + indexResponse.getResult());

		// 4 关闭连接
		client.close();
	}
Map方式:
@Test
	public void createIndexByMap() {

		// 1 文档数据准备
		Map<String, Object> json = new HashMap<String, Object>();
		json.put("id", "2");
		json.put("title", "底层调用了Lucene");
		json.put("content", "这是一个基于RESTful web接口的框架");

		// 2 创建文档
		IndexResponse indexResponse = client.prepareIndex("blog", "article", "2").setSource(json).execute().actionGet();

		// 3 打印返回的结果
		System.out.println("index:" + indexResponse.getIndex());
		System.out.println("type:" + indexResponse.getType());
		System.out.println("id:" + indexResponse.getId());
		System.out.println("version:" + indexResponse.getVersion());
		System.out.println("result:" + indexResponse.getResult());

		// 4 关闭连接
		client.close();
	}
ES构建器:
@Test
	public void createIndex() throws Exception {

		// 1 通过es自带的帮助类,构建json数据
		XContentBuilder builder = XContentFactory.jsonBuilder().startObject().field("id", 3)
				.field("title", "基于Lucene的搜索服务器").field("content", "它提供了一个分布式多用户能力的全文搜索引擎,基于RESTful web接口。")
				.endObject();

		// 2 创建文档
		IndexResponse indexResponse = client.prepareIndex("blog", "article", "3").setSource(builder).get();

		// 3 打印返回的结果
		System.out.println("index:" + indexResponse.getIndex());
		System.out.println("type:" + indexResponse.getType());
		System.out.println("id:" + indexResponse.getId());
		System.out.println("version:" + indexResponse.getVersion());
		System.out.println("result:" + indexResponse.getResult());

		// 4 关闭连接
		client.close();
	}
3.5 搜索文档
	@Test	// 单个索引
	public void getData() throws Exception {

		// 1 查询文档
		GetResponse response = client.prepareGet("blog", "article", "1").get();

		// 2 打印搜索的结果
		System.out.println(response.getSourceAsString());

		// 3 关闭连接
		client.close();
	}
@Test	// 多个索引
	public void getMultiData() {

		// 1 查询多个文档
		MultiGetResponse response = client.prepareMultiGet().add("blog", "article", "1").add("blog", "article", "2", "3")
				.add("blog", "article", "2").get();

		// 2 遍历返回的结果
		for(MultiGetItemResponse itemResponse:response){
			GetResponse getResponse = itemResponse.getResponse();

			// 如果获取到查询结果
			if (getResponse.isExists()) {
				String sourceAsString = getResponse.getSourceAsString();
				System.out.println(sourceAsString);
			}
		}

		// 3 关闭资源
		client.close();
	}
3.6 更新文档数据——update、upsert
update
@Test
	public void updateData() throws Throwable {

		// 1 创建更新数据的请求对象
		UpdateRequest updateRequest = new UpdateRequest();
		updateRequest.index("blog");
		updateRequest.type("article");
		updateRequest.id("3");

		updateRequest.doc(XContentFactory.jsonBuilder().startObject()
				// 对没有的字段添加, 对已有的字段替换
				.field("title", "基于Lucene的搜索服务器")
				.field("content",
						"它提供了一个分布式多用户能力的全文搜索引擎,基于RESTful web接口。大数据前景无限")
				.field("createDate", "2017-8-22").endObject());

		// 2 获取更新后的值
		UpdateResponse indexResponse = client.update(updateRequest).get();

		// 3 打印返回的结果
		System.out.println("index:" + indexResponse.getIndex());
		System.out.println("type:" + indexResponse.getType());
		System.out.println("id:" + indexResponse.getId());
		System.out.println("version:" + indexResponse.getVersion());
		System.out.println("create:" + indexResponse.getResult());

		// 4 关闭连接
		client.close();
	}
upsert
@Test
	public void testUpsert() throws Exception {

		// 设置查询条件, 查找不到则添加
		IndexRequest indexRequest = new IndexRequest("blog", "article", "5")
				.source(XContentFactory.jsonBuilder().startObject().field("title", "搜索服务器").field("content","它提供了一个分布式多用户能力的全文搜索引擎,基于RESTful web接口。Elasticsearch是用Java开发的,并作为Apache许可条款下的开放源码发布,是当前流行的企业级搜索引擎。设计用于云计算中,能够达到实时搜索,稳定,可靠,快速,安装使用方便。").endObject());

		// 设置更新, 查找到更新下面的设置
		UpdateRequest upsert = new UpdateRequest("blog", "article", "5")
				.doc(XContentFactory.jsonBuilder().startObject().field("user", "李四").endObject()).upsert(indexRequest);

		client.update(upsert).get();
		client.close();
	}
3.7 删除文档数据(prepareDelete)
	@Test
	public void deleteData() {

		// 1 删除文档数据
		DeleteResponse indexResponse = client.prepareDelete("blog", "article", "5").get();

		// 2 打印返回的结果
		System.out.println("index:" + indexResponse.getIndex());
		System.out.println("type:" + indexResponse.getType());
		System.out.println("id:" + indexResponse.getId());
		System.out.println("version:" + indexResponse.getVersion());
		System.out.println("found:" + indexResponse.getResult());

		// 3 关闭连接
		client.close();
	}
3.8 条件查询:查询所有、对所有字段分词查询、通配符查询、词条查询、模糊查询。
查询所有
@Test
	public void matchAllQuery() {

		// 1 执行查询
		SearchResponse searchResponse = client.prepareSearch("blog").setTypes("article")
				.setQuery(QueryBuilders.matchAllQuery()).get();

		// 2 打印查询结果
		SearchHits hits = searchResponse.getHits(); // 获取命中次数,查询结果有多少对象
		System.out.println("查询结果有:" + hits.getTotalHits() + "条");

		Iterator<SearchHit> iterator = hits.iterator();

		while (iterator.hasNext()) {
			SearchHit searchHit = iterator.next(); // 每个查询对象

			System.out.println(searchHit.getSourceAsString()); // 获取字符串格式打印
		}

		// 3 关闭连接
		client.close();
	}
对所有字段分词查询
@Test
	public void query() {
		// 1 条件查询
		SearchResponse searchResponse = client.prepareSearch("blog").setTypes("article")
				.setQuery(QueryBuilders.queryStringQuery("全文")).get();

		// 2 打印查询结果
		SearchHits hits = searchResponse.getHits(); // 获取命中次数,查询结果有多少对象
		System.out.println("查询结果有:" + hits.getTotalHits() + "条");

		Iterator<SearchHit> iterator = hits.iterator();

		while (iterator.hasNext()) {
			SearchHit searchHit = iterator.next(); // 每个查询对象

			System.out.println(searchHit.getSourceAsString()); // 获取字符串格式打印
		}

		// 3 关闭连接
		client.close();
	}
通配符查询(wildcardQuery)
*:表示多个字符(任意的字符)
?:表示单个字符
@Test
	public void wildcardQuery() {

		// 1 通配符查询
		SearchResponse searchResponse = client.prepareSearch("blog").setTypes("article")
				.setQuery(QueryBuilders.wildcardQuery("content", "*全*")).get();

		// 2 打印查询结果
		SearchHits hits = searchResponse.getHits(); // 获取命中次数,查询结果有多少对象
		System.out.println("查询结果有:" + hits.getTotalHits() + "条");

		Iterator<SearchHit> iterator = hits.iterator();

		while (iterator.hasNext()) {
			SearchHit searchHit = iterator.next(); // 每个查询对象

			System.out.println(searchHit.getSourceAsString()); // 获取字符串格式打印
		}

		// 3 关闭连接
		client.close();
	}
词条查询(TermQuery)
@Test
	public void termQuery() {

		// 1 第一field查询
		SearchResponse searchResponse = client.prepareSearch("blog").setTypes("article")
				.setQuery(QueryBuilders.termQuery("content", "全")).get();

		// 2 打印查询结果
		SearchHits hits = searchResponse.getHits(); // 获取命中次数,查询结果有多少对象
		System.out.println("查询结果有:" + hits.getTotalHits() + "条");

		Iterator<SearchHit> iterator = hits.iterator();

		while (iterator.hasNext()) {
			SearchHit searchHit = iterator.next(); // 每个查询对象

			System.out.println(searchHit.getSourceAsString()); // 获取字符串格式打印
		}

		// 3 关闭连接
		client.close();
	}
模糊查询(fuzzy)
@Test
	public void fuzzy() {

		// 1 模糊查询
		SearchResponse searchResponse = client.prepareSearch("blog").setTypes("article")
				.setQuery(QueryBuilders.fuzzyQuery("title", "lucene")).get();

		// 2 打印查询结果
		SearchHits hits = searchResponse.getHits(); // 获取命中次数,查询结果有多少对象
		System.out.println("查询结果有:" + hits.getTotalHits() + "条");

		Iterator<SearchHit> iterator = hits.iterator();

		while (iterator.hasNext()) {
			SearchHit searchHit = iterator.next(); // 每个查询对象

			System.out.println(searchHit.getSourceAsString()); // 获取字符串格式打印
		}

		// 3 关闭连接
		client.close();
	}
3.9 映射相关操作
@Test
	public void createMapping() throws Exception {

		// 1设置mapping
		XContentBuilder builder = XContentFactory.jsonBuilder()
				.startObject()
					.startObject("article")
						.startObject("properties")
							.startObject("id1")
								.field("type", "string")
								.field("store", "yes")
							.endObject()
							.startObject("title2")
								.field("type", "string")
								.field("store", "no")
							.endObject()
							.startObject("content")
								.field("type", "string")
								.field("store", "yes")
							.endObject()
						.endObject()
					.endObject()
				.endObject();

		// 2 添加mapping
		PutMappingRequest mapping = Requests.putMappingRequest("blog4").type("article").source(builder);

		client.admin().indices().putMapping(mapping).get();

		// 3 关闭资源
		client.close();
	}
四、ElasticSearch与Spring Boot整合
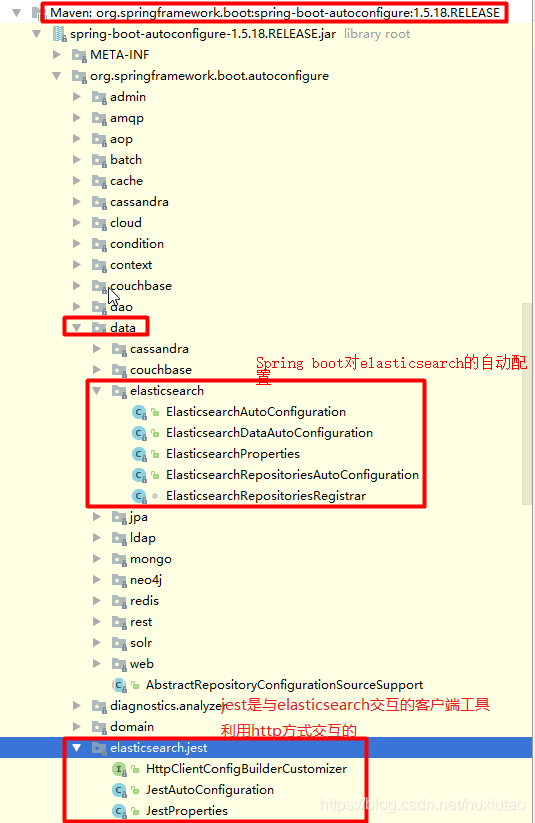
SpringBoot默认支持两种技术来和ES交互:
1)Jest(默认是不生效的,如果想让其生效,必须导入jest的工具包:import io.searchbox.client.JestClient;)
2)SpringData ElasticSearch
- 类ElasticsearchAutoConfiguration,自动帮我们配置了客户端类Client,在这里面需要配置节点信息clusterNodes和clusterName。
- 类ElasticsearchDataAutoConfiguration,自动帮我们配置了让我们来操作ES的ElasticsearchTemplate。
- 编写一个ElasticsearchRepository的子接口来操作ES
4.1 利用Jest操作ElasticSearch
在pom中移除spring-boot-starter-data-elasticsearch
在pom中导入jest的依赖
访问http://172.22.34.28:9200/时的返回信息中有响应的版本信息,如下:
后来我又搭建了一台ElasticSearch Server,用的版本比较新:5.6.12.
{
  "name" : "725ijsI",
  "cluster_name" : "elasticsearch",
  "cluster_uuid" : "IwPHG-JtT6Wd7SXCE1L96g",
  "version" : {
    "number" : "5.6.12",
    "build_hash" : "cfe3d9f",
    "build_date" : "2018-09-10T20:12:43.732Z",
    "build_snapshot" : false,
    "lucene_version" : "6.6.1"
  },
  "tagline" : "You Know, for Search"
}
我们看到是5.6.12版本,所以,在引入依赖时也要用相应大版本号的:
<!-- https://mvnrepository.com/artifact/io.searchbox/jest -->
<dependency>
   <groupId>io.searchbox</groupId>
   <artifactId>jest</artifactId>
   <version>5.3.4</version>
</dependency>
我的测试程序:
@Autowired
JestClient jestClient;

// 给ES中索引(保存)一个文档
@Test
public void testSaveToES() throws IOException {
   Article article = new Article(001, "胡秀韬","Good News","今天看了一部好电影。");
   // 新建构建器
   Index.Builder builder = new Index.Builder(article);
   // 指定索引(保存)到的地方
   builder.index("mytest");
   // 指定保存的类型
   builder.type("news");
   // 指定保存的id,因为article对象中有ID,此处可以省略
   builder.id(String.valueOf(article.getId()));
   // 将信息设置好之后,进行构建
   Index index = builder.build();
   // 上面的index就构建了一个索引功能
   // 利用jestClient开始执行
   jestClient.execute(index);
}
执行后可在页面上查看是否成功:

测试搜索:
// 测试搜索
@Test
public void searchES() {
   // Elasticsearch提供丰富且灵活的查询语言叫做DSL查询(Query DSL),
   // 它允许你构建更加复杂、强大的查询。
   // DSL(Domain Specific Language特定领域语言)以JSON请求体的形式出现
   // 定义查询表达式
   String json = "{\n" +
         "\"query\" : {\n" +
         "\"match\" : {\n" +
         "\"content\" : \"电影\"\n" +
         "}\n" +
         "}\n" +
         "}";
   // 创建构建器
   Search.Builder builder = new Search.Builder(json);
   // 指定在哪个索引下搜索
   builder.addIndex("mytest");
   // 指定在哪个类型下搜索
   builder.addType("news");
   // 构建搜索操作功能
   Search search = builder.build();
   // 利用jestClient执行
   try {
      SearchResult result = jestClient.execute(search);
      // result中可以拿到许多信息
      System.out.println(result.getJsonString());
   } catch (IOException e) {
      e.printStackTrace();
   }
}
控制台输出:
{
	"took": 165,
	"timed_out": false,
	"_shards": {
		"total": 5,
		"successful": 5,
		"skipped": 0,
		"failed": 0
	},
	"hits": {
		"total": 1,
		"max_score": 0.5446649,
		"hits": [{
			"_index": "mytest",
			"_type": "news",
			"_id": "1",
			"_score": 0.5446649,
			"_source": {
				"id": 1,
				"author": "胡秀韬",
				"title": "Good News",
				"content": "今天看了一部好电影。"
			}
		}]
	}
}
2、引入spring-boot-starter-data-elasticsearch
<dependency>
   <groupId>org.springframework.boot</groupId>
   <artifactId>spring-boot-starter-data-elasticsearch</artifactId>
</dependency>
关于版本问题:
https://spring.io/projects/spring-data官网中查看:Community modules模块下的Spring Data Elasticsearch - Spring Data module for Elasticsearch.打开Spring Data Elasticsearch连接后,打开"Learn"后,再打开最新版本的Reference Doc,从中找到Project Metadata:
Version Control - https://github.com/spring-projects/spring-data-elasticsearch
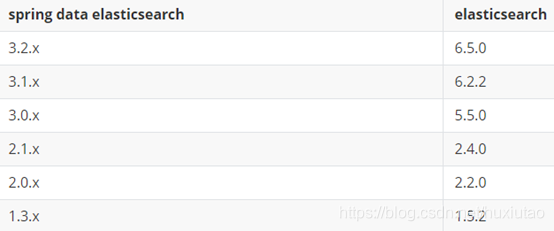
一般更换ES的版本。(本例使用2.4.6)
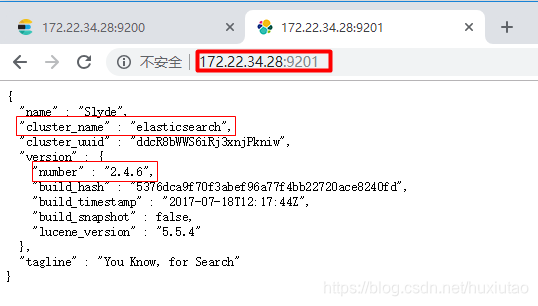
在application.properties中配置:
spring.data.elasticsearch.cluster-name=elasticsearch
spring.data.elasticsearch.cluster-nodes=172.22.34.28:9301
第一种方法:ElasticsearchRepository
定义Book实体:
// 一定要注明索引和type
@Document(indexName = "mytest", type = "book")
public class Book {
    private Integer id;
    private String bookName;
    private String author;
  	// constructor
  	// Getter Setter方法
}
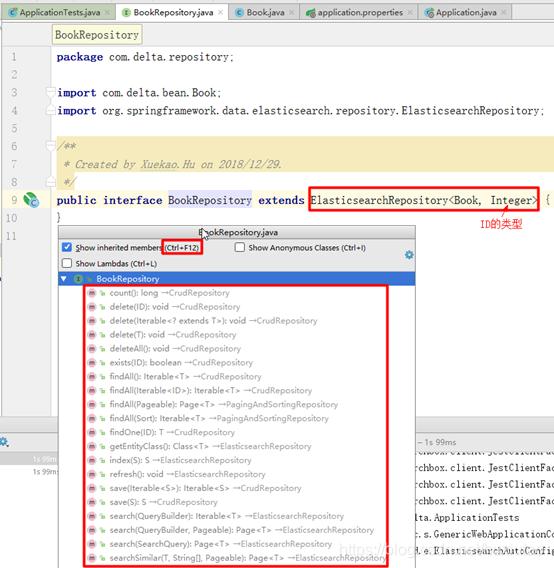
自定义repository接口,并继承ElasticsearchRepository
public interface BookRepository extends ElasticsearchRepository<Book, Integer> {
    // 支持自定义方法
    // 具体使用和更多的使用方法参照:https://docs.spring.io/spring-data/elasticsearch/docs/3.1.3.RELEASE/api/
    public List<Book> findByBookNameLike(String bookName);
}
@Test
public void testElasticsearchRepository() {
   Book book = new Book(001, "《红楼梦》", "曹雪芹");
   // 保存
   bookRepository.index(book);
   // 模糊查询
   List<Book> result = bookRepository.findByBookNameLike("红");
   for (Book book1 : result) {
      System.out.println(book1);
   }
}