1.ClassLoader:首先熟悉下ClassLoader,当java的类被编译成Class文件时,如果想翻译成机器码则必须通过JVM虚拟机中的ClassLoader来进行加载。
Android中ClassLoader分为三种(当然还有其他但是这里只介绍三种):
BootClassLoader:加载Android Framework层class文件。
PathClassLoader:加载已经安装在手机上的APK的class文件。
DexClassLoader:用于加载指定目录中的class文件。(插件,热修复等都是通过这个来完成)
2、双亲代理模式:
先解释什么叫双亲代理,当一个class文件被加载时,classloader会在自己的缓存中查找这个class文件是不是被加载过,如果已经加载就直接返回不重新加载,如果没有被加载则会查找父ClassLoader是不是加载过,如果所有的ClassLoader都没加载过则一层层返回到当前ClassLoader,进行加载。
再来熟悉下Android中ClassLoader,如图所示:
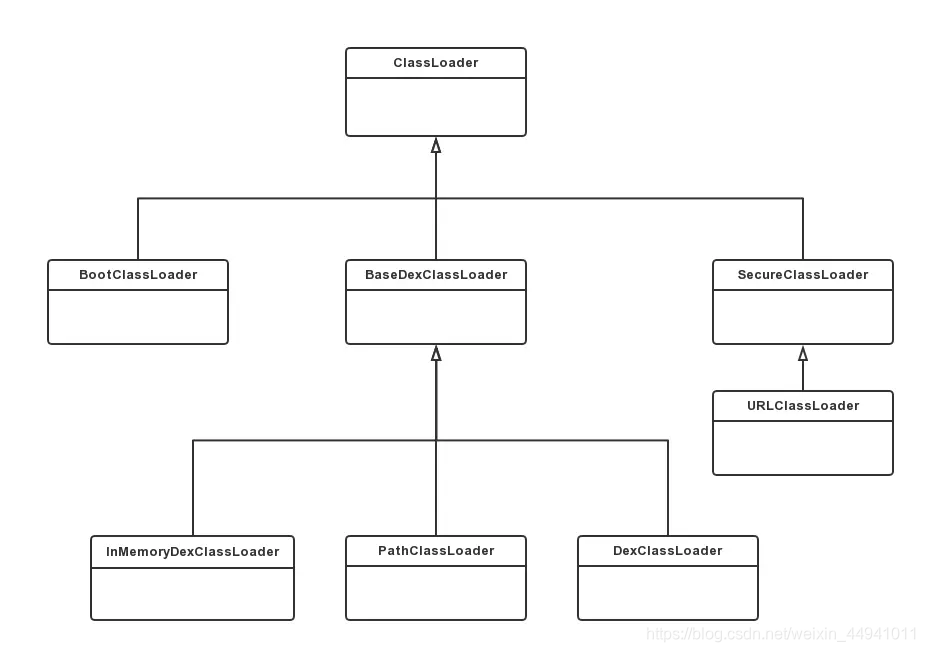
这只是classloader的类继承关系并不是刚才所讲的双亲代理的父子关系。
真正双亲代理中的查找顺序是:DexClassLoader—>PathClassLoader–> BaseDexClassLoader(平常所用到的插件化,热修复都是通过这三种ClassLoader来实现,其他不做介绍)但是PathClassLoader并不是DexClassLoader的父类。这里需要注意下。
3、简述插件化,热修复等技术的原理:
其实就一句话,利用双亲代理。
先说插件化:一个插件被会被一个自定义的DexClassLoader来加载,通过双亲代理模式则肯定会找不到,则会自定义的这个DexClassLoader来加载从而达到不安装就可以被调用的效果
再说热修复:Android程序中的Class文件会被封装成一个或者多个Dex文件(这个将APK解压就会看出来),在刚才提到的DexClassLoader和PathClassLoader是怎么加载Dex文件呢?
下面看他们俩的父类BaseDexClassLoader的构造函数:
/**
 * Constructs an instance.
 *
 * @param dexPath the list of jar/apk files containing classes and
 * resources, delimited by {@code File.pathSeparator}, which
 * defaults to {@code ":"} on Android
 * @param optimizedDirectory directory where optimized dex files
 * should be written; may be {@code null}
 * @param librarySearchPath the list of directories containing native
 * libraries, delimited by {@code File.pathSeparator}; may be
 * {@code null}
 * @param parent the parent class loader
 */
public BaseDexClassLoader(String dexPath, File optimizedDirectory,
        String librarySearchPath, ClassLoader parent) {
    super(parent);
    this.pathList = new DexPathList(this, dexPath, librarySearchPath, optimizedDirectory);
}
(为了简单弄明白热修复的原理不做展开只介绍热修复简单原理)
在这里有一个名为pathList的DexPathList对象,再看DexPathList的构造函数
public DexPathList(ClassLoader definingContext, String dexPath,
        String librarySearchPath, File optimizedDirectory) {
//省略部分代码
//赋值类加载器
    this.definingContext = definingContext;
    // 将dex文件或压缩包中的信息保存到dexElements中
    this.dexElements = makeDexElements(splitDexPath(dexPath), optimizedDirectory, suppressedExceptions, definingContext);
   //省略部分代码
}
这里看到了咱们刚才提到的Dex的影子,再看makeDexElements方法
/**
 * Makes an array of dex/resource path elements, one per element of
 * the given array.
 */
private static Element[] makeDexElements(List<File> files, File optimizedDirectory,List<IOException> suppressedExceptions,ClassLoader loader) {
    return makeElements(files,optimizedDirectory,suppressedExceptions,false,loader);
}
是个重载,继续看看makeElements方法:
private static Element[] makeElements(List<File> files, File optimizedDirectory,List<IOException> suppressedExceptions,boolean ignoreDexFiles,ClassLoader loader) {
//实例化dex文件或者包含dex文件的的文件长度的Element数组
    Element[] elements = new Element[files.size()];
    int elementsPos = 0;
    /*
     * Open all files and load the (direct or contained) dex files
     * up front.
     */
    for (File file : files) {
        File zip = null;
        File dir = new File("");
        DexFile dex = null;
        String path = file.getPath();
        String name = file.getName();

    //省略部分代码
//如果是dex文件
     if (name.endsWith(DEX_SUFFIX)) {
         dex = loadDexFile(file, optimizedDirectory, loader,elements);
      } else {
//如果是那些包含dex文件的压缩文件
       zip = file;
dex = loadDexFile(file, optimizedDirectory, loader, elements);
            }
        }
//省略部分代码
    return elements;
}
代码不复杂就是将一个个的Dex来封装成Element,在返回来看DexClassLoader和PathClassLoader从BaseDexClassLoader继承过来的方法findCLass,
@Override
protected Class<?> findClass(String name) throws ClassNotFoundException {
   List<Throwable> suppressedExceptions = new ArrayList<Throwable>();
   Class c = pathList.findClass(name, suppressedExceptions);
   if (c == null) {
       ClassNotFoundException cnfe = new ClassNotFoundException("Didn't find class \"" + name + "\" on path: " + pathList);
       for (Throwable t : suppressedExceptions) {
           cnfe.addSuppressed(t);
       }
       throw cnfe;
   }
   return c;
}
看到了吗?pathList出现了,传入的是一个class 的name并返回了一个Class对象,现在开始追踪pathList的findClass方法,
/**
* Finds the named class in one of the dex files pointed at by
* this instance. This will find the one in the earliest listed
* path element. If the class is found but has not yet been
* defined, then this method will define it in the defining
* context that this instance was constructed with.
*
* @param name of class to find
* @param suppressed exceptions encountered whilst finding the class
* @return the named class or {@code null} if the class is not
* found in any of the dex files
*/
public Class findClass(String name, List<Throwable> suppressed) {
   for (Element element : dexElements) {
       DexFile dex = element.dexFile;

       if (dex != null) {
           Class clazz = dex.loadClassBinaryName(name, definingContext, suppressed);
           if (clazz != null) {
               return clazz;
           }
       }
   }
   if (dexElementsSuppressedExceptions != null) {
       suppressed.addAll(Arrays.asList(dexElementsSuppressedExceptions));
   }
   return null;
}
看到了刚才说的Element的身影,pathList中的findClass方法会遍历当前ClassLoader中的Element,并将Element转换成Dex文件,Dex文件获取指定Class的对象,直到获取到对应的Class为止。
了解了加载Class的流程后就不难解释热修复是怎么做的了,我们只需要将修复过的Dex文件放在存在Bug的Dex的前面就可以,因为双亲代理模式当一个Class被加载过了就不会再去加载而是从缓存中的获取。
读者福利
Android架构师的门槛,有没有免费学习资料?
加入Android高级架构群;1007478004,免费提供视频和资料,一起学习,相互讨论。
