版权声明:欢迎转载,期待指正 https://blog.csdn.net/fighting_sxw/article/details/89163151
参考:
https://github.com/leetens/bookworm-plugins/tree/master/Chapter1-1
http://www.cnblogs.com/huiy/p/6169614.html
http://www.importnew.com/21988.html
http://www.cnblogs.com/xing901022/p/5608823.html
环境:MacOS,IntelliJ IDEA、JDK1.8
第一步 pom.xml配置
在pom.xml中引入commons-cli和appassembler-maven-plugin
<?xml version="1.0" encoding="UTF-8"?>
<project xmlns="http://maven.apache.org/POM/4.0.0"
         xmlns:xsi="http://www.w3.org/2001/XMLSchema-instance"
         xsi:schemaLocation="http://maven.apache.org/POM/4.0.0 http://maven.apache.org/xsd/maven-4.0.0.xsd">
    <modelVersion>4.0.0</modelVersion>

    <groupId>com</groupId>
    <artifactId>jvm</artifactId>
    <version>1.0-SNAPSHOT</version>
    <build>
        <plugins>
            <plugin>
                <artifactId>maven-resources-plugin</artifactId>
                <executions>
                    <execution>
                        <id>copy-resources</id>
                        <phase>package</phase>
                        <goals>
                            <goal>copy-resources</goal>
                        </goals>
                        <configuration>
                            <outputDirectory>${project.build.directory}/${project.name}/classes</outputDirectory>
                            <resources>
                                <resource>
                                    <directory>${project.build.directory}/classes</directory>
                                    <filtering>false</filtering>
                                </resource>
                            </resources>
                        </configuration>
                    </execution>
                </executions>
            </plugin>
            <plugin>
                <groupId>org.codehaus.mojo</groupId>
                <artifactId>appassembler-maven-plugin</artifactId>
                <version>2.0.0</version>
                <configuration>
                    <!-- 生成linux, windows两种平台的执行脚本 -->
                    <platforms>
                        <platform>windows</platform>
                        <platform>unix</platform>
                    </platforms>
                    <!-- 根目录 -->
                    <assembleDirectory>${project.build.directory}/${project.name}</assembleDirectory>
                    <!-- 打包的jar,以及maven依赖的jar放到这个目录里面 -->
                    <repositoryName>lib</repositoryName>
                    <!-- 可执行脚本的目录 -->
                    <binFolder>bin</binFolder>
                    <!-- lib目录中jar的存放规则,默认是${groupId}/${artifactId}的目录格式,flat表示直接把jar放到lib目录 -->
                    <repositoryLayout>flat</repositoryLayout>
                    <encoding>UTF-8</encoding>
                    <logsDirectory>logs</logsDirectory>
                    <tempDirectory>tmp</tempDirectory>
                    <programs>
                        <program>
                            <!-- 启动类 修改成自己的类-->
                            <mainClass>CommandLineUtil</mainClass>
                            <jvmSettings>
                                <extraArguments>
                                    <extraArgument>-server</extraArgument>
                                    <extraArgument>-Xmx2G</extraArgument>
                                    <extraArgument>-Xms2G</extraArgument>
                                </extraArguments>
                            </jvmSettings>
                        </program>
                    </programs>
                </configuration>
            </plugin>
        </plugins>
    </build>

    <dependencies>
        <!-- https://mvnrepository.com/artifact/commons-cli/commons-cli -->
        <dependency>
            <groupId>commons-cli</groupId>
            <artifactId>commons-cli</artifactId>
            <version>1.4</version>
        </dependency>
    </dependencies>

</project>
第二步 Java代码
编写测试类:
import org.apache.commons.cli.*;

/**
 * @description: TODO
 * @author: xiaowen
 * @create: 2019-04-09 11:04
 **/
public class CommandLineUtil {
    public static void main(String[] args) {
        parseOptions(args);
    }
    //java [-options] class [args...]
    private static void parseOptions(String[] args){
        Options options=new Options();

        //第一个参数是选项名称的缩写,第二个参数是选项名称的全称,第三个参数表示是否需要额外的输入,第四个参数表示对选项的描述信息
        Option opt_help = new Option("h", "help", false, "print help message");
        opt_help.setRequired(false);
        options.addOption(opt_help);

        Option opt_version = new Option("v", "version", false, "print version and exit");
        opt_version.setRequired(false);
        options.addOption(opt_version);

        //用来打印帮助信息
        HelpFormatter hf=new HelpFormatter();
        hf.setWidth(110);

        CommandLine commandLine=null;
        CommandLineParser parser=new DefaultParser();

        try {
            commandLine=parser.parse(options,args);
            if(commandLine.hasOption("h")){
                hf.printHelp("testApp",options,true);
            }
            if(commandLine.hasOption("v")){
                System.out.println("version 0.0.1");
            }
        } catch (ParseException e) {
            e.printStackTrace();
        }
    }
}
第三步 打包
在项目的根目录下使用如下命令打包
mvn clean package appassembler:assemble
看到下图表示执行成功

执行完命令后会在target目录下生成可执行文件
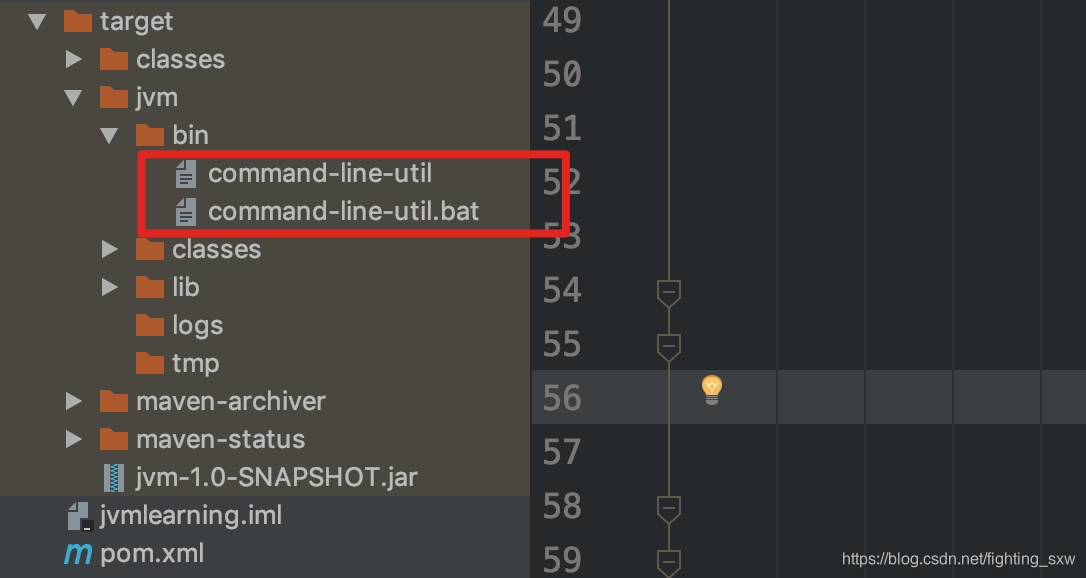
第四步 终端测试
进入target/jvm/bin/
执行命令./command-line-util -h 或者./command-line-util -help

执行命令 ./command-line-util -v 或者./command-line-util -version
