1、Spring 号称是一个可以实现模块可插拔(轻量级)的 JavaEE 开发框架。那么它是如何实现程序的可插拔(轻量级)的呢?
答:实现程序的可插拔的核心理念就是控制反转(IoC:Inversion of Control),所谓的控制反转就是将代码的调用权(控制权)从调用放转移给被调用方(服务提供方)。
如图所示:
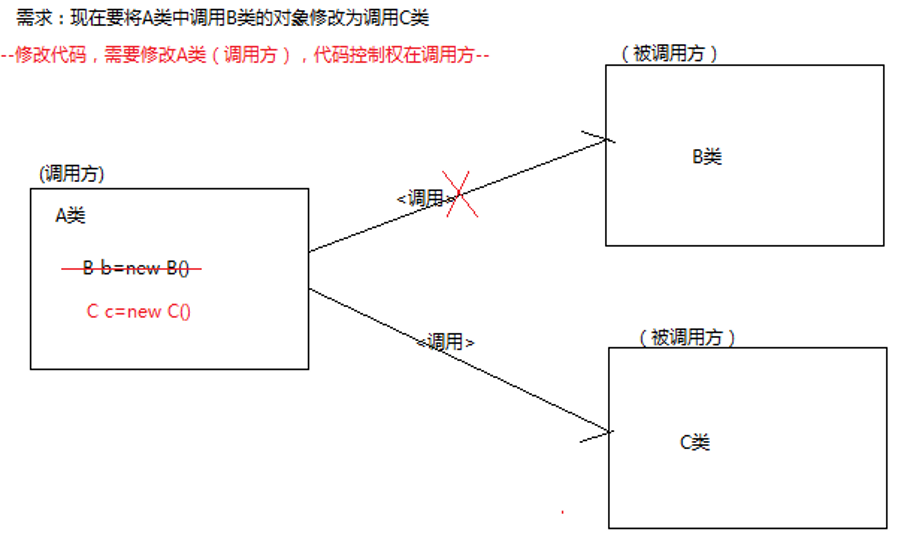
(1) 强耦合调用方式
将 A 调用 B 的对象修改为 C 类的对象,修改的是调用方的代码,所以我们认为代码的调用权在调用方。
(2) 基于 IoC(控制反转)的调用方式
将上图的需求,修改为使用 IoC 的调用代码方式。就是将代码的控制权从调用方修改为被调用方,意味着,代码的调用权转移给被调用方(我们也称为服务方),不用修改调用方的代码,只要修改配置文件就实现对象的切换。
如下图:将 A 类调用 B 类的对象修改为 C 类的对象,修改的是被调用方的配置文件的代码,所以代码的调用权转移到了被调用方。通过控制反转,我们可以实现增加模块或者移除模块统一由配置文件关联,所以增加或者移除模块配置 XML 配置文件即可。
我们将代码的调用权(控制权)从调用方转移给被调用方(服务提供方)的设计模式称为控制反转(IoC)。


根据上图可以得出,实现一个 IoC 的框架,必须要解决两个问题:
① 被调用方(服务方),在程序启动时就要根据配置文件类以及类与类的关系创建好对象,放在一个容器里面。
② 调用方使用一个接口或类的引用(不用使用 new),就可以创建获得对象。
我们将这种不用 new,而是根据接口或者类的引用就可以从被调用的容器里获得创建的对象的方式称为依赖注入。
所以 控制反转(IoC)= 依赖注入 + 面向接口的编程思想的实现
在这里,我们首先抓住一个重点:Spring 之所以可以实现可插拔程序,是实现了不用 new ,使用类或接口就可以获得对象。
2、基于 Spring 框架的 IoC 实现
(1)说明需求
CustomerClient 调用 CustomerService 的 save() 方法。将调用 CustomerServiceImpl 的对象实现的 save() 切换成调用 CustomerServiceImpl2 对象实现的 save().
注意:重点观察 CustomerClient,在切换过程中有没有修改该类的代码。
需求修改说明图:
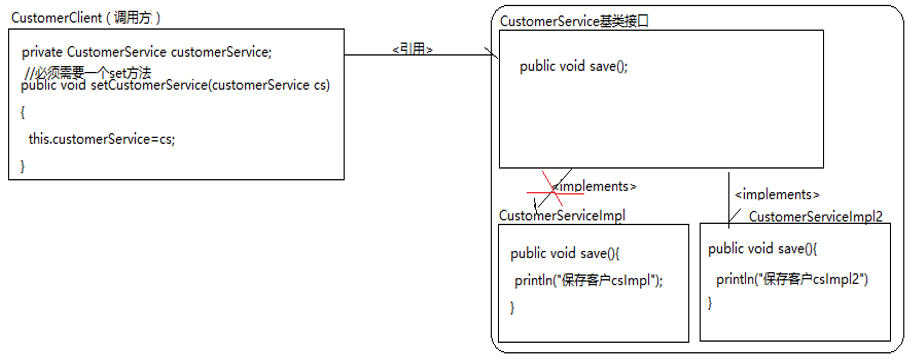
如果将 CustomerClient 调用的 CustomerServiceImpl 的对象修改为 CustomerServiceImpl2 的对象,而不用修改 CustomerClient 的代码。那么说明代码的调用权从 CustomerClient 转移到了服务方。
(2)示例代码:
① CustomerService 接口代码:
1 package cn.mgy.service;
2
3 public interface CustomerService {
4     /**
5      * 保存方法
6      */
7     public void save();
8
9 }
② CustomerServiceImpl 子类:
 1 package cn.mgy.service.impl;
 2
 3 import cn.mgy.service.CustomerService;
 4
 5 public class CustomerServiceImpl implements CustomerService{
 6
 7     @Override
 8     public void save() {
 9         System.out.println("-保存客户-CustomerServiceImpl");
10
11     }
12 }
③ CustomerServiceImpl2 子类:
 1 package cn.mgy.service.impl;
 2
 3 import cn.mgy.service.CustomerService;
 4
 5 public class CustomerServiceImpl2 implements CustomerService{
 6
 7     @Override
 8     public void save() {
 9         System.out.println("-保存客户-CustomerServiceImpl2");
10
11     }
12 }
④ CustomerClient 类(调用方):
 1 package cn.mgy.client;
 2
 3 import cn.mgy.service.CustomerService;
 4
 5 public class CustomerClient {
 6
 7     //1.声明一个父接口的引用
 8     private CustomerService customerService;
 9
10     //2.使用set方法注入对象,我们将通过方法注入的对象的方式称为依赖注入
11     public void setCustomerService(CustomerService customerService) {
12         this.customerService = customerService;
13     }
14
15     public void login(){
16         //调用服务端的方法
17         customerService.save();;
18     }
19 }
⑤ 配置文件 applicationContext.xml:
 1 <?xml version="1.0" encoding="UTF-8"?>
 2 <beans xmlns="http://www.springframework.org/schema/beans"
 3     xmlns:xsi="http://www.w3.org/2001/XMLSchema-instance"
 4     xsi:schemaLocation="http://www.springframework.org/schema/beans http://www.springframework.org/schema/beans/spring-beans-4.2.xsd ">
 5
 6 <!-- <bean>标签:用于声明一个类,在启动Spring框架的时候根据该配置的类创建对象到容器里面 name -->
 7 <!-- <bean name="customerServiceImpl" class="cn.mgy.service.impl.CustomerServiceImpl"></bean> -->
 8    <!--
 9    CustomerServiceImpl修改为CustomerServiceImpl2的配置
10     -->
11     <bean name="customerServiceImpl" class="cn.mgy.service.impl.CustomerServiceImpl2"></bean>
12
13     <bean name="customerClient" class="cn.mgy.client.CustomerClient">
14         <!-- 对应set方法关联的对象 customerService
15                  name:关联对应的set方法,关联规则:xxx对应setXxx();如:customerService() 对应setCustomerService()
16                  ref:指向容器中的对象
17          -->
18         <property name="customerService" ref="customerServiceImpl"></property>
19     </bean>
20 </beans>
⑥ 测试代码:
 1 package cn.mgy.test;
 2
 3 import org.junit.Test;
 4 import org.springframework.context.ApplicationContext;
 5 import org.springframework.context.support.ClassPathXmlApplicationContext;
 6
 7 import cn.mgy.client.CustomerClient;
 8
 9 public class ClientTest {
10
11
12     @Test
13     public void save(){
14         ApplicationContext context = new ClassPathXmlApplicationContext("applicationContext.xml");
15         CustomerClient customerClient = context.getBean("customerClient", CustomerClient.class);
16         //调用方法
17         customerClient.login();
18
19     }
20 }