initramfs是Linus开发的一种基于内存的根文件系统,**在编译Linux内核的时候,它会直接把根文件系统树打包进内核的镜像文件中(zImage),**这也意味着该镜像文件同时包含了Linux内核和根文件系统。因为根文件系统是内核打包进去的,所以内核自己知道根文件系统的位置,这样u-boot也就不需要通过bootargs参数告诉内核根文件系统的信息,此外也不需要额外烧录根文件系统镜像文件,如ubifs、yaffs2、jffs2等。在今后做其他根文件系统的时候,请务必在内核中禁用initramfs,否则Linux内核将优先使用initramfs启动了。
因为initramfs是基于内存的根文件系统,所以大家在开发板上对根文件系统里的任何文件的操作,包括创建、删除、修改在重启后都会丢失。因此如果想要更改根文件系统里的文件,必须修改根文件系统树,然后重新编译Linux内核并使用u-boot重新烧录。
在前一篇博客已经讲了如何制作制根文件系统,而要将文件系统移植到开发板,还需要相应的步骤,典型的一种方式就是使用initramfs。
接下来制作基于initramfs的根文件系统的制作与移植:
Linux内核使用initramfs启动,只需要在make menuconfig作下面修改,然后重新编译即可。
zhanghang@ubuntu:~/fl2440/linux$ cd linux-3.0/
zhanghang@ubuntu:~/fl2440/linux/linux-3.0$ make menuconfig
General setup --->
		[*] Initial RAM filesystem and RAM disk (initramfs/initrd) support
		(../../linux/rootfs/) Initramfs source file(s) 指定前面制作的根文件系统树所在的路径
Device Drivers --->
		[*] Block devices --->
				< > Network block device support
				< > Low Performance USB Block driver
				< > RAM block device support 务必将这个ramdisk选项取消掉,否则initramfs根文件系统不能启动,默认用作 initrd启动。
				< > ATA over Ethernet support
再次编译:
zhanghang@ubuntu:~/fl2440/linux/linux-3.0$ ./build.sh
...
  LD      init/built-in.o
  LD      .tmp_vmlinux1
  KSYM    .tmp_kallsyms1.S
  AS      .tmp_kallsyms1.o
  LD      .tmp_vmlinux2
  KSYM    .tmp_kallsyms2.S
  AS      .tmp_kallsyms2.o
  LD      vmlinux
  SYSMAP  System.map
  SYSMAP  .tmp_System.map
  OBJCOPY arch/arm/boot/Image
  Kernel: arch/arm/boot/Image is ready
  GZIP    arch/arm/boot/compressed/piggy.gzip
  AS      arch/arm/boot/compressed/piggy.gzip.o
  SHIPPED arch/arm/boot/compressed/lib1funcs.S
  AS      arch/arm/boot/compressed/lib1funcs.o
  LD      arch/arm/boot/compressed/vmlinux
  OBJCOPY arch/arm/boot/zImage
  Kernel: arch/arm/boot/zImage is ready
  Building modules, stage 2.
  MODPOST 360 modules
  LD [M]  kernel/configs.ko
  ...
    CHK     include/linux/version.h
  CHK     include/generated/utsrelease.h
make[1]: `include/generated/mach-types.h' is up to date.
  CALL    scripts/checksyscalls.sh
  CHK     include/generated/compile.h
  Kernel: arch/arm/boot/Image is ready
  SHIPPED arch/arm/boot/compressed/lib1funcs.S
  AS      arch/arm/boot/compressed/lib1funcs.o
  LD      arch/arm/boot/compressed/vmlinux
  OBJCOPY arch/arm/boot/zImage
  Kernel: arch/arm/boot/zImage is ready
  Building modules, stage 2.
  MODPOST 360 modules
Image Name:   Linux Kernel
Created:      Sun Apr 28 22:13:13 2019
Image Type:   ARM Linux Kernel Image (uncompressed)
Data Size:    7183168 Bytes = 7014.81 kB = 6.85 MB
Load Address: 30008000
Entry Point:  30008040
zhanghang@ubuntu:~/fl2440/linux/linux-3.0$ du -h linuxrom-s3c2440.bin
6.9M    linuxrom-s3c2440.bin
加入根文件系统后,可以看到,内核文件变得很大,由于initramfs文件系统内核和根文件系统时同时烧录的,所以只需要将怎么.bin文件烧录到30008000上就可以启动。
使用串口登录开发板,进入到u-boot界面:
U-Boot 2010.09 (Apr 25 2019 - 22:37:02)

DRAM:  64 MiB
NAND:  256 MiB
In:    serial
Out:   serial
Err:   serial
Net:   dm9000
Hit any key to stop autoboot:  0
[fl2440@lingyun]#
//u-boot里设置bootargs参数,该参数是u-boot传给Linux内核的参数,这里不需要告诉Linux内核根文件系统信息:
[fl2440@lingyun]# set bootargs 'console=tty0 console=ttyS0,115200 mem=64M rw loglevel=7'
[fl2440@lingyun]# save
Saving Environment to NAND...
Erasing Nand...
Erasing at 0x60000 -- 100% complete.
Writing to Nand... done
Abort
[fl2440@lingyun]# tftp 30008000 linuxrom-s3c2440.bin
dm9000 i/o: 0x20000300, id: 0x90000a46
DM9000: running in 16 bit mode
MAC: 08:00:3e:26:0a:5b
could not establish link
Using dm9000 device
TFTP from server 192.168.2.8; our IP address is 192.168.2.168
Filename 'linuxrom-s3c2440.bin'.
Load address: 0x30008000
Loading: T #################################################################
         #################################################################
         #################################################################
         #################################################################
         #################################################################
         #################################################################
         #################################################################
         ###################################
done
Bytes transferred = 7183232 (6d9b80 hex)
[fl2440@lingyun]# nand erase 100000

NAND erase: device 0 offset 0x100000, size 0xff00000
Skipping bad block at  0x005c0000
Skipping bad block at  0x031a0000
Erasing at 0xffe0000 -- 100% complete.
OK
[fl2440@lingyun]# nand write 30008000 100000 ${filesize}

NAND write: device 0 offset 0x100000, size 0x6da000
Skip bad block 0x005c0000
 7184384 bytes written: OK
[fl2440@lingyun]# reset//重启;
...
TCP cubic registered
NET: Registered protocol family 17
drivers/rtc/hctosys.c: unable to open rtc device (rtc0)
Freeing init memory: 11728K
usb 1-1: new full speed USB device number 2 using s3c2410-ohci
usb 1-1: device descriptor read/64, error -62
usb 1-1: device descriptor read/64, error -62
usb 1-1: new full speed USB device number 3 using s3c2410-ohci
usb 1-1: device descriptor read/64, error -62
usb 1-1: device descriptor read/64, error -62
usb 1-1: new full speed USB device number 4 using s3c2410-ohci
usb 1-1: device not accepting address 4, error -62
usb 1-1: new full speed USB device number 5 using s3c2410-ohci
usb 1-1: device not accepting address 5, error -62
hub 1-0:1.0: unable to enumerate USB device on port 1
dm9000 dm9000: eth0: link down

Default Logon Username: root Password: 123456
LingYunFL2440 login: dm9000 dm9000: eth0: link up, 100Mbps, full-duplex, lpa 0xCDE1
root//账号
Password://密码
~ >://登录
~ >: ls
apps     dev      init     mnt      sbin     usr
bin      etc      lib      proc     sys      var
data     info     linuxrc  root     tmp
~ >: vim hello
~ >: ls
apps     dev      info     linuxrc  root     tmp
bin      etc      init     mnt      sbin     usr
data     hello    lib      proc     sys      var
重启:
~ >: reboot
出现错误:
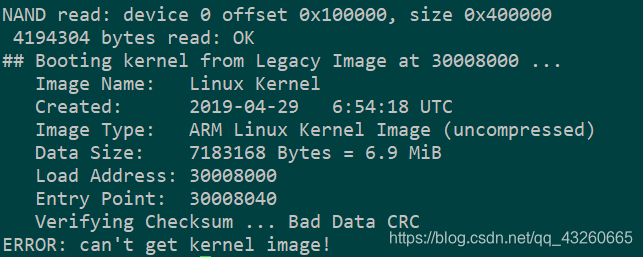
我们可以看到,u-boot在读取内核时,从0x100000开始读取0x400000个字节,此时,我们内核文件大小是7183168bytes,(由于initramfs文件系统是和内核一起写入到内存中运行,所以比其它类型文件系统要大)但是只能读取到4194304bytes,所以CRC会出错,系统不能正常启动,如果是ubifs等文件系统,与内核分开烧录,内核大小一般不会超过0x400000。
1,刚才tftp下载内核时已经把完整的内核image加载到相应的内存位置上去了;
2,reset命令会导致cpu复位,这时候内存并没有掉电,内存中的数据还没丢失,这也意味着刚才tftp下载的内核image文件内容都还在这个内存中,这种复位叫做热复位;
3,系统启动时执行bootcmd环境变量的命令,该命令会将之前写入nandflash中的内核image读入相应的内存地址上,刚好这个地址跟tftp下载的内存地址一致;
4,内核image有约7m,你只读了4m,但因为之前tftp下载的内存数据还在,所以第一次复位启动可以正常启动
5,当你系统运行后,内存中的数据已经改变了,这时你再复位但只读了4M,文件没读完,所以起不来
解决办法:
重新烧录内核文件,然后设置重新bootcmd大小并保存。
[fl2440@lingyun]# tftp 30008000 linuxrom-s3c2440.bin
dm9000 i/o: 0x20000300, id: 0x90000a46
DM9000: running in 16 bit mode
MAC: 00:11:22:33:44:55
could not establish link
Using dm9000 device
TFTP from server 192.168.2.8; our IP address is 192.168.2.168
Filename 'linuxrom-s3c2440.bin'.
Load address: 0x30008000
Loading: T #################################################################
         #################################################################
         #################################################################
         #################################################################
         #################################################################
         #################################################################
         #################################################################
         ###################################
done
Bytes transferred = 7183228 (6d9b7c hex)
[fl2440@lingyun]# nand erase 100000

NAND erase: device 0 offset 0x100000, size 0xff00000
Skipping bad block at  0x005c0000
Skipping bad block at  0x031a0000
Erasing at 0xffe0000 -- 100% complete.
OK
[fl2440@lingyun]# nand write 30008000 100000 ${filesize}

NAND write: device 0 offset 0x100000, size 0x6da000
Skip bad block 0x005c0000
 7184384 bytes written: OK
[fl2440@lingyun]# set bootcmd 'nand read 30008000 100000 1000000; bootm 30008000'
[fl2440@lingyun]# save
[fl2440@lingyun]# reset
resetting ...


U-Boot 2010.09 (Apr 28 2019 - 06:50:04)

DRAM:  64 MiB
NAND:  256 MiB
In:    serial
Out:   serial
Err:   serial
Net:   dm9000
Hit any key to stop autoboot:  0

NAND read: device 0 offset 0x100000, size 0x1000000
Skipping bad block 0x005c0000
 16777216 bytes read: OK
## Booting kernel from Legacy Image at 30008000 ...
   Image Name:   Linux Kernel
   Created:      2019-04-29   8:13:21 UTC
   Image Type:   ARM Linux Kernel Image (uncompressed)
   Data Size:    7183164 Bytes = 6.9 MiB
   Load Address: 30008000
   Entry Point:  30008040
   Verifying Checksum ... OK
   XIP Kernel Image ... OK
OK

Starting kernel ...
...
usb 1-1: new full speed USB device number 3 using s3c2410-ohci
usb 1-1: device descriptor read/64, error -62
usb 1-1: device descriptor read/64, error -62
usb 1-1: new full speed USB device number 4 using s3c2410-ohci
usb 1-1: device not accepting address 4, error -62
usb 1-1: new full speed USB device number 5 using s3c2410-ohci
usb 1-1: device not accepting address 5, error -62
hub 1-0:1.0: unable to enumerate USB device on port 1
dm9000 dm9000: eth0: link down

Default Logon Username: root Password: 123456
LingYunFL2440 login: dm9000 dm9000: eth0: link up, 100Mbps, full-duplex, lpa 0xCDE1
root
Password:
~ >: ls
apps     dev      init     mnt      sbin     usr
bin      etc      lib      proc     sys      var
data     info     linuxrc  root     tmp
~ >:
再写一个程序:

~ >: vim hello
aaaaaaaaa
~ >: ls
apps     dev      info     linuxrc  root     tmp
bin      etc      init     mnt      sbin     usr
data     hello    lib      proc     sys      var
~ >: reboot
...
Default Logon Username: root Password: 123456
LingYunFL2440 login: root
Password:
~ >: ls
apps     dev      init     mnt      sbin     usr
bin      etc      lib      proc     sys      var
data     info     linuxrc  root     tmp
发现hello没了,这正是initramfs文件系统的缺点,initramfs和内核运行在内存,写入数据在每次重启或掉电后都会丢失。。。