首先打开 IDEA 并点击 New Project,进入如下页面,点击 Maven,选中"Create from archetype" big选择 quickstart 然后 next

GroupId 为 package 名,ArtifactId 为项目名称,点击 next

不用改动,直接 next(有教程说要添加一个什么东西来防止下载速度过慢,笔者用了另一种办法,后面描述)

上一步也可以选择在properties里加入 archetypeCatalog=internal

这个页面也不用改动,直接 finish

进入项目后,先去修改 pom.xml 文件,首先添加图中圈出的三处(version 请视自己具体所用版本而定)

接着在 <dependencies> </dependencies> 标签内添加以下配置
    <dependency>
      <groupId>org.springframework.boot</groupId>
      <artifactId>spring-boot-starter-tomcat</artifactId>
      <version>2.0.4.RELEASE</version>
    </dependency>
    <dependency>
      <groupId>org.springframework.boot</groupId>
      <artifactId>spring-boot-starter-data-jpa</artifactId>
      <version>2.0.4.RELEASE</version>
    </dependency>
    <dependency>
      <groupId>org.springframework.boot</groupId>
      <artifactId>spring-boot-starter-web</artifactId>
      <version>2.0.4.RELEASE</version>
    </dependency>
    <dependency>
      <groupId>org.springframework.boot</groupId>
      <artifactId>spring-boot-starter-jdbc</artifactId>
    </dependency>
    <dependency>
      <groupId>mysql</groupId>
      <artifactId>mysql-connector-java</artifactId>
      <scope>runtime</scope>
    </dependency>
    <dependency>
      <groupId>org.springframework.boot</groupId>
      <artifactId>spring-boot-starter-test</artifactId>
      <scope>test</scope>
    </dependency>
    <dependency>
      <groupId>org.mybatis.spring.boot</groupId>
      <artifactId>mybatis-spring-boot-starter</artifactId>
      <version>1.3.2</version>
    </dependency>
然后将 <build> </build> 标签改为下图所示

此时右下角可能会出现下图所示的小窗口,并且一直停滞,这就是上面所提到的问题,此时,下载 archetype-catalog.xml 文件(尽力了,设置最低积分也需要 1 分,没有积分的可以评论留邮箱我发给你),并将其放在 C 盘 .m2 文件的根目录下


关闭项目后再次打开发现下载速度明显提升并且很快结束下载
然后在 main 目录下创建文件夹 resources 并且设置为 Resources Root

在 Resources 目录下创建 application.properties 文件并填写有关数据库的配置(这里配置端口是因为笔者的服务器中8080端口已被占用,所以使用了另外的端口)

spring.datasource.url=jdbc:mysql://localhost:3306/basketball?serverTimezone=GMT&allowMultiQueries=true&useUnicode=true&characterEncoding=utf-8&useSSL=false
spring.datasource.driver-class-name=com.mysql.jdbc.Driver
spring.datasource.username=root
spring.datasource.password=root

# 设置 tomcat 端口为 8880
server.port=8880
此时,正式开始代码部分
在 com.hello 包下创建 controller 包, 并在其下创建 HelloController 类

在其中编写代码
package com.hello.controller;

import org.springframework.web.bind.annotation.GetMapping;
import org.springframework.web.bind.annotation.RestController;

import java.util.HashMap;
import java.util.Map;

@RestController
public class HelloController {

    @GetMapping(value = "/hello")
    public Map<String, Object> hello(){
        Map<String, Object> map = new HashMap<>();
        map.put("hello", "Hello world!");
        return map;
    }

}
打开 App.java
为 App 添加注解 @SpringBootApplication,并在 Main 函数中运行 SpringApplication.run(App.class, args);
package com.hello;

import org.springframework.boot.SpringApplication;
import org.springframework.boot.autoconfigure.SpringBootApplication;

/**
 * Hello world!
 *
 */
@SpringBootApplication
public class App
{
    public static void main( String[] args )
    {
        SpringApplication.run(App.class, args);
//        System.out.println( "Hello World!" );
    }
}
此时,代码部分已经结束,开始进行下一步,按图中箭头所示进行操作


Name 可以自己取,Main class 选取添加了 @SpringBootApplication 注解的 App 类,直接 ok

运行后用 Postman(Get 方法也可以在浏览器地址栏直接访问) 访问 url,成功返回

接下来,将项目打包为 jar 包并上传至服务器
在 View 中的 Tool Windows 找到Maven Projects 并打开

先双击 clean (如果是第一次则不需要) 然后双击 install

此时,打包成功

在 target 目录下可以看到生成的 .jar 文件

然后利用 FileZilla 将 jar 包上传至服务器文件

利用 PuTTY 登录云服务器,进入到所上传 jar 包的目录下
运行 jar 包有两种方式
# 直接运行,当该窗口关闭时程序终止
java -jar xxxx.jar
# 持久运行,即便窗口关闭程序也不会终止
nohup java -jar xxxx.jar &
这里运用第二种方法

此时 hello.jar 已在运行,并且将日志存放在 nohup.out 文件中
# 查看日志, Ctrl + C 退出查看
tail -100f nohup.out
此时再次通过 Postman 访问路径,可以成功得到返回结果

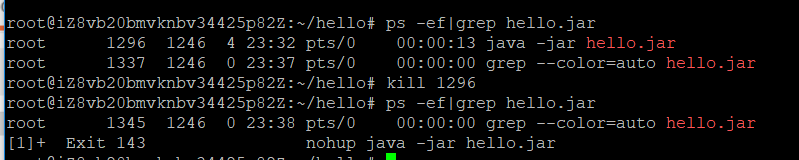
若想关闭 jar 包的运行,首先要查看当前 jar 包的进程号,然后利用 kill 命令杀死进程
# 查看 xxxx.jar 运行的进程号
ps -ef|grep xxxx.jar
# 关闭进程号为 xx 的进程
kill xx