UIViewController
An object that manages a view hierarchy for your UIKit app.
On This Page
Declaration
class UIViewController : UIResponder
Overview
The UIViewController class defines the shared behavior that is common to all view controllers. You rarely create instances of the UIViewController class directly. Instead, you subclass UIViewController and add the methods and properties needed to manage the view controller's view hierarchy.
A view controller’s main responsibilities include the following:
-
Updating the contents of the views, usually in response to changes to the underlying data.
-
Responding to user interactions with views.
-
Resizing views and managing the layout of the overall interface.
-
Coordinating with other objects—including other view controllers—in your app.
A view controller is tightly bound to the views it manages and takes part in handling events in its view hierarchy. Specifically, view controllers are UIResponder objects and are inserted into the responder chain between the view controller’s root view and that view’s superview, which typically belongs to a different view controller. If none of the view controller’s views handle an event, the view controller has the option of handling the event or passing it along to the superview.
View controllers are rarely used in isolation. Instead, you often use multiple view controllers, each of which owns a portion of your app’s user interface. For example, one view controller might display a table of items while a different view controller displays the selected item from that table. Usually, only the views from one view controller are visible at a time. A view controller may present a different view controller to display a new set of views, or it may act as a container for other view controllers’ content and animate views however it wants.
Subclassing Notes
Every app contains at least one custom subclass of UIViewController. More often, apps contain many custom view controllers. Custom view controllers define the overall behaviors of your app, including the app’s appearance and how it responds to user interactions. The following sections provide a brief overview of some of the tasks your custom subclass performs. For detailed information about using and implementing view controllers, see View Controller Programming Guide for iOS.
View Management
Each view controller manages a view hierarchy, the root view of which is stored in the viewproperty of this class. The root view acts primarily as a container for the rest of the view hierarchy. The size and position of the root view is determined by the object that owns it, which is either a parent view controller or the app’s window. The view controller that is owned by the window is the app’s root view controller and its view is sized to fill the window.
View controllers load their views lazily. Accessing the view property for the first time loads or creates the view controller’s views. There are several ways to specify the views for a view controller:
-
Specify the view controller and its views in your app’s Storyboard. Storyboards are the preferred way to specify your views. With a storyboard, you specify the views and their connections to the view controller. You also specify the relationships and segues between your view controllers, which makes it easier to see and modify your app's behavior.
To load a view controller from a storyboard, call the
instantiateViewController(withIdentifier:)method of the appropriateUIStoryboardobject. The storyboard object creates the view controller and returns it to your code. -
Specify the views for a view controller using a Nib file. A nib file lets you specify the views of a single view controller but does not let you define segues or relationships between view controllers. The nib file also stores only minimal information about the view controller itself.
To initialize a view controller object using a nib file, create your view controller class programmatically and initialize it using the
init(nibName:bundle:)method. When its views are requested, the view controller loads them from the nib file. -
Specify the views for a view controller using the
loadView()method. In that method, create your view hierarchy programmatically and assign the root view of that hierarchy to the view controller’sviewproperty.
All of these techniques have the same end result, which is to create the appropriate set of views and expose them through the view property.
Important
A view controller is the sole owner of its view and any subviews it creates. It is responsible for creating those views and for relinquishing ownership of them at the appropriate times such as when the view controller itself is released. If you use a storyboard or a nib file to store your view objects, each view controller object automatically gets its own copy of these views when the view controller asks for them. However, if you create your views manually, each view controller must have its own unique set of views. You cannot share views between view controllers.
A view controller’s root view is always sized to fit its assigned space. For other views in your view hierarchy, use Interface Builder to specify the Auto Layout constraints that govern how each view is positioned and sized within its superview’s bounds. You can also create constraints programmatically and add them to your views at appropriate times. For more information about how to create constraints, see Auto Layout Guide.
Handling View-Related Notifications
When the visibility of its views changes, a view controller automatically calls its own methods so that subclasses can respond to the change. Use a method like viewWillAppear(_:) to prepare your views to appear onscreen, and use the viewWillDisappear(_:) to save changes or other state information. Use other methods to make appropriate changes.
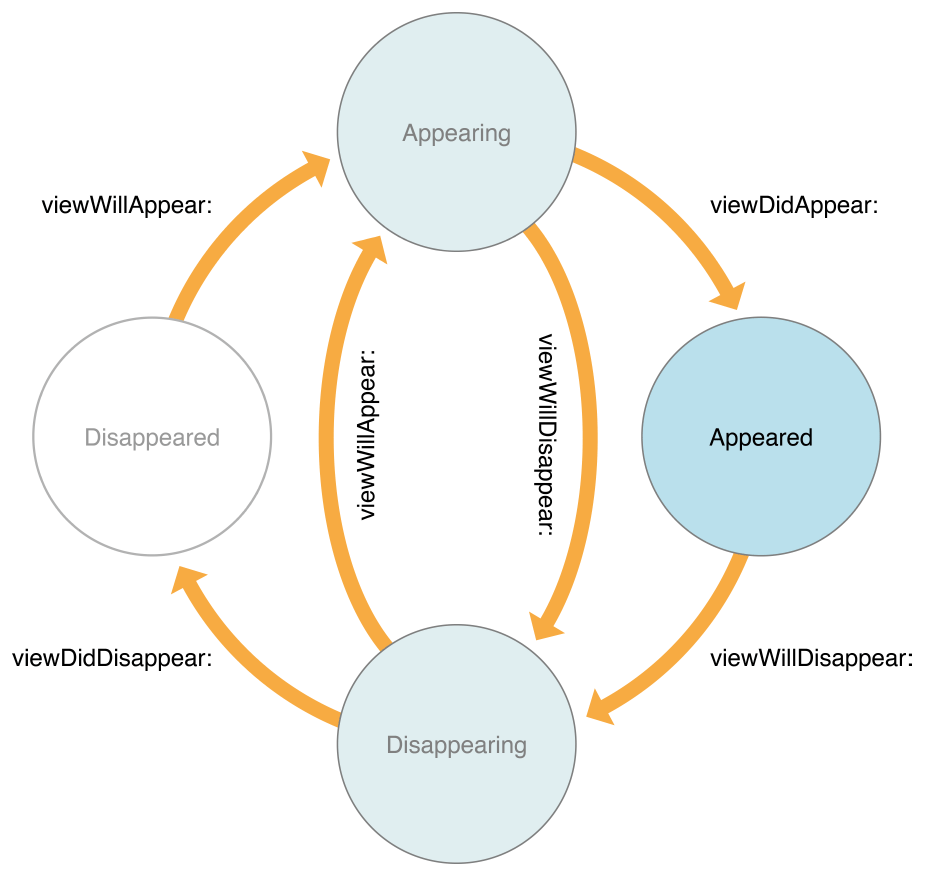
Figure 1 shows the possible visible states for a view controller’s views and the state transitions that can occur. Not all ‘will’ callback methods are paired with only a ‘did’ callback method. You need to ensure that if you start a process in a ‘will’ callback method, you end the process in both the corresponding ‘did’ and the opposite ‘will’ callback method.
Figure 1
Valid State Transitions
Handling View Rotations
As of iOS 8, all rotation-related methods are deprecated. Instead, rotations are treated as a change in the size of the view controller’s view and are therefore reported using the viewWillTransition(to:with:) method. When the interface orientation changes, UIKit calls this method on the window’s root view controller. That view controller then notifies its child view controllers, propagating the message throughout the view controller hierarchy.
In iOS 6 and iOS 7, your app supports the interface orientations defined in your app’s Info.plist file. A view controller can override the supportedInterfaceOrientationsmethod to limit the list of supported orientations. Typically, the system calls this method only on the root view controller of the window or a view controller presented to fill the entire screen; child view controllers use the portion of the window provided for them by their parent view controller and no longer participate directly in decisions about what rotations are supported. The intersection of the app's orientation mask and the view controller's orientation mask is used to determine which orientations a view controller can be rotated into.
You can override the preferredInterfaceOrientationForPresentation for a view controller that is intended to be presented full screen in a specific orientation.
When a rotation occurs for a visible view controller, the willRotate(to:duration:), willAnimateRotation(to:duration:), and didRotate(from:) methods are called during the rotation. The viewWillLayoutSubviews() method is also called after the view is resized and positioned by its parent. If a view controller is not visible when an orientation change occurs, then the rotation methods are never called. However, the viewWillLayoutSubviews() method is called when the view becomes visible. Your implementation of this method can call the statusBarOrientation method to determine the device orientation.
Note
At launch time, apps should always set up their interface in a portrait orientation. After the application(_:didFinishLaunchingWithOptions:) method returns, the app uses the view controller rotation mechanism described above to rotate the views to the appropriate orientation prior to showing the window.
Implementing a Container View Controller
A custom UIViewController subclass can also act as a container view controller. A container view controller manages the presentation of content of other view controllers it owns, also known as its child view controllers. A child's view can be presented as-is or in conjunction with views owned by the container view controller.
Your container view controller subclass should declare a public interface to associate its children. The nature of these methods is up to you and depends on the semantics of the container you are creating. You need to decide how many children can be displayed by your view controller at once, when those children are displayed, and where they appear in your view controller's view hierarchy. Your view controller class defines what relationships, if any, are shared by the children. By establishing a clean public interface for your container, you ensure that children use its capabilities logically, without accessing too many private details about how your container implements the behavior.
Your container view controller must associate a child view controller with itself before adding the child's root view to the view hierarchy. This allows iOS to properly route events to child view controllers and the views those controllers manage. Likewise, after it removes a child's root view from its view hierarchy, it should disconnect that child view controller from itself. To make or break these associations, your container calls specific methods defined by the base class. These methods are not intended to be called by clients of your container class; they are to be used only by your container's implementation to provide the expected containment behavior.
Here are the essential methods you might need to call:
Note
You are not required to override any methods when creating a container view controller.
By default, rotation and appearance callbacks are automatically forwarded to children. You may optionally override the shouldAutomaticallyForwardRotationMethods() and shouldAutomaticallyForwardAppearanceMethods methods to take control of this behavior yourself.
Memory Management
Memory is a critical resource in iOS, and view controllers provide built-in support for reducing their memory footprint at critical times. The UIViewController class provides some automatic handling of low-memory conditions through its didReceiveMemoryWarning()method, which releases unneeded memory.
State Preservation and Restoration
If you assign a value to the view controller's restorationIdentifier property, the system may ask the view controller to encode itself when the app transitions to the background. When preserved, a view controller preserves the state of any views in its view hierarchy that also have restoration identifiers. View controllers do not automatically save any other state. If you are implementing a custom container view controller, you must encode any child view controllers yourself. Each child you encode must have a unique restoration identifier.
For more information about how the system determines which view controllers to preserve and restore, see App Programming Guide for iOS.
From:https://developer.apple.com/documentation/uikit/uiviewcontroller