采用微服务架构的系统,由按照业务划分、职责单一的多个服务单元组成,并且每个服务可能又有多个服务实例。相比传统单体架构,微服务服务单元粒度比较小、服务数量较多、服务之间的依赖比较复杂,服务之间调用往往会形成网状结构,为了更好地统一管理服务实例,注册中心应运而生。
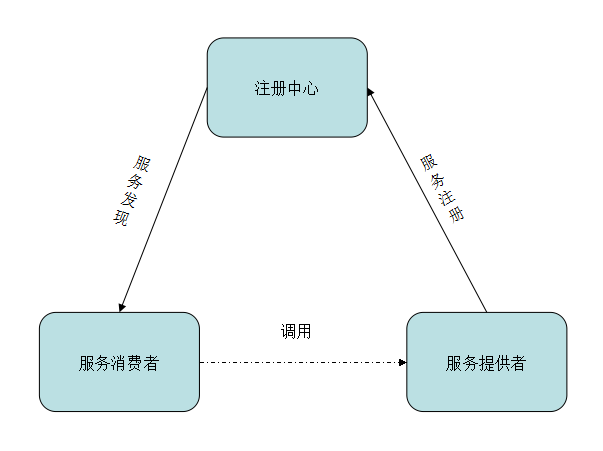
服务注册是指服务提供者向注册中心注册服务实例,主要将其服务信息如服务名称、IP 地址、端口等注册到注册中心。
服务发现是指服务消费者需要调用其他服务时,注册中心将服务提供者的服务信息如服务名称、IP 地址、端口等告知服务消费者。
微服务开发过程中,注册中心至关重要,可以说它是整个微服务架构系统的心脏。当前常用的注册中心有 Consul、Zookeeper、Eureka、etcd 等,各常用注册中心的关键特点见下图所示。
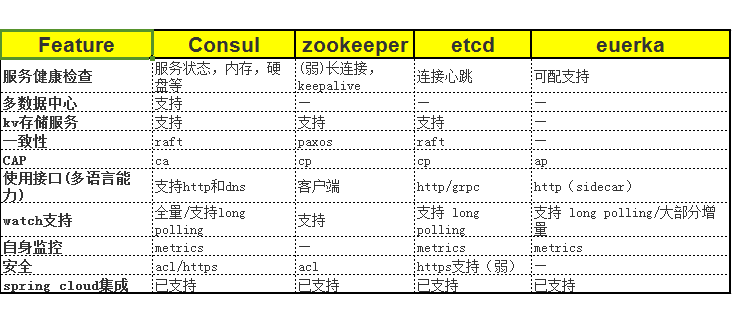
从上表可以看出,无论是 Consul 提供的主要功能,还是 Spring Cloud 对其集成的支持,都比较完善,且运维的复杂度也较低,比如对容器化技术 Docker 有比较好的支持。而 Eureka 在设计上比较符合场景,但仍需持续的完善。综上分析,本课实战环节中,我最终选择了 Consul 作为服务的注册中心。如需要了解 Consul 的更多详情,请访问官网。
Windows 环境中安装 Consul
我们首先到 Consul 官网下载64位 Consul 安装包 consul_1.2.1_windows_amd64.zip,如果读者 PC 是32位的,下载 Consul 32位安装包即可。
然后,将安装包解压到磁盘的某一目录下,我选择解压在 F:\springCloud 目录下,解压后的目录为 F:\springCloud\consul_1.2.1_windows_amd64。完成后,再将当前路劲添加到环境变量 PATH 中。
之后,进入 CMD,运行 consul agent -dev 启动 Consul 服务端。
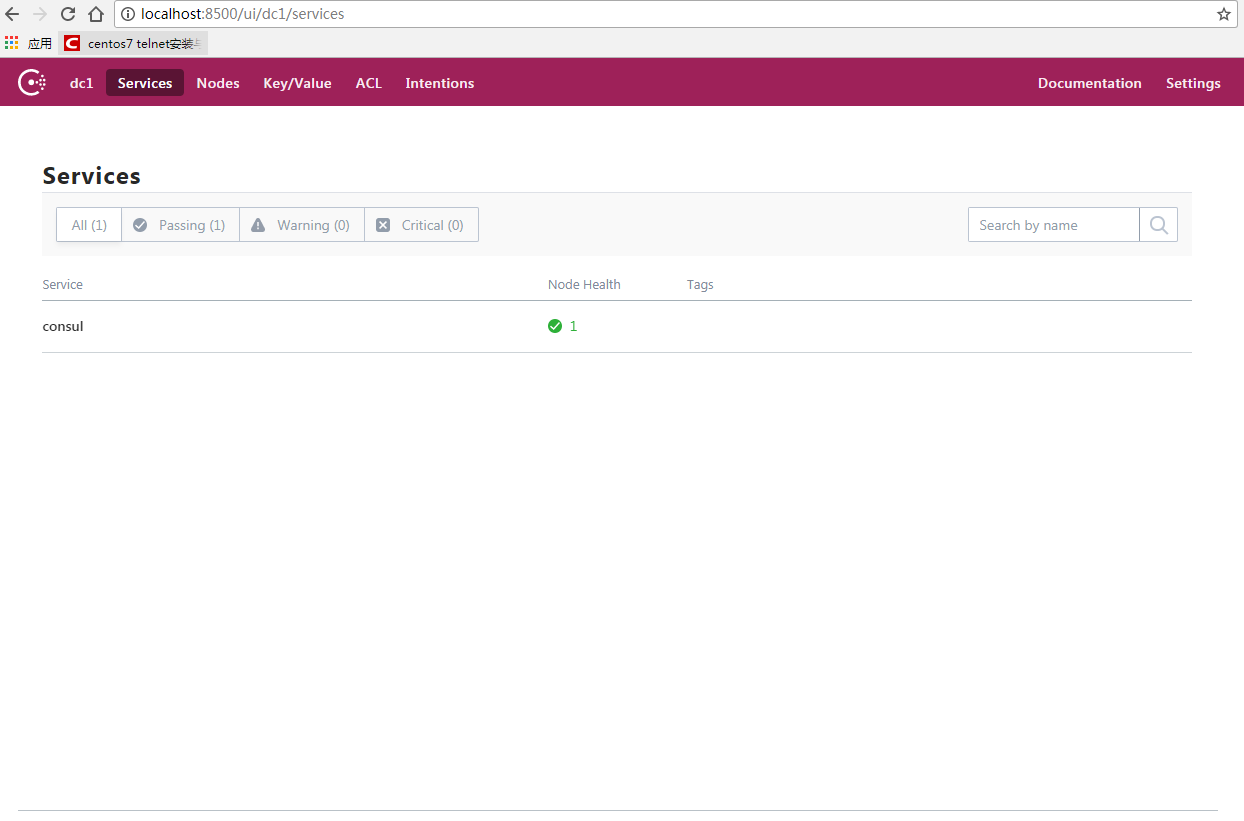
在浏览器输入地址:http://localhost:8500,看到如下界面,则表示安装成功。
利用 Spring Cloud 及 Consul 实现服务注册
首先,在 pom 文件中添加依赖 Consul 客户端、Spring Cloud 依赖:
<!--Consul 客户端依赖 -->
<dependency>
<groupId>org.springframework.cloud</groupId>
<artifactId>spring-cloud-starter-consul-discovery
</artifactId>
</dependency>

<!-- Spring Cloud 依赖-->
<dependencyManagement>
<dependencies>
    <dependency>
    <groupId>org.springframework.cloud</groupId>
    <artifactId>spring-cloud-dependencies</artifactId>
    <version>${spring-cloud.version}</version>
    <type>pom</type>
    <scope>import</scope>
    </dependency>
</dependencies>
</dependencyManagement>
注意: 添加 Spring Cloud 依赖时,选择的 Spring Cloud 版本必须和 Spring Boot 版本相匹配,否则程序启动时会报错。版本对应关系如下:
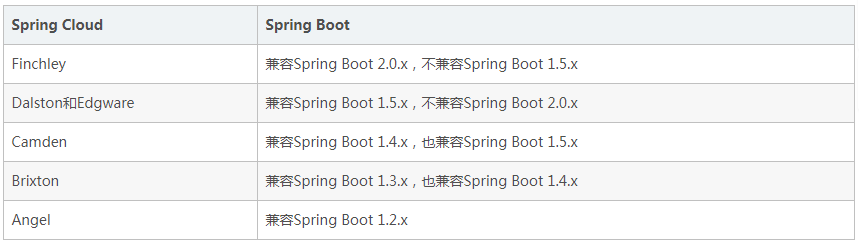
本课中,选择了 Spring Cloud 的稳定版本 Dalston,因此 Spring Boot 应选择 1.5.14.RELEASE 版本。
然后,在 application.yml 配置文件中添加如下内容:
server:
  ##服务在8080端口暴露出来
  port: 8080

spring:
  cloud:
    consul:
      ##Consul所在主机ip
      host: localhost
      ##Consul监听端口
      port: 8500
      discovery:
        ##配置服务注册到Consul上
        register: true
        ##配置服务健康检查地址,供Consul调用
        healthCheckPath: /health
        ##Consul 健康检查频率
        healthCheckInterval: 2s
        ##配置注册到Consul服务id
        instance-id: order-service
  application:
    ##应用服务名称
    name: order-service
之后,在 controller 包中添加 HealthCheckController,并添加供 Consul 调用的健康检查接口:
@RestController
public class HealthCheckController {

    //RequestMapping中的url地址需和配置文件中保持一致
    @RequestMapping("/health")
    public String healthCheck(){
        return "ok";
    }
}
接着,在 Lesson6Application 类上添加使应用启动并向 Consul 注册服务的注解 @EnableDiscoveryClient:
@SpringBootApplication
@EnableDiscoveryClient
public class Lesson6Application {
    public static void main(String[] args) {
        SpringApplication.run(Lesson6Application.class, args);
    }
}
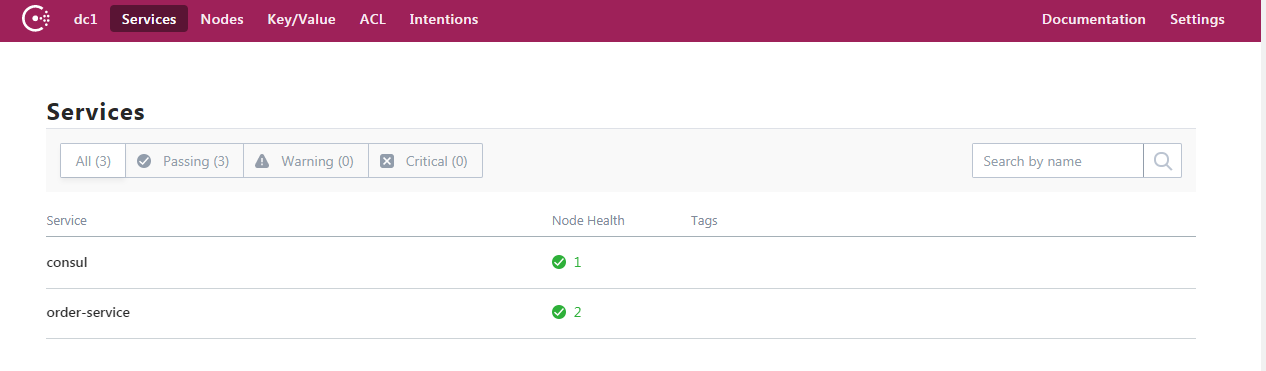
最后,在 CMD 中执行命令 consul agent -dev 启动 Consul 注册中心,之后再启动应用程序,观察到此时 order-service 服务已经注册到注册中心,如下图所示。
通过以上过程,我们已将服务注册到 Consul 注册中心。当前我们只是会应用了,但对利用 Consul 进行服务注册的源码不太清楚。接下来,我将向大家介绍下服务注册的主要源码,以便大家在遇到服务注册相关问题时能更好地解决。
(1)在主类上必须添加注解 @EnableDiscoveryClient,只有这样,服务注册、心跳检测相关配置信息才能被自动加载。
(2)内嵌 Tomcat 容器启动后,发布 EmbeddedServletContainerInitializedEvent 事件:
protected void finishRefresh() {
    super.finishRefresh();
    //启动内嵌tomcat容器
    EmbeddedServletContainer localContainer = startEmbeddedServletContainer();
    if (localContainer != null) {
        //发布EmbeddedServletContainerInitializedEvent事件
        publishEvent(
                    new EmbeddedServletContainerInitializedEvent(this, localContainer));
        }
    }
(3)AbstractDiscoveryLifecycle 类监听 EmbeddedServletContainerInitializedEvent 事件,并调用其 start 方法将服务注册到 Consul 注册中心上:
public void start() {
    //判断是否需要将服务注册到注册中心
    if (!isEnabled()) {
        if (logger.isDebugEnabled()) {
            logger.debug("Discovery Lifecycle disabled. Not starting");
            }
            return;
        }

    if (this.port.get() != 0 && getConfiguredPort() == 0)  {
        setConfiguredPort(this.port.get());
    }

    if (!this.running.get() && getConfiguredPort() > 0) {
            //调用register方法注册服务
            register();
            if (shouldRegisterManagement()) {
                registerManagement();
            }

            this.context.publishEvent(new InstanceRegisteredEvent<>(this,
                    getConfiguration()));
            this.running.compareAndSet(false, true);
        }
    }
(4)第三步中的 register 方法最终调用 AgentConsulClient 类中的 agentServiceRegister 方法注册服务:
public Response<Void> agentServiceRegister(NewService newService, String token) {
    UrlParameters tokenParam = token != null ? new SingleUrlParameters("token", token) : null;
    //json格式服务参数
    String json = GsonFactory.getGson().toJson(newService);
    //拼接url地址,利用httpClient请求Consul服务端注册服务
    RawResponse rawResponse = rawClient.makePutRequest("/v1/agent/service/register", json, tokenParam);

    if (rawResponse.getStatusCode() == 200) {
        return new Response<Void>(null, rawResponse);
    } else {
        throw new OperationException(rawResponse);
    }
}
以上四个步骤给出了服务注册的主要代码,有兴趣的读者可以按照上面思路跟踪代码做更进一步地学习。
利用 Spring Cloud 及 Consul 客户端实现服务发现
为了演示服务发现实现过程,我们再新建一个项目 lesson6-client,同时在 pom 文件中也添加 Consul 客户端依赖:
<dependency>
<groupId>org.springframework.cloud</groupId>
<artifactId>spring-cloud-starter-consul-discovery</artifactId>
</dependency>
然后,在 application.yml 中添加配置:
spring:
  application:
    name: service-client
  cloud:
    consul:
      ##consul服务端所在pc机ip
      host: localhost
      ##consul服务端监听端口
      port: 8500
      discovery:
        ##不需要注册到consul上
        register: false
之后,在主程序类上添加注解 @EnableDiscoveryClient。
接着,新建 ApiController,通过服务名称从注册中心中获取订单服务的 IP 和 Port(服务发现:根据服务名称从注册中心获取订单服务 IP 及端口),并利用 RestTemplate 实例根据订单 ID 获取订单信息接口 getOrderDetailInfoById,并进行调用,代码如下:
@RequestMapping("/api")
@RestController
public class ApiController {
    @Autowired
    private LoadBalancerClient loadBalancer;

    @RequestMapping("/getOrderDetailInfoById")
    public Object getOrderDetailInfoById(Integer orderId){
    //根据服务名称从注册中心获取订单服务order-service实例
    ServiceInstance serviceInstance = loadBalancer.choose("order-service");

    //拼接调用订单服务(order-service)接口url地址
    String url = "http://" + serviceInstance.getHost() + ":" + serviceInstance.getPort()
                + "/order/getOrderDetailInfoById?orderId={1}";
    //利用RestTemplate实例调用订单服务接口
    return new RestTemplate().getForObject(url,OrderEntity.class,100);
    }
}
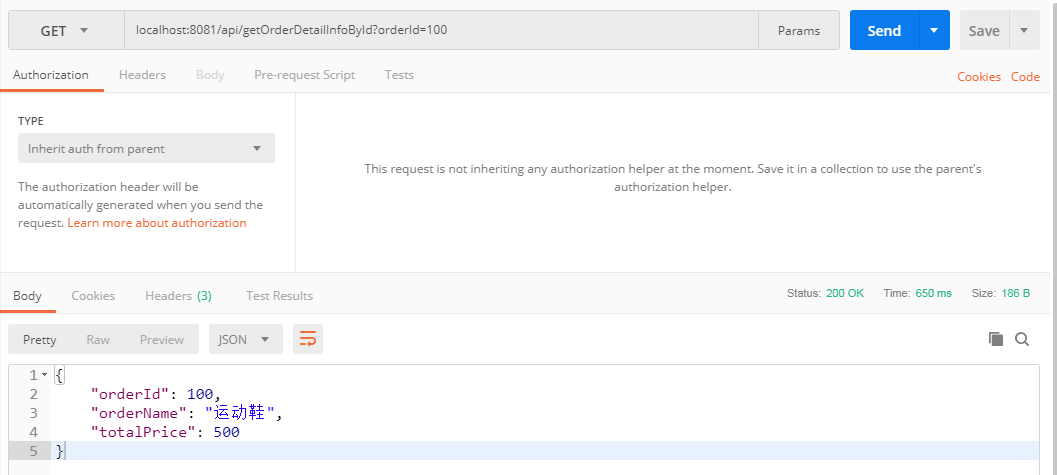
最后,启动应用程序,并利用 Postman 调用接口:
http://localhost:8081/api/getOrderDetailInfoById?orderId=100
输出结果如下: