1、hibernate_helloworld
a)新建 java 项目即可,如图:
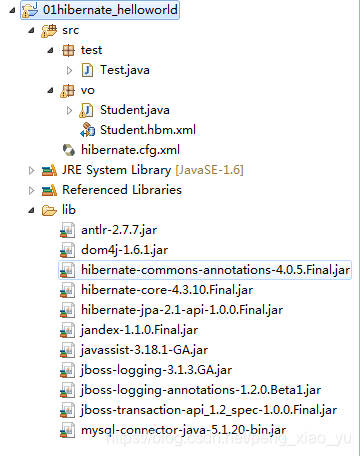
b)导入相关 jar 包
antlr-2.7.7.jar
dom4j-1.6.1.jar
hibernate-commons-annotations-4.0.5.Final.jar
hibernate-core-4.3.10.Final.jar
hibernate-jpa-2.1-api-1.0.0.Final.jar
jandex-1.1.0.Final.jar
javassist-3.18.1-GA.jar
jboss-logging-3.1.3.GA.jar
jboss-logging-annotations-1.2.0.Beta1.jar
jboss-transaction-api_1.2_spec-1.0.0.Final.jar
mysql-connector-java-5.1.20-bin.jar
c)编写 hibernate.cfg.xml 文件 ~~~配置文件下一节讲解
<!DOCTYPE hibernate-configuration PUBLIC
	"-//Hibernate/Hibernate Configuration DTD 3.0//EN"
	"http://www.hibernate.org/dtd/hibernate-configuration-3.0.dtd">

<hibernate-configuration>
<session-factory>
	<property name="hibernate.connection.driver_class">
		com.mysql.jdbc.Driver
	</property>
	<property name="hibernate.connection.url">jdbc:mysql://localhost:3306/test</property>

	<property name="hibernate.connection.characterEncoding">true</property>
    <property name="hibernate.connection.characterEncoding">UTF-8</property>
	<property name="connection.user">root</property>
	<property name="connection.password">root</property>
	<property name="dialect">
		org.hibernate.dialect.MySQL5Dialect
	</property>

	<!-- 打印hibernate生成的sql语句 -->
	<property name="show_sql">true</property>

	<!-- 格式化打印的sql语句 -->
	<property name="format_sql">true</property>

	<mapping resource="vo/Student.hbm.xml" />

</session-factory>
</hibernate-configuration>
d)编写实体类(vo) Student.java
package vo;

import java.io.Serializable;


public class Student implements Serializable{
	private int id ;
	private String name ;
	private int age ;
	private String address ;
	private String phone ;

	public Student() {

	}

	public Student( String name, int age, String address, String phone) {
		super();
		this.name = name;
		this.age = age;
		this.address = address;
		this.phone = phone;
	}


	public Integer getId() {
		return id;
	}
	public void setId(Integer id) {
		this.id = id;
	}
	public String getName() {
		return name;
	}
	public void setName(String name) {
		this.name = name;
	}
	public int getAge() {
		return age;
	}
	public void setAge(int age) {
		this.age = age;
	}
	public String getAddress() {
		return address;
	}
	public void setAddress(String address) {
		this.address = address;
	}
	public String getPhone() {
		return phone;
	}
	public void setPhone(String phone) {
		this.phone = phone;
	}

	@Override
	public String toString() {
		return "Student [id=" + id + ", name=" + name + ", age=" + age
				+ ", address=" + address + ", phone=" + phone + "]";
	}

}
e)编写实体类的映射文件(Student.hbm.xml)---将映射文件加入到 hibernate.cfg.xml
<?xml version="1.0" encoding="utf-8"?>
<!DOCTYPE hibernate-mapping PUBLIC "-//Hibernate/Hibernate Mapping DTD 3.0//EN"
"http://hibernate.sourceforge.net/hibernate-mapping-3.0.dtd">
<!-- 类的映射文件信息 -->
<!-- package指定类的包名 可以不配置 如果不配置 那么在配置class的name时需要指定该类所在包-->
<hibernate-mapping>
	<!-- 实体类对应的表名称 -->
	<class name="vo.Student" table="Student">
		<!-- 表中的字段的名称name 、类型 type-->
		<id name="id" column="id" type="int">
			<!-- 主键自增 -->
			<generator class="native"/>
		</id>
		<!-- 表中的字段的名称name 、类型 type-->
		<property name="name" column="name" type="string"/>
		<property name="age" column="age" type="int"/>
		<property name="address" column="address" type="string"/>
		<property name="phone" column="phone" type="string"/>

	</class>
</hibernate-mapping>
f)编写测试类Test.java
package test;

import org.hibernate.Session;
import org.hibernate.SessionFactory;
import org.hibernate.Transaction;
import org.hibernate.boot.registry.StandardServiceRegistryBuilder;
import org.hibernate.cfg.Configuration;
import org.hibernate.service.ServiceRegistry;

import vo.Student;

public class Test {

	public static void main(String[] args) {

		//1.读取配置文件 hibernate.cfg.xml 配置文件
		Configuration cfg = new Configuration().configure();
		//2.创建服务注册
		ServiceRegistry registry = new     StandardServiceRegistryBuilder().applySettings(cfg.getProperties()).build();
		//3.新建sessionFactory
		SessionFactory factory =cfg.buildSessionFactory(registry);
		//4.创建session对象
		Session session = factory.openSession();
		//5.获取对象   通过id
		Student student1 = (Student) session.get(Student.class, 28) ;
		System.out.println(student1);
		System.out.println("=====================================");
		//保存数据
		Transaction tx = session.beginTransaction();
		Student student = new Student( "张三1",22 ,"地址ww" , "123456");
		session.save(student);
		tx.commit();
		//6.释放资源
		session.close();
		factory.close();

	}

}
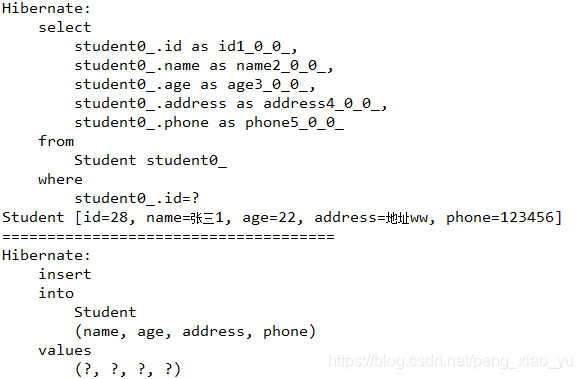
g)环境搭建成功,控制台输出结果如下图: