背景:项目要求用户可以创建,编辑,删除,分享日记和心情,同时可以追踪日记和心情。
在开始之前我必须假设你已经有了对swift xcode 一定的基础,基础的关联ui ,MySQLite数据库的操作。
做好了项目的Prototype,写好的报告(对我已经写好了,坑逼作业只写代码不好吗!!!)
来,让我们抛开所有学到的理论,写啥核心啊,什么程序逻辑啊,我才不管呢。我就是要从UI开始做起。
恩,看着我设计的模板,我陷入了沉思:
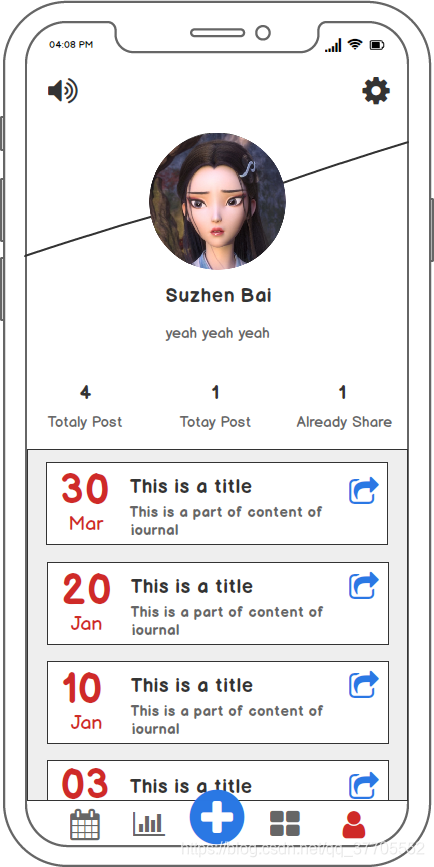
底下切换按钮是怎么实现的呢?我只学过button,navigation之类的,这tm的难道是用button写的吗??
不废话,经过百度我发现了有一个叫tabBar的控件,于是又经过一番摸索,找到了一个教学视频:
https://www.youtube.com/watch?v=n7NNAdaIDKQ
再见不送。自己看去吧。
重点是千万不要直接把一个tabbar拖进view,因为之后我就不会做了,大神请忽略,小白怎么做,怎么搞切换?不用担心,拖进来一个tabbarcontroller直接搞定,都预设好了。详情请看youtube教程。
yeah做好了tabbar,怎么做那个tabbar突出的部分呢?
千万不要百度,千百度之后拿着一堆过时的代码,或者根本看不懂的代码就哭吧,请右上角谷歌走起。小白用词不准搜了几天没搜出来,无奈之下问了老师:如下链接走起:
https://stackoverflow.com/questions/42477440/swift-3-how-do-i-create-a-prominent-button-on-a-tab-bar-e-g-camera-button
做好了中间的button,那么如何disable掉中间的tabbariteam呢:
//disable centre tabbar item
        if let arrayOfTabBarItems = self.tabBar.items as AnyObject as? NSArray,let
            tabBarItem = arrayOfTabBarItems[2] as? UITabBarItem {
            tabBarItem.isEnabled = false
        }
中间那个数组什么意思不用我说了吧。放在哪里也不用我说了吧。初始化的时候用。
ok 如何自定义table呢?这里的坑很大,继续链接走起:
https://www.youtube.com/watch?v=FtO5QT2D_H8
这个要记得给table设置source data 和delegate 在视频中都有讲到
做好table,随便放点数据,发现和背景的白色完全同为一体了,有点不好看,决定增加一个table的边框,顺便设置下背景颜色
如下是设置cell的边框,原理一样。
Swift - UIView,UItableView,Cell设置边框方法
// 设置边框的宽度

            cell.layer.borderWidth = 1

            // 设置边框的颜色

            cell.layer.borderColor = UIColor.blackColor().CGColor

            // 设置UIView的边框为圆角和展现

            cell.layer.cornerRadius = 10

            //自动遮罩不可见区域,超出的不显示

            cell.layer.masksToBounds = true

            cell.backgroundColor = UIColor.whiteColor()
设置完后,发现在没有数据的cell还是有一条条的分割线存在,非常不好看 于是决定删除:https://www.jianshu.com/p/b96ed172467d
//去掉没有数据显示部分多余的分隔线
    tableview_bill.tableFooterView =  UIView.init(frame: CGRect.zero)

    //将分隔线offset设为零,即将分割线拉满屏幕
    tableview_bill.separatorInset = UIEdgeInsetsMake(0, 0, 0, 0)

    //设置分隔线颜色
    tableview_bill.separatorColor = UIColor.line_grey
哈 我现在想增加按下按钮的button来一个水波纹的动画:http://www.pianshen.com/article/9104158301/
mark 延迟执行的用法:转原文:https://blog.csdn.net/weixin_33794672/article/details/87447084
 // 1.perform(必须在主线程中执行)
        self.perform(#selector(delayExecution), with: nil, afterDelay: 3)
        // 取消
        NSObject.cancelPreviousPerformRequests(withTarget: self)

        // 2.timer(必须在主线程中执行)
        Timer.scheduledTimer(timeInterval: 3, target: self, selector: #selector(delayExecution), userInfo: nil, repeats: false)

        // 3.Thread (在主线程会卡主界面)
        Thread.sleep(forTimeInterval: 3)
        self.delayExecution()

        // 4.GCD 主线程/子线程
        DispatchQueue.main.asyncAfter(deadline: .now() + 3) {
            self.delayExecution()
        }

        DispatchQueue.global().asyncAfter(deadline: .now() + 3) {
            self.delayExecution()
        }
粒子发射器,特效:
转的,加上自己修改了一下 网址找不到了
 override func viewDidLoad() {
        super.viewDidLoad()
        //hidden the navigation bar navigationController?.setNavigationBarHidden(true, animated: false)

        var emitter:CAEmitterLayer? = particleEffect(UIImage(named: "1")!)

        emitter!.birthRate = 0


        // Do any additional setup after loading the view, typically from a nib.
    }

    override func didReceiveMemoryWarning() {
        super.didReceiveMemoryWarning()
        // Dispose of any resources that can be recreated.
    }

    func particleEffect(_ image:UIImage) -> CAEmitterLayer {
        let rect = CGRect(x: 0.0, y: -70.0, width: view.bounds.width,
                          height: 50.0)
        let emitter = CAEmitterLayer()
        emitter.frame = rect
        view.layer.addSublayer(emitter)
        emitter.emitterShape = CAEmitterLayerEmitterShape.rectangle

        //kCAEmitterLayerPoint
        //kCAEmitterLayerLine
        //kCAEmitterLayerRectangle
        let point = CGPoint(x: rect.width/2, y: rect.height/2)
        emitter.emitterPosition = point
        emitter.emitterSize = rect.size

        let emitterCell = CAEmitterCell()

        emitterCell.contents = image.resizeImage(30, opaque: true).cgImage
        emitterCell.birthRate = 120  //每秒产生120个粒子
        emitterCell.lifetime = 3    //存活1秒
        emitterCell.lifetimeRange = 3.0

        emitter.emitterCells = [emitterCell]  //这里可以设置多种粒子 我们以一种为粒子
        emitterCell.yAcceleration = 70.0  //给Y方向一个加速度
        emitterCell.xAcceleration = 20.0 //x方向一个加速度
        emitterCell.velocity = 20.0 //初始速度
        emitterCell.emissionLongitude = CGFloat(-Double.pi) //向左
        emitterCell.velocityRange = 200.0   //随机速度 -200+20 --- 200+20
        emitterCell.emissionRange = CGFloat(Double.pi/2) //随机方向 -pi/2 --- pi/2
        //emitterCell.color = UIColor(red: 0.9, green: 1.0, blue: 1.0,
        //   alpha: 1.0).CGColor //指定颜色
        emitterCell.redRange = 0.3
        emitterCell.greenRange = 0.3
        emitterCell.blueRange = 0.3  //三个随机颜色

        emitterCell.scale = 0.8
        emitterCell.scaleRange = 0.8  //0 - 1.6
        emitterCell.scaleSpeed = -0.15  //逐渐变小

        emitterCell.alphaRange = 0.75   //随机透明度
        emitterCell.alphaSpeed = -0.15  //逐渐消失
        return emitter
    }
    /*
    // MARK: - Navigation

    // In a storyboard-based application, you will often want to do a little preparation before navigation
    override func prepare(for segue: UIStoryboardSegue, sender: Any?) {
        // Get the new view controller using segue.destination.
        // Pass the selected object to the new view controller.
    }
    */

}
如何停止发射:
设置 emitter.birthRate = 0 才能停止粒子发射
上面的粒子特效,直接调用就行,参数就是UIImage,你想要的粒子特效的图片。不过还要extension一下UIImage 增加两个方法。
调用example:
var emitter = particleEffect(UIImage(named: "图片名字"))

//停止特效代码
emitter.birthRate = 0
extension 代码:
圆形转场特效 注意extension的时候,如果原本的class不是继承于UIViewController并没有影响,直接extension 一个UIViewControllerTransimitioningDelegate就好:
https://www.youtube.com/watch?v=B9sH_VxPPo4
隐藏显示navigation bar:
navigationController?.setNavigationBarHidden(true, animated: false)
什么是lazy 懒加载:https://www.jianshu.com/p/d1c4cbb5bede
按下按钮从底部弹出选择菜单: https://www.youtube.com/watch?v=5-uLbwNgHng
从相册或相机选择一张图片https://blog.csdn.net/sun_cui_hua/article/details/78113086
沙盒文件管理:基本方法:https://www.jianshu.com/p/ccff0bb50d7a,https://blog.csdn.net/wangtianya125/article/details/82746008
将图片保存到沙盒下:http://www.zhimengzhe.com/bianchengjiaocheng/swift/261343.html
如何需要访问相机,相册等数据: 会出现iOS 11 NSPhotoLibraryAddUsageDescription 错误。解决办法:https://www.jianshu.com/p/bf7de88be6e1
动画button menuhttps://www.youtube.com/watch?v=Mj2Hc6GU8Is