学习了一下Spring Security,做了两个demo,拿出来分享一下。
第一个demo是SpringSecurity基于内存的用户登录功能的实现。
第二个demo是SpringSecurity使用数据库的用户的登录的实现。在这个demo中,不光有登录功能,还新增的注册功能,使用了bcrypt的加密算法对用户密码加密,使得数据库中没有存储明文密码。
本文源码:demo
整合SpringSecurity
新建一个spirngboot项目,pom.xml的配置如下所示:

Controller层实现请求映射
@Controller
public class HelloController {

    @GetMapping("/")
    public String index() {
        return "index";
    }

    @GetMapping("/hello")
    public String hello() {
        return "hello";
    }

    @RequestMapping("/login")
    public String login() {
        return "login";
    }
}
实现映射的页面
- src/main/resources/templates/index.html
<!DOCTYPE html>
<html lang="en">
<head>
    <meta charset="UTF-8">
    <title>首页</title>
</head>
<body>
<h1>欢迎使用Spring Security</h1>
<p>点击<a href="/hello">这里</a>打个招呼吧</p>
</body>
</html>
- src/main/resources/templates/hello.html
<!DOCTYPE html>
<html lang="en" xmlns:th="http://www.thymeleaf.org">
<head>
    <meta charset="UTF-8">
    <title>欢迎</title>
</head>
<body>
<h1>hello world</h1>
<form th:action="@{/logout}" method="post">
    <input type="submit" value="注销"/>
</form>
</body>
</html>
- src/main/resources/templates/login.html
<!DOCTYPE html>
<html lang="en" xmlns:th="http://www.thymeleaf.org">
<head>
    <meta charset="UTF-8">
    <title>登录</title>
</head>
<body>
<form th:action="@{/login}" method="post" autocomplete="off">
    <table>
        <tr>
            <td><label for="username">用户名</label></td>
            <td><input type="text" id="username" name="username" value="user" placeholder="user"></td>
        </tr>
        <tr>
            <td><label for="password">密码</label></td>
            <td><input type="password" id="password" name="password" value="password" placeholder="password"></td>
        </tr>
        <tr>
            <td><input type="submit" value="提交"></td>
            <td><input type="reset" value="重置"></td>
        </tr>
    </table>
</form>
</body>
</html>
Spring Security配置
创建Spring Security的配置类WebSecurityConfig,具体如下:
@EnableWebSecurity  // 此注解用于开启Spring Security的功能
public class WebSecurityConfig extends WebSecurityConfigurerAdapter {

    @Override
    protected void configure(HttpSecurity http) throws Exception {
        http.authorizeRequests()
                .antMatchers("/", "/index").permitAll()  // 允许"/", "/index"的请求访问
                .anyRequest().authenticated()
                .and()
                .formLogin().loginPage("/login").permitAll()  // 允许"/login"的请求访问,设置需要登录时的跳转页面
                .and()
                .logout().permitAll();  // 允许登出
    }

    @Autowired
    public void configureGlobal(AuthenticationManagerBuilder auth) throws Exception {
        // 存中创建了一个用户,该用户的名称为user,密码为password,用户角色为USER
        // 对用户密码进行了加密
        auth.inMemoryAuthentication()
                .passwordEncoder(new BCryptPasswordEncoder())
                .withUser("user").password(new BCryptPasswordEncoder().encode("password")).roles("USER");
    }
}
启动项目,来看一下效果吧
启动项目后,访问http://localhost:8080/:

点击超链接"这里"访问/hello,由于没有登录,页面将被重定向到/login页面:
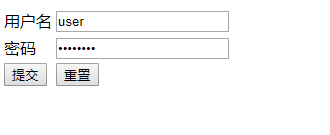
点击提交按钮进行登录,成功后会进入欢迎界面:

基于内存的用户登录功能实现了,下面这个案例将实现通过查询数据库来实现用户的登录:
SpringSecurity在Springboot中的使用(二)