多线程基础
1、多线程是怎么来的?
1.计算机资源的利用不充分。
2.批处理操作系统。--指令有阻塞,指令都在同一块内存中。
3.进程的出现。--让指令得以切换或者说让CPU时间片得以切换。分配单独的内存地址。
4.线程的出现。将一个进程中的多个子任务放在线程中进行处理。多核CPU可以实现并行。
2、多线程的应用场景?
1.通过并行计算提高程序性能
2.等待网络、IO响应导致的耗时问题。例如将BIO的处理放在线程池中进行处理,从而实现其他程序能够异步执行。
3.Thread 如何应用在项目中。代码示例:


  1 package com.jlDemo.ConcurrentFirstChapter.ThreadDemo;
  2
  3 /**
  4  * @author jar luo
  5  * @time 2019.4.22
  6  */
  7 public class Request {
  8     private String name;
  9
 10     public String getName() {
 11         return name;
 12     }
 13
 14     public void setName(String name) {
 15         this.name = name;
 16     }
 17
 18     @Override
 19     public String toString() {
 20         return "Request{" +
 21                 "name='" + name + '\'' +
 22                 '}';
 23     }
 24 }
 25
 26 package com.jlDemo.ConcurrentFirstChapter.ThreadDemo;
 27 /**
 28  * @author jar luo
 29  *
 30  * @time  2019.4.22
 31  */
 32 public interface RequestProcessor {
 33
 34     void processorRequest(Request request);
 35
 36 }
 37
 38
 39 package com.jlDemo.ConcurrentFirstChapter.ThreadDemo;
 40
 41 import java.util.concurrent.LinkedBlockingQueue;
 42
 43 /**
 44  * @author jar luo
 45  * @time 2019.4.22
 46  * @desc 打印请求的内容--借鉴zk的责任链思想
 47  */
 48 public class PrintProcesser extends Thread implements RequestProcessor {
 49
 50     LinkedBlockingQueue<Request> linkedBlockingQueue = new LinkedBlockingQueue();
 51
 52     private final RequestProcessor nextProcessor;
 53
 54     public PrintProcesser(RequestProcessor nextProcessor) {
 55         this.nextProcessor = nextProcessor;
 56     }
 57
 58     @Override
 59     public void run() {
 60         while (true){
 61             try {
 62                 Request request = linkedBlockingQueue.take();
 63                 System.out.println("print data:" + request);
 64                 nextProcessor.processorRequest(request);
 65             } catch (InterruptedException e) {
 66                 e.printStackTrace();
 67             }
 68         }
 69     }
 70
 71     @Override
 72     public void processorRequest(Request request) {
 73         linkedBlockingQueue.add(request);
 74     }
 75 }
 76
 77
 78 package com.jlDemo.ConcurrentFirstChapter.ThreadDemo;
 79
 80 import java.util.concurrent.LinkedBlockingQueue;
 81
 82 /**
 83  *
 84  */
 85 public class SaveProcessor extends Thread implements RequestProcessor{
 86
 87     LinkedBlockingQueue<Request> linkedBlockingQueue = new LinkedBlockingQueue();
 88
 89
 90     @Override
 91     public void run() {
 92         while (true){
 93             try {
 94                 Request request = linkedBlockingQueue.take();
 95                 System.out.println("save data:" + request);
 96             } catch (InterruptedException e) {
 97                 e.printStackTrace();
 98             }
 99         }
100     }
101
102     @Override
103     public void processorRequest(Request request) {
104         linkedBlockingQueue.add(request);
105     }
106 }
107
108
109 package com.jlDemo.ConcurrentFirstChapter.ThreadDemo;
110
111 /**
112  *
113  */
114 public class Demo {
115
116     PrintProcesser printProcesser ;
117
118     public Demo() {
119         SaveProcessor saveProcessor = new SaveProcessor();
120         saveProcessor.start();
121         printProcesser = new PrintProcesser(saveProcessor);
122         printProcesser.start();
123     }
124
125
126
127     public static void main(String[] args) {
128         Request request = new Request();
129         request.setName("jar luo");
130         new Demo().doTest(request);
131     }
132
133     public void doTest(Request request){
134         printProcesser.processorRequest(request);
135     }
136
137
138 }
3、并发编程的基础知识?
1.Thread
2.Runnable
3.Callable。 代码示例:
 1 package com.jlDemo.ConcurrentFirstChapter.CallableDemo;
 2
 3 import java.util.concurrent.*;
 4
 5 /**
 6  * @author jar luo
 7  *
 8  * @desc 并发编程(一)--Callable
 9  *
10  */
11 public class CallableDemo implements Callable<String> {
12
13     public static void main(String[] args) throws ExecutionException, InterruptedException {
14         ExecutorService executorService = Executors.newCachedThreadPool();
15         CallableDemo  callableDemo = new CallableDemo();
16
17         Future<String> future = executorService.submit(callableDemo);
18
19         String str = future.get();//阻塞
20         System.out.println(str);
21
22         executorService.shutdown();
23
24
25     }
26
27     @Override
28     public String call() throws Exception {
29         //
30         return "string" + 1;
31     }
32 }
4.Future
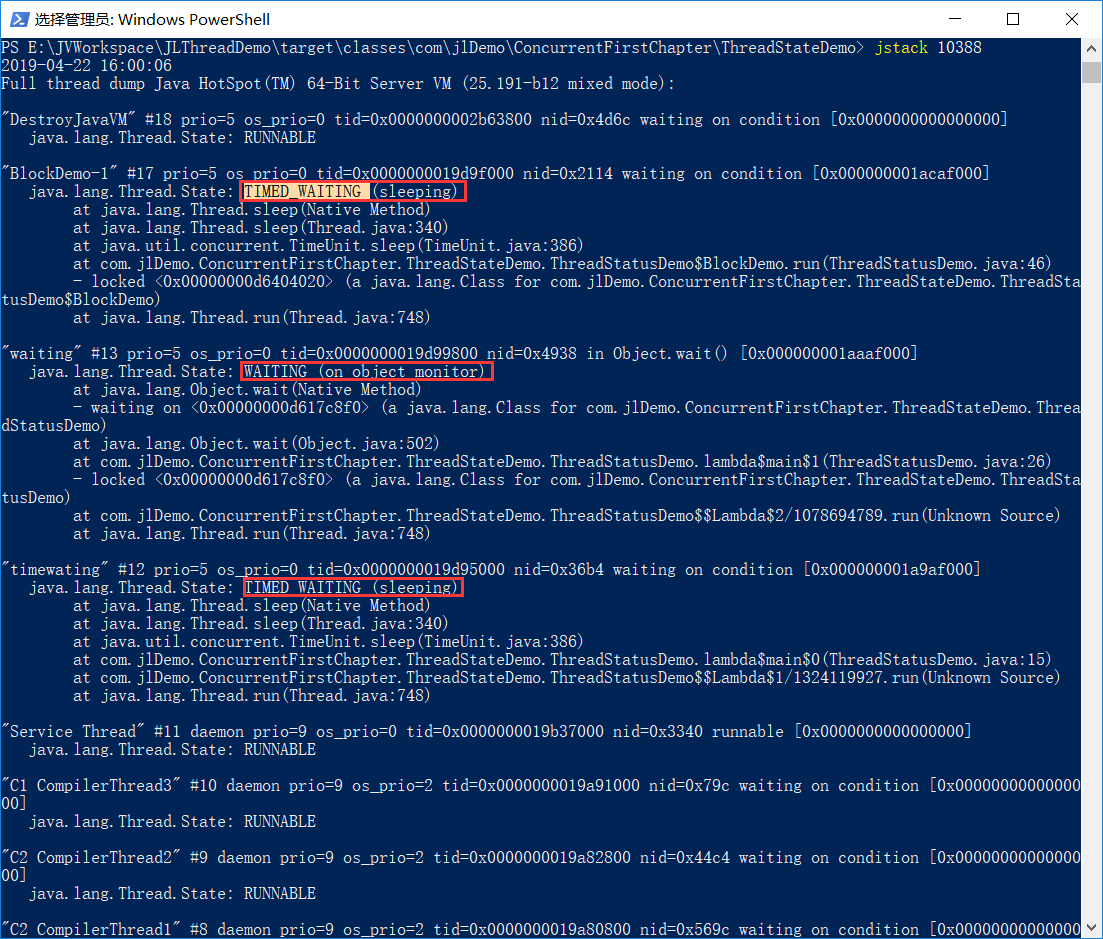
5.线程的状态 6种
NEW 没有调用start()方法,初始状态
RUNNABLE 运行状态
BLOCKED 阻塞
等待阻塞 wait
同步阻塞 synchronize
其他阻塞 sleep/join/
WAITING 等待
TIMED_WAITING 时间等待
TERMINATED 终止
状态关系图图例:

代码示例:
package com.jlDemo.ConcurrentFirstChapter.ThreadStatusDemo;

import java.util.concurrent.TimeUnit;

/**
 * @author jar luo
 * @time 2019.4.22
 */
public  class ThreadStatusDemo {

    public static void main(String[] args) {
        new Thread(()->{
            while(true){
                try {
                    TimeUnit.SECONDS.sleep(100);
                } catch (InterruptedException e) {
                    e.printStackTrace();
                }
            }
        },"timewating").start();

        new Thread(()->{
            while(true){
                synchronized(ThreadStatusDemo.class){
                    try {
                        ThreadStatusDemo.class.wait();
                    } catch (InterruptedException e) {
                        e.printStackTrace();
                    }
                }
            }
        },"waiting").start();


        new Thread(new BlockDemo(),"BlockDemo-0").start();  //第一次跑时BlockDemo-0 没有显示
        new Thread(new BlockDemo(),"BlockDemo-1").start();

    }

    static class BlockDemo extends Thread{

        @Override
        public void run() {
            synchronized(BlockDemo.class){
                try {
                    TimeUnit.SECONDS.sleep(100);
                } catch (InterruptedException e) {
                    e.printStackTrace();
                }

            }
        }


    }


}

6.线程的启动和终止
线程的启动 : 调用start 方法,是本地方法 native
线程的终止:
X:不使用过期的stop方法,相当于linux系统中kill一个进程,是一个暴力中断的方式,不知道是否有用户正在请求或者使用该线程,会导致数据异常或者一些不可预测的问题发生。
Y:a.使用interrupt方法 优雅的中断方式,先阻止新的请求进来,然后等正在处理的请求处理完成,然后在终止该线程;
Thread.interrupted 对设置的中断标识的线程进行复位. 可以恢复为false/
b.通过指令的方式 volite boolean isStop = false.
代码示例:
package com.jlDemo.ConcurrentFirstChapter.InterruptDemo;

import java.util.concurrent.TimeUnit;

public class InterupptDemo {
    private  static int i;
    public static void main(String[] args) throws InterruptedException {
        Thread thread = new Thread(()->{
            while(!Thread.currentThread().isInterrupted()){
                i++;
            }
            System.out.println(i);
        },"interruptDemo");
        thread.start();
        TimeUnit.SECONDS.sleep(1);

        thread.interrupt(); //设置interrupt标识为true, 可以去jdk中查看本地方法源码
        System.out.println(thread.isInterrupted());
    }
}
 1 package com.jlDemo.ConcurrentFirstChapter.InterruptDemo;
 2
 3 import java.util.concurrent.TimeUnit;
 4
 5 public class ThreadInterruptedDemo {
 6     public static void main(String[] args) throws InterruptedException {
 7         Thread thread = new Thread(()->{
 8             while(true){
 9                boolean in = Thread.currentThread().isInterrupted();
10                if(in){
11                    System.out.println("before:"+in);
12                    Thread.interrupted();//设置复位
13                    System.out.println("after:"+Thread.currentThread().isInterrupted());
14                }
15             }
16         });
17
18         thread.start();
19         TimeUnit.SECONDS.sleep(1);
20         thread.interrupt();
21     }
22
23 }
4、线程安全的问题?
可见性 volatile 关键字
原子性 没有办法在多线程情况下实现一个原子递增的问题
有序性 问题 程序运行的顺序和我们编写代码的顺序可能是不一致的,因为存在编译器的优化和指令的优化(CPU运行中的一个优化过程,指令重排序导致的执行乱序),不影响代码语义的情况下做的指令重排序.
硬件层面产生线程安全问题的原因:
由CPU的高速缓存和多核CPU技术的出现引发的缓存一致性问题。
JMM涉及的内容,线程是CPU的最小调度单元。
UML图例:(现代操作系统物理架构:)
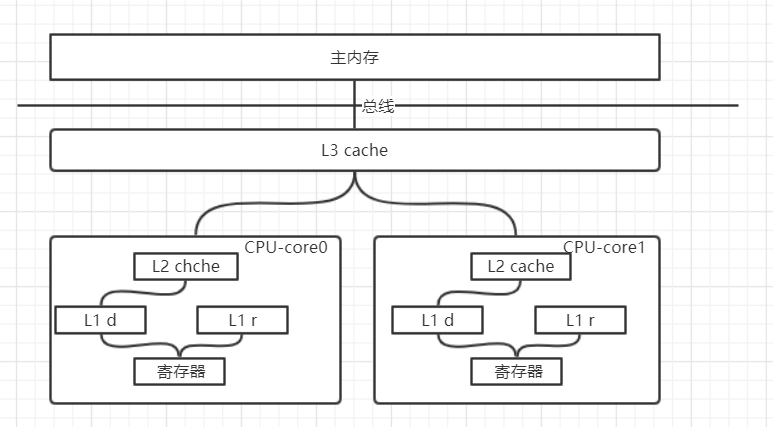
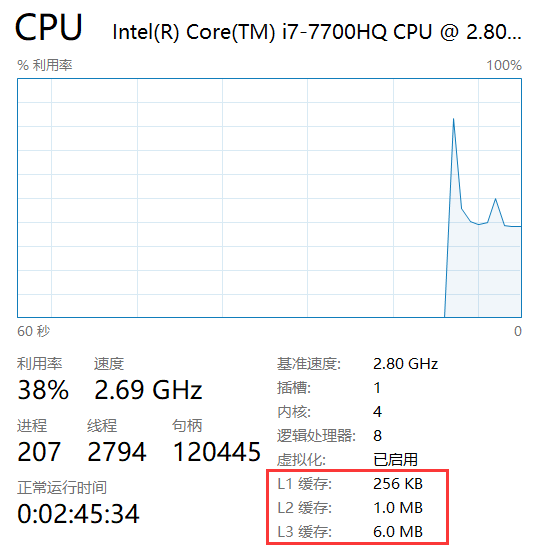
本地电脑图示:
L1 分为 指令缓存 数据缓存
缓存一致性问题:通过在(处理器-> 高速缓存-> 缓存一致性协议->主内存)高速缓存和主内存之间架设缓存一致性协议来解决。
总线锁:(排它锁),会导致性能问题,相当于一个悲观锁。降低了CPU的利用率。
缓存锁:(MESI协议),只锁当前缓存,会加#Lock指令,使其他缓存失效。
标记位:
M(Modify):修改状态、
I(Invalid):失效状态、直接去主内存加载
E(Exclusive):独占缓存、只会在一个cou中使用,并且该cpu值和主内存中的值保持一致。
S(Shared):多核CPU缓存一致,实现共享 嗅探协议。
以上情况为硬件层面的问题,但是硬件和硬件之间操作系统的差异,从而迫使我们在软件层面进行进一步处理。这就要说说我们下一节的主角 JMM内存模型。