线程的创建方式
一、实现runnable接口
1、步骤:
- 创建自定义类并实现runnable接口,并实现接口中的run方法
- 实例化自定义的类
- 将自定义类的实例作为参数给Thread类,创建thread实例
- 调用thread实例的start方法,启动子线程
2、使用示例
public class RunnableTest implements Runnable {
@Override
public void run() {
System.out.println(Thread.currentThread().getName()+" subthread start");
System.out.println(Thread.currentThread().getName()+" subthread end");
}
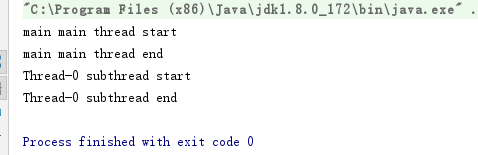
}public class Test {
public static void main(String[] args) {
System.out.println(Thread.currentThread().getName()+" main thread start");
RunnableTest runnableTest = new RunnableTest();
Thread thread = new Thread(runnableTest);
thread.start();
System.out.println(Thread.currentThread().getName()+" main thread end");
}
}
二、继承Thread类
1、步骤
- 创建自定义的类继承Thread类,并且重写run接口
- 实例化自定义的类
- 通过实例化对象调用start方法来创建新线程
2、使用示例
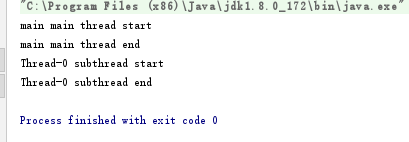
public class ThreadTest extends Thread {

    @Override
    public void run() {
        System.out.println(Thread.currentThread().getName()+" subthread start");
        System.out.println(Thread.currentThread().getName()+" subthread end");
    }
}
public class Test {
public static void main(String[] args) {
ThreadTest threadTest = new ThreadTest();
System.out.println(Thread.currentThread().getName()+" main thread start");
threadTest.start();
System.out.println(Thread.currentThread().getName()+" main thread end");
}
}
三、实现Callable接口
callable接口的实现是线程池提供的一种创建线程的方式

1、步骤
- 实现Callable接口,并且实现call方法
- 创建线程池(Executors工具类提供的方法创建线程池)
- 创建Callable接口实现类的实例
- 将实例对象通过线程池的submit方法提交给线程池进而创建新的线程
2、使用示例
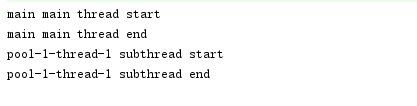
public class CallableTest implements Callable<Integer> {

    @Override
    public Integer call() throws Exception {
        System.out.println(Thread.currentThread().getName()+" subthread start");
        Integer i =100;
        System.out.println(Thread.currentThread().getName()+" subthread end");
        return i;
    }
}
public class Test {
public static void main(String[] args) {
System.out.println(Thread.currentThread().getName()+" main thread start");
ExecutorService executor = Executors.newSingleThreadExecutor(); //创建线程池
CallableTest callableTest = new CallableTest();
executor.submit(callableTest);
System.out.println(Thread.currentThread().getName()+" main thread end");
}
}
tips:线程之间的执行是相互独立的,哪一个线程优先执行取决于OS的调度
获取和设置线程对象名称
- 获取线程对象的名称
public final String getName():获取线程的名称。
- 设置线程对象的名称
public final void setName(String name):设置线程的名称
用有参构造设置线程名称 eg:MyThread thread = new MyThread("线程1");
- 针对不是Thread类的子类获取线程对象名称
Thread.currentThread().getName() ( public static Thread currentThread():返回当前正在执行的线程对象)
线程调度
线程有两种调度模型:
- 分时调度模型:所有线程轮流使用 CPU 的使用权,平均分配每个线程占用 CPU 的时间片
- 抢占式调度模型:优先让优先级高的线程使用 CPU,如果线程的优先级相同,那么会随机选择一个,优先级高的线程获取的 CPU 时间片相对多一些。
而Java使用的是抢占式调度模型。
获取线程对象的优先级: public final int getPriority():返回线程对象的优先级
设置线程对象的优先级: public final void setPriority(int newPriority):更改线程的优先级。
MIN_PRIORITY = 1; 线程的最小优先级
NORM_PRIORITY = 5; 线程的默认优先级
MAX_PRIORITY = 10; 线程的最大优先级
如果设置的优先级参数超过优先级的范围,会抛出IllegalArgumentException非法参数异常。
优先级分为10级,优先级数字越大,即优先级越高。线程优先级高仅仅表示线程获取的 CPU时间片的几率高,被优先调用的概率会大,但是要在次数比较多,或者多次运行的时候才能看到比较好的效果。
线程操作的相关方法
- void run():
run()方法是子线程的执行体,子线程从进入run方法开始,直至run方法执行结束,意味着子线程的任务执行结束。
在主线程直接调用run方法不能创建子线程,其实就相当于普通方法的调用,所以是单线程的效果
- void start():启动一个新的线程。
start()方法必须是子线程第一个调用的方法,start不能够重复调用,新线程会调用runnable接口提供的run方法
start()方法就呈现的是多线程的效果
run()和start()的区别是什么呢??
run():仅仅是封装被线程执行的代码,直接调用是普通方法
start():首先启动了线程,然后再由JVM去调用该线程的run()方法
- static void sleep(long millis):线程休眠
示例:
public class ThreadSleep extends Thread {
    @Override
    public void run() {
        for (int x = 0; x < 100; x++) {
            System.out.println(getName() + ":" + x + ",日期:" + new Date());
            // 睡眠
            try {
                Thread.sleep(1000); //睡眠1秒
            } catch (InterruptedException e) {
                e.printStackTrace();
            }
        }
    }
}


public class Demo {

    public static void main(String[] args) {
        ThreadSleep ts1 = new ThreadSleep();
        ThreadSleep ts2 = new ThreadSleep();

        ts1.setName("One");
        ts2.setName("Two");

        ts1.start();
        ts2.start();
    }
}
部分结果展示:

- final void join():等待该线程终止
等待线程执行结束才继续执行,会抛出 InterruptedException异常。
假如在a线程中b线程进行b.join调用,a线程等待b线程执行结束后才能继续执行,控制多线程按照次序执行。
(要在start()方法执行之后执行)
- static void yield():暂停当前正在执行的线程对象,并执行其他线程。
这是Thread类的静态方法。让正在执行的线程停止或者让步,让给优先级较高的线程获取CPU的执行权,(不一定会让出CPU执行权,如等待的线程优先级较低或者当前只有一个线程在执行时,那么当先线程又会立即获取CPU的执行权)
- final void setDaemon(boolean on):将该线程标记为守护线程或用户线程。
true表示设置为守护线程
false表示用户线程 ,默认是用户线程
当正在运行的线程都是守护线程时,Java 虚拟机退出。 所以该setDaemon()方法必须在启动线程前调用。
用户线程和守护线程区别:
守护线程的生命周期是依赖于用户线程,当有用户线程存在,守护线程就会存活,当没有用户线程存在,那守护线程也随之消亡,垃圾回收是有单独线程来处理的,负责垃圾回收的线程就是守护线程
- boolean isDaemon():测试该线程是否为守护线程
守护线程:脱离于空中终端,作为提供通用服务的线程存在
- void interrupt():中断线程
把线程的状态终止,并抛出InterruptedException异常
该方法底层调用的是native方法。native方法的作用是对特定标识位做修改
该方法主要作用于线程:运行中线程、阻塞线程(sleep、join)
运行中的线程:interrupt方法仅仅是对标志位做了修改,其他没有影响
阻塞线程:interrupt方法对标志位做了修改,另阻塞中的线程感知到标志位做了修改,就会中断当前的阻塞状态,抛出InterruptedException异常
- boolean isInterrupted
():测试线程是否已经中断
true:表示发生中断
false:表示未发生中断
线程的生命周期

使用练习
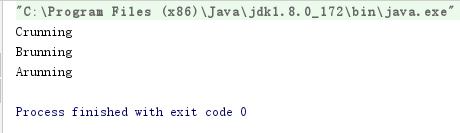
有线程A、B、C,让线程按C、B、A顺序执行
public class TestThread extends Thread{
     private Thread thread;

     public TestThread(){
         this.thread = null;
     }

     public TestThread(Thread thread){
         this.thread = thread;
     }
    @Override
    public void run() {
        if (thread != null){
            try {
                this.thread.join();
            } catch (InterruptedException e) {
                e.printStackTrace();
            }
        }

        System.out.println(Thread.currentThread().getName()+"running ");
    }
}
public class Test1 {
public static void main(String[] args) {
TestThread TC = new TestThread();
TC.setName("C");
TestThread TB = new TestThread(TC);
TB.setName("B");
TestThread TA = new TestThread(TB);
TA.setName("A");
TA.start();
TB.start();
TC.start();
}
}运行结果: