罗列笔者认为比较有用的一些maven打包插件,方便后续查阅
spring-boot-maven-plugin
springboot自带的maven插件,可用于简单的JAR/WAR方式打包,官方地址为https://docs.spring.io/spring-boot/docs/current/reference/html/build-tool-plugins-maven-plugin.html
简单的应用如下
<plugin>
    <groupId>org.springframework.boot</groupId>
    <artifactId>spring-boot-maven-plugin</artifactId>
    <!--当使用springboot构建服务,则该配置可省略-->
    <version>2.1.4.RELEASE</version>
</plugin>当执行mvn clean package命令的时候,其会默认执行该插件的repackage任务。其会在target目录下生成以下两个文件
> ls target/*.jar
> target/demo-springboot-web-0.0.1-SNAPSHOT.jar target/demo-springboot-web-0.0.1-SNAPSHOT.jar.original其中demo-springboot-web-0.0.1-SNAPSHOT.jar.original文件,用户可将.original后缀去掉便可得到用户自己编写的项目包。
而demo-springboot-web-0.0.1-SNAPSHOT.jar文件往往比上面那个文件要大的多,其实其内部已经将用户编写的项目所相关的依赖都打进去了,百闻不如一见。
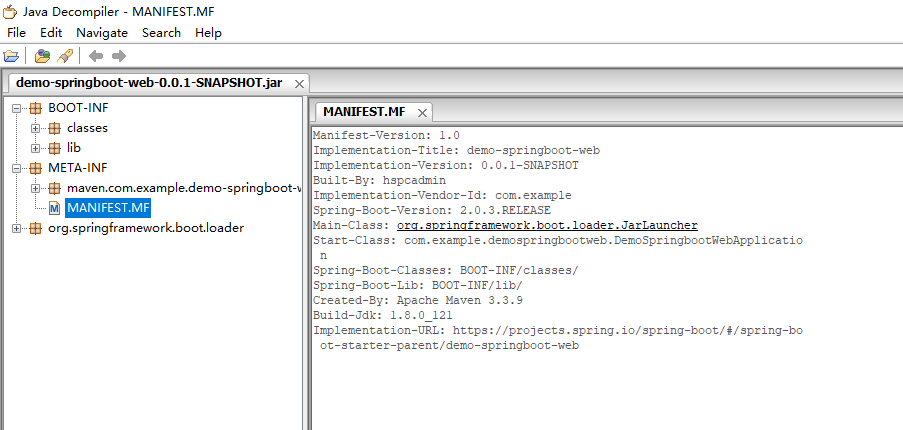
由图中可知,相应的依赖均被打入至\BOOT-INF\lib目录,而相应的源码则被编译放置到\BOOT-INF\classes目录。
上述打出的JAR包,由\META-INF\MANIFEST.MF文件的属性Main-Class可知具体的启动由springboot官方编写的org.springframework.boot.loader.JarLauncher类来启动,且其会默认找寻相应的main类来作为真正的启动类。而用户层的调用则可执行命令java -jar demo-springboot-web-0.0.1-SNAPSHOT.jar便可
而用户如果想个别指定相应的main-class便可使用以下配置
<plugin>
    <groupId>org.springframework.boot</groupId>
    <artifactId>spring-boot-maven-plugin</artifactId>
    <!--当使用springboot构建服务,则该配置可省略-->
    <version>2.1.4.RELEASE</version>
    <configuration>
        <archive>
            <manifest>
                <mainClass>com.example.demo.DemoSpringApplication</mainClass>
            </manifest>
        </archive>
    </configuration>
</plugin>
maven-assembly-plugin
apache开发的maven插件,可用于复杂方式打包,比如支持ZIP、TAR等方式的输出,有助于集成。官方地址为http://maven.apache.org/plugins/maven-assembly-plugin/plugin-info.html
英文单词assembly带有组装的意思,其功能比较强大,一般用户都比较青睐的工具。
简单的应用如下
<plugin>
        <groupId>org.apache.maven.plugins</groupId>
        <artifactId>maven-assembly-plugin</artifactId>
        <version>3.1.1</version>
</plugin>倘若我们直接使用mvn clean package命令,你会发现毫无有用的包打出来,看来是需要添加一些配置才能。
1.官方提供了默认的装配方式,比如jar-with-dependencies
<plugin>
        <groupId>org.apache.maven.plugins</groupId>
        <artifactId>maven-assembly-plugin</artifactId>
        <version>3.1.1</version>
        <configuration>
            <descriptorRefs>
                <descriptorRef>jar-with-dependencies</descriptorRef>
            <descriptorRefs>
        </configuration>
        <!--bind goal to package-->
        <executions>
            <execution>
                <id>make-assembly</id>
                <phase>package</phase>
                <goals>
                    <goal>single</goal>
                <goals>
            </execution>
        </executions>
</plugin>这时候可使用mvn clean package进行打包了,还是以上述的项目为例,打包后的文件出现在target目录
> ls target\*.jar
> target/demo-springboot-web-0.0.1-SNAPSHOT.jar target/demo-springboot-web-0.0.1-SNAPSHOT-jar-with-denpendencies.jar与spring-boot-maven插件打包类似,前者为项目源码,后者为相应的依赖包。简单看下相应的依赖包情况
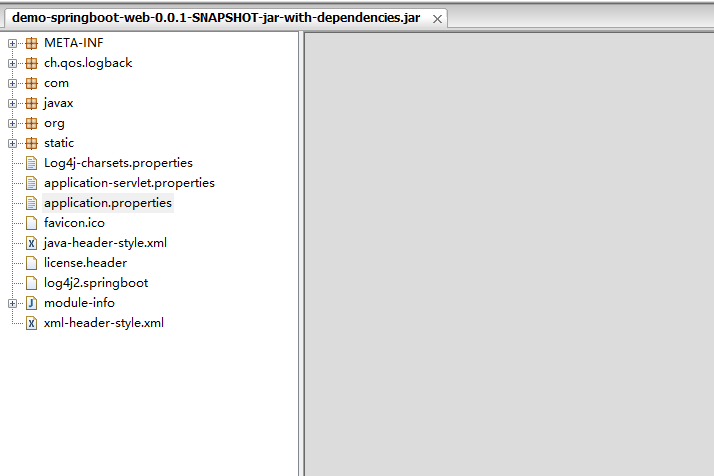
由上图可知相应的源码也被打进包中,所有的依赖包的代码都会打进了该包中。当然用户如果想指定相应的启动类,则采取archive配置即可。
2.当然使用最多的还是用
<?xml version="1.0" encoding="UTF-8"?>
<assembly>
    <!-- 可自定义,这里指定的是项目环境 -->
    <id>${project.version}</id>

    <!-- 打包的类型,如果有N个,将会打N个类型的包 -->
    <formats>
        <format>tar.gz</format>
        <!--<format>zip</format>-->
    </formats>

    <includeBaseDirectory>true</includeBaseDirectory>

    <fileSets>
        <!--
            0755->即用户具有读/写/执行权限,组用户和其它用户具有读写权限;
            0644->即用户具有读写权限,组用户和其它用户具有只读权限;
        -->

        <!-- 将src/main/assembly/bin目录下的所有文件输出到打包后的bin目录中 -->
        <fileSet>
            <directory>${basedir}/src/main/assembly/bin</directory>
            <outputDirectory>bin</outputDirectory>
            <fileMode>0755</fileMode>
            <includes>
                <include>**.sh</include>
                <include>**.bat</include>
            </includes>
        </fileSet>

        <!-- 指定输出resource中的配置文件到conf目录中 -->
        <fileSet>
            <directory>${basedir}/src/main/resource</directory>
            <outputDirectory>conf</outputDirectory>
            <fileMode>0644</fileMode>
            <includes>
                <include>*.*</include>
                <include>**/**</include>
            </includes>
        </fileSet>

        <!-- 将项目启动jar打包到./目录中 -->
        <fileSet>
            <directory>${basedir}/target</directory>
            <outputDirectory>.\</outputDirectory>
            <fileMode>0755</fileMode>
            <includes>
                <include>${project.name}-${project.version}.jar</include>
            </includes>
        </fileSet>
    </fileSets>
</assembly>经过上述的配置便可指定打包成.tar.gz压缩包,推荐使用此方式进行打包,个性化程度高。