官方英文文档链接:https://docs.microsoft.com/en-us/windows/desktop/medfound/picture-aspect-ratio
基于05/31/2018
In this article
此文介绍两个相似的概念,图片比例和像素比例。然后介绍如何在 media type 中使用。
Picture Aspect Ratio
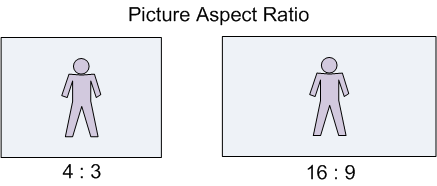
Picture aspect ratio 表明了图片显示的形状。图片的长宽比表示为 X:Y,X 表示宽。大多数视频标准使用 4:3 或 16:9 的比例。16:9 通常称为宽屏(widescreen)。电影通常采用 1:85:1 或 1:66:1(?是不是1.85:1和1.66:1)。图片比例通常也称为 display aspect ratio (DAR).
![]()
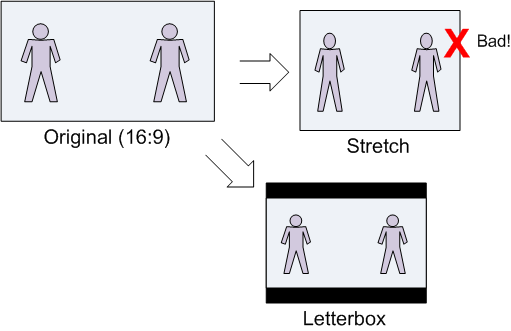
有时候视频图像和显示区域的比例不一样。比如 4:3 的视频可能显示在 16:9 的显示器上。在电脑上,视频可能显示在任意大小的窗口中。在这种情况下,可以通过以下三种方式来使图像适应显示区域:
- 沿一个轴拉伸图像以适应显示区域。
- 缩放图像以适合显示区域,同时保持原始图片长宽比。
- 裁切图像。
拉伸图像以适应显示区域几乎总是错误的,因为它不能保留正确的图片长宽比。
Letterboxing
缩放宽屏图像以适应 4:3 显示区域的过程称为 letterboxing,如下图所示。图像顶部和底部的矩形区域通常为黑色,当然也可以是其他颜色。
![]()
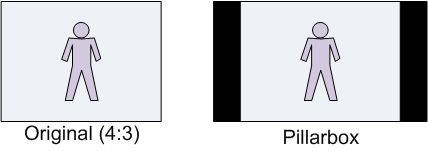
相反,缩放 4:3 的图像以适应 16:9 显示区域的过程有时称为 pillarboxing。但是 letterbox 这个词也可以在其他各种情况下使用,意思就是缩放图像以适应任何给定的显示区域。
![]()
Pan-and-Scan
Pan-and-scan 是一种将宽屏图像裁切为 4:3 矩形图像的技术,用于在 4:3 设备上显示,生成的图像可以充满整个显示区域,但原图的一部分会被裁掉。这个区域可以根据不同的帧来决定,使图像一直包含比较重要的部分。“pan” 这个词主要是指显示区域在视频画面上横向移动。(译者的理解)

![]()
Pixel Aspect Ratio
Pixel aspect ratio (PAR) 表示像素的形状。
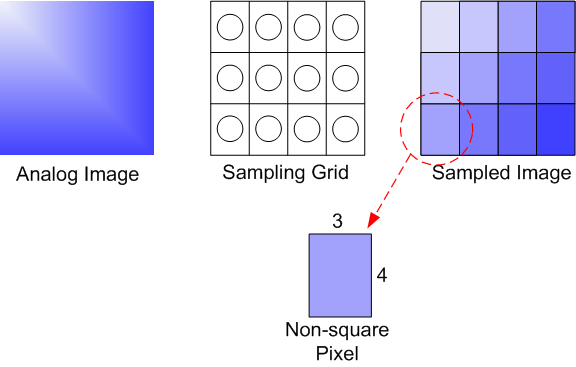
捕获数字图像时,将会从水平和竖直方向进行采样,从而生成一个称为像素(pixels or pels)的矩阵。采样网格的形状决定了图像中像素的形状。
下面是一个简单的示例。假设原始图像是正方形(即长宽比为 1:1),还假设采样网格(可以理解成相机传感器?)包含 12 个元素,排列成 4*3。所以生成的每个像素的形状,都是高度大于宽度,具体来说,每个像素的比例将是 3:4。非正方形的像素称为 non-square pixels。
![]()
像素长宽比也存在于显示在设备上。显示设备的物理性状和物理像素分辨率决定了 PAR。(电脑显示器通常是正方形像素)。如果图像的 PAR 和显示设备的 PAR 不匹配,则必须在一个维度(垂直或水平)上缩放图像,才能正确显示。下面的公式设计 PAR,显示比例(DAR)和图像分辨率:
DAR = (图像宽度 / 图像高度) × PAR
注意此公式中的图像分辨率表示内存中的图像(就是原始的内存数据),而不是显示的图像。
下面是一个真实的例子:NTSC-M 模拟视频图像包含480条扫描线(也就是高度是480)。ITU-R Rec. BT.601 标准指出水平方向每行要有 704 个可见的像素采样,也就是会生成一个 704 * 480 像素的图像。但是我们期望得到 4:3 的长宽比,于是可以得到(704*480分辨率时)像素比例(PAR)应该是 10:11。
- DAR: 4:3
- Width in pixels: 704
- Height in pixels: 480
- PAR: 10/11
4/3 = (704/480) x (10/11) 注意这里应该是480而不是420,原文档写错了
为了在具有方形像素的显示设备上正确显示此图像,必须将宽度缩放为 10/11,或将高度缩放为 11/10。
Working with Aspect Ratios
视频帧的正确形状由 pixel aspect ratio (PAR) 和显示区域(display area)定义。
- PAR 定义了图形中像素的形状。方形像素的比例是 1:1。其他比例的像素都不是方形像素。例如,NTSC 电视使用 10:11 的 PAR。假设你用电脑显示器显示视频,则显示器具有 1:1 的方形像素。PAR 在 media type 中使用 MF_MT_PIXEL_ASPECT_RATIO attribute 表示。
- display area 是一帧里面要显示的图像区域。media type 中可能会有两种相关的 display area:
- Pan-and-scan aperture. pan-and-scan aperture 是视频中一个 4×3 的区域(pan/scan mode)。它用来在 4:3 的显示区域上显示宽屏视频而不进行 letterboxing(见前面)。pan-and-scan 用 MF_MT_PAN_SCAN_APERTURE attribute 表示,而且仅能在 MF_MT_PAN_SCAN_ENABLED attribute 为 TRUE 时使用。
- Display aperture. 这个 aperture 在一些视频标准中定义了。display aperture 之外的区域都是过度扫描的区域,不应该显示。例如 NTSC 电视分辨率是 720×480,而 display aperture 是 704×480。display aperture 用 MF_MT_MINIMUM_DISPLAY_APERTURE attribute 表示。如果这项存在,那么应该在 pan-and-scan 模式为 FALSE 时使用。
如果 pan-and-can 模式设置为 FALSE 但是没有定义 display aperture,那就应该显示整个视频画面。事实上,除了电视和DVD视频之外,绝大多数都是如此。整个画面的最终比例的计算方式为 (display area width / display area height) × PAR。
Code Examples
Finding the Display Area
下面展示如何从 media type 中获得 display area。
Converting Between Pixel Aspect Ratios
下面展示了如何在不同的 pixel aspect ratio (PAR) 之间转换,同时保持图片的比例。
 1 //-----------------------------------------------------------------------------
 2 // Converts a rectangle from one pixel aspect ratio (PAR) to another PAR.
 3 // Returns the corrected rectangle.
 4 //
 5 // For example, a 720 x 486 rect with a PAR of 9:10, when converted to 1x1 PAR,
 6 // must be stretched to 720 x 540.
 7 //-----------------------------------------------------------------------------
 8
 9 RECT CorrectAspectRatio(const RECT& src, const MFRatio& srcPAR, const MFRatio& destPAR)
10 {
11     // Start with a rectangle the same size as src, but offset to (0,0).
12     RECT rc = {0, 0, src.right - src.left, src.bottom - src.top};
13
14     // If the source and destination have the same PAR, there is nothing to do.
15     // Otherwise, adjust the image size, in two steps:
16     //  1. Transform from source PAR to 1:1
17     //  2. Transform from 1:1 to destination PAR.
18
19     if ((srcPAR.Numerator != destPAR.Numerator) ||
20         (srcPAR.Denominator != destPAR.Denominator))
21     {
22         // Correct for the source's PAR.
23
24         if (srcPAR.Numerator > srcPAR.Denominator)
25         {
26             // The source has "wide" pixels, so stretch the width.
27             rc.right = MulDiv(rc.right, srcPAR.Numerator, srcPAR.Denominator);
28         }
29         else if (srcPAR.Numerator < srcPAR.Denominator)
30         {
31             // The source has "tall" pixels, so stretch the height.
32             rc.bottom = MulDiv(rc.bottom, srcPAR.Denominator, srcPAR.Numerator);
33         }
34         // else: PAR is 1:1, which is a no-op.
35
36         // Next, correct for the target's PAR. This is the inverse operation of
37         // the previous.
38
39         if (destPAR.Numerator > destPAR.Denominator)
40         {
41             // The destination has "wide" pixels, so stretch the height.
42             rc.bottom = MulDiv(rc.bottom, destPAR.Numerator, destPAR.Denominator);
43         }
44         else if (destPAR.Numerator < destPAR.Denominator)
45         {
46             // The destination has "tall" pixels, so stretch the width.
47             rc.right = MulDiv(rc.right, destPAR.Denominator, destPAR.Numerator);
48         }
49         // else: PAR is 1:1, which is a no-op.
50     }
51     return rc;
52 }
Calculating the Letterbox Area
下面展示如何计算 letterbox 区域,给定了原图的比例和显示区域的比例。假设两者有相同的 PAR。
 1 RECT LetterBoxRect(const RECT& rcSrc, const RECT& rcDst)
 2 {
 3     // Compute source/destination ratios.
 4     int iSrcWidth  = rcSrc.right - rcSrc.left;
 5     int iSrcHeight = rcSrc.bottom - rcSrc.top;
 6
 7     int iDstWidth  = rcDst.right - rcDst.left;
 8     int iDstHeight = rcDst.bottom - rcDst.top;
 9
10     int iDstLBWidth;
11     int iDstLBHeight;
12
13     if (MulDiv(iSrcWidth, iDstHeight, iSrcHeight) <= iDstWidth)
14     {
15         // Column letterboxing ("pillar box")
16         iDstLBWidth  = MulDiv(iDstHeight, iSrcWidth, iSrcHeight);
17         iDstLBHeight = iDstHeight;
18     }
19     else
20     {
21         // Row letterboxing.
22         iDstLBWidth  = iDstWidth;
23         iDstLBHeight = MulDiv(iDstWidth, iSrcHeight, iSrcWidth);
24     }
25
26     // Create a centered rectangle within the current destination rect
27
28     LONG left = rcDst.left + ((iDstWidth - iDstLBWidth) / 2);
29     LONG top = rcDst.top + ((iDstHeight - iDstLBHeight) / 2);
30
31     RECT rc;
32     SetRect(&rc, left, top, left + iDstLBWidth, top + iDstLBHeight);
33     return rc;
34 }