最近项目需要实现地图功能,以便于实现对房源周边配套设施的检索。内容如下
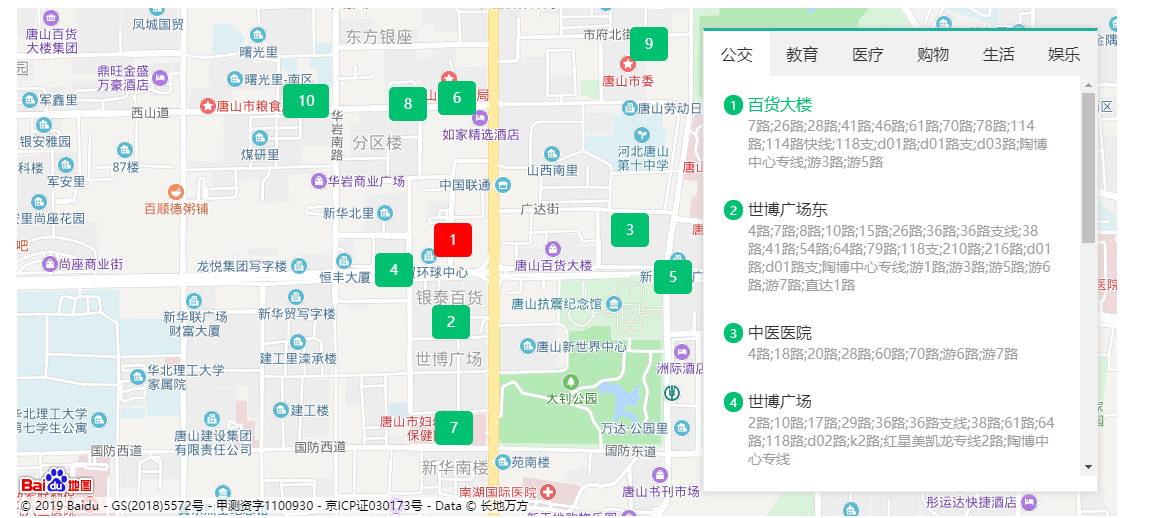
其实百度官方有对应的api,但是对于一个网站来说这样的样式难免有些难看
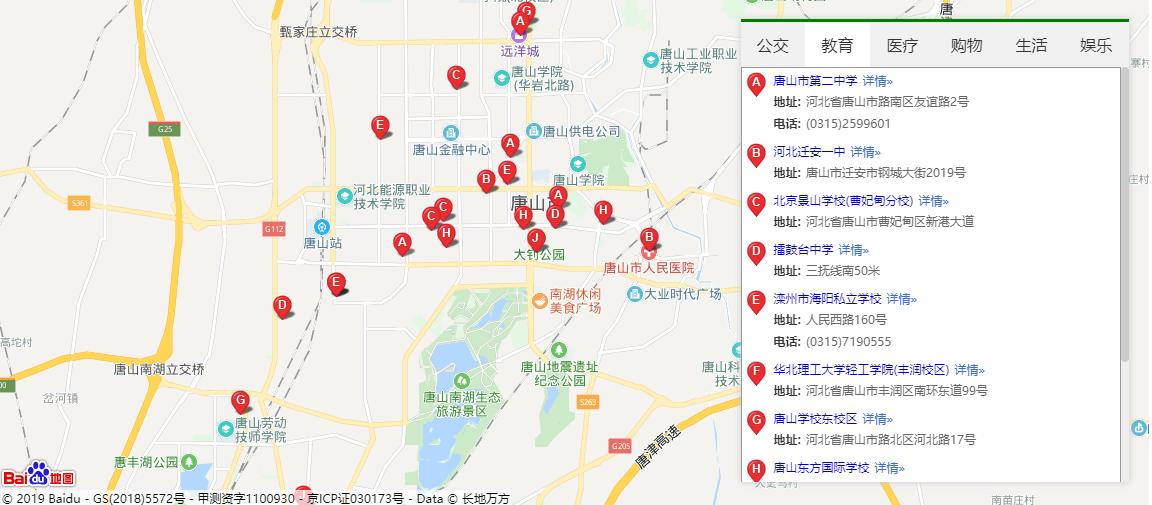
这样的结果显然不能满足当下的需求,所以我决定利用官方给的web服务接口加上覆盖物实现对应的效果。
由于我们用的vue框架,所以我采用了基于百度地图封装的插件:vue-baidu-map 实现,对应版本号是:0.21.18,项目安装依赖如下:
npm install vue-baidu-map --save
然后在main.js中注入依赖即可:
import BaiduMap from 'vue-baidu-map'
Vue.use(BaiduMap, {
  ak: '申请的百度秘钥'
})
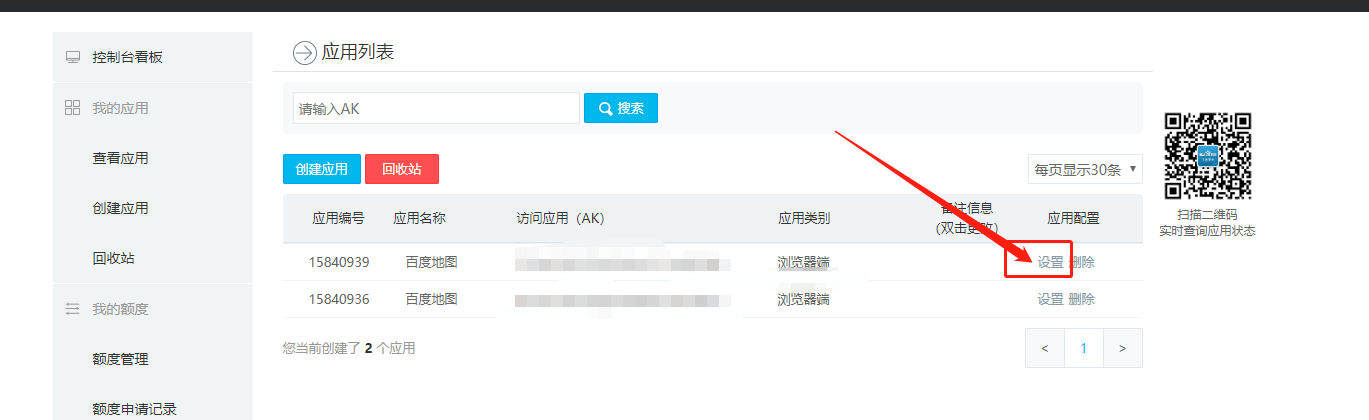
这里的ak需要去官方申请秘钥,地址在这里,需要注意的是,申请完成之后会给你两个秘钥,我们需要给调起服务主机的ip加到白名单里,不然会有访问权限错误,由于现在是开发环境,所以我设置的是通配符*,也就是所有的主机,但是正是环境就不推荐这么做了,原因是前端代码容易泄露AK,被其他网站非法调用。
打开控制台,步骤如下:
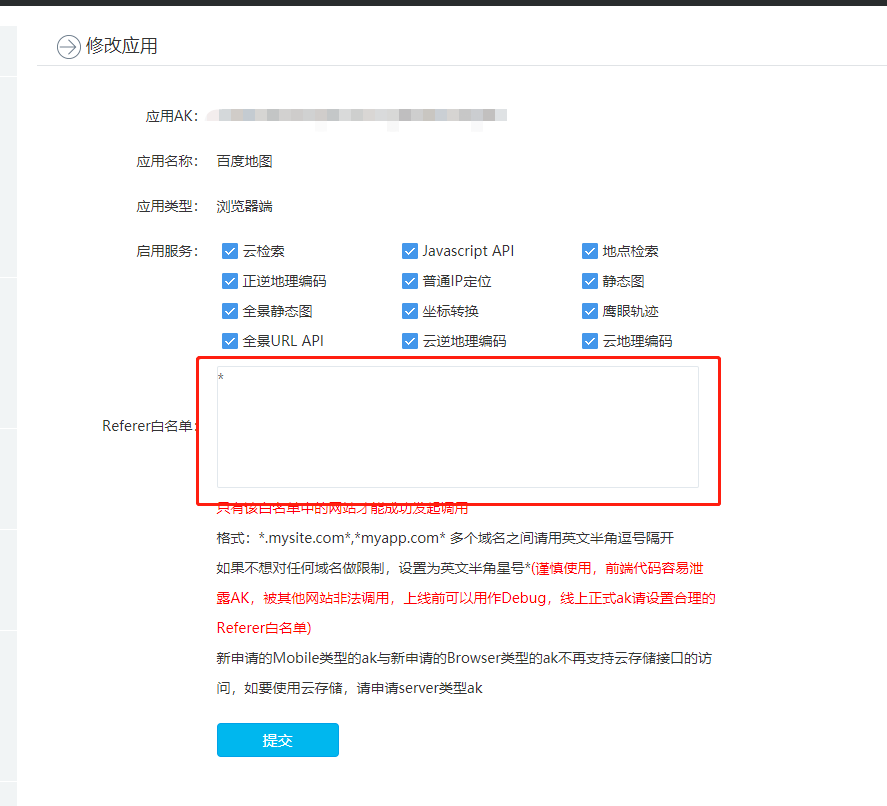
白名单设置好以后,就能开始调用web服务了;
首先要注意一个问题,由于同源策略,我们直接调用百度官方的接口会出现跨域问题,关于什么是跨域,这里不多解释。那么前端处理跨域最理想的方案是jsonp,也就是利用script天生的优势(他可以动态获取src属性),那么vue项目不同于传统html,所以这里我用到了一个插件,也就是vue-jsonp,他是一个基于promise封装的请求库,使用方法也很简单,具体如下:
首先是安装:
npm install vue-jsonp --save
安装完成之后注入要vue实例中:
import jsonp from "vue-jsonp"
Vue.use(jsonp)
使用起来也很方便:
this.$jsonp('url',params).then(()=> {
   // 成功之后的回调
}).catch(() => {
 // 失败之后的回调
})
下面就正是开始搭建地图了,首先开始写地图容器,按照vue-baidu-map官方的方法构建即可,注意要开启滚轮操作,还要设置地图展开的深度zoom
<template>
    <div class="map-plus">
        <!-- 地图容器 -->
        <baidu-map
            class="baidu-map"
            id="map"
            :double-click-zoom="false"
            :min-zoom="10"
            :max-zoom="18" :scroll-wheel-zoom="true" :center="center" :zoom="zoom" @ready="handler"> </baidu-map> </div> </template> <script> export default { methods: { // 地图组件渲染完毕时触发  handler({ BMap, map }) { this.center.lng = 118.186882019043; this.center.lat = 39.63203811645508; this.zoom = 16; } } }; </script> <style lang="scss"> .map-plus { position: relative; } #map { width: 1100px; height: 508px; margin-top: 200px; margin-left: 50px; } </style>
这里我想主要说一下覆盖物的封装:
首先由于左右是一个联动的过程,这里我的思路是按照索引,也就是设置一个激活的索引,如果和当前点击的索引一样的话实现激活效果,还有一点体验性的问题,由于我想点击某个漂浮物的时候让该漂浮物回到地图中间,所以每次点击我根据百度服务给的经纬度赋值给当前地图的中心,覆盖物的封装如下:
<template>
  <bm-overlay
    ref="customOverlay"
    class="happy-layer"
    pane="labelPane"
    @draw="draw">
    <div class="content"
         :class="{active: busActiveIndex == title+1}"
         @click="handleClick"> {{title+1}} </div> </bm-overlay> </template> <script> export default { props: [ // 位置 'position', // 是否激活 'active', // 内容 'title', // 激活的索引 'busActiveIndex' ], watch: { position: { handler () { this.$refs.customOverlay.reload() }, deep: true } }, methods: { handleClick () { this.$emit('change',this.title) }, draw ({el, BMap, map}) { const {lng, lat} = this.position const pixel = map.pointToOverlayPixel(new BMap.Point(lng, lat)) el.style.left = pixel.x - 60 + 'px' el.style.top = pixel.y - 20 + 'px' } } } </script> <style lang="scss"> .happy-layer { position: absolute; z-index: 99; &:hover { z-index: 999; } } .content { padding: 10px 15px; font-size: 14px; color: #fff; background-color: #00c170; cursor: pointer; border-radius: 5px; &:hover { background-color: red; } } .active { background-color: red; } </style>
调用他就比较简单了,只要把从服务端拿到的结果遍历一下绑定到组件上就行了
 <happy-layer v-for="(item,index) in layerList" :key=index
                     :position="{lng: item.location.lng , lat: item.location.lat}"
                     :title=index
                     :busActiveIndex="busActiveIndex"
                     @change="overLayClick"></happy-layer>
关于获取周边配套,我用到两个方法,一个负责接收参数调用服务,另一个负责获取数据
 // 获取周边接口
    getRound: function (key) {
        let ak = "F7XhtYsBvOZeQUbrmCCuy0KGNVCZApB8";
        return this.$jsonp(`http://api.map.baidu.com/place/v2/search?query=${key}&location=39.63203811645508,118.186882019043&radius=2000&output=json&ak=${ak}`)
    },
    // 获取周边信息
    getMsg: function(a) {
      this.getRound(a).then(res => {
        this.layerList = [] res.results.forEach(el => el.location && this.layerList.push(el)); }); },
最后就剩下列表的搭建了,这个就不说了,直接上源码吧:
地图容器父组件:
<template>
    <div class="map-plus">
        <!-- 地图容器 -->
        <baidu-map
            class="baidu-map"
            id="map"
            :double-click-zoom="false"
            :min-zoom="10"
            :max-zoom="18" :scroll-wheel-zoom="true" :center="center" :zoom="zoom" @ready="handler"> <!-- 覆盖物组件 --> <happy-layer v-for="(item,index) in layerList" :key=index :position="{lng: item.location.lng , lat: item.location.lat}" :title=index :busActiveIndex="busActiveIndex" @change="overLayClick"></happy-layer> </baidu-map> <!-- 右侧搜索 --> <div class="search-wrap"> <!-- 标签 --> <div class="tags"> <div class="tag_item" :class="{'tag-active': activeIndex == index}" v-for="(item,index) in tagsArr" :key="index" @click="tagsClick(index,item)">{{item.name}}</div> </div> <!-- 列表 --> <div class="list"> <div class="list-top" v-for="(bus,indexs) in layerList" :key="indexs" @click="chooseListItem(bus,indexs)"> <div class="title" :class="{'active-bus': busActiveIndex == indexs+1}"> <span class="indexs">{{indexs+1}}</span> <span>{{bus.name}}</span> </div> <div class="bus-num"> {{bus.address}} </div> </div> </div> </div> </div> </template> <script> export default { data() { return { active: false, // 左边中心 center: { lng: 0, lat: 0 }, // 深度 zoom: 3, // 标签激活索引 activeIndex: 0, // 漂浮物激活索引 busActiveIndex:1, // 数据结果  layerList: [], // 标签数组  tagsArr: [ { name: "公交" }, { name: "教育" }, { name: "医疗" }, { name: "购物" }, { name: "生活" }, { name: "娱乐" } ] }; }, mounted() { this.getMsg('公交'); }, methods: { // 地图组件渲染完毕时触发  handler({ BMap, map }) { this.center.lng = 118.186882019043; this.center.lat = 39.63203811645508; this.zoom = 16; }, // 标签激活  tagsClick: function(index, item) { this.activeIndex = index this.getMsg(item.name) }, // 获取周边接口  getRound: function (key) { let ak = 你申请的秘钥; return this.$jsonp(`http://api.map.baidu.com/place/v2/search?query=${key}&location=39.63203811645508,118.186882019043&radius=2000&output=json&ak=${ak}`)  }, // 获取周边信息  getMsg: function(a) { this.getRound(a).then(res => { this.layerList = [] res.results.forEach(el => el.location && this.layerList.push(el)); }); }, // 覆盖物点击激活  overLayClick: function (num) { this.busActiveIndex = num + 1 }, // 选择列表某一项  chooseListItem: function (bus,indexs) { this.busActiveIndex = indexs+1 this.center = bus.location } } }; </script> <style lang="scss"> .map-plus { position: relative; } #map { width: 1100px; height: 508px; margin-top: 200px; margin-left: 50px; } .search-wrap { width: 393px; height: 460px; border: 1px solid #eee; background-color: #fff; position: absolute; left: 736px; top: 220px; box-shadow: 0 0 10px #ccc; border-top: 3px solid #1fb19e; .list { height: 400px; overflow-y: scroll; .list-top { color: #333; padding: 20px 20px 10px 20px; cursor: pointer; .indexs { padding: 2px 6px; font-size: 12px; border-radius: 50%; background-color: #00c170; color: #fff; } &:hover { color: #00c170; } .bus-num { font-size: 14px; margin: 5px 0 0 24px; color: #9c9fa1; line-height: 18px; } } } .active-bus { color: #00c170; } .tags { line-height: 45px; height: 45px; background-color: #f1f1f1; display: flex; justify-content: space-between; .tag_item { width: 66px; text-align: center; cursor: pointer; } .tag-active { background-color: #fff; } } } </style>
覆盖物子组件:
<template>
  <bm-overlay
    ref="customOverlay"
    class="happy-layer"
    pane="labelPane"
    @draw="draw">
    <div class="content"
         :class="{active: busActiveIndex == title+1}"
         @click="handleClick"> {{title+1}} </div> </bm-overlay> </template> <script> export default { props: [ // 位置 'position', // 是否激活 'active', // 内容 'title', // 激活的索引 'busActiveIndex' ], watch: { position: { handler () { this.$refs.customOverlay.reload() }, deep: true } }, methods: { handleClick () { this.$emit('change',this.title) }, draw ({el, BMap, map}) { const {lng, lat} = this.position const pixel = map.pointToOverlayPixel(new BMap.Point(lng, lat)) el.style.left = pixel.x - 60 + 'px' el.style.top = pixel.y - 20 + 'px' } } } </script> <style lang="scss"> .happy-layer { position: absolute; z-index: 99; &:hover { z-index: 999; } } .content { padding: 10px 15px; font-size: 14px; color: #fff; background-color: #00c170; cursor: pointer; border-radius: 5px; &:hover { background-color: red; } } .active { background-color: red; } </style>